background image

37

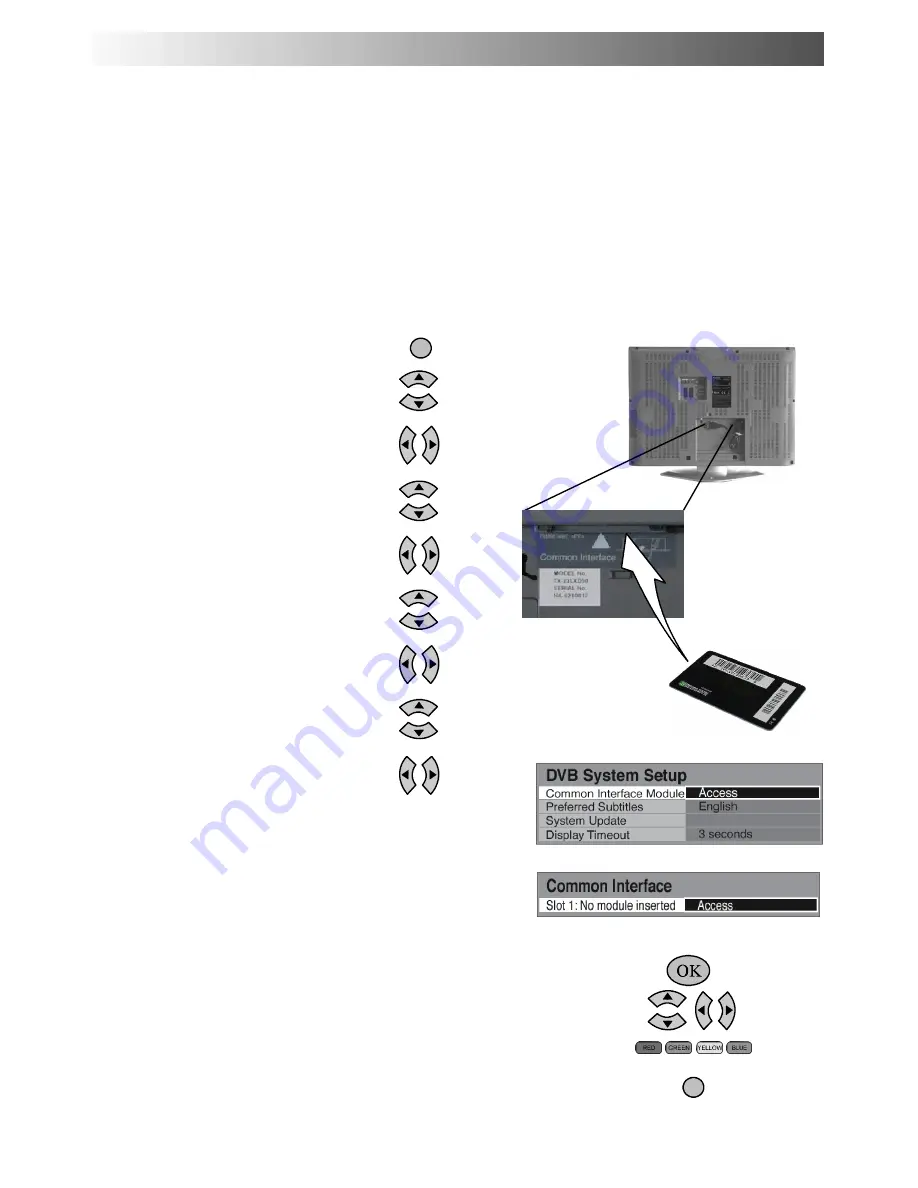
The Common Interface Module menu provides access to software contained on Common Interface (CI) Modules. These can be
inserted in the “CI” slot located at the rear of the TV.

IMPORTANT NOTES:

S

Switch off the TV using the front panel switch before inserting or removing a module.

S

If you are installing a TV software update, please follow the dedicated instructions supplied with the module.

S

Insert / remove a module straight to the CI slot.

Insert the CI module:

Some Common Interface Modules may be a two piece design consisting of a card reader together with the viewing card. When using
this design of card, first insert the card reader firmly into the CI slot on the TV. Secondly, insert the viewing card into the reader.

Switch on the TV.
In

DVB mode

Press the

MENU

button.

Move to

Setup menu

.

Access

Setup menu.

Move to

DVB Setup Menu.

Access

DVB Setup Menu.

Move to

DVB System Setup.

Access

DVB System Setup.

Move to

Common Interface Module

Access

Common Interface Module

Access the module

If no module is inserted the message “No Module Inserted!” will be displayed.

(If you have inserted a module, check that it is fully inserted.)

The features that now appear on screen are dependent on the contents of
the selected Common Interface Module.
Refer to the instructions supplied with the card or contact the vendor.
In all cases, it is possible to navigate the pages using buttons on the remote control,
but because the commands available must apply to all manufacturers of DVB equipment,
some on--screen commands may not correspond exactly to the remote control buttons.
For example:
For the on--screen command ‘

select

’ or ‘

go

’, use the

OK

button.

If you see the

A

"

B

Y

symbols, use the cursor keys.

If you see a line of key words displayed in red, green, yellow and blue,
use the coloured multifunction buttons to operate the functions.
The

EXIT

button should always allow you to exit the CI software.

Common Interface Module menu (DVB mode)

MENU

EXIT

Содержание TX-23LXD60

Страница 1: ...TX 32LXD6 TX 26LXD6 Operating Instructions Digital LCD TV Please read these instructions before operating your set and retain them for future reference U K Standard ...

Страница 2: ... receive terrestrial digital services using an integrated DVB Digital Video Broadcasting decoder This allows you to enjoy the new era of digital terrestrial television including future interactive services without the need for a set top box or satellite dish your current roof or loft mounted antenna is all you need DVB is a trademark of the DVB Digital Video Broadcasting Project 1991 to 1996 Warni...

Страница 3: ...se a permanent after image to remain on the LCD TV screen D Examples of still pictures include logos video games computer images teletext and images displayed in 4 3 mode D This type of LCD panel damage is not an operating defect and as such is not covered by the Panasonic warranty FOR YOUR SAFETY PLEASE READ THE FOLLOWING TEXT CAREFULLY This appliance is supplied with a fitted three pin mains plu...

Страница 4: ...correct way round D Do not mix old batteries with new batteries Remove old exhausted batteries immediately D Do not mix different battery types i e Alkaline and Manganese or use rechargeable Ni Cd Ni MH batteries Remote control batteries Remote Control Transmitter EUR 7651050A Pan European Guarantee Card 1 2 Insert batteries note correct polarity and 3 Replace the cover 1 Year Guarantee Registrati...

Страница 5: ... quality picture When the LCD is exposed to light from outdoors or lighting fixtures high contrast pictures may not be displayedclearly Turn off fluorescent lamps near the LCD and place in location not exposed to outdoor light How to use the LCD stand Adjust the stand to your desired angle The stand angle can be adjusted in the following directions 20_ Right 20_ Left 20_ 20_ To clean this unit wip...

Страница 6: ...e STTL button Text F P button Analogue mode Subtitle On Off DVB mode See page 13 Direct channel access Available in Analogue mode During normal TV viewing or when in the Tuning Programme edit or Manual Tuning menus press and then enter channel number using the numeric buttons Switch between viewing TV or AV input See page 44 Exit the mode Text Index button See page 42 Sound mute On Off VCR DVD but...

Страница 7: ... Socket Aerial Output Socket Aerial Input Socket AV2 Socket SCART cabel not supplied RF cable not supplied VCR DVD R TV SCART connections The VCR DVD R can be connected to the TV using a SCART cable if you are using a SCART equipped VCR DVD R Use the AV2 SCART socket of the TV for a VCR DVD R RF connections Connect the RF cable to the Aerial In socket of the VCR DVD R and an RF cable from the VCR ...

Страница 8: ...et of the Satellite Receiver must be connected to the AV1 SCART socket of the TV RF Connections S Connect an RF cable to the Aerial In socket of the Satellite Receiver S Connect an RF cable from the RF Out socket of the Satellite Receiver to the RF In socket S Connect an RF cable from the RF Out socket of the VCR DVD R to the TV Aerial In socket NOTES Additional equipment and cables are not suppli...

Страница 9: ...Are sorted by their logical channel number sent by the broadcasters which can be grouped into a favourite channels list by using Profile Edit See page 33 SAnalogue Stations Are sorted into channel order but can be changed to your preference See page 22 The sorted programme order depends upon the TV signal the broadcasting system and reception conditions TV to VCR or DVD Recorder Download If a Q Li...

Страница 10: ...ne Change character using the up or down cursor buttons Select the character position using the left or right cursor buttons Repeat above until NAME HOUSE NUMBER and POSTCODE are entered Press the OK button to store the details Press the OK button again when you are asked Are you sure For further information on Owner I D see page 28 Adjust Volume Change Channel Auto Setup is now complete You are n...

Страница 11: ...the remote control In this guide use the cursor buttons to move the cursor bar around the list Use the programme change button to step through the guide page by page Pres the OK button to view the selected programme The Guide can be cleared from the screen using the EXIT or GUIDE button ANALOGUE PROGRAMME GUIDE Select Select Exit Confirm Page Page ...

Страница 12: ...For example press the Yellow button and select Free TV Radio services or Profile 1 by pressing the up or down cursor buttons Press the OK button to view a list of the selected category To view any of the current DVB programmes select it with the cursor buttons and press the OK button You can view further information about the selected programme Select the programme for which you require further in...

Страница 13: ...view To clear the banner from the screen while in extended banner mode press the EXIT button In Analogue mode Pressing the i Information button will display the analogue channel information for a few seconds This will then be timed out to display just the programme position number near the top left corner of the screen To remove this programme position number press the i Information button again I...

Страница 14: ...9 or 14 9 widescreen ratio Panasonic Auto appears in the top left of the screen if black stripes above and below the picture are detected Auto Aspect chooses the best ratio and expands the picture to fill the screen This process can take several minutes depending on the darkness of the picture You may prefer to manually select one of the other aspect options available to view the picture Notes D I...

Страница 15: ...c picture with no aspect distortions 14 9 14 9 will display a 14 9 letterbox or 4 3 picture with no aspect distortions 4 3 4 3 will display a 4 3 picture at its standard 4 3 size with no aspect distortions ASPECT CONTROLS 16 9 16 9 14 9 14 9 4 3 4 3 ...

Страница 16: ...distortions Zoom2 Zoom2 will display 16 9 anamorphic letterbox pictures as a full screen display with no aspect distortions Zoom3 Zoom3 will display 21 9 letterbox pictures as a full screen display with no aspect distortions ASPECT CONTROLS Zoom2 Zoom1 Zoom1 Zoom2 Zoom3 Zoom3 ...

Страница 17: ...button is used to open the main menu and also to return to the previous menu MENU The up and down cursor buttons are used to move the cursor up and down the me nus The left and right cursor buttons are used to access menus adjust levels or to select from a range of options The OK button is used to store and confirm tuning OSD functions and other settings The EXIT button is used to exit the menu sy...

Страница 18: ...ll four modes feature automatic enhancement You can restore the factory settings for the selected profile on the selected signal source by pressing the N button on the remote control The Contrast Brightness Colour Tint in NTSC only and Sharpness levels can be adjusted to suit your own preferences and the viewing conditions The Colour balance setting allows you to set the overall colour tone of the...

Страница 19: ... a level comfortable for them Not available with DVB programmes Select On to provide stereo sound reproduction Select Off for FM Mono sound output If reception deteriorates it may help to switch Nicam to Off The sound can be improved during Music or Speech mode by selecting the appropriate function Ambience provides a dynamic enhancer to simulate improved spatial effects Displayed during HDMI1 inp...

Страница 20: ...TV off within a preset time which you can choose from between 0 to 90 minutes in 15 minute intervals Set to TV to view picture from TV tuner Set to AV to view input from external equipment connected to a Scart socket e g satellite receiver Note The external equipment must be switched on and sending a control signal for automatic switching at power on to occur Provides access to many other features...

Страница 21: ...exit the menu system Accessing the Programme edit menu will allow stations to be moved added deleted named or locked and provides access to the TV system See page 22 The Auto setup menu allows you to automatically retune the TV See page 25 TheManualtuningmenu allows individual programmepositions to be tunedmanually See page 26 TUNING MENU Analogue mode Tuning menu Programme edit Access Auto setup ...

Страница 22: ... menu press the EXIT button to exit To delete an unwanted programme position Choose the programme position Press the Red button on remote control Press the Red button again to confirm TUNING MENU PROGRAMME EDIT Programme edit 1 CH41 XYZ Off 2 Off 3 Off 4 Off 5 Off Prog Chan Name Lock Delete Add Move Download Programme edit Prog Chan Name Lock Delete Cancel 1 CH41 XYZ Off 2 Off 3 Off 4 Off 5 Off Ch...

Страница 23: ...ow button again to confirm To rename a programme position Choose the programme position Move to the Name column Choose the new character Move to the next character position Continue until renaming is done TUNING MENU PROGRAMME EDIT Delete Confirm Cancel Programme edit Prog Chan Name Lock Delete Add Cancel 1 CH41 XYZ Off 2 Off 3 Off 4 Off 5 Off Programme edit Prog Chan Name Lock 1 CH41 XYZ Off 2 Of...

Страница 24: ...This might take a few seconds depending on the number of stations stored Note If the message Q Link Feature not available D check Q Link AV1 or AV2 D check your VCR DVD R appears on the screen the television is unable to send the programme information to the VCR DVD R See the VCR DVD R handbook for further information TUNING MENU PROGRAMME EDIT Programme edit Prog Chan Name Lock Lock Off On Select...

Страница 25: ...e wiped out so the new settings can be stored S If you exit the procedure after this point and before Auto setup is complete no station information will be stored Restart and complete the Auto setup procedure so that the TV is retuned The TV will search for locate and sort into order your local stations Once this operation is completed the TV will display programme position 1 TUNING MENU AUTO SETU...

Страница 26: ...l tuning Select the programme position to be tuned Start tuning When the desired programme is found press OK button to store Press the EXIT button to exit Note If your VCR is connected to this TV by an RF cable only choose programme position 0 to tune to the VCR signals TUNING MENU MANUAL TUNING Analogue mode Tuning menu Programme edit Auto setup Manual tuning Access 1 CH41 Manual tuning 1 CH41 21...

Страница 27: ...e or Search Press the or button to change programme position start search When the desired station is found press STR to store the changes The programme position will flash Repeat above procedure to tune additional programmes or press the F button to exit TUNING MENU MANUAL TUNING Analogue mode Tuning mode F No Yes Manualtuning Search TV AV Move cursor STR To store F To exit 21 68 1 SC2 CH41 ...

Страница 28: ...wner I D has previously been set enter your own 4 digit Owner I D PIN NUMBER using 0 to 9 on the remote control If a 4 digit PIN NUMBER was entered above you will be taken automatically to the NAME line If not move to the NAME line Change character Repeat above until NAME HOUSE NUMBER and POSTCODE are entered Press the OK button to store the details Press again when you are asked Are you sure SETU...

Страница 29: ... after operating the Shipping condition menu Open the Main menu Move to Setup menu Access Setup menu Move to Shipping condition Access Shipping condition Press OK to start Press again to confirm each time that you are asked Are you sure Switch TV off and wait for a few seconds Switch TV on again Auto setup will begin stations will be located sorted and stored ready for use See page 25 SETUP MENU S...

Страница 30: ... TV Guide or Information banner See page 33 You may wish to lock a DVB programme channel to prevent access to it See page 34 Provides access to many other DVB Tuning features See page 35 Provides access to various specialised DVB options See page 36 Multi audio which will only appear when a DVB programme is selected allows you to select an alternative sound track The number of options available de...

Страница 31: ...ote control Move to the Subtitles field If you wish to record subtitles if available select Auto Press the OK button to store Press the EXIT button to leave the DVB Timer Programming screen Notes STo delete a timer programme select the recording with the cursor bar and press the Red button STo edit a previously entered timer programme select it with the cursor bar and press the OK button STimer pr...

Страница 32: ...g device will record at the same time on the same day each week Note If new timer programme data overlaps any part of an existing timer programme the message Timer Incorrect will be displayed and the new data will be cleared If overlapping data is entered using the Timer function on the TV Guide menu see page 12 the message Timer overlap with other timer will appear Encrypted Programmes In the fut...

Страница 33: ...tegories Press the Green button repeatedly to cycle through the profiles Press the Yellow button to add a channel to the profile list Press the Blue button to add all the channels to the profile list Press the OK button to store your Profile list Edit the Profile list When the profile list is highlighted Press the Red button to edit the profile name Press the Green button to move the channel Press...

Страница 34: ...er the first time you will only need to enter a password once to display Child Lock screen Move to Child Lock Service List Access Child Lock Service List Select the channel you want to lock and then press the OK button to lock Press again to unlock Press the Yellow button to lock all channels Press the Blue button to unlock all channels The PIN number is required when you wish to watch a locked ch...

Страница 35: ... wish to be informed of any updates The signal condition function displays indications of both signal quality and signal strength for each DVB programme position The DVB system requires that the signal condition is of good quality to provide the best picture When viewing analogue pictures interference such as signal reflection from nearby buildings or mountains causes ghosting but still provides a...

Страница 36: ...ult replacing the factory setting The Common Interface Module menu provides access to functions contained on a Common Interface Module inserted into the CI slot located at the rear of the TV See page 37 This option allows you to select the language in which subtitles should appear if available when the STTL button is pressed This menu allows you to download new software to the television See page ...

Страница 37: ...DVB System Setup Access DVB System Setup Move to Common Interface Module Access Common Interface Module Access the module If no module is inserted the message No Module Inserted will be displayed If you have inserted a module check that it is fully inserted The features that now appear on screen are dependent on the contents of the selected Common Interface Module Refer to the instructions supplie...

Страница 38: ...at 03 00 or 05 00 GMT Set to Off if you do not want new software to be automatically downloaded In this case a new software banner will appear when the TV set is switched on and tuned to a BBC channel if new software is being broadcast Press the OK button to download the new version The TV will begin download of the new software version This can take up to 15 minutes Press the EXIT button to exit ...

Страница 39: ...heck tape or disc The tape or disc may have been write protected missing or may be damaged The device may already be recording Refer to the device s operating instruction book Recording DVB stations If you press the DIRECT TV REC button while watching a DVB station the recording device will automatically switch to its AV input to record the DVB signal from the TV via the SCART cable and the DVB pr...

Страница 40: ...press to view the picture rapidly forward DVD R Press once to skip to the next track In play mode press and hold to view the picture rapidly forward Skip Fast Forward Cue VCR Press to rewind the tape In Play mode press to view the picture rapidly in reverse DVD R Press once to skip to the previous track In play mode press and hold to view the picture rapidly in reverse Skip Rewind Review Press in ...

Страница 41: ...ode TV Teletext mode Pages can be selected in two ways a Press the Up Down buttons to increase or decrease the page number by one b By entering the page number using 0 9 on the remote control Page Selection Press the MENU button to display special functions followed by the Green button Press the Green button again to expand the BOTTOM half Press again to return to normal FULL size Full Top Bottom ...

Страница 42: ...b pages In Teletext operation use the following procedure to access sub pages If the sub page you want to look at is not yet available press the MENU button to display special functions followed by the Yellow button to view the TV picture whilst waiting for more sub pages to be found The sub pages found will be displayed across the top of the screen When the sub page you are waiting for is availab...

Страница 43: ...bered options use the numeric keypad 4 D The TV TEXT button 5 should allow you to exit the teletext system Alternatively press the CHANNEL UP DOWN buttons 6 to select another channel DVB teletext services Cursor keys Left Right Up Down Select Go OK Coloured Keywords Numbered options As soon as you switch toa DVBchannel with links toa teletext service software is downloaded in thebackground toenabl...

Страница 44: ... left top corner of the screen and the signal from the AV equipment for the RGB signal the EC RGB will be displayed The picture received will remain the same when the TV programme is changed See table below for full functionality D You may switch back to the television by pressing button TV AV or by switching off the AV device D You can also select an AV source using the TV AV button on the contro...

Страница 45: ...LE GAME CONSOLE DVD RECORDER COMPUTER RGB CAMCORDER How to connect the Component Input terminals This terminal accepts normal interlace format as well as progressive format DVD Player Audio L R YUV component Rear of TV Notes D Additional equipment and cables shown are not supplied with this TV set D Do not connect a computer with TTL output 5V to this set D For Scart socket wiring information see ...

Страница 46: ...c equipment is also automatically set to Standby Summary of Control Functions o indicates available indicates not available HDMI and SCART SCART Q Link only HDMI only Function Connections o Not when viewing HDMI input o o o o o o o o o o o o Easy Playback Direct TV Recording Power on Link Power off Link Analogue TV tuning download See page 24 S Setup the equipment to enable this function Read the ...

Страница 47: ...to show line jitter SWhen viewing a Component or HDMI source then AV Monitor Out is not available A d Aspect Control Signals Signal name Aspect modes Widescreen signal WSS Control signal through SCART pin8 or HDMI terminal Signal name o indicates available indicates unavailable Auto Aspect 16 9 14 9 4 3 Zoom 1 Zoom 2 Zoom 3 TV AV 1 AV 2 AV 3 Com ponent AV1 AV2 HDMI1 HDMI2 PAL I o o o o o o o o o o...

Страница 48: ...5 63 31 25 45 00 37 50 33 75 28 13 59 94 60 59 94 60 50 00 50 00 50 00 50 00 60 00 60 00 Notes Signals other than the above may not be displayed properly AV2 21 pin SCART terminal RGB VIDEO S Video Q Link 21 19 17 15 13 11 9 7 5 3 1 20 18 16 14 12 10 8 6 4 2 CVBS in video RGB status earth Status RGB Status CVBS Audio in L Audio earth Audio in R Earth Socket Earth CVBS out video CVBS earth Red in R...

Страница 49: ... liquid crystal panel is built with very high precision technology giving you fine picture details Occasionally a few non active pixels may appear on the screen as a fixed point of blue green or red Please note this does not affect the performance of your LCD Normal Picture Weak or distorted sound Sound reception may have deteriorated Switch NICAM setting Sound menu to Off until reception improves...

Страница 50: ...sider improving your aerial system To check the quality of your signal use the Signal Condition feature see page 35 Good quality signal indication is green Poor quality signal indication is red Symptom Checks Blocky interference Picture freezes intermittently No DVB channels listed in the TV Guide after Auto Setup Check that DVB transmissions are available from the transmitter you are currently us...

Страница 51: ...m select analogue sound connection p 19 Pictures from external equipment are unusual when the equipment is connected via HDMI Is the HDMI cable connected properly p 46 Turn Off the TV unit and equipment then turn them on again Check input signal from the equipment p 35 Use equipment compliant with EIA CEA 861 861B D V B Interference or frozen disappearing image in DVB Check Signal Condition p 35 I...

Страница 52: ... is selected Invalid system time Please exit Cannot get the time information Check the connection of the RF cable Max number of Timer already set Max number of Timer already set New DVB Service Found Press OK start Auto Setup Press EXIT to Ignore Warning Selecting Auto Setup will delete current Profile and Childlock settings There is a new DVB station p 35 New version 1 90 found Do you really want...

Страница 53: ... later Press EXIT to continue Perform System Update Search Now in System Update p 38 If it is still failed there may not be any new software This service is locked Press OK to enter PIN The selected channel is locked in Child Lock p 34 Timer already expired Starting time in Timer Programming is already past Set correctly p 31 Timer Event Due to Start 1 BBC1 has been Programmed for recording at 20 ...

Страница 54: ...ut Systems Band name DVB Digital terrestrial services via UHF aerial input M NTSC Playback from M NTSC Videorecorders VCR NTSC AV input only Playback from NTSC Videorecorders VCR Aerial Rear UHF Operating Conditions Temperature 5 C 35 C Humidity 5 90 RH non condensing Connections Rear AV1 21 pin socket Audio Video in out RGB in Q Link AV2 21 pin socket Audio Video in out S Video in RGB in Q Link C...

Страница 55: ...55 ...

Страница 56: ...uipment private households This symbol on the products and or accompanying documents means that used electrical and electronic products should not be mixed with general household waste For proper treatment recovery and recycling please take these products to designated collection points where they will be accepted on a free of charge basis Alternatively in some countries you may be able to return ...

Отзывы: