background image

113

Troubleshooting (Advanced)

You can check the computer’s usage status in the PC Information Viewer. You may need this information when calling 
Panasonic Technical Support for advice. 

NOTE

z

This computer periodically records the management information of the flash memory etc. The maximum data volume 
for each record is 2048 bytes. The information is only used for estimating the cause when the flash memory goes 
down by any possibility. They are never sent to outside via network nor used for any other purpose except for the pur-
pose described the above.


To disable the function, add a check mark for [Disable the automatic save function for management information his-
tory] in [Hard Disk Status] of PC Information Viewer, and click [OK].
• A standard user needs to enter an administrator password.

z

As long as it is activated, the PC Information Viewer will appear in front of all other screens.

z

Depending on your network environment, it may take sometime to start up PC Information Viewer.

z

If you use a guest account to log in, some information will be displayed as [Not Found].

1

Click   (Start) - [All Programs] - [Panasonic] - [PC Information Viewer] - [PC Information 
Viewer]. 

2

Select the item to display the detailed information.

„

Others

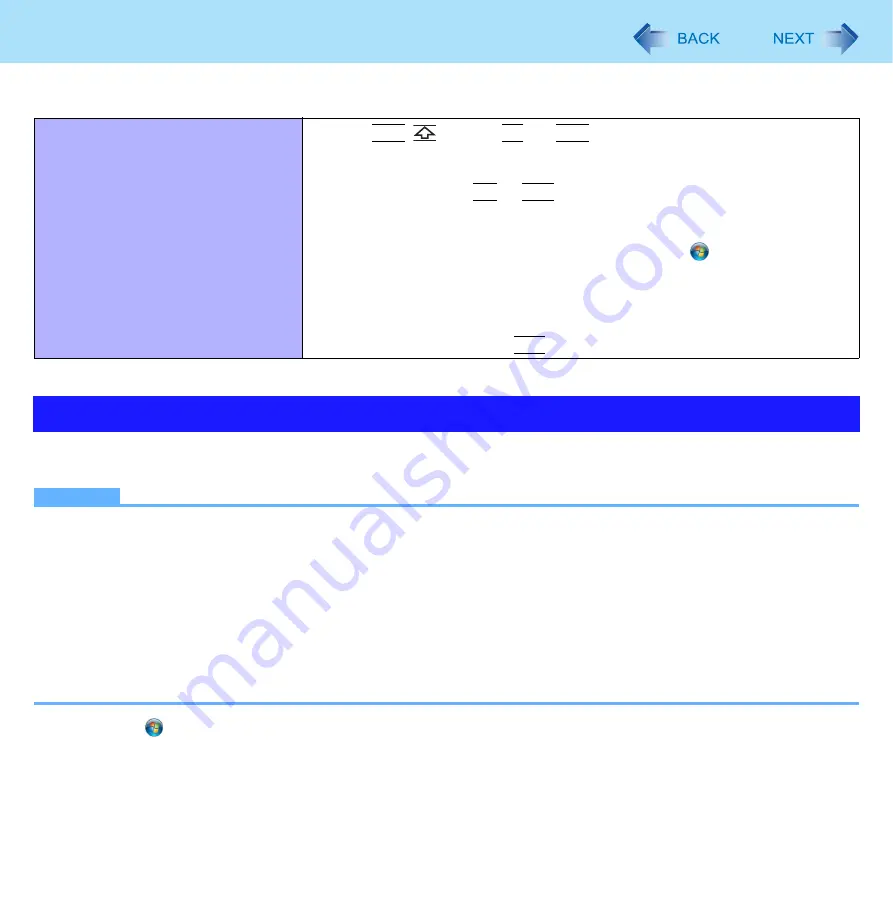
No response.

z

Press 

Ctrl


(Shift)

*5

Fn

 and 

Tab


(ESC)

*6

 to open Task Manager and 

close the software application.

z

An input screen (e.g., password input screen at startup) may be hidden behind 
another window. Use 

Alt

*5


+

Tab

 to check.

z

Shut down by pressing and holding the power switch for 4 seconds or longer, 
and turn on the computer and open the application again. If Windows runs cor-
rectly, but the application software does not start, click 

 (Start) - [Control 

Panel] - [Uninstall a program] and remove the failing application software, then 
reinstall the application software.

*5

For Numeric keyboard model, use a USB keyboard or software keyboard.

*6

For Numeric keyboard model : 

Esc

Checking the Computer’s Usage Status

Содержание Toughbook CF-U1GQG6L2M

Страница 1: ...1 Reference Manual Personal Computer Model No CF U1 Series We recommend that this Reference Manual be printed...

Страница 2: ...y Useful and helpful information Press Enter key Fn Del Press and hold Fn key and then press Del key This manual explains key operations based on QWERTY keyboard models for US English When the key com...

Страница 3: ...ator password and click OK Set USB selective suspend setting to Enabled A Click Start Control Panel System and Security Power Options B Click Change plan settings of the current power plan C In Change...

Страница 4: ...can use the key combinations of LCD brightness and Display switching z The key combinations may not work with some applications z The pop up icon appears after logging on to Windows It may not appear...

Страница 5: ...and on the display in the process of returning to the normal desktop from Screen Saver with a password or from Sleep Hibernation z Until Windows startup is completed during Setup Utility etc the Dupli...

Страница 6: ...ntly z This does not work on beeps or speakers connected to the USB port 3 For Numeric keyboard model Fn 4 For Numeric keyboard model Fn 7 Fn T Fn 6 Activate sleep page 26 Fn F Fn 9 Remaining battery...

Страница 7: ...operation buttons QWERTY key board model Numeric key board model Function Fn D Fn 8 Keyboard except for Fn D 5 scroll button zoom button and application buttons are disabled When locked The message a...

Страница 8: ...otification area Fn is locked Fn is not locked Disable popup The pop up icon will not be displayed 3 Click OK NOTE z You can have different settings for each user 6 If the speakers are muted beeps do...

Страница 9: ...layed by pressing Windows key once Press 3 times to display the menu Windows specification z When Sticky key is not active After pressing Ctrl Alt Fn Del 8 the indicator next to Ctrl and Alt 7 remains...

Страница 10: ...pressure when operating the touchscreen Only a light touch is required to operate the touchscreen Applying too much pressure may damage the surface z When the touchscreen becomes dirty wipe it with a...

Страница 11: ...ation response may be slower in low temperature environments The touchscreen may respond to operations more slowly when using the computer in temperatures less than 5 C but this is not a malfunction R...

Страница 12: ...t with neutral detergent Do not use bleach or a fabric conditioner softener or carry out sterilization by boiling If the LCD gets wet wipe the surface lightly with the soft cloth While wiping the LCD...

Страница 13: ...r each user 1 Run Tablet PC Settings Click Start Control Panel Hardware and Sound Tablet PC Settings 2 Click Calibrate 3 Select Touch input or Pen input 4 Using the stylus touch each of the target mar...

Страница 14: ...also select files with extensions pdf jpeg wma etc other than exe When selecting files other than exe select All File You can specify the parameter only for exe files If the application software star...

Страница 15: ...on the task bar after logging on If is not dis played click Start All Programs Panasonic Software Keyboard 1 Touch the software keyboard z To use shortcut key Example Ctrl C Press Ctrl turns blue and...

Страница 16: ...ove The software keyboard moves automatically to avoid overlapping the selected window z Auto Restore The software keyboard minimized on the task bar will be restored when you change the input mode Th...

Страница 17: ...art Control Panel Clock Language and Region Region and Language Formats Additional settings Currency Currency symbol z After changing the currency symbol click A and then change the size of the numeri...

Страница 18: ...ode 1 Put the cursor A on the position you want to zoom in 2 Press the zoom button B Zoom in Zoom out to the original size The area around the cursor is zoomed in Each time you press the button zoom r...

Страница 19: ...e Zoom function will also be displayed when it is on the frame of Windows 1 Click on the notification area and then click Zoom menu appears 2 Click Use Zoom Cursor to add a check mark NOTE z Use Zoom...

Страница 20: ...ove the zoom position When you move the cursor to the position you want to zoom the zoom position changes as well Always Foremost mode You can display the task bar in its original size for easy operat...

Страница 21: ...m Up Area Always Foremost Side On Set Always Foremost mode to ON Zoom Up Area Always Foremost Side Off Set Always Foremost mode to OFF D Click OK 2 For Numeric keyboard model use a USB keyboard or sof...

Страница 22: ...ight click then click Exit Panasonic Hand Writing and then restart Panasonic Hand Writing z Panasonic Hand Writing may not work properly if another application software is active In this case close th...

Страница 23: ...rformance is slightly lowered z When the display is rotated the zoom function becomes ineffective z When the display is rotated the motion video may not be displayed correctly or the sound may be dist...

Страница 24: ...ngs only if you logged on to Win dows as an administrator B When a check mark for Allow all users to use setting dialog is added each user can choose the order C When a check mark for This setting aff...

Страница 25: ...tup Utility is not requested at resuming You can use the Windows password for security in sleep or hibernation In the default setting you are requested to enter the Windows password when the computer...

Страница 26: ...oose what the power buttons do z While the computer is entering sleep or hibernation do not touch the computer For example do not Touch the keyboard touchscreen or power switch Use an external mouse o...

Страница 27: ...rnal mouse or other peripheral devices Connect or disconnect the AC adaptor Shut down or restart Windows Enter sleep or hibernation Wait approximately 1 minute Operate the wireless switch Insert and r...

Страница 28: ...ave changes z The setting for hibernation may change unexpectedly when you change the setting for sleep Confirm that the time to enter hibernation is 1 080 minutes default setting or longer below Hibe...

Страница 29: ...brightness will reduce power consumption 1 For Numeric keyboard model Fn z Turn off the computer when it is not in use You can also turn off only the wireless LAN wireless WAN or Bluetooth power z Di...

Страница 30: ...n in Confirm New Password and press Enter 6 Press Fn B F10 1 and then select Yes and press Enter 1 For Numeric keyboard model connect a USB keyboard and press F10 CAUTION z Do not forget your password...

Страница 31: ...lity page 92 CAUTION z For the data being read written on the original computer the Setup Utility settings must be the same as when the flash memory was removed z You cannot use the flash memory lock...

Страница 32: ...attach the battery cover with the battery pack already inserted You can check the battery level by blinking times Except for the operations stated above In high temperature mode the battery pack is d...

Страница 33: ...r is open If you remove the battery pack in this case the power supply is cut off and the computer is shut down Do not remove the battery pack because this may cause data to be lost and the computer t...

Страница 34: ...rm the Battery Recalibration page 37 The battery indicator remains red The indicator lights orange and the display shows 99 for a long time Low battery warning appears soon after a short time of use T...

Страница 35: ...switching from Normal Temperature to High Temperature or vice versa the remaining battery capacity will not be displayed correctly until the battery pack is completely discharged or fully charged z I...

Страница 36: ...uter z Connect the AC adaptor immediately If you do not have the AC adaptor exit the running programs and Windows then confirm that the power indicator is off z If you have a fully charged spare batte...

Страница 37: ...Windows click Yes The battery recalibration starts After the battery pack is fully charged discharging starts When the discharging is completed the power goes off automatically After the battery recal...

Страница 38: ...ery pack that can be replaced removed Remove replace the battery pack under the right conditions according to the chart below because if the computer is mistak enly shut down this may cause data to be...

Страница 39: ...he left side as an example A Remove the edge of hand strap passing through the clip B Tip the top of clip front C Pull out the clip from the computer z Do the same for the right clip 3 Open up the who...

Страница 40: ...ift up the battery pack 7 Insert the new battery pack A Insert the battery pack matching with B side B Slide down the battery pack 8 Attach the battery cover A Insert the claw of the cover matching th...

Страница 41: ...tery cover slide the latch to fix 10 Attach the hand strap back to the original form z Take the step 2 A to C in the reverse order CAUTION z Make sure the latch is securely locked otherwise the batter...

Страница 42: ...ion area and click More power options 2 Click Create a power plan click the basic plan and input the name of power plan 3 Click Next 4 Change the settings and click Create z To change the settings or...

Страница 43: ...SD Memory Card in the case after removing it from the computer z Do not Disassemble or modify the card Hit bend or drop the card Touch the terminals with fingers or metal object Remove the labels of...

Страница 44: ...onger be performed normally z Note that Panasonic assumes absolutely no liability for any loss of data recorded by the user or any other damages direct or indirect z Do not forcibly draw out the card...

Страница 45: ...d confirm the SD Memory Card indicator A is off 1 Disable the card function A Click on the notification area and click B Select the card z These steps are not necessary when removing the card after tu...

Страница 46: ...n screws at position A For further information refer to the instruction manual of the USB device To remove the USB device 1 Disable the USB device A Click on the notification area and click B Select t...

Страница 47: ...se is connected to the computer touching the USB key board keys or mouse will resume the computer When connected to the USB port of the Cradle touching the USB keyboard or mouse will not resume the co...

Страница 48: ...light Using the Camera 1 Hold both sides of the computer to aim the camera NOTE z When the computer is moved from hot and humid environments to cold environments dew condensation may form mist inside...

Страница 49: ...all multi media software including this utility and restart this utility z If an error message appears and nothing is displayed restart this utility z Two or more users cannot use this utility with Wi...

Страница 50: ...the Light Zoom In Take Photo Functions to an Application Button z The light turns off automatically after a certain period of time Click Control Camera Light Settings to set your lighting duration pr...

Страница 51: ...will not enlarge the camera s image Take Photo You can record the camera image as a picture 1 Adjust the direction of camera zoom See above picture quality page 52 etc 2 Click or click Photos Take pho...

Страница 52: ...eferred settings and click OK z When the following boxes are checked Box A only Select to save or cancel after the photo is taken Save and delete icons will appear after the photo is taken Photo will...

Страница 53: ...eo 1 Click or click Video Start Recording While recording the icon changes to 2 Click or click Video Stop Recording NOTE z You cannot zoom or display the date time stamp while recording z When the dis...

Страница 54: ...and saved using the windows File Name box that appears after stopping the video Video can be deleted by selecting cancel Boxes A and B Select to save or cancel after the video is recorded Name the re...

Страница 55: ...z Color Space Compression Set the compressed data format for the image z Output Size Set the image resolution NOTE z Make sure the image resolution is within the range of the display resolution of th...

Страница 56: ...tter When assigning the Take photo function by specifying the file name page 52 c program files panasonic panasonic camera utility pcam exe shutter_name 4 Click OK NOTE z When the Panasonic Camera Uti...

Страница 57: ...Y AT THE LASER LIGHT For model with 2D Barcode Reader DO NOT LOOK DIRECTLY AT THE LED LIGHT z Be sure to read Precautions in OPERATING INSTRUCTIONS NOTE z When the computer is moved from hot and humid...

Страница 58: ...lways On Keep barcode reader active even after reading a barcode Disconnect Barcode Module Stop barcode reader connection in Always On mode or Power Saving Mode Confirmation Message On If the trigger...

Страница 59: ...the Barcode Module In Always On mode the Barcode Module is not reconnected only by turning on the computer Select Connection to Barcode Always On again from the above menu 1 Aim the reader at the bar...

Страница 60: ...ond each edge of the barcode For model with 2D Barcode Reader z Perform reading so that the entire symbol falls within the center of the red LED light z The reader can still read a barcode even if the...

Страница 61: ...ials that can easily scratch the reading window to touch the window such as sandpaper or metal object In addition do not directly apply a liquid such as water detergent or alcohol on the surface of th...

Страница 62: ...mpletely crosses You can slide your finger from both sides z When the fingerprint sensor does not enroll or authenticate your fingerprint properly You slid your finger too fast or too slow Your finger...

Страница 63: ...Module to increase the secu rity level of your computer To access the online manual This manual describes Step 2 3 and the initial part of Step 4 For further information refer to the UPEK Protector Su...

Страница 64: ...not be any negative interaction with any third party software and will not accept any responsibility for such an interaction 1 TPM Installation Refer to the Installation Manual of Trusted Platform Mo...

Страница 65: ...nd click Finish z Enrollment mode You can make the configuration for the enrollment only once during this initialization phase Enrollment to the biometric device All enrolled fingerprints are stored d...

Страница 66: ...ck Close E Add a check mark for Power On in Password Types F Enter the password step C and click OK G Click Next Follow the on screen instructions NOTE z To use the Power on Security feature enable it...

Страница 67: ...ve already made Power on Security effective after step B your fingerprint authentication will be necessary A Turn on or restart the computer B Press Fn U F2 or Fn Del while Panasonic boot screen is di...

Страница 68: ...word using the User Enrollment wizard If you do not define the backup password you may lose your data in case of authentication hardware failure z File used by each user Backup user passport data Defa...

Страница 69: ...e software s online manual page 63 Handling Maintenance z The enrolling and authentication sensitivity may decline under the conditions below Wipe off stains or moisture on the sensor surface with a s...

Страница 70: ...n security using fingerprints and click OK D Click Fingerprints and click Enroll or Edit Fingerprints User Enrollment wizard starts Follow the on screen instructions E When the User s Fingers screen a...

Страница 71: ...ve Surely remove all of the fingerprints 3 Uninstall Protector Suite Performed by the Computer Administrator A Log on to Windows as an Administrator B Close all programs C Click Start Control Panel Un...

Страница 72: ...cancel fingerprint dialog and you will be prompted for a password If you do not use Advanced Security enter your Windows log on password Otherwise enter your Advanced Security backup password CAUTION...

Страница 73: ...o fix it to the Cradle CAUTION z You can select whether the USB ports of the Cradle are to be Enabled or Disabled in Setup Utility page 90 It is separated from the setting for the USB port of the comp...

Страница 74: ...hing to MID in Intel R Graphics Media Accelerator Driver for ultra mobile We recommend you to switch the output destination by pressing P 1 or Fn E 2 z When you use the external display only set the s...

Страница 75: ...external display for which you have set high resolution or high refresh rate Connecting disconnecting an external display during computer operations 3 For Numeric keyboard model 3 4 For Numeric keyboa...

Страница 76: ...ck the desktop and click Graphics Properties B Select Extended Desktop in Operating Mode C Click Apply D Click OK To change the display settings 1 Right click the desktop and click Graphics Properties...

Страница 77: ...ernal display will be set to primary device or MID Monitor the internal LCD will be set to primary device z To switch to the Extended Desktop be sure to use the Intel R GMA Driver for ultra Mobile scr...

Страница 78: ...ni Port Replicator 1 Turn off the computer z Do not use sleep or hibernation function 2 Set the computer to the Cradle 3 Connect the LAN port A and the network system server HUB etc by using a LAN cab...

Страница 79: ...menu of the Setup Utility page 89 NOTE z For further information about Wireless LAN page 82 z For further information about Bluetooth page 85 z For further information about Wireless WAN Refer to the...

Страница 80: ...pear All wireless equipment wireless LAN Bluetooth wireless WAN will remain ready irrespective of the wireless switch setting z It may take some time to turn off wireless communication after switching...

Страница 81: ...tus on each time with the dialog box Display a dialog each time you set the wireless switch to ON so you can choose which wireless device to enable Turns on the following device Only selected devices...

Страница 82: ...reless LAN antenna A Do not block the antenna area with your hand or body z You cannot use the wireless LAN function together with the Fast User Switching function z The transmission rate will be lowe...

Страница 83: ...on the notification area 3 Select an access point and click Connect 4 Input the key you set for the access point to recognize the computer and click OK Wait for the computer to connect to the wireles...

Страница 84: ...ted to an IEEE802 11b g access point the connec tion will be temporarily interrupted z You can also change the IEEE802 11a setting in Device Manager A Click Start Computer System properties Device Man...

Страница 85: ...use Bluetooth set Bluetooth to Enabled default in the Advanced Wireless Configuration menu of the Setup Utility page 90 z The transmission rate will be lower when a microwave oven is used near by To...

Страница 86: ...imes while Panasonic boot screen is dis played soon after the computer starts the startup procedure When Enter Password is displayed input your password When you start the Setup Utility with Superviso...

Страница 87: ...Language English Japanese Product Information Computer information cannot be changed Model No Serial No System Information Processor Type Processor Speed Memory Size Available Memory Hard Disk BIOS In...

Страница 88: ...ouchscreen mode setting either Touchscreen Mode or Tablet Mode is displayed Del BS Key Normal Replace APP3 Button This setting is effective only until Windows startup is completed during Setup Utility...

Страница 89: ...ature Auto Battery 1 Current Status Only when Environment is set to Auto Depending on the battery status either Normal Temperature or High Temperature is displayed Battery 2 Current Status Only when E...

Страница 90: ...Threshold Disabled High Mid Low XWireless Configuration Enter the sub menu 1 XSerial Port Configuration Used to configure the GPS and Barcode Reader Enter the sub menu 2 Wireless Switch Disabled Enabl...

Страница 91: ...nal boot device that existed before at the position When you select Disabled in the following menu the disabled Boot Option is ignored and the boot device in the next Boot Option operates USB Floppy D...

Страница 92: ...d Password on Boot 4 Disabled Enabled Set Supervisor Password 4 Enter the sub menu Hard Disk Lock Can be changed only when Set Supervisor Password is set Disabled Enabled User Password Protection No P...

Страница 93: ...he system without saving the changes Save Options Save Current Values Save the changes for all Setup options Load Previous Values Load previous values for all Setup options Load Default Values Load de...

Страница 94: ...n U F2 Press F2 z CPU Systems check CPU z RAM XXX MB check Memory z HDD XXX GB check Flash Memory Drive z Video check Video Controller z Sound 1 z Wireless LAN 2 z Wireless WAN 3 z Bluetooth 4 z GPS 5...

Страница 95: ...er and press Fn U F2 or Fn Del while Panasonic boot screen is displayed The Setup Utility starts up z If the password is requested enter the Supervisor Password z If you are using the computer after c...

Страница 96: ...icon A Aqua Not running diagnostic check Alternating blue and yellow Currently running diagnostic check The interval of the alternating colors differs depending on the type of diagnostic check curren...

Страница 97: ...is displayed as red and contact Panasonic Technical Support If the display is green and the message Check Result TEST PASSED is displayed the computer s hardware is operating normally Continue using...

Страница 98: ...your computer NOTE z Connect the AC adaptor and do not remove it until backup is complete NOTE z This function does not work when you turn on the computer for the first time or just after you reinstal...

Страница 99: ...up If the password is requested enter the Supervisor Password C Write down all of the contents of the Setup Utility and press Fn F9 At the confirmation message select Yes and press Enter D Press Fn B...

Страница 100: ...cluded USB CD DVD drive optional refer to recent catalogs and other sources for information about the products available z Remove all peripherals except for the CD DVD drive z Connect the AC adaptor a...

Страница 101: ...ery DVD ROM into the CD DVD drive 7 Select the Exit menu then select your CD DVD drive in Boot Override 8 Press Enter z The computer will restart z If Enter Password is displayed during the following...

Страница 102: ...ettings to the default values and then change the settings as necessary z If the problem persists the internal clock battery may need to be replaced Contact Panasonic Technical Support System CMOS Che...

Страница 103: ...be interrupted or the performance may be adversely affected In this case restart the computer z In a network environment set Never for Put the computer to sleep and Hibernate after page 28 The Windows...

Страница 104: ...nter sleep or hibernation automatically z Disconnect peripheral devices z If you connect to a network using wireless LAN function perform access point settings page 83 z If you do not use wireless LAN...

Страница 105: ...r special characters etc and symbols z Use the character map Click Start All Programs Accessories System Tools Character Map Cannot use the keyboard in the Tablet mode z Use the Tablet PC Input Panel...

Страница 106: ...N is set to Enabled page 90 Wireless Switch Slide the wireless switch to ON Wireless Switch Utility Confirm that Wireless LAN is ON page 80 z This computer uses channels 1 through 11 3 when using IEEE...

Страница 107: ...item may be unavailable for some types of devices The connected mouse does not work z Check the mouse connection USB floppy disk drive does not work as a boot drive z The operation is confirmed by us...

Страница 108: ...the keyboard Press Windows 4 and press 2 times and press to select Restart and press Enter 4 When the Sticky Key function is enabled at the time of purchase press Windows 3 times z If the computer doe...

Страница 109: ...e Fingerprint Reader page 62 and Finger print Tutorial Click Start All Programs Protector Suite QL Fingerprint Tutorial The sensor enrolls or authenticates no fingerprint or performs authentication po...

Страница 110: ...A Log on to Windows as an Administrator You can always access the computer by using your Windows log on password In convenient mode any user can access the computer by using your Windows log on passwo...

Страница 111: ...may need to use the Enroll or Edit Fingerprints wizard to update the related data Enrollment to the device If the fingerprint has been enrolled to the device a new passport will be required Follow the...

Страница 112: ...remove it go to the Delete passport wizard and delete existing passports and then use the Fingerprint Storage Inspector to remove remaining fingerprints e g left over from previous installations z In...

Страница 113: ...r in front of all other screens z Depending on your network environment it may take sometime to start up PC Information Viewer z If you use a guest account to log in some information will be displayed...

Страница 114: ...message appears click OK The screen image is saved in Documents folder z Alternatively you can save a copy of the screen in the following procedure Click Start All Programs Panasonic PC Information V...

Страница 115: ...rosoft Windows and the Windows logo are registered trademarks or trademarks of Microsoft Corporation of the United States and or other countries Intel Core and PROSet are either registered trademarks...

Отзывы: