background image

123

Troubleshooting (Advanced)

*1

Windows XP: standby

„

Sleep

*1

 or Hibernation

Cannot enter sleep

*1

 or hibernation.

z

Remove USB devices temporarily. If the problem persists, restart the computer.

z

It may take 1 or 2 minutes to enter sleep

*1

 or hibernation. 

z

The computer may not enter sleep

*1

 when the computer is communicating via 

modem. 

z

The computer does not enter sleep

*1

 or hibernation immediately after resuming. 

Wait approximately 1 minute.

Cannot enter sleep

*1

 or hibernation 

automatically.

z

Disconnect peripheral devices.

z

If you connect to a network using wireless LAN function, select the profile and 
connect to the access point (

Î


page 82

).

z

If you do not use wireless LAN function, turn off wireless LAN function 


(

Î


page 77

).

z

Make sure that you are not using any software that regularly accesses the hard 
disk.

The computer does not resume.

z

If you slide and hold the power switch for 4 seconds or longer, the power will be 
turned off forcibly and the computer will not resume. In this case, all unsaved 
data will be lost.

z

You disconnected the AC adaptor and the battery pack while the computer was 
in sleep

*1

. If the computer’s power supply is disconnected in sleep

*1

, unsaved 

data will be lost and the computer will not resume.

z

The battery is exhausted. Sleep

*1

 and hibernation consume some power.

„

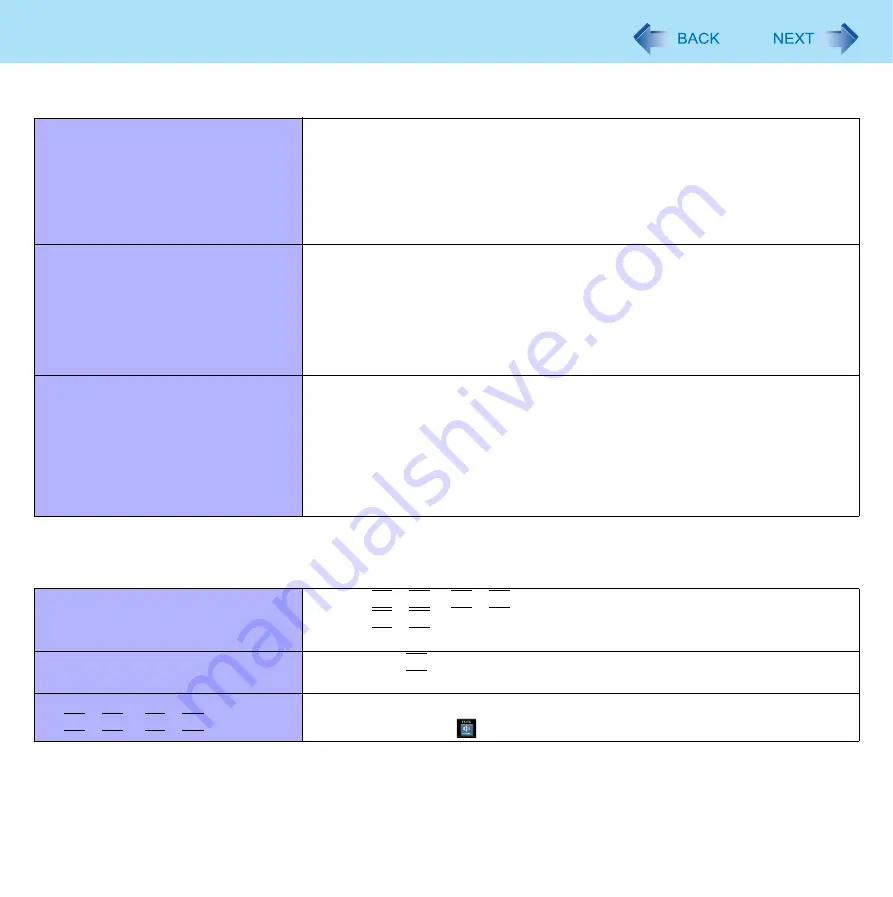
Sound

No sound.

z

Press 

Fn

 + 

F4

 or 

Fn

 + 

F6

 to cancel mute.

z

Press 

Fn

 + 

F8

 to turn off the concealed mode.

z

Restart the computer.

Distorted sound.

z

Performing 

Fn

 key combinations sometimes causes sound distortion. Stop and 

restart playback.

Cannot change the volume by press-
ing 

Fn

 + 

F5

 or 

Fn

 + 

F6

.

z

Activate the Windows sound function. When it is not active, the volume does 
not change even if 

 is displayed.

Содержание Toughbook CF-31AAA7J1M

Страница 1: ... Reference Manual be printed Descriptions For common procedures and screens for Windows 7 and Windows XP this Reference Manual uses the procedures and screens of Windows 7 Some menus may differ for Windows XP Windows XP does not require clicking operation to of the notification area ...

Страница 2: ...al refer to the sections preceded by the following descriptions whenever they appear When the Intel GPU with lower power consumption is activated When the discrete GPU with higher power consumption is activated For the users of the model without Discrete Video Controller Your computer is equipped with the Intel graphics processing unit GPU which is designed to save power effectively z In this manu...

Страница 3: ... Enabled A Click Start Control Panel System and Security Power Options B Click Change plan settings of the current power plan C In Change settings for the plan click Change advanced power settings D In Advanced settings double click USB settings E Double click the displayed USB selective suspend setting F Change settings of On battery and Plugged in to Enabled G Click OK and exit the Advanced sett...

Страница 4: ...ion may unexpectedly be changed You can select the Classic view of Control Panel or the Classic Start menu You can also change the way a user logs on or off This manual explains using the Windows XP default setting not Classic view or Classic Start menu etc z If the message Your computer might be at risk is displayed Select red icon on the notification area and make the appropriate settings The Wi...

Страница 5: ...t use the key combinations before you log on to Windows Wait until the hard disk drive indicator turns off On the Setup Utility screen you can use the key combinations of Fn F1 Fn F2 and Fn F3 z The key combinations may not work with some applications z The pop up icon appears after logging on to Windows It may not appear in some application conditions Key Function Pop up icon Fn F1 1 Fn F2 1 LCD ...

Страница 6: ...eys until the display has finished switching z Do not use this function When playing motion video such as DVD or MPEG When an extended monitor is not connected When showing a game screen such as pinball When using the extended desktop Fn F4 1 Speaker on off OFF MUTE ON Key Function Pop up icon LCD LCD HDMI display port replicator side 2 HDMI display port replicator side 2 LCD HDMI display computer...

Страница 7: ...Fn F6 up NOTE z When fine tuning the sound volume press and hold Fn and press F5 or F6 intermittently z This does not work on beeps or speakers connected to the USB port Fn F7 Activate sleep 4 Î page 17 Fn F8 Concealed Mode on off You can select on off of LCD Backlight LED Sound 3 Wireless Radio Backlit Keyboard and Fan 5 NOTE z You have to set Concealed Mode to Enabled in Setup Utility Î page 98 ...

Страница 8: ...successive Fn key combinations A Press Fn twice Locked B Press another key Fn key remains locked until you press Fn again Notification Make sounds when Fn key is pressed 7 Show status on screen Displays the Fn key status when on the notification area is clicked Fn is locked Fn is not locked Disable popup The pop up icon will not be displayed Display status bar while Fn Key is held down Status bar ...

Страница 9: ...to Delete Cursor since the display may be distorted z If you add a check mark for Use in Hold Ctrl key down Touch the screen of Touch Panel Configuration touching the screen may always be recognized as a right click To return to the normal operation press Ctrl on the keyboard z The touchscreen function does not work in the Setup Utility in the full screen of Command Prompt Operate the touchscreen ...

Страница 10: ...erprint etc with the other side of the soft cloth After wiping off foreign particles and dust wash the soft cloth refer to the following to remove the foreign particles and dust from the soft cloth When the soft cloth becomes dirty wash it with neutral detergent Do not use bleach or a fabric conditioner softener or carry out sterilization by boiling If the LCD gets wet wipe the surface lightly wit...

Страница 11: ... to the touchscreen Do not lift the computer while holding the LCD screen or allow the screen to be twisted Do not place any objects on the LCD screen Any of the above may cause the touchscreen glass to break or may damage the LCD screen Operation response may be slower in low temperature environments The touchscreen may respond to operations more slowly when using the computer in temperatures les...

Страница 12: ...k Start Control Panel Hardware and Sound Tablet Calibration 2 Using the stylus touch each of the target marks one by one 3 Click OK Calibration by a standard user NOTE z Perform the following calibration for each user 1 Run Tablet Calibration Click Start Control Panel Hardware and Sound Tablet Calibration 2 Using the stylus touch each of the target marks one by one and then click OK z Perform the ...

Страница 13: ...ty Click start All programs Fujitsu Touch Panel USB Touch Screen Calibration Utility 2 Using the stylus touch each of the target marks one by one until it blinks and then press Enter 3 Press Enter NOTE z Perform the touchscreen calibration for each user ...

Страница 14: ...e notifica tion area and right click then click Exit Hand Writing Utility and then restart Hand Writing Utility z Hand Writing Utility may not work properly if another application software is active In this case close the application software and try handwriting again 1 Click on the notification area and double click Alternatively you can click Start 1 All Programs Panasonic Hand Writing Utility N...

Страница 15: ...hanges z The setting for hibernation may change unexpectedly when you change the setting for sleep Confirm that the time to enter hibernation is 1 080 minutes default setting or longer below Hibernation 1 After the step 2 of Sleep setting above click Change advanced power settings 2 Double click Sleep and double click Hibernate after 3 Click the item and select the setting 4 Click OK Starting Up Y...

Страница 16: ...ord you set in the Setup Utility is not requested at resuming You can use the Windows password for security in sleep 2 or hibernation In the default setting you are requested to enter the Windows password when the computer resumes You can use the Windows password for security in standby or hibernation A Click start Control Panel User Accounts and select the account B Click Create a password and se...

Страница 17: ...Panasonic boot screen will appear At this time do not start the Setup Utility and do not change settings Otherwise resume may not operate correctly Cannot resume from hibernation by the Wake Up from wired LAN function the Task Scheduler or the operation to open the display z Failing the password input while resuming from sleep 3 Cannot resume from sleep 3 using the USB devices To enter sleep 3 or ...

Страница 18: ... indicator blinks or goes off If you slide and hold the power switch for longer than 4 seconds the computer will forcibly shut down and unsaved data will be lost even if you have set When I press the power button to any item in Choose what the power button does of Power Options in Control Panel If you slide and hold the power switch for longer than 4 seconds the computer will forcibly shut down an...

Страница 19: ...e computer is on a network Touch the keyboard except for password input touch pad touchscreen only for model with touchscreen or power switch Use an external mouse or other peripheral devices Connect or disconnect the AC adaptor Close or open the display Shut down or restart Windows Enter sleep 3 or hibernation Wait approximately 1 minute Operate the wireless switch Insert and remove the SD Memory...

Страница 20: ...n Also make detailed settings such as reducing the time entered in the Turn off monitor setting z Use a related utility The following utilities provide additional power saving functions not available in Power Options Use Power Plan Extension Utility Î page 21 Use Power Saving Utility Î page 21 z Press Fn F1 to reduce LCD brightness Reducing internal LCD brightness will reduce power consumption z T...

Страница 21: ...nasonic Power Management Active is selected To save power more effectively select Panasonic Power Management Power Saving or Power saver For the computer s behavior in each power plan see the descriptions located below You can also change the settings item by item 3 Click Apply 4 Click OK When the Intel GPU with lower power consumption is activated A single setting allows you to enable all the fol...

Страница 22: ...e confirmation screen that appears z To enable Intel video driver power saving func tion Select Enable and slide the slide bar to the Maxi mum Battery end 3 Click OK Click Restore initial settings to return to the factory default settings and click OK NOTE z Even if you can enable each function using power saving utility you can also enable them as follows When the Intel GPU with lower power consu...

Страница 23: ...and press Enter 5 Enter your password again in Confirm New Password and press Enter 6 Press F10 and then select Yes and press Enter CAUTION z Do not forget your password If you forget your Supervisor Password you will not be able to use your computer Con tact Panasonic Technical Support z When running the Setup Utility do not leave and go away from your computer even for a short time since other p...

Страница 24: ... guarantee complete protection of the data 1 Select Enabled in Hard Disk Lock in the Security menu of the Setup Utility Î page 103 CAUTION z For the data being read written on the original computer the Setup Utility settings must be the same as when the hard disk was removed z You cannot use the hard disk lock function without setting the Supervisor Password Set the Supervisor Password beforehand ...

Страница 25: ...provider is required To check if such application software is installed do the following Click Start Control Panel Uninstall a program Click start Control Panel Add or Remove Programs If Intel R Identity Protection Technology x x x x is displayed the software has been installed Otherwise install the software in the following steps 1 Log on to Windows as an Administrator 2 Click Start and input c u...

Страница 26: ...1 In high temperature mode the battery pack is discharging the power to 80 2 of normal temperature mode Î page 28 Do not remove the battery pack in this status Red The remaining battery is approximately 9 or less Blinking red The battery pack or the charging circuit is not operating properly Blinking orange The battery cannot be charged temporarily due to the following reasons Its internal tempera...

Страница 27: ...that supports a second battery pack Only when a second battery pack is attached z When the battery pack is inserted example Normal temperature mode Î page 28 High temperature mode Î page 28 z When the battery pack is not inserted z When the battery pack is discharged AC adaptor is disconnected The discharging battery lights yellow Left icon Main battery Right icon Second battery optional Checking ...

Страница 28: ...the computer is used in high temperature envi ronment or used for a long time with its battery fully charged Select Auto default or High Temperature in Environment of the Main menu of the Setup Utility Î page 98 NOTE z Note that a level corresponding to a 100 charge for high temperature mode is approximately equivalent to an 80 charge level for normal temperature mode z After switching from Normal...

Страница 29: ...ff z If you have a fully charged spare battery turn off the computer replace the battery and turn the computer on again z Connect the AC adaptor and charge the battery z If you have a fully charged spare battery turn off the computer replace the battery and turn the computer on again When the computer enters hibernation with the battery down and you resume the operation without charging the batter...

Страница 30: ...arts After the battery pack is fully charged discharging starts When the discharging is completed the power goes off automatically After the battery recalibration is finished normal charging starts 5 Windows XP start NOTE z The temperature range should be 10 C to 30 C 50 F to 86 F z The battery recalibration does not work correctly if a port replicator other than the CF VEB311 is connected The bat...

Страница 31: ...ry pack is a consumable item so the replacement will be necessary If the battery operation time becomes noticeably short and not recovered even after recalibrating the battery replace with a new battery Only for model that supports a second battery pack If necessary attach the second battery pack to the multimedia pocket Î page 35 CAUTION z The battery pack is not charged when you first purchase i...

Страница 32: ...ery Power 2 Remove Insert the battery pack z To remove A Slide the latch A to the right to unlock the cover 6 Windows XP standby B Slide the latch A down and open the cover C Pull the tab B of the battery pack ...

Страница 33: ...attery pack until it securely fits the connector B Close the cover until it clicks C Slide the latch C to the left to lock the cover CAUTION z Make sure the latch is securely locked otherwise the battery pack may fall when you carry the computer ...

Страница 34: ...tion area and click More power options 2 Click Create a power plan click the basic plan and input the name of power plan 3 Click Next 4 Change the settings and click Create z To change the settings or to make more detailed settings above Changing the Power Plan Setting 1 Click or on the notification area and click More power options 2 Click the power plan other than the power plan to be deleted 3 ...

Страница 35: ...ices carefully 1 Windows XP standby 1 Disable the multimedia pocket device function A Click on the notification area and click B Click Eject TEAC DV W28S V C Confirm that the multimedia pocket device indicator and the hard disk drive indicator are not lit A Double click on the notification area B Select TEAC DV W28S V x and then click Stop C Follow the on screen instructions D Confirm that the mul...

Страница 36: ...move 5 Carefully insert the device into the multimedia pocket by pushing both corners until it surely fits in the slot z Press the release handle C to set in z Insert the device with the label side up 6 Close the cover until it clicks CAUTION z Hold the device by both sides Otherwise the device may be damaged z When raising the slot side upward and inserting the device be careful not to apply any ...

Страница 37: ...u in the Setup Utility Î page 95 When using a second battery pack press Fn F9 4 If the device is not recognized or if the media cannot be accessed turn off the computer and reinsert the device 2 Windows XP is not displayed 3 Windows XP by double clicking on the notification area 4 Only for model that support a second battery pack ...

Страница 38: ...card SRAM card FLASH ROM card excluding ATA interface type and other cards that require 12 V of operating voltage z Do not start up Windows with a storage type of CardBus PC card attached An error may occur Preparation Attach the device for the media containing the card driver e g CD ROM Equipment connected to the multimedia pocket cannot be recognized if connected after the card driver installati...

Страница 39: ...on the notification area and click B Select the card A Double click on the notification area and select the card then click Stop B Follow the on screen instructions z These steps are not necessary when removing the card after turning off the computer 2 Open the cover and remove the card z ExpressCard F A Press the card so it comes out of the slot B Draw the card straight out z PC Card G A Press th...

Страница 40: ...art the computer z If the computer freezes after resuming from sleep 1 or hibernation remove and reinsert the card If the problem per sists restart the computer z When a card is inserted power consumption increases Remove the card when it is not in use especially when oper ating by battery power z To connect peripheral devices SCSI IEEE 1394 etc using a PC Card or an ExpressCard follow the steps b...

Страница 41: ...dows but use the SD Memory Card format software You can download the software from the web site below http panasonic jp support global cs sd download sd_formatter html z To use the SD Memory Card on other devices format the card on the devices For further information refer to the instruc tion manual of the devices 1 Windows XP SD SDHC Memory Cards SD Memory Card Information ...

Страница 42: ...operation is completed the data may be damaged or the card access may no longer be performed normally z Note that Panasonic assumes absolutely no liability for any loss of data recorded by the user or any other damages direct or indirect z Do not forcibly draw out the card otherwise the slot may be damaged z Insert the card in the correct direction otherwise the card and the slot may be damaged z ...

Страница 43: ...d function A Click on the notification area and click B Select the card A Double click on the notification area and click Secure Digital Storage Device then click Stop B Follow the on screen instructions z These steps are not necessary when removing the card after turning off the computer 2 Remove the card A Press the card so it comes out of the slot B Draw it straight out ...

Страница 44: ... for a long time Remove the card immediately after inserting it To insert the card 1 Slide the latch A and open the cover and insert the Smart card with the contact part B in front z Insert the card until it surely fits in the slot To remove the card 1 Press the eject button C The Smart card pops out CAUTION z Use the eject button to remove the card otherwise the reading contact may be damaged Ins...

Страница 45: ... electricity from the human body When inserting and removing RAM modules do not touch the terminals or internal components and do not allow foreign particles to enter the slots Doing so may cause damage fire or electric shock 1 Turn off the computer z Do not use sleep 1 or hibernation 1 Windows XP standby 2 Disconnect the AC adaptor and remove the battery pack Î page 31 Only for model that support...

Страница 46: ...the cover and battery pack CAUTION z Set the cover and battery pack correctly so that they do not fall when you carry the computer NOTE z If it is hard to insert or to press down the RAM module do not try forcibly but check the module s direction z Use the appropriate screw driver so as not to strip the thread of screw z If the RAM module is recognized correctly the total size of the RAM module me...

Страница 47: ...ive be sure to connect the USB drive to the USB port on the computer not to the USB port on the port replicator or the car mounter z You cannot use the AC adaptor CF AA1653A included with this computer for the port replicator or the car mounter Contact Panasonic Technical Support z When using a conventional port replicator such as the CF VEB272AW CF VEB272A2W power consumption will automatically b...

Страница 48: ...48 Port Replicator Car Mounter NOTE z When you do not use the expansion bus connector close the slide cover so that por tion B matches the mark C ...

Страница 49: ... the cover Connect the HDMI display to the HDMI display port B 1 Press P or Fn F3 2 Click the Display mode 1 Press Fn F3 Each time you press the key combination Switching the Display Mode LCD LCD HDMI display port replicator side HDMI display port replicator side LCD HDMI display computer side HDMI display computer side LCD analog display analog display HDMI display port replicator side HDMI displ...

Страница 50: ...e simultaneous display DVD Video MPEG files and other motion image files may not be played back smoothly z When you close the lid of the computer the output destination may be switched z Carefully read the instruction manual of the external display When connecting an external analog display that does not conform to the Plug Play standards select the display driver accordingly in the following menu...

Страница 51: ...ws you to set the scaling rate of an external HDMI display 1 Click Start 3 All Programs Panasonic Display Selector 2 Make the required settings A Operating Mode Select Single Display to activate only one display Select Extended Desktop to activate the extended desktop function Select Clone Displays to activate two displays After making a selection click Apply The following settings can then be mad...

Страница 52: ...splay image with the black frame and the taskbar indicates the primary device and the other indicates the secondary device 3 Click Apply to enable the settings 4 Click OK 3 Windows XP start 4 Embedded HDMI and Port Replicator HDMI are available only for the model with Discrete Video Controller and when the discrete GPU is activated HDMI is displayed for the model without Discrete Video Controller ...

Страница 53: ...e z Only for model with touchscreen Set the internal LCD to the primary device when using the touchscreen The cursor will move on the primary device when you touch the internal LCD When the Intel GPU is activated and the extended desktop function is used z You cannot switch the display by pressing Fn F3 ...

Страница 54: ...Extended Desktop and make the settings for Primary Device and Secondary Device 3 Click OK At the confirmation message click OK Using Catalyst Control Center utility When the discrete GPU with higher power consumption is activated 1 Click Start 5 All Programs Catalyst Control Center CCC 2 Click Desktops and Displays Click Display Manager 3 Make the settings for the primary and secondary devices 4 C...

Страница 55: ...splay Make sure your HDMI display is equipped with speakers 1 Click Start Control Panel Hardware and Sound Sound Playback 2 Select the sound output destination 3 Click Set Default and then click OK 1 Click start Control Panel Sound Speech and Audio Devices Audio 2 Select the sound output destination in Default Device 3 Click OK Changing the Sound Output Destination ...

Страница 56: ...ter the USB device driver installation screen appears To connect the USB device 1 Open the cover and connect the USB device to one of the USB ports A B C or D For further information refer to the instruction manual of the USB device To remove the USB device 1 Disable the USB device A Click on the notification area and click B Select the USB device Connecting Removing USB Devices ...

Страница 57: ...struction man ual of the USB device z You may need to install the driver again when connecting the device to another port z When a USB device is connected sleep 1 and hibernation may not function normally If the computer does not start up normally remove the USB device and restart the computer z When the USB device is removed and then inserted while the computer is on or may appear in the Device M...

Страница 58: ...puter and the IEEE 1394 device 2 Slide downward and open the cover and connect the IEEE 1394 device to the IEEE 1394 interface connector A For further information refer to the instruction manual of the IEEE 1394 device NOTE z You may need to install the driver for the IEEE 1394 device Follow the on screen instructions or refer to the instruction manual of the IEEE 1394 device To remove IEEE 1394 d...

Страница 59: ...et the first joint of your finger on the sensor as illustrated to the right B Slide your finger to the right or left while keeping it in contact with the fingerprint sensor A C Slide your finger to the right or left until the sensor is visible z When the fingerprint sensor does not enroll or authenticate your fingerprint properly You slid your finger too fast or too slow Your finger was soiled or ...

Страница 60: ...u can use your fingerprints to start up your computer and log on Windows We recommend you use the Fingerprint Reader in combination with the TPM Trusted Platform Module to increase the secu rity level of your computer To access the online manual This manual describes Step 2 3 and the initial part of Step 4 For further steps refer to the Protector Suite Help menu z Click Start 1 All Programs Protec...

Страница 61: ...be any negative interaction with any third party software and will not accept any responsibility for such an interaction 1 TPM Installation Refer to the Installation Manual of Trusted Platform Module TPM Click Start input c util drivers tpm readme pdf in Search programs and files and press Enter Click start Run and input c util drivers tpm readme pdf and click OK 2 Fingerprint Utility Installation...

Страница 62: ...Settings Advanced Settings Trusted Plat form Mobule TPM Initialize And then click Start 2 All Programs Protector Suite Control Center Identity Multifactor and choose a method of authentication 4 User Fingerprint Enrollment Performed by each user A Double click the Fingerprint software Icon B Carefully read the License Agreement and then click Accept C Select an enrollment mode and click Apply z En...

Страница 63: ...nauthorized access to the user s computer at the BIOS level A Click Start 2 All Programs Protector Suite Control Center B Click Identity Status C Click Power on security status Change D Click Edit and Add the check mark to Enable power on security and then click Apply E Click Identity Power on Password F When the Power on Security screen appears click Manage Passwords G Select Power On in Password...

Страница 64: ... Enter The password will not be displayed on the screen You can use up to 32 alphanumeric characters including spaces The case upper lower is distinguished Use only the upper horizontal row of numeric keys to input your password You cannot use Ctrl to input a password F Enter your password again in Confirm New Password and press Enter 2 Set the High Security Level A Select Fingerprint Security and...

Страница 65: ...ata Default name UserAccount vtp You need this file when you replace the embedded fingerprint chip or the hard disk drive or when reinstalling Windows This file contains the fingerprints encryption keys and logon authentication data NOTE z How to Backup Select Identity in Account Operation to save the user data Click Start 3 All Programs Protector Suite Control Center Identity Account Operation Fo...

Страница 66: ...y may decline under the conditions below Wipe off stains or moisture on the sensor surface with a soft cloth The surface of the fingerprint sensor is soiled with dust skin oil or sweat The surface of the fingerprint sensor is wet as a result of moisture or condensation z Static electricity may also cause the sensor to malfunction To make your finger static free touch a metal surface before placing...

Страница 67: ...int data is not registered 2 Delete Fingerprint Data Performed by each user A Click Start 6 All Programs Protector Suite Control Center B Click Identity Account Operation C Click Delete user data At the confirmation message click Yes D Enter Windows log on password then click Submit Confirm that there is no item in Password Types 3 Uninstall Protector Suite Performed by the Computer Administrator ...

Страница 68: ...ount Operation wizard and export the passport even without using your fingerprint You need to cancel fingerprint dialog and you will be prompted for a password If you do not use backup password enter your Windows log on password Otherwise enter your backup password CAUTION z We recommend you set the backup password If biometrics authorization does not work there is no way to backup your data C Del...

Страница 69: ...nect the telephone jack A to the computer by using the telephone cable B z Hold the cable so that the shape of the connector C matches the port and insert fully until it clicks 2 Click Start Control Panel Connect to the Internet Dial up and change the settings as necessary Click start Control Panel Printers and Other Hardware Phone and Modem Options and change the settings as neces sary NOTE z Do ...

Страница 70: ...eceive fax calls and click OK 4 Click Start Computer System properties Device Manager z A standard user needs to enter an administrator password 5 Double click Modems and then double click the internal modem 6 Click Power Management and add a check mark for Allow this device to wake the com puter and then click OK 1 Click start Control Panel Performance and Maintenance System Hardware Device Manag...

Страница 71: ...rk after the computer resumes from sleep 2 The previous screen display will be restored when you touch the keyboard touch pad or touchscreen only for model with touchscreen z The computer cannot resume if the telephone is not connected to the internal modem e g you cannot use a PC Card modem z The computer needs some time to respond so set the calling time longer than normal If this is not possibl...

Страница 72: ... or hibernation 2 Slide downward and open the cover and connect the cable Connect the LAN port A and the network system server HUB etc using a LAN cable 3 Turn on the computer NOTE z The communication speed using the 2nd LAN port is lower than that of the other LAN port Connecting LAN Only for model with 2nd LAN ...

Страница 73: ...ter after removing them z The screen remains dark when the computer resumes from sleep 1 The previous screen display will be restored when you touch the keyboard touch pad or touchscreen only for model with touchscreen 1 Windows XP standby Enabling the Power On by LAN function The computer automatically turns from off to on when the computer is accessed from the network server via the internal LAN...

Страница 74: ...dvanced C Click Wake on Settings in Property and select Wake on Magic Packet in Value and then click OK z If you forcibly shut down Windows the Power On by LAN function will not work Only for the model with 2nd LAN z The 2nd LAN port does not support the Power On by LAN function Enabling Disabling the Wake Up from wired LAN function When the Wake Up from wired LAN function is enabled the computer ...

Страница 75: ...rtup due to unintentional access by a computer A Click Start Computer System properties Device Manager z A standard user needs to enter an administrator password Click start Control Panel Performance and Maintenance System Hardware Device Manager B Double click Network adapters Intel R 82579LM Gigabit Network Connection C Click Power Management add a check mark for Only allow a magic packet to wak...

Страница 76: ...t Bluetooth Î page 86 z For further information about Wireless WAN Refer to the instruction manual of the wireless device z The wireless communication can be enabled or disabled by connecting or disconnecting the LAN cable Î page 78 To disable all wireless communication 1 Slide the latch A open the cover and slide the switch B to OFF To enable wireless communication 1 Slide the latch A open the co...

Страница 77: ...ge 101 z When you set Wireless Switch to Disabled in the Advanced menu of the Setup Utility Î page 100 the Wireless Switch Utility icon will not appear in the notification area All wireless equipment wireless LAN Bluetooth wireless WAN will remain ready irrespective of the wireless switch setting z It may take some time to turn off wireless communication after switching the wireless switch off z I...

Страница 78: ...Turns on the following device Only selected devices are enabled when you set the wireless switch to ON Turns on the device that was on immediately before the wireless switch was turned off the last time default When you turn on the wireless switch the on off settings that were selected when you last turned off the wireless switch will be restored 1 Click on the notification area and click the Wire...

Страница 79: ...all the Wireless Connection Disable Utility Checking the status of the wireless connection NOTE z The Wireless Switch Utility should also be installed so that the Wireless Connection Disable Utility works The Wire less Switch Utility has already been installed at the factory z To use the utility set Wireless Switch to Enabled in the Advanced menu of the Setup Utility Î page 100 z The utility does ...

Страница 80: ... not monitor the LAN port status the Wireless Switch Utility has not been started or LAN is disabled in the Advanced menu of the Setup Utility or in the device manager Menu Right clicking the utility icon opens a menu as follows Clicking the menu item causes the following utility action Monitoring LAN Cable ON Enables the Wireless Connection Disable Utility to monitor the LAN port and disable wire...

Страница 81: ...atible with external antenna you can switch the internal antenna to the external antenna or vice versa Î page 97 z You cannot use the wireless LAN function together with the Fast User Switching function z The transmission rate will be lower when a microwave oven is used near by z To use wireless LAN set Wireless LAN to Enabled default in the Advanced menu of the Setup Utility Î page 101 Before usi...

Страница 82: ...ss point to recognize the com puter 1 Turn the wireless LAN on 2 Click or on the notification area 3 Select an access point and click Connect 4 Input the key you set for the access point to recognize the computer and click OK Wait for the computer to connect to the wireless LAN access point When the icon on the notification area is changed to the wireless LAN setting is complete 5 Click Close NOTE...

Страница 83: ... When or is displayed skip step 2 2 When you double clicked in step 1 slide the wireless switch to turn on 3 Click Profiles at the lower right corner of the window and click Add 4 Enter the profile name and wireless network name SSID and make other necessary changes then click Next 5 Make necessary settings and click OK 6 Select the profile you set and click Connect 7 Click Close For model with At...

Страница 84: ... Click 802 11a Enabled or 802 11a Disabled z A standard user needs to enter an administrator password NOTE z In some countries communication using IEEE802 11a 5 GHz wireless LAN standard is restricted by law z The Wireless Switch Utility icon or indicates the on off status of wireless LAN and or wireless WAN not the setting of IEEE802 11a z If IEEE802 11a is enabled or disabled while the computer ...

Страница 85: ...value in Value and select the settings e g 802 11a and 802 11g E Click OK If you enable or disable 802 11a using the pop up menu of Wireless Switch Utility the setting in Device Manager will be accordingly changed as below Settings in Device Manager Settings in Wireless Switch Utility When 802 11a is enabled When 802 11a is disabled 6 802 11a b g 4 802 11b g 802 11a 802 11b and 802 11g 802 11b and...

Страница 86: ...r when a microwave oven is used near by z When you uninstall the Bluetooth Driver turn Bluetooth off Before using a Bluetooth turn the Bluetooth communication on Turning on off the Bluetooth communication 1 Slide the wireless switch to turn ON OFF Bluetooth Î page 76 1 Click on the notification area and place the cursor over the Wireless Switch Utility icon or on the notification area A tooltip ap...

Страница 87: ...the Wireless WAN communication Enter ing sleep 1 or hibernation without cutting the connection may disable communication after resum ing In this case restart the computer z If the computer repeatedly enters sleep 1 connection using Wireless WAN Manager may become impossible In this case restart the computer z If Device driver software was not installed correctly or a similar message appears when s...

Страница 88: ...SIM card into the SIM card slot with the contact side facing downward and with the cut corner oriented as shown in the illustration CAUTION z Do not insert the SIM card upside down 4 Close the cover If the cover is not closed the SIM card may jump out when the computer falls SIM Card Contact ...

Страница 89: ...the way out 4 Close the cover When is displayed on the desktop you can use application software compatible with the built in wireless WAN For the using method of the application software see on line help using the following operation 1 Double click on the desktop Wireless WAN Manager screen appears 2 Click Help Wireless WAN Manager ...

Страница 90: ...ity Î page 103 before removing the hard disk drive z Carefully remove insert the hard disk drive since the hard disk drive is extremely sensitive to shock Note that static electricity may affect some internal components 1 Turn off the computer and disconnect the AC adaptor z Do not use sleep 1 or hibernation 2 Remove the battery pack Î page 31 3 Insert Remove the hard disk drive z To remove A Slid...

Страница 91: ...ver 4 Insert the battery pack Î page 31 1 Windows XP standby CAUTION z Confirm that the latches are surely locked so that it does not fall when you carry the computer NOTE z You can erase the data before changing the hard disk drive Î page 117 z You can check that the hard disk is recognized or not in the Information menu of the Setup Utility Î page 95 If the hard disk is not recognized turn off t...

Страница 92: ...k mark for the item you want to accept 4 Click Finish or Next z If the other setting screen appears repeat step 3 z If Enter Password is displayed input the Supervisor Password or the User Password of setup Utility 5 Click OK CAUTION z Setting Fast in step 3 screen above will skip the Panasonic boot screen normally displayed immediately after the computer is turned on The time required to display ...

Страница 93: ...t training 4 Select the timing of performing boot training and the action after finishing boot training and click OK 5 Click OK on the message of the password NOTE z While performing the boot training do not touch the keyboard touch pad external mice etc To clear all settings To clear all settings of Quick Boot Manager perform the following procedure 1 Start the Quick Boot Manager 2 Click Clear al...

Страница 94: ...e Setup Utility with Supervisor Password z You can make the settings of all items of the Setup Utility When you start the Setup Utility with User Password z Note the following In the Advanced and Boot menus you cannot make the settings of all items In the Security menu you can change only the User Password when User Password Protection is set to No Protection You cannot delete the User Password In...

Страница 95: ...than 4 GB Available Memory is 8 GB 3 25 GB for 32bit OS Information Menu Language English French Japanese Model No Computer information cannot be changed Serial No Processor Type Computer information cannot be changed Processor Speed Memory Size Available Memory 1 Hard Disk Optical Drive BIOS Computer information cannot be changed BIOS Configuration Embedded Controller Intel R ME firmware Accumula...

Страница 96: ...hscreen Mode is set to Auto Depending on the current status either Touchscreen Mode or Tablet Mode is displayed 10 Key Mode Select the behavior of the ten key area of the keyboard When NumLock is selected the NumLock LED lights and the ten key area works as a number pad When Fn Key is selected the ten key area works as a number pad when the Fn key is held NumLock Fn Key Display The display during ...

Страница 97: ... This GPU consumes more power When Switchable is selected you can change the GPU that is used after starting up the computer Î page 3 Switchable Power Saving Video Performance Video LCD Brightness Mode When High Brightness is selected the brightness of the LCD is about twice that of Normal Brightness mode and power consumption is also higher Normal Brightness High Brightness Battery Charging Indic...

Страница 98: ...only when Concealed Mode is set to Enabled Except for the LED of external devices ON OFF Sound Can be changed only when Concealed Mode is set to Enabled ON OFF Wireless Radio Can be changed only when Concealed Mode is set to Enabled ON OFF Backlit Keyboard Only for model with Backlit Keyboard Can be changed only when Concealed Mode is set to Enabled ON OFF Fan Can be changed only when Concealed Mo...

Страница 99: ...on Prevention DEP Disabled Enabled Intel R Hyper Threading Technology Disabled Enabled Core Multi Processing Disabled Enabled Intel R Virtualization Technology Disabled Enabled Intel R VT d Disabled Enabled Intel R Trusted ExecutionTechnology Only for model that supports TPM Disabled Enabled Intel R Turbo Boost Technology 2 0 Disabled Enabled XSerial Port Settings Used to configure the serial port...

Страница 100: ... IRQ7 2E8 IRQ5 HDD Controller Setting Do not change this setting If you do the operating system will not function correctly AHCI Compatible Optical Drive Disabled Enabled LAN Disabled Enabled Power On by LAN Can be changed only when LAN is set to Enabled To use Power On by LAN make additional settings in Device Manager Î page 73 Deny Allow LAN 2nd Only for model with 2nd LAN Disabled Enabled Modem...

Страница 101: ...per Ext Antenna Only when the Antenna ID is 1 WWAN main NONE Lower Ext Antenna Only when the Antenna ID is 1 WWAN Sub WLAN main GPS NONE Upper Ext Antenna Only when the Antenna ID is 2 WLAN main WWAN Sub GPS NONE Touchscreen Only for model with touchscreen Disabled Enabled ExpressCard Slot Disabled Enabled PC Card Slot Disabled Enabled SD Slot Disabled Enabled IEEE1394 Port Only for model with IEE...

Страница 102: ...rt of port replicator or the car mounter is also disabled Disabled Enabled Legacy USB Support Disabled Enabled Boot Menu Boot Mode Setting Fast will skip the Panasonic boot screen normally displayed immediately after the computer is turned on The time required to display the Windows boot screen will become shorter Since the Panasonic boot screen is not displayed press and hold F2 or Del and turn t...

Страница 103: ...boot screen However F2 and F12 will work even if the message is not displayed Disabled Enabled Boot Popup Menu Enabled Disabled Password On Boot Disabled Enabled Auto Password On Reboot Disabled Same as Boot Password On Resume Disabled Enabled Auto Boot Device on Hibernation Resume Try prior devices Hard Disk only Set Supervisor Password Enter the sub menu Hard Disk Lock Can be changed only when S...

Страница 104: ...iles and press Enter Click start Run enter c util drivers tpm readme pdf and click OK Enter the sub menu XFingerprint Security Only for model with Fingerprint Reader Enter the sub menu XAMT Configuration Only for model that supports Intel R AMT Enter the sub menu Exit Menu Save Values and Reboot To reboot the system after saving the changes Reboot Without Saving Changes To reboot the system withou...

Страница 105: ... display pop ups scroll the screen or use other functions to display the hidden items z The Icon Enlarger setting affects the website characters displayed by Internet Explorer and the e mail characters in Outlook Express Some characters of website and e mail may not be enlarged Preparation Close all of the applications before using Icon Enlarger 1 Click start All Programs Panasonic Icon Enlarger 2...

Страница 106: ...fied part z To hide the loupe window click the Hide button B Alternatively you can click any part out of the loupe window or press and hold Alt and right click z To change the loupe window size drag the bottom right corner C The size range you can enlarge shrink depends on the screen s resolution NOTE z The magnified text or image in the loupe window is fixed at the moment that the part is magnifi...

Страница 107: ...r example Ctrl Alt C Click either Right click or Left click to use in combination with the key s selected in step B above z When using the keyboard A Click Keyboard B Click the text box and then press the key used for the shortcut e g Alt Z Ctrl Alt Z etc Window shape Select the shape of the loupe window Autorun You can turn on off autorun of the Loupe Utility and the explanation window Restore De...

Страница 108: ...nly for model with Bluetooth z GPS Only for model with GPS z USB z IEEE 1394 Only for model with IEEE 1394 interface z PC Card check PC Card Controller z SD check SD Card Controller z Express Card z Smart Card Only for model with Smart Card slot z Serial Port z Keyboard z Touch Pad z Touchscreen Only for model with Touchscreen 1 Only when the optional CD DVD drive is inserted 2 When the PC Diagnos...

Страница 109: ...tic Utility on the Exit menu of Setup Utility besides the following method Î page 104 1 Connect the AC adaptor and turn on the wireless switch Î page 76 During the diagnostic check do not remove the AC adaptor or attach any peripheral devices 2 Turn on or restart the computer and press F2 or Del while Panasonic boot screen is dis played The Setup Utility starts up z If the password is requested en...

Страница 110: ... cannot restart the check partway through by clicking Display help click the screen or press Space to return to the original diagnostic check screen z You can check the status of the diagnostic check by the display color on the left side of the hardware icon A Aqua Not running diagnostic check Alternating blue and yellow Currently running diagnostic check The interval of the alternating colors dif...

Страница 111: ...dware component is displayed as red and contact Pana sonic Technical Support If the display is green and the message Check Result TEST PASSED is displayed the computer s hardware is operating normally Continue using the computer as it is If the computer still does not operate properly reinstall the software OPERATING INSTRUCTIONS Reinstalling Software NOTE z If you run a memory diagnostic check af...

Страница 112: ...sing Create a system image use System Image Recovery in System Recovery Options NOTE z This function does not work when you turn on the computer for the first time or just after you reinstall Windows Start and shut down Windows 7 and then you can use the function z Connect the AC adaptor and do not remove it until restoration is complete z If Windows does not start up run System Recovery Options a...

Страница 113: ... on which the system image has been backed up and then click Retry 9 Click Next Follow the on screen instructions Start up System Recovery Options z To perform from Advanced Boot Options A Turn on the computer and when Panasonic boot screen disappears press and hold F8 z If Enter Password is displayed during the following procedure input the Supervisor Password or the User Password B Release your ...

Страница 114: ...n all of the contents of the Setup Utility and press F9 At the confirmation message select Yes and press Enter D Press F10 At the confirmation message select Yes and press Enter The computer will restart E Press F2 or Del while Panasonic boot screen is displayed The Setup Utility starts up If the password is requested enter the Supervisor Password F Set the Product Recovery DVD ROM for Windows 7 i...

Страница 115: ...cts available z Connect the AC adaptor and do not remove it until the operation is complete z Close all applications except for this utility CAUTION z Do not perform the following operations until creating the recovery disc is complete Shut down or restart Windows Enter sleep or hibernation Change the drive letters for the CD DVD drive 1 Log on to Windows as an administrator 2 Insert the CD DVD dr...

Страница 116: ... or more users cannot use this utility with Windows Fast User Switching function z Additional applications cannot be recovered even if you use a recovery disc created with this utility z If you interrupted creating a recovery disc a message of failure may appear in step 10 screen above In this case cre ate a new recovery disc again z You cannot successively create some recovery discs with this uti...

Страница 117: ...ve z Connect the AC adaptor and do not remove it until hard disk data erase is complete 1 Turn off the computer and insert the CD DVD drive into the multimedia pocket Î page 35 2 Turn on the computer and press F2 or Del while Panasonic boot screen is displayed The Setup Utility starts up z If the password is requested enter the Supervisor Password 3 Press F9 At the confirmation message select Yes ...

Страница 118: ...z If Enter Password is displayed during the following procedures input the Supervisor Password or the User Password 9 Click Erase the whole data on the Hard Disk for security and click Next 10 At the confirmation message click YES 11 Click Continue 12 Click Continue again 13 Click YES Erasing the hard disk data starts 14 After erasing is completed remove the Product Recovery DVD ROM and click OK ...

Страница 119: ...tings are not correct z Start the Setup Utility and set the correct date and time z If the problem persists the internal clock battery may need to be replaced Con tact Panasonic Technical Support Press F2 to enter setup z Write down the error details and press F2 or Del to start the Setup Utility Change the settings if necessary RAM Module Failed When the RAM module is not inserted correctly or th...

Страница 120: ... and Maintenance Power Options Power Schemes 1 Windows XP standby Computrace software tracks your stolen computer z Computrace software is not included in this computer z Refer to the following URL for Computrace software for installation and available service regions Note that this service is only available in certain regions http www absolute com NOTE z Consult Absolute Software Corp before disp...

Страница 121: ... COM ports of the computer are assigned as below z COM1 Serial Port A z COM2 Serial Port B Port replicator 2 Car mounter 2 z COM3 GPS 2 2 Optional If you change the assignment the serial devices may not work properly Serial Devices ...

Страница 122: ...layed click Change plan settings in the power plan to be deleted and click Delete this plan to delete Graphics display performance is low z When you start up the computer for the first time after purchase the Intel GPU is activated to save power Restart the computer and set Switchable Graphics in the Main menu of the Setup Utility to Performance Video This activates the discrete GPU which maintain...

Страница 123: ...ou are not using any software that regularly accesses the hard disk The computer does not resume z If you slide and hold the power switch for 4 seconds or longer the power will be turned off forcibly and the computer will not resume In this case all unsaved data will be lost z You disconnected the AC adaptor and the battery pack while the computer was in sleep 1 If the computer s power supply is d...

Страница 124: ... and Sound Sound Recording Microphone Properties and then remove a check mark for Mono Microphone A Click start Control Panel Sound Speech and Audio Device Sounds and Audio Devices Audio and click Volume in Sound recording B Click Options and add a check mark for Advanced Control C Click Advanced in Mic Volume and remove a check mark for 2 Mono Mic then click Close When logging on e g resuming the...

Страница 125: ... Start 3 All Programs Accessories Command Prompt B Input getmac fo list v and press Enter z Insert a space between fo and list and between list and v Input ipconfig all and press Enter C Wireless LAN s MAC address For model with Intel Centrino Advanced N 6205 Make a note of the 12 digit string of alphanumeric displayed on Physical Address line of Intel R Centrino R Advanced N 6205 Wired LAN s MAC ...

Страница 126: ...Enabled Î page 101 Wireless Switch Slide the wireless switch to ON Wireless Switch Utility Confirm that Wireless LAN is ON Î page 77 For model with Intel Centrino Advanced N 6205 Confirm that is displayed on the notification area If is not displayed on the notification area turn on the wireless communication Î page 76 For model with Atheros AR928X Confirm that is displayed on the notification area...

Страница 127: ... the above remedies the wireless WAN device may not be correctly recognized Restart the computer Only for model with wireless WAN Cannot connect to the mobile broad band network When you connect to the mobile broadband network for the first time proceed as follows A Click to open Connect to a Network select Mobile Broadband Network and then click Connect A message appears to show that connection h...

Страница 128: ...e z When is displayed in the Device Manager remove and insert the device If the problem persists restart the computer z When you set USB Port to Disabled in the Advanced menu of the Setup Utility Î page 101 USB ports of port replicator are also disabled z The computer may not recognize the connection removal of some devices or may not operate normally with some devices A Click Start Computer Syste...

Страница 129: ...e You do not know the address map for IRQ I O port address etc z You can check with the following procedure A Click Start Computer System properties Device Manager z A standard user needs to enter an administrator password B Click View Resources by type To check the current address map click start Control Panel Performance and Maintenance System Hardware Device Manager View Resources by type The d...

Страница 130: ... These problems may occur due to performance loss that results from the CPU power saving function Log on to Windows as an administrator and follow the steps below A Click start Run and input c util cpupower setup exe and click OK Follow the on screen instructions B Click start All Programs Panasonic CPU Idle Setting C Click Performance and click OK then click Yes The computer will restart z If the...

Страница 131: ...ouse drivers Check your mouse s operating instructions Only for model with touchscreen Cannot point the correct position using the included stylus z Perform the touchscreen calibration Î page 12 Only for model with touchscreen Cannot input using the touchscreen z Set Touchscreen Mode to Auto or Tablet in the Main menu of the Setup Utility Î page 96 Cannot use scroll function of touch pad on Intern...

Страница 132: ...ect z Read the instruction manual of the card or contact the manufacturer of the card z Remove the card and insert it again Î page 38 z The driver is not compatible with the operating system SD Memory Card Cannot use an SD Memory Card z Set SD Slot to Enabled in the Advanced menu of the Setup Utility Î page 101 Smart Card only for model with Smart Card slot Cannot use a Smart Card z Insert the Sma...

Страница 133: ...n or authentication Treat your finger with a hand cream when it is rough skin or dry z Clean the fingerprint sensor For further information refer to Handling Maintenance Î page 66 z The fingerprint sensor may be malfunctioning when it continues to perform poorly after the steps described above have been performed Contact Panasonic Technical Support Sensor does not work z Exported passport can help...

Страница 134: ... case we recommend either to wait until your finger is usable again e g the injury heals or to delete the passport Use Delete user data wizard and then reenroll new fingerprints Please note that in the latter case all your stored secret data passwords File Safe encryption keys Personal Safe data will be lost To perform the delete operation it is necessary to cancel the fingerprint verification ope...

Страница 135: ...se your data again z If you select Remove all Protector Suite data you need to enroll fingerprint data again after reinstalling Protector Suite In case of changing the Enrollment mode reinstalling Protector Suite is necessary Lost File Safe backup password z It is necessary to change the backup password for File Safe refer to the Pro tector Suite Help menu Click Start 7 All Programs Protector Suit...

Страница 136: ... A Right click the Fingerprint software icon B Select Use Sensor Fast User Switching Function Some applications do not work prop erly z When switching to a different user with the Fast User Switching function the following problems may occur Some applications may not work properly Key combination with Fn may not work The display settings may not be possible A serial mouse may not work Only for mod...

Страница 137: ...artup may be hidden behind another window Use Alt Tab to check z Shut down by sliding and holding the power switch for 4 seconds or longer and turn on the computer and open the application again If Windows runs correctly but the application software does not start click Start 8 Control Panel Uninstall a program and remove the failing application software then reinstall the application software ...

Страница 138: ...s to enter an administrator password z As long as it is activated the PC Information Viewer will appear in front of all other screens z Depending on your network environment it may take 1 minute to start the PC Information Viewer z If you use a guest account to log in 9 some items may displayed as Not Found 1 Click Start 10 All Programs Panasonic PC Information Viewer PC Informa tion Viewer 2 Sele...

Страница 139: ...s z When using the extended desktop Î page 51 a copy of the primary device screen is saved z The default key combination to copy is Ctrl Alt F7 You can change it in the following procedure A Log on to Windows as an administrator B Click Start 10 All Programs Panasonic PC Information Viewer C Right click Screen Copy and click Properties Shortcut D Move the cursor to Shortcut key and press the key s...

Страница 140: ...d trademarks or trademarks of Intel Corporation SDXC Logo is a trademark of SD 3C LLC Adobe the Adobe logo and Adobe Reader are either registered trademarks or trademarks of Adobe Systems Incorporated in the United States and or other countries Bluetooth is a trademark owned by Bluetooth SIG Inc U S A and licensed to Panasonic Corporation HDMI the HDMI Logo and High Definition Multimedia Interface...

Отзывы: