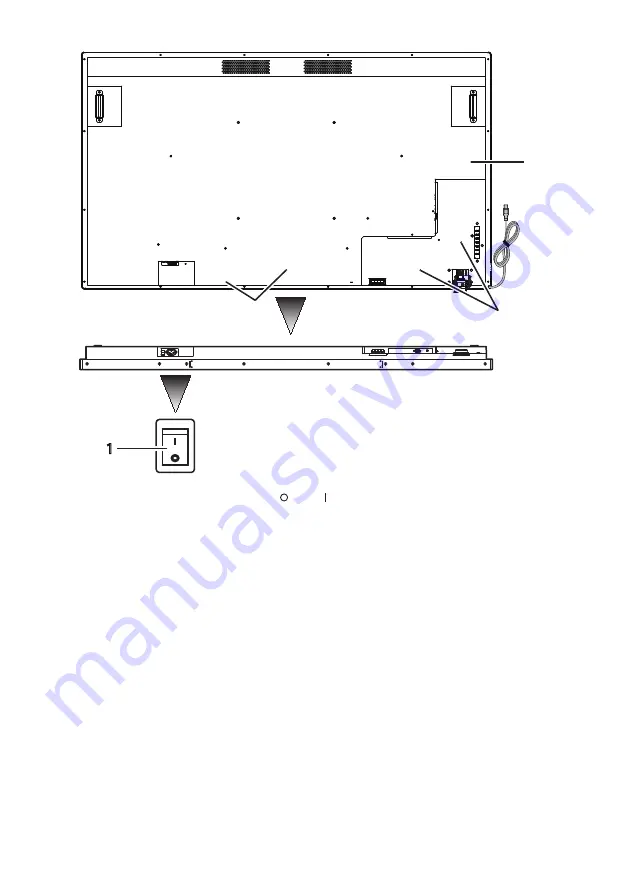
Panasonic TH-65BFE1W Скачать руководство пользователя страница 16

16

English

1

2

2

2

Back side

Base

1

Main power switch

It turns “Off ( ) / On ( )” the main power supply. It is used for starting / 

stopping power supply to the device.

2

Hole for cable clamp  

installation

It is used for fastening cable with the main unit.

Содержание TH-65BFE1W

Страница 1: ...al Manual Touch screen LCD display For business use Model No TH 75BQE1W 75 inch model English Please read these instructions before operating your set and retain them for future reference EU DPQP1184ZC X1 Actual resolution 3840 2160p ...

Страница 2: ...from the actual ones Important Safety Instructions 4 FCC STATEMENT 5 Important Safety Notice 6 Safety Precautions 7 Precautions for use 11 Chapter 1 Introduction 13 Checking the accessories 13 Remote Control Batteries 14 Names and functions of parts 15 Button and indicator 15 Cable and terminal 17 Remote control 18 How to use the remote control 19 Setting the remote control sensor 19 Operating ran...

Страница 3: ...gs 34 Play the playlist 35 Control by the serial terminal 37 Configuration and basic operation of OSD screen 38 Basic operation of OSD screen 39 Menu screen of picture 41 Menu settings of aspect ratio 42 Menu screen of sound 43 Menu screen of settings 44 Menu screen of initial settings 45 Setting method of the scheduler 46 Menu screen of system information 47 Annex 48 Table 1 Specifications of the...

Страница 4: ...o not block any ventilation openings Install in accordance with the manufacturer s instructions 8 Do not install near any heat sources such as radiators heat registers stoves or other apparatus including amplifiers that produce heat 9 Do not defeat the safety purpose of the polarized or grounding type plug A polarized plug has two blades with one wider than the other A grounding type plug has two ...

Страница 5: ...wing two conditions 1 This device may not cause harmful interference and 2 this device must accept any interference received including interference that may cause undesired operation CANADIAN NOTICE This Class A digital apparatus complies with Canadian ICES 003 WARNING Not for use in a computer room as defined in the Standard for the Protection of Electronic Computer Data Processing Equipment ANSI...

Страница 6: ...ce near sources of strong electromagnetic fields or where electrical noise may overlap with the input signals could cause the picture and sound to wobble or cause interference such as noise to appear To avoid the possibility of harm to this appliance keep it away from sources of strong electromagnetic fields WARNING This equipment is compliant with Class A of CISPR32 In a residential environment t...

Страница 7: ...the Pedestal sold separately Installation should be done by a professional vendor Work in a team of 4 persons when installing Pedestal TY ST75PE9 Note When installing the Pedestal thoroughly read the instructions manual included with the product and correctly install the stand Make sure to take the fall prevention measures For ensuring safety and performance ask your distributor or a professional ...

Страница 8: ...he ventilation holes Doing so may cause the Display to overheat which can cause fire or damage to the Display Do not stick any foreign objects into the Display Do not insert any metal or flammable objects into the ventilations holes or drop them onto the Display as doing so can cause fire or electric shock Do not remove the cover or modify it in any way High voltages which can cause severe electri...

Страница 9: ...he wall outlet and then contact the dealer for repairs To cut off the power supply to this Display completely you need to unplug the power supply plug from the wall outlet Repairing the unit yourself is dangerous and shall never be done To enable to unplug the power supply plug immediately use the wall outlet which you can reach easily Do not touch the unit directly by hand when it is damaged Elec...

Страница 10: ...the outer cover peeling away or removed The outer cover is attached to the battery for safety It must not be removed Doing so may cause short circuits Mishandling the batteries may cause the batteries to short circuit resulting in fire injury or damage to surrounding properties Remove the batteries from the remote control transmitter when not using for a long period of time The battery may leak he...

Страница 11: ...wall hanging etc follow the manual of it If there is no specific indication of installation dimension in the installation manual leave a space of 10 cm 3 15 16 or more at the top bottom left and right and 5 cm 1 31 32 or more at the rear Minimum distance a a b a 10 cm 3 15 16 b 5 cm 1 31 32 a Operation of this unit is guaranteed up to an ambient temperature of 40 C 104 F When installing the unit i...

Страница 12: ...cularly dirty soak the cloth in water to which a small amount of neutral detergent has been added and then wring the cloth dry Use this cloth to wipe the cabinet and then wipe it dry with a dry cloth Do not allow any detergent to come into direct contact with the surface of the Display If water droplets get inside the unit operating problems may result Avoid contact with volatile substances such a...

Страница 13: ... Left DPVF1710ZA Right Right Left These clasps are assembled with the speaker and supplied with it Screw for Mounting the Speaker M3 4 DPVF1701ZA Speaker Cable 2 Approx 0 7 m DPVF1702ZA Attention Store small parts in an appropriate manner and keep them away from young children The part numbers of accessories are subject to change without notice The actual part number may differ from the ones shown...

Страница 14: ... Disposal of batteries should be done in an environment friendly manner Take the following precautions 1 Batteries shall always be replaced as a pair 2 Do not combine a used battery with a new one 3 Do not mix battery types example manganese dioxide battery and alkaline battery etc 4 Do not attempt to charge disassemble or burn used batteries 5 Do not burn or breakup batteries Moreover batteries m...

Страница 15: ...lect HDMI1 HDMI2 DVI D PC and USB with the up down buttons 3 Plus button It increases the volume 4 Minus button It lowers the volume 5 Up button It moves up the item highlighted in the OSD menu 6 Down button It moves down the item highlighted in the OSD menu 7 POWER button It turns ON OFF the power supply This button cannot be operated when the power indicator is turned off In this case turn on th...

Страница 16: ... Back side Base 1 Main power switch It turns Off On the main power supply It is used for starting stopping power supply to the device 2 Hole for cable clamp installation It is used for fastening cable with the main unit ...

Страница 17: ...OUT This terminal is for connecting a speaker having amplifier It will output audio when AUDIO OUT is specified in Sound Output Select Output can be adjusted with the VOL button of the remote control 8 AUDIO IN It is used for connecting audio output cables of external devices such as PC VCR and DVD player For HDMI input you can select AUDIO IN in Sound Audio Source see page 43 AUDIO IN is default ...

Страница 18: ... used for operating the menu screen 12 OK It is used for selecting menu items 13 EXIT It turns OFF the OSD menu 14 INFO It shows the selected input source 15 MEDIA CONTROL It provides various control functions of a specific menu Function of each button will appear in OSD in the colour of the respective button 16 VOL Pressing the plus side will increase the audio output level Pressing the minus sid...

Страница 19: ...emote control from the front side of remote control sensor or by keeping it towards the remote control sensor from the direction where the remote control sensor can be seen Note The remote control system may not function if the remote control sensor of LCD display is exposed to direct sunlight or strong lighting or if there is an obstacle in the sensor s trajectory You can check whether the power ...

Страница 20: ...ly using with the device Do not use it for any other purpose Fixing the connection cables Note Three clampers are provided as accessories with the device When not using the touch panel use one of the clampers to fix the USB cable for touch panel at the position of A Moreover with the other two clampers fix the other cables at the position of B If you wish to purchase clampers please contact your d...

Страница 21: ...mote control where INPUT is displayed Note You can also directly select HDMI1 or HDMI2 by using the HDMI button of the remote control Audio connection during HDMI input You can select HDMI and AUDIO IN for HDMI input see page 43 Connection through DVI D IN terminal 1 Connect the commercially available DVI D cable to the DVI D IN terminal 2 Select DVI D by using the INPUT button of LCD display or t...

Страница 22: ...venting disconnection of the USB cable for touch panel fix it with the device by using the clamper see page 20 Wipe off dirt on the infrared transmitting part with a soft cloth Wipe off dirt on the infrared transmitting part with a soft cloth once in a day When a defect has occurred because of dirt on the infrared transmitting part lightly wiping it will restore the function If the infrared transm...

Страница 23: ...up never hold or put pressure on the front panel Inside of the front panel may be damaged 2 As shown in the figure below mount the speaker on the display Fix the speaker with 2 speaker mounting clasps and 4 speaker mounting screws supplied Tightening torque 0 5 to 0 8 N m Note Speaker mounting clasps are assembled with the speaker and supplied with it In the case of lateral placement Speaker Screw...

Страница 24: ...play to the red terminal on the speaker and the same applies for the black terminals on them When connecting the speaker cable please take precaution so that short circuit doesn t happen in the core wire EXT SP 8Ω 20W 10W 10W R L 1 While pushing the lever 1 Pushing down the lever 3 Return the lever 2 Insert the cable 3 Release the lever 2 Insert the cable Mount the clamper supplied at the followin...

Страница 25: ...nsor of LCD display Remote control sensor is the small black box located on the left side of the back of LCD display Until the sensor gets locked at the designated position push the position of A with thumb etc and slide it in the downward direction refer to bottom right of the illustration Follow these steps in the opposite order for returning the sensor to its original position A When the remote...

Страница 26: ...When the Main power switch is off power indicator is light out control buttons on the back side remote control and the settings of scheduler will not work For using these check that the Main power switch is on power indicator has light up Main power switch 4 Turn on the device Press the POWER button located on the left side of the device or the POWER button located on top left of the remote contro...

Страница 27: ...ement function may not work normally depending on the video output device In this case set this function to Off No Activity Power Off If this is set to Enable the power supply will automatically turn off standby when the device is not operated for more than 4 hours It will show the remaining time starting from 3 minutes before the power supply turns off When the power supply has turned off because...

Страница 28: ... Press the MENU button located on the remote control or the left side of LCD display to start the OSD menu You can select the language of OSD by using the Menu Language located in the Initial Setting menu on the OSD menu screen See page 45 ...

Страница 29: ...ect HDMI1 HDMI2 DVI D PC USB by using the HDMI DVI PC USB buttons of the remote control Select with the INPUT button of the unit Pressing the INPUT button of the unit will show the OSD menu of the input source You can select your target input source by using the up down buttons Options of the input source are HDMI1 HDMI2 DVI D PC and USB Pressing the INPUT button once again will show the selected ...

Страница 30: ...left and the right buttons of the remote control and select the type of the contents you want to play Press the OK button to confirm the selection 1 USB 2 0 PHOTO MUSIC MOVIE 4 The USB flash drive will appear as C depending on the situation Press the OK button of the remote control and open this C drive media list page 5 Use the up and the down buttons of the remote control to search contents in t...

Страница 31: ...se the volume Right key Right key Increase the volume Decrease the volume Left key Left key Decrease the volume Up Up key Up key Next image music file video Down Down key Down key Previous image music file video Power supply Power supply off Power supply off Power supply off Supported devices Commercially available USB flash drives are supported USB flash drives with security function are not supp...

Страница 32: ...ton of the remote control and open this C drive 1 1 C Back 3 Pressing the red button will show the check boxes Select files with the up and the down buttons and add the checked and selected files to the playlist with the OK button PHOTO C 1 1 Move Back Play Playlist Option Play all FileName Back Movie Picture Music image01 jpg image02 bmp Red ...

Страница 33: ...selected files in the playlist PHOTO C 1 1 Move Back Play Cancel Load Clear Save FileName Back Movie Picture Music image01 jpg image02 bmp Save the playlist Yes No Red Green Yellow Blue 5 When the playlist is not defined pressing either the red button Play all OK button and Play button will play all files in the current folder Note Changing to another input source without saving the playlist will ...

Страница 34: ...n 3 When music is also included in the folder where pictures are saved you can play music in the background while pictures are displayed Slideshow settings In the playback mode of pictures by using slideshow you can play all selectable pictures or all pictures in the playlist Use the yellow button to display slideshow options Option Slideshow Time Transition 3 Sec Off Back 1 Slideshow Time It sets...

Страница 35: ...Use the Info button to hide the play guide Functions of play guide Remote key Function Pause Play Forward Cannot be used in the PHOTO mode Rewind Cannot be used in the PHOTO mode Next picture track file Previous picture track file Stop the playback Play stop the music in the background Can be used only in the PHOTO mode When this function cannot be used the button will not work even if you press i...

Страница 36: ...below Repeat Information It is used for selecting menu items Stop or Play Forward Rewind Skip to above Skip to below Repeat Information Play the item selected Play the item selected Play the item selected Stop and return to the list screen Stop and return to the list screen Stop and return to the list screen Pause the slideshow Pause the playback Pause the playback Not used Forward Forward Not use...

Страница 37: ... according to control details STX C1 C2 C3 P1 P2 P3 P4 P5 ETX Start Command 3 characters 3 Byte Colon Parameter End 3 List of commands Command Parameter Control details PON None Power ON POF None Power OFF AVL Volume 000 100 AMT 0 Mute Off 1 Mute On IMS None Input select toggle HM1 HDMI 1 input HDMI1 HM2 HDMI 2 input HDMI2 DV1 DVI D IN input DVI D PC1 PC IN input PC UD1 USB input USB VMT 0 Video m...

Страница 38: ...yed on the screen and adjust brightness and other settings Main Menu Picture Sound Setup Initial Setting System Information This table shows the functions of default settings of OSD of the Main Menu screen Detailed items are explained from next page onwards Main Menu screen Menu items Detailed information Picture See page 41 Sound See page 43 Setup See page 44 Initial Setting See page 45 System In...

Страница 39: ...nitor 1 Press the MENU button to display the OSD screen Use the up down buttons and select items from the Main Menu 2 Pressing the OK button and confirming the selected Main Menu will select the sub menu located at the top Pressing the INPUT button and confirming the selected Main Menu will select the sub menu located at the top 3 Use the up down buttons to select a sub menu ...

Страница 40: ...e selected sub menu Press the INPUT button and confirm the selected sub menu 5 Use the left and the right buttons to select the settings Use the plus and the minus buttons to select the settings 6 Press the EXIT button to close the current menu Press the MENU button to close the current menu ...

Страница 41: ... of the OSD menu screen Standard It is the standard image quality Cinema will be available for selection according to the input signal You can make the following settings to determine the picture style Contrast Adjusts the difference between light and dark of images Brightness Adjusts light and dark of the entire screen Sharpness Adjust the sharpness of image outlines Tint Adjust the tint of entir...

Страница 42: ...on clock and phase It will work only in PC input Reset Picture Setting Settings will be restored to the factory default settings Menu settings of aspect ratio Picture Picture Mode Backlight Color Temperature Gamma Noise Reduction Adaptive Contrast Over Scan Aspect Ratio Color Range PC setting Reset Picture Setting Dynamic 100 11500 2 2 Middle Off Off 16 9 Automatic Menu settings of aspect ratio In...

Страница 43: ...You can select the mode that is suitable to the audio Standard Factory default setting Dynamic Setting for emphasizing audio Custom Use the custom audio settings saved earlier You can adjust high volume low volume and balance that decide the audio style Adjusting this will store the value as Sound Style Custom Surround Sound Turns on off the surround sound Output Select EXT SP Audio will be output...

Страница 44: ...tomatically play USB if the source was USB when the power supply was on Signal Check Priority Enable Signal Check Input Priority 1 Priority 2 Priority 3 Priority 4 Priority 5 Reset Setting Control Setting Select so that the LCD display is controlled via the serial terminal Sleep Timer Changes the settings of sleep timer or turns off the sleep timer No Activity Power Off Enables disables the functi...

Страница 45: ...u Clock Changes time and date Logo Display Selects whether to display the logo of Panasonic or not when the power supply is turned on Remote Operation Enables disables the operation of the remote control Note When the remote control operation is disabled you can enable the operation of remote control by pressing the buttons of the remote control in the MENU left right up down sequence If Keypad Op...

Страница 46: ...duler You can move each item by using cursor buttons You can select items by pressing the OK button and by checking the check box You can deselect by removing check mark from the check box For the power supply on off time items you can set time with the up and down buttons by selecting places from the time display and pressing the OK button For closing a time setting press the RETURN button For in...

Страница 47: ... power supply on off time of two or more schedules is same power supply on off time of the youngest programme number will be executed Once a schedule is set off timer will be disabled Power supply on time and power supply off time cannot be set to the same time Power supply off time cannot be set unless power supply on time is set Even if the main power supply is turned off or the breaker has trip...

Страница 48: ...iles Especially the device may not be able to play MP4 video files depending on the encoder Table 2 Specifications of the supported formats audio File extension Audio codec Bit rate Sampling rate mp3 MPEG1 Audio Layer 3 32 Kbps 320 Kbps 32 kHz 48 kHz N A Only video files are supported AC3 32 Kbps 640 Kbps 32 kHz 44 1 kHz 48 kHz m4a AAC AAC HEAAC 24 Kbps 384 Kbps 8 kHz 48 kHz wma asf WMA 128 Kbps 3...

Страница 49: ...80 x 800 49 70 59 81 83 50 640 x 480 60Hz 640 x 480 31 50 60 00 25 20 480p 60Hz 720 x 480 31 50 60 00 27 03 480p 60Hz 720 x 480 31 50 60 00 27 03 720p 60Hz 1 280 x 720 45 00 60 00 74 25 1080i 60Hz 1 920 x 540 33 75 60 00 74 25 480i 60Hz 720 1 440 x 480i 15 75 60 00 27 03 1080p 60Hz 1 920 x 1 080 67 50 60 00 148 50 576p 50Hz 720 x 576 31 25 50 00 27 00 576p 50Hz 720 x 576 31 25 50 00 27 00 720p 50H...

Страница 50: ...ts etc Colour is pale Check if the colour strength is adjusted properly Check the adjusted values of the picture 41 Coloured pattern appears and then the colour fades Check if the unit is affected interference by another imaging device This symptom may improve if the installation location of the unit is changed The top or bottom of the picture on the screen is cut off The image position has been a...

Страница 51: ...2 Digital RGB input terminal DVI D 24 Pin 1 DVI D IN PC input terminal Mini D sub 15 Pin Compatible with DDC2B 1 PC IN R G B HD VD 0 7 Vp p 75 Ω without sync signal TTL Audio input terminal Stereo mini jack M3 1 0 5 Vrms shared with DVI D IN and PC IN AUDIO IN Audio output terminal Stereo mini jack M3 1 0 5 Vrms AUDIO OUT Output Variable 0 dB 1 kHz 0 dB input 10 kΩ load Serial input terminal Exter...

Страница 52: ...er dimensions W H D 160 mm 50 mm 20 mm 6 3 2 0 0 8 Speaker Impedance 8 Ω Rated input 20 W 10 W 10 W Outer dimensions W H D 763 mm 82 mm 59 mm 30 1 3 3 2 4 Mass Approx 2 0 4 4 lbs Cabinet material Resin 1 Environmental temperature to use this unit at high altitudes 1 400 m 4 593 ft and higher and below 2 800 m 9 186 ft above sea level 0 C to 35 C 32 F to 95 F 2 VIERA LINK is not supported ...

Страница 53: ... outside the European Union These symbols are only valid in the European Union If you wish to discard these items please contact your local authorities or dealer and ask for the correct method of disposal EU Notice U S A only Disposal may be regulated in your community due to environmental considerations For disposal or recycling information please visit Panasonic website http www panasonic com en...

Отзывы: