background image

14

English

Using Media Player

Media Player allows you to enjoy photo, video or music 
recorded on a USB Flash Memory.
Photo mode:

Digital photo data will be displayed.

Video mode:

Digital video data will be played back.


Supported file format   

“Supported file format in 

Media Player” (p. 19)


During the operation, audio signal is output from AV1, 
AUDIO OUT and HDMI2 (ARC function) terminals. 
But no video signals are output. To use HDMI2 with 
ARC function, connect an amplifier that has ARC 
function.


The picture may not appear correctly on this TV 
depending on the recording equipment used.


Display may take some time when there are many 
files and folders.


Partly degraded files might be displayed at a reduced 
resolution.


Picture setting may not work depending on the 
conditions.


The folder and file names may be different depending 
on the digital camera or digital video camera used.

Music mode:

Digital music data will be played back.


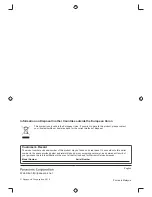
To insert or remove the USB Flash Memory


Insert or remove straightly and completely.


Connect the USB Flash Memory to the USB port.


Check the type of terminals and devices are 
correct when connecting.

1

  Insert the USB Flash Memory to the 

TV

2

  Display [VIERA TOOLS] and select 

the content (Photo / Music / Movie)

VIERA

TOOLS

VIERA LINK

VIDEO

MUSIC

ECO NAVIGATION

Photo


Select the appropriate device and content for playing 
back each file.


To change the contents

While the thumbnail is displayed, display 
the contents selection.

B


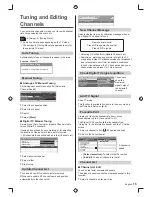
Digital TV Channel List

70

105

719

72

CBBC Channel

BBCi

BBC Radio Wales

Cartoon Nwk

:  Reveal
:  Hide

2

  Edit the channel


[Tune]:

 To retune each channel (Manual Tuning)


[Swap] / [Move]:

 To swap / move the channel 

position (if available)


[Reveal all]:

 To reveal all channels


[Rename]:

 To rename the channel (Analogue TV) 

backspace

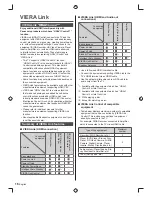
Updating the TV 
Software

A new version of software may be released for download 
to enhance the performance or operations of the TV.

[Setup]

[System Menu]

[System Update]


To update automatically

Set [Auto Update Search in Standby]

System Update

Auto Update Search in Standby

System Update Search Now

Off

If System Update is performed, the software will 
be updated (it may change TV functions).
If you do not want to do so, set [Auto Install] to 
[No].


Every time you set, the TV automatically performs a 
search in Standby and downloads an update, if any 
software updates are available.


The automatic updating is performed in Standby 
mode (TV turned off with the remote control).


To update immediately

1

  Select [System Update Search Now]

2

  Searches for an update (for several minutes) and 

displays a corresponding message if any

3

  Download

Note


Download may take a few hours.


During software download and update, DO NOT 
switch off the TV.


The notification message might be a reminder. In this 
case, the schedule information (the date that the new
version can be used) will appear. You can set the 
reservation for update. The update will not start when 
the TV is off.

Содержание TH-60A430H

Страница 1: ...nd Editing Channels 13 Updating the TV Software 14 Using Media Player 14 VIERA Link 16 Technical Information 18 Others Maintenance 20 FAQs 21 Specifications 22 TQB4GC1210 Operating Instructions LED TV Thank you for purchasing this Panasonic product Please read these instructions carefully before operating this product and retain them for future reference The images shown in this manual are for ill...

Страница 2: ...ill give to any third party who contacts us at the contact information provided below for a charge no more than our cost of physically performing source code distribution a complete machine readable copy of the corresponding source code covered under LGPL V2 1 or the other licenses with the obligation to do so as well as the respective copyright notice thereof Contact Information cdrequest unipf j...

Страница 3: ...electronic components Safety Precautions To help avoid risk of electrical shock fire damage or injury please follow the warnings and cautions below Mains plug and lead Warning If you detect anything unusual immediately remove the mains plug This TV is designed to operate on AC 220 240 V 50 60 Hz Insert the mains plug fully into the socket outlet Ensure that the mains plug is easily accessible Disc...

Страница 4: ...en not in use for a long time Caution This TV will still consume some power even in the Off mode as long as the mains plug is still connected to a live socket outlet Remove the mains plug from the wall socket when the TV is not in use for a prolonged period of time Use conditions Caution This appliance is intended for use in tropical climates Battery for the Remote Control Caution Incorrect instal...

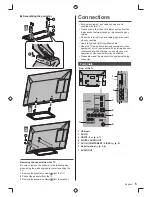
Страница 5: ...wise distortion of image sound may occur or operation of other equipment may be affected Please also read the manual of the equipment being connected Terminals Rear of the TV 1 3 5 4 6 7 2 1 USB port 2 AV2 IN 3 HDMI1 2 p 6 7 4 DIGITAL AUDIO OUT 5 AV1 IN COMPONENT VIDEO p 6 6 Aerial terminal p 5 6 7 AUDIO OUT Assembling the pedestal A C D 1 2 B 3 Removing the pedestal from the TV Be sure to remove ...

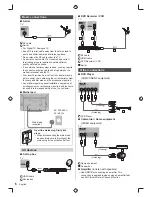
Страница 6: ...al correct cable 75 coaxial and correct terminating plug are required to obtain optimum quality picture and sound If a communal aerial system is used you may require the correct connection cable and plug between the wall aerial socket and the TV Your local Television Service Centre or dealer may be able to assist you in obtaining the correct aerial system for your particular area and the accessori...

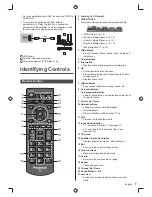
Страница 7: ...t pages Sets characters When in Standby mode switches TV on 11 Still Freezes unfreezes the picture 12 Input mode selection TV switches to Digital TV Analogue TV AV switches to AV input mode from Input Selection list 13 TV Guide 14 Subtitles Audio Description Displays Audio Description Subtitle Menu 15 Exit Returns to the normal viewing screen 16 Cursor buttons Makes selections and adjustments 17 R...

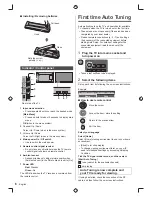
Страница 8: ...rst time These steps are not necessary if the setup has been completed by your local dealer Please complete connections p 5 7 and settings if necessary of the connected equipment before starting Auto Setup For details of settings for the connected equipment read the manual of the equipment 1 Plug the TV into mains socket and turn power on POWER Takes a few seconds to be displayed 2 Select the foll...

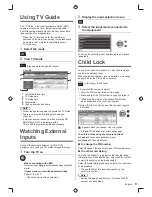
Страница 9: ...function depends on the country you select Note Setting Shipping Condition p 12 erases the PIN number and all settings Using TV Guide The TV Guide Electronic Programme Guide EPG shows a list shows a list of the current broadcasts and forthcoming broadcasts over the next seven days depending on the broadcasters When this TV is turned on for the first time or switched off for more than a week it may...

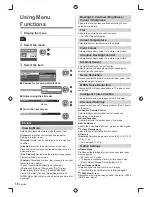
Страница 10: ...8 For Analogue TV only Option Settings Game Mode Provides suitable images for fast response signal when playing games Not valid on TV mode To display a continuous record of time spent using Game Mode Playing Time Display p 12 Film Cadence Mode Improves vertical resolution for movie images This function is available for the interlaced signal 1080p Pixel Direct Reproduces the original image quality ...

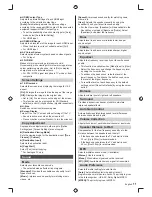
Страница 11: ...iority is given in the following order HE AAC Dolby Digital MPEG MPEG The priority is given to MPEG HDMI Content Type Adjusts the picture settings of each HDMI input according to the selected content type Auto Automatically adjusts the picture settings according to the received HDMI content if the connected equipment supports HDMI Content Type To set the availability of each content type for Auto ...

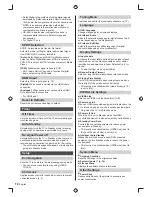
Страница 12: ... licence information Other Settings Power Save Reduces brightness of the picture to economise on power consumption Dolby Digital is the method of coding digital signals developed by Dolby Laboratories Apart from stereo 2ch audio these signals can be multi channel audio MPEG is an audio compression method that compresses audio to the smaller size without any considerable loss of audio quality HE AA...

Страница 13: ...FTV guide 7 7 Digital 9 NINE DIGITAL 70 7 Digital 79 7 guide Select favourites To select other Favourites Add all To add all channels to the list Channel List Channel List Edit You can hide skip unwanted channels The hidden channels cannot be displayed except in this function 1 Select a channel and reveal hide Tuning and Editing Channels You can retune channels or make your favourite channel lists...

Страница 14: ...ck each file To change the contents While the thumbnail is displayed display the contents selection B Digital TV Channel List 70 105 719 72 CBBC Channel BBCi BBC Radio Wales Cartoon Nwk Reveal Hide 2 Edit the channel Tune To retune each channel Manual Tuning Swap Move To swap move the channel position if available Reveal all To reveal all channels Rename To rename the channel Analogue TV backspace...

Страница 15: ...er Photo All photos EXIT Info Option Menu USB 2 0 View Select Slideshow View Select Drive Select Contents Select RETURN Error display Single view Photos are displayed one at a time Select the file from the thumbnail of photos to be viewed Slideshow Slideshow completes when all photos are viewed within the current thumbnail 1 Select the file from the thumbnail of photos for the first view 2 Start S...

Страница 16: ...and the equipment with VIERA Link function and enables easy control playback energy saving creating home theatre etc without complicated settings Connections to the equipment DIGA Recorder HD Video Camera Player theatre Amplifier etc with an HDMI cable allow you to interface them automatically These features are limited to models incorporating HDAVI Control and VIERA Link This TV supports HDAVI Co...

Страница 17: ...tions VIERA Link connection p 16 Set up the connected equipment Read the manual of the equipment Set VIERA Link to On in the Setup Menu p 12 Set up the TV After connection turn the equipment on and then switch the TV on Select the input mode from HDMI1 or HDMI2 p 9 and make sure that an image is displayed correctly This setup should be done each time when the following conditions occur for the fir...

Страница 18: ... TV s lower number of HDMI terminal connected to the same type equipment For example two recorders to HDMI1 and HDMI2 the recorder connected to HDMI1 is displayed as Recorder1 and the recorder connected to HDMI2 is displayed as Recorder2 VIERA Link Menu VIERA Link Control Speaker Selection Home Cinema Recorder2 Recorder1 3 Player1 3 Recorder2 If you access non VIERA Link equipment The type of the ...

Страница 19: ...u to enjoy high definition digital images and high quality sound by connecting the TV and the equipment HDMI compatible equipment 1 with an HDMI or DVI output terminal such as a DVD player a set top box or game equipment can be connected to the HDMI terminal using an HDMI compliant fully wired cable Applicable HDMI features Input audio signal 2ch Linear PCM sampling frequencies 48 kHz 44 1 kHz 32 ...

Страница 20: ...t liable for any deterioration or damage of recorded data USB connection It is recommended to connect the USB Flash Memory directly to the TV s USB port Some USB devices or USB HUB may not be used with this TV You cannot connect any devices by using USB card reader Additional information for USB devices may be on the following website English only http panasonic net viera support Maintenance First...

Страница 21: ... then turn it on again Check foreign objects are not inside the USB port FAQs Before requesting service or assistance please follow these simple guides to solve the problem When an error message appears follow the message s instructions If the problem still persists contact your local Panasonic dealer or the authorised service centre Block noise frozen or disappearing image occurs in Digital TV mo...

Страница 22: ...C 4 43 6 5 MHz 11 NTSC 3 58 5 5 MHz 12 NTSC 3 58 6 0 MHz 13 NTSC 3 58 6 5 MHz 14 SECAM I 15 PAL 60 Hz 5 5 MHz Playback from Special Disc Players and Special VCR s or DVD 16 PAL 60 Hz 6 0 MHz 17 PAL 60 Hz 6 5 MHz Digital terrestrial TV GB20600 2006 free to air TV broadcast reception Specifications TV Model Name TH 60A430H Dimensions W H D 1 351 mm 822 mm 289 mm With Pedestal 1 351 mm 778 mm 62 mm T...

Страница 23: ...arefully during installation since subjecting it to impact or other forces may cause product damage Do not mount the unit directly below ceiling lights such as spotlights or halogen lights which typically give off high heat Doing so may warp or damage plastic cabinet parts Take care when fixing wall brackets to the wall Always ensure that there are no electrical cables or pipes in the wall before ...

Страница 24: ...ustomer s Record The model number and serial number of this product may be found on its rear panel You should note this serial number in the space provided below and retain this book plus your purchase receipt as a permanent record of your purchase to aid in identification in the event of theft or loss and for Warranty Service purposes Model Number Serial Number Web Site http panasonic net Panason...

Отзывы: