background image

34

Advanced

35

Menu

Item

Adjustments / Configurations (options)

Picture

Advanced

PC 

Settings

W/B High R

White balance of bright red area

 and 

repeatedly adjusted

W/B High B

White balance of bright blue area

W/B Low R

White balance of dark red area

W/B Low B

White balance of dark blue area

Gamma

(2.0 / 2.2 / 2.5 / S Curve)

Setup

PC

Setup

Input

Resolution

Switches to a wide view


VGA (640 × 480 pixels), WVGA (852 × 480 pixels),

XGA (1,024 × 768 pixels), WXGA (1,366 × 768 pixels)


Options change depending on signals

Clock 

Set to the minimum level if noise occurs

H-pos

Adjusts horizontal position


V-pos

Adjusts vertical position


Clock Phase

Eliminates flicker and distortion


Adjust after Clock adjustment


Set to the minimum level if noise occurs

Sync

Chooses another synchronous signal if the image is distorted 

(H & V / On G)


H & V : by the horizontal and vertical signals from your PC

On G  : by the green signal from your PC (if available)

OPTION SD CARD

EXIT

RETURN

INPUT

Input Selection

AV1

AV2/AV2S

AV4/AV4S

AV3/AV3S

COMPONENT

PC

HDMI1

HDMI2

HDMI3

TV

Main Menu

VIERA Link

Picture

Sound

Setup

2/3

Preferred Subtitles

English

Shipping Condition

Owner ID

Common Interface

System Update

       Setup Menu

Power Save

Side Panel

Off

Banner Display Timeout

3 seconds

Off

Access

Input Labels

OPTION SD CARD

INPUT

EXIT

TV

RETURN

Input Labels

AV1

DVD

AV2/AV2S

AV2/AV2S

AV4/AV4S

AV4/AV4S

AV3/AV3S

AV3/AV3S

COMPONENT

COMPONENT

PC

PC

HDMI1

HDMI1

HDMI2

HDMI2

HDMI3

HDMI3


To return to TV 


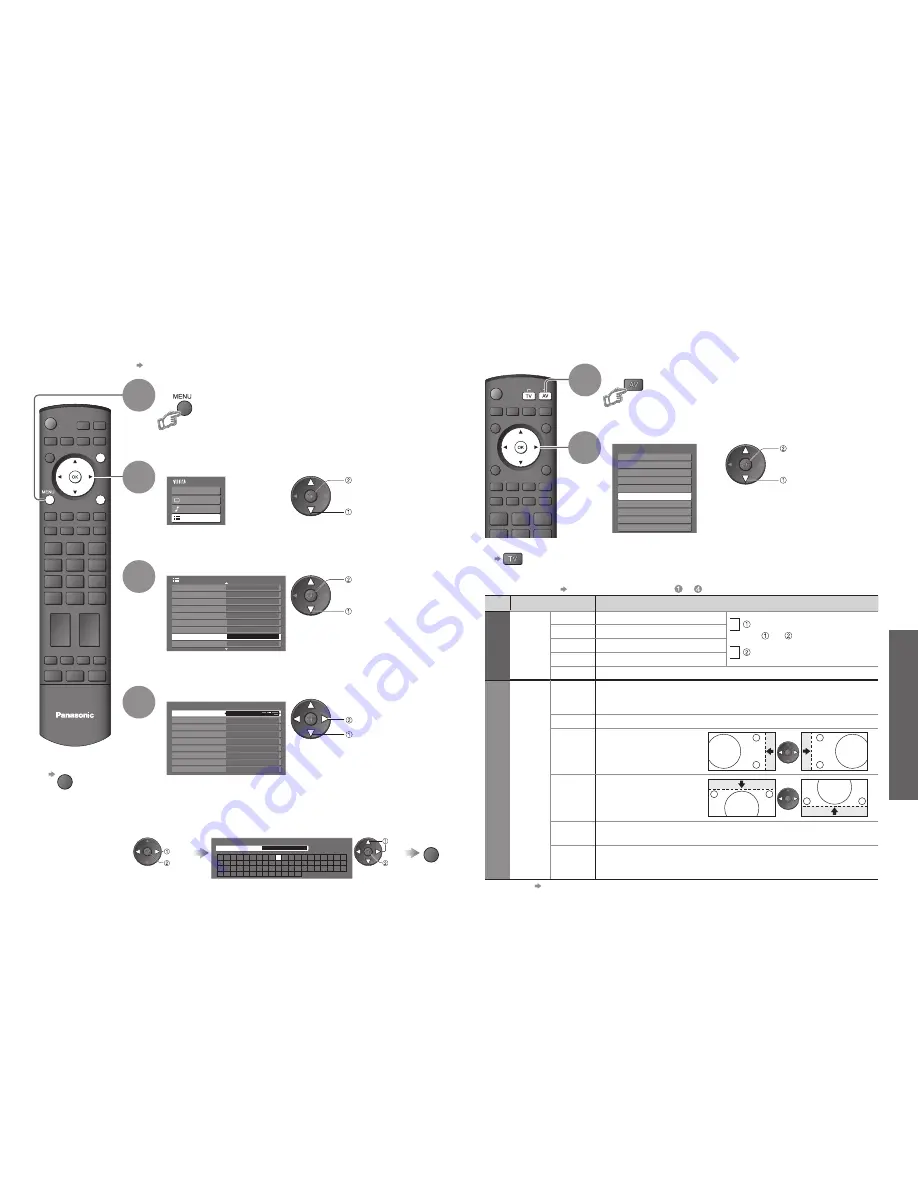
Displaying PC Screen on TV

Select the external input

Select “PC”

2

The screen of the PC connected to the TV can be displayed on the TV.

You can also listen to PC sound with the audio cable connected. To connect PC


(p. 44)

• 

Corresponding signals (p. 49)

• 

If “H-freq.” or “V-freq.” is shown in red, 

the signals may not be supported.


PC menu setting 

(changed as desired)

 • 

To make settings   “How to Use Menu Functions” 

 to 

 (p. 21)

• 

Other items   p. 22 and p. 23

Displaying PC Screen on 

TV

Input Labels

1

Input Labels

2

3

4

Select “Setup”

Select “Input Labels”

Display the menu

Select a input terminal and set


To return to TV


EXIT

For easier identification and selection of the input mode, you can label each input terminals or skip 

terminal that is not connected to any equipment.

(To select the input mode   p. 16)


set


select

1

The labels you set will be displayed in “Input Selection” menu (p. 16) or banner.

• 

If “Skip” is selected, you cannot select the mode.

 access

 select

 access

 select

 access

 select


User input

You can name each input terminals freely. 

Select “User input”

 access

 select

Set characters

User input

Name

A

B

C D

E

F

G H

I

J

K

L

M N

U

V W X

Y

Z

0

1

2

3

4

5

6

a

b

c

d

e

f

g

h

i

j

k

l

m

n

u

v

w

x

y

z

(

)

+

-

.

*

_

O P Q R

S

T

7

8

9

!

:

#

o

p

q

r

s

t

 set

 select

(maximum: ten characters)

Store

RETURN

Содержание TH-50PX720B

Страница 1: ...urces and prevent any potential negative effects on human health and the environment which could otherwise arise from inappropriate waste handling Please contact your local authority for further details of your nearest designated collection point Penalties may be applicable for incorrect disposal of this waste in accordance with national legislation For business users in the European Union If you ...

Страница 2: ...on of Conformity No 4493 15 January 2007 TH 50PX700B Declaration of Conformity No 4494 15 January 2007 Support Audio Description signal p 12 and p 22 Audio description AD is an ancillary component associated with a broadcast which delivers a verbal description of the visual scene as an aid to understanding and enjoyment particularly for visually impaired viewers HD ready HD ready means the ability...

Страница 3: ...ndle or naked flame on top or near the TV Power source This TV is designed to operate on 220 240V 50 60 Hz AC Do not remove the cover Do not remove the rear cover as live parts are accessible when it is removed There are no user serviceable parts inside Transport only in upright position Transporting the TV with its display panel facing upright or downward may cause damage to the internal circuitr...

Страница 4: ... p 22 Changes the input mode TV switches DVB digital broadcasting Analogue mode p 12 AV changes AV input mode p 16 Viewing SD Card p 38 Returns to the previous menu Still picture p 13 Teletext Hold p 20 Do not bundle the RF cable and mains lead together could cause distorted image Fix cables with clampers as necessary When using the optional accessory follow the option s assembly manual to fix cab...

Страница 5: ...t to AV3 for a DVD Recorder VCR supporting Q Link p 40 Connect to AV1 for a Satellite receiver If connecting the TV and Satellite receiver with SCART cable you can watch satellite broadcast by RGB input signal SCART 21 pin connection used for video audio and switching signals Also known as Euro SCART and Peritel RF Radio Frequency Signal received from terrestrial aerial RGB S Video Video Choose be...

Страница 6: ... your TV is ready for viewing When inputting owner ID later EXIT You can now use the remote control to turn On the TV or turn the TV to standby mode Power LED On 2 If you input the ID later Owner ID p 33 If a compatible recording equipment with Q Link or similar technologies p 40 is connected analogue channel information is automatically downloaded to the equipment Auto Setup will start to search ...

Страница 7: ...isplay Timeout p 23 To hide EXIT Appears also when changing channel Information of another channel Information on next programme DVB To watch the programme listed in the banner Information banner operation 1st press Display banner 2nd press Banner programme synopsis DVB 3rd press Exit Features available Programme DVB Programme Start Finish time Analogue Programme Status Channel Current time Catego...

Страница 8: ... D means DVB channel and A means Analogue channel TV Guide date Programme TV Guide start page View TV Guide landscape or portrait select type Current date and time Category list Type list To list favourite channels p 29 To return to TV EXIT view view Landscape Displays by broadcaster View Portrait to see one channel at a time View Landscape to see many channels Note When this TV is turned on for t...

Страница 9: ...remote control or the front panel of the TV Press the button repeatedly until the desired input is selected You can label or skip each input modes Input Labels p 34 Dependant on the setup of the equipment Screen display Watching VCR DVD and Satellites VCR DVD switch Select VCR to operate Panasonic VCR or DVD equipment Select DVD to operate Panasonic DVD equipment or Player home theatre Standby Set...

Страница 10: ...fer greatly from analogue teletext When you switch to a DVB teletext service the images you see can contain graphics and text laid out and controlled in a manner decided by the broadcaster You can check if the programme has teletext information To change the channel When select or go is displayed When symbol is displayed When the key words are displayed on colour bar red green yellow blue When opt...

Страница 11: ...yellow Appears when updating is completed You cannot change the channel Teletext automatically updates itself when new information becomes available The news page provides a function that indicates arrival of latest news News Flash Changes to TV screen temporarily View the updated page View the TV picture while searching for a teletext page View sub page Enter the 4 digit number example P6 Appears...

Страница 12: ...DMI input mode only HDMI2 terminal is for digital signal only No setting for HDMI2 available Audio Description Menu Audio Description Useful for visually impaired viewers Off On Select On to sound the description sound if the programme has the signal Volume Adjusts the volume for audio description Speakers Set to On to active the description sound track from TV speakers Off On Headphones Set to On...

Страница 13: ...33 2 CH21 3 CH21 4 CH60 5 CH21 1 2 3 X Y Z F T P 4 5 6 Prog Chan Name p 31 Child Lock Service List Change PIN Access p 29 Input Labels AV1 DVD AV2 AV2S AV2 AV2S AV4 AV4S AV4 AV4S AV3 AV3S AV3 AV3S COMPONENT COMPONENT PC PC HDMI1 HDMI1 HDMI2 HDMI2 HDMI3 HDMI3 p 34 System Update Auto Update Search in Standby System Update Search Now On p 27 1 of 2 Owner ID Please enter new PIN PIN p 33 Off 2 of 2 Co...

Страница 14: ...mmon Interface Module menu provides access to software contained on Common Interface CI Modules This TV receiver works only Pay TV modules complying with CI standard Off 2 of 2 Common Interface Slot 1 Module inserted Access Common Interface select go Coloured characters red green yellow blue Follow the on screen instructions example On screen operation guide may not correspond to the remote contro...

Страница 15: ...hannel select Appears when the channel is locked Enter the PIN number 4 digits Select Service List To cancel Select the locked channel To lock all channels yellow To cancel all channel locks blue Select the channel to be locked Note Setting Shipping Condition p 32 erases the PIN number and all settings Enter the PIN number twice at first setting Make a note of the PIN number in case you forget it ...

Страница 16: ...tomatically Add DVB channel automatically Add New DVB Services Any new services found will be added to the DVB Service List p 29 automatically Add New DVB Services Please wait This will take about 3 mins 21 68 Prog Channel Service Name Net ID TS ID Quality ZDF ARD start The new service is added with the current settings saved as they are Set Analogue channel manually Analogue Manual Tuning Program...

Страница 17: ...ID Owner ID Restore Settings 3 4 Select Owner ID Set To return to TV EXIT Entry of the security code PIN number and personal information your name address and post code In the unfortunate event of theft it will help the Police to determine the owner If you have skipped the Owner ID input in Auto Setup p 10 and input it later start from If you input the Owner ID in Auto Setup p 10 perform Select Se...

Страница 18: ...t Labels OPTION SDCARD INPUT EXIT TV RETURN Input Labels AV1 DVD AV2 AV2S AV2 AV2S AV4 AV4S AV4 AV4S AV3 AV3S AV3 AV3S COMPONENT COMPONENT PC PC HDMI1 HDMI1 HDMI2 HDMI2 HDMI3 HDMI3 To return to TV Displaying PC Screen on TV Select the external input Select PC 2 The screen of the PC connected to the TV can be displayed on the TV You can also listen to PC sound with the audio cable connected To conn...

Страница 19: ...ing time Ending time Subtitles Off Auto one day ahead daily or weekly press repeatedly Select the programme to be changed using and press Correct as necessary as above Repeat the operations as below and set items in the order of to Recording time automatic display Daily SU SA Sunday to Saturday Daily MO SA Monday to Saturday Daily MO FR Monday to Friday Weekly SA FR TH WE TU MO SU Same time on the...

Страница 20: ... the card while the TV is accessing data this can damage card or TV Do not touch the pins on the back of the card Do not subject the card to a high pressure or impact Insert the card in the correct direction otherwise card may be damaged Electrical interference static electricity or erroneous operation may damage the data or card Back up the recorded data at regular intervals in case of deteriorat...

Страница 21: ...emark of Metz Corporation Megalogic a trademark of Grundig Corporation Easy Link a trademark of Philips Corporation SMARTLINK a trademark of Sony Corporation Read the manuals of the equipment too Download analogue channel settings Perform Auto Setup p 30 When first using this TV see Auto Setup p 10 Perform download to the equipment p 23 HDMI Functions Q Link Functions 1 The HDMI logo is displayed ...

Страница 22: ...nnected Panasonic equipment is also automatically set to Standby This function will work even if the TV enters standby mode automatically by Off Timer function or auto power standby function Speaker control You can control the theatre speaker with TV s remote control This function is available when Panasonic Amplifier or Player theatre is connected If you cannot access the menu check the settings ...

Страница 23: ...n the Sound Menu p 22 External Equipment M3 stereo mini plug Computer Amplifier with speaker system PC Viewing Listening To listen with speakers Conversion adapter if necessary HD Satellite receiver DVD Recorder VCR SCART cable RF cable or SCART cable To watch satellite broadcasts To record playback To watch DVDs DVD player Fully wired HDMI compliant cable Viewing Listening Camcorder HDMI equipmen...

Страница 24: ...everal minutes depending on the darkness of the picture New version 1 00 found Do you really want to update the software and reboot the system Press OK to download the new version Press EXIT to lgnore Updating the DVB software Note During software download and update DO NOT switch off the TV From time to time a new version of software for DVB mode may become available for download to enhance perfo...

Страница 25: ...nal COMPONENT Y PB PR HDMI PC D sub 15P SCART S VIDEO and HDMI terminal information Socket Earth CVBS out video CVBS earth Red in Red earth Green in Green earth Blue in Blue earth Audio out L Audio out R CVBS in video RGB status earth Status RGB Earth Status CVBS Audio in L Audio earth Audio in R 21 19 17 15 13 11 9 7 5 3 1 20 18 16 14 12 10 8 6 4 2 AV1 SCART terminal RGB VIDEO Suitable inputs for...

Страница 26: ...inimum p 22 HDMI Other Before requesting service or assistance please follow these simple guides to resolve the problem If problem still persists please contact your local Panasonic dealer or Panasonic Customer Care Centre for assistance For details p 56 White spots or shadow images noise Check the position direction and connection of the aerial Neither image nor sound is produced Is the TV in AV ...

Страница 27: ...ill be erased all present DVB and Analogue tuning datas p 30 Message Meaning Action Message Meaning Action Unable to download Check Equipment The tape or disc is active Stop the equipment and try again Please check aerial or local DVB service availability Press OK to start Auto Setup Please follow the message If it is still failed consult your local Panasonic dealer Please wait A function is in pr...

Страница 28: ...2 AV3 out 23 40 Banner Display Timeout 23 Category list 14 Child Lock 29 CI module 27 Clamper 6 COMPONENT 44 49 Connection 8 44 Direct TV Recording 40 Download to equipment 10 23 D sub 15 pin 49 DVB LED 7 15 37 DVB Manual Tuning 31 DVB Profile Edit 29 DVB Settings 26 DVB Signal Condition 31 DVB Timer Programming 36 DVI 41 DVDs 8 16 EPG 14 External equipment 8 16 44 External input 16 35 FAQs 50 51 ...

Отзывы: