30
Advanced
31
Main Menu
VIERA Link
Picture
Sound
Setup
Off
1/3
DVB Timer Programming
DVB Profile Edit
DVB Service List
Q-Link Settings
Child Lock
Tuning Menu
Off Timer
Off
Power on Preference
Teletext
FASTEXT
TV
Access
Setup Menu
OPTION SD CARD
EXIT
INPUT
RETURN
Off
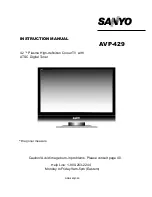
Tuning Menu
Auto Setup
Access
Analogue Programme Edit
Access
DVB Manual Tuning
Analogue Manual Tuning
Access
Add New DVB Services
Access
Access
New Service Message
DVB Signal Condition
Access
On
Tuning Channels
Select “Setup”
3
Select “Tuning Menu”
4
Display the menu
Select a function and set
5
You can re-tune all TV channels when moving house or search for new services which may have recently
started broadcasting.
■
To return to TV
EXIT
2
•
T
uning Channels
Set DVB and
Analogue
channels
automatically
Auto Setup
Off
DVB Signal Condition
DVB Programme
[70] CBBC Channel
0 5 10
Signal Quality
Signal Strength
Selects a channel and checks the DVB signal condition.
Use for adjusting the direction of the aerial.
A good Signal Strength is not an indication of
suitable signal for DVB reception. Please use
the Signal Quality indicator as follows:
Signal Quality:
•
Green bar Good
•
Yellow bar Poor
•
Red bar Bad (Check the aerial)
•
To change the programme
(during the menu appears)
Check
DVB signal
DVB Signal
Condition
access
select
access
select
access
select
1
Select DVB or Analogue
•
“DVB Manual Tuning”, “Add New DVB Services”, “New Service
Message” and “DVB Signal Condition” are available in DVB mode only.
•
“Analogue Programme Edit” and “Analogue Manual Tuning” are
available in Analogue mode only.
Display a
notification
message
New Service
Message
New DVB service found!
Press OK to start Auto Setup.
Press EXIT to lgnore.
Selecting Auto Setup will delete
current Profile and Childlock settings
Selects whether to give a notification message when a new DVB service is found.
(Off / On)
•
Selecting OK (Auto Setup) will delete
current Profile and Childlock settings.
Set DVB
channel
manually
DVB Manual
Tuning
select channel
search
DVB Manual Tuning
Signal Quality
Stopped
0
10
Signal Strength
0
10
Frequency
MHz
[CH21]
474,00
Prog.
Channel
Net ID.
Quality
TS ID.
Service Name
Normally use “Auto Setup” or “Add New DVB Services” to add DVB channels to your service list.
If tuning has not done completely, use this function.
•
All services found will be added to the
DVB Service List (p. 29) automatically.
Add
DVB channel
automatically
Add New
DVB Services
Any new services found will be added to the DVB Service List (p. 29) automatically.
Add New DVB Services
Please wait!
This will take about 3 mins.
21
68
Prog.
Channel
Service Name
Net ID.
TS ID.
Quality
ZDF
ARD
start
•
The new service is added with the current settings
saved as they are.
Set Analogue
channel
manually
Analogue
Manual
Tuning
Programme
1
[CH33]
Analogue Manual Tuning
Manual Tuning 21
68
Set Analogue channel manually after Auto Setup.
If a VCR is connected with only the RF cable, select programme position “0”.
store
search
Search and store
Select the channel
Select the programme position
Auto Setup - Digital and Analogue
This will take about 3 mins.
Analogue Scan
21
68
Digital Scan
21
68
62
Channel
Service Name
Type
Quality
CBBC Channel
DVB
10
62
BBC Radio Wales
DVB
10
62
BBC Radio Cymru
DVB
10
62
E4
DVB
10
62
Cartoon Nwk
DVB
10
29
Analogue
-
33
BBC1
Analogue
-
EXIT
RETURN
Start Auto Setup
All tuning data will be erased
Auto Setup
Start Auto Setup
Settings are made automatically
•
When the operation is completed, the digital service at programme position “1” will be displayed.
If no DVB services are found, the first analogue service will be displayed.
•
If tuning has not done completely “DVB Manual Tuning”, “Analogue Manual Tuning”
Automatically set the DVB and Analogue channels received in the area.
If a Child Lock PIN number (p. 29) has been set, it must be entered.
•
All previous settings are erased.
•
The analogue settings are
downloaded to a Q-Link compatible
equipment connected to the TV.
For Auto Setup, using the buttons on the front of the TV
Press repeatedly until “Auto Setup” appears
Access “Auto Setup”
Start “Auto Setup”
■
To return to TV
Edit
Analogue
channels
■
Delete
■
Add
■
Move
■
Change
name
Analogue
Programme
Edit
3 FTP
23:35
Corontation Street
For info press
Change category
Profile 1
Analogue Programme Edit
1
CH33
2
CH21
3
CH21
4
CH60
5
CH21
1 2 3
X Y Z
F T P
4 5 6
Prog.
Chan.
Name
Analogue Programme Edit
1
CH33
2
CH21
3
CH21
4
CH60
5
CH21
Prog.
Chan.
Name
1 2 3
X Y Z
F T P
4 5 6
■
To change the name of the broadcaster
displayed when selecting channels
Cursor
Select the
“Name” field
Select the
character
Select the channel to edit
Channel
Name
Edit
■
To delete
red
After confirming, press
red
■
To add
green
After confirming, press
green
■
To move
yellow
Select new
position
yellow
Edit the analogue programme position settings
select
Set ( Maximum:
five characters)
red
Enter the
“User input” mode
•
To change channel number
“Analogue Manual Tuning”
RETURN
Store