background image

9

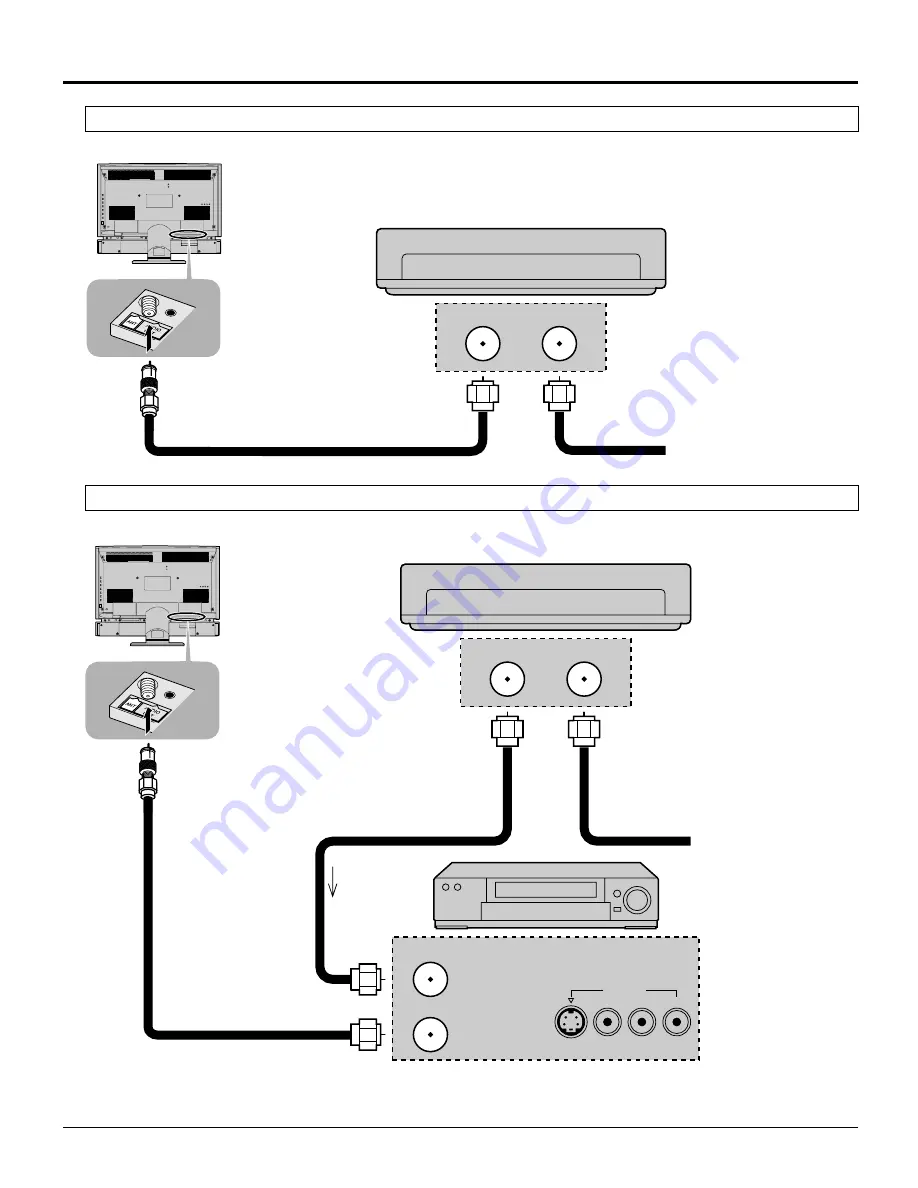
Use this configuration when connecting the TV to a cable TV system using a Cable Box.

Use this configuration when connecting the TV to a cable TV system using a Cable Box and VCR.

Connect the cable from the Output
terminal on the back of the Cable
Box to the ANT terminal on the left
side of the TV.

CABLE BOX

TERMINAL ON THE BACK

OF THE CABLE BOX

Incoming Cable from Antenna
or Cable TV System

OUTPUT

S VIDEO

VIDEO

L-AUDIO-R

Connect the cable from
the Output terminal on the
back of the VCR to the
Antenna input terminal on
the left side of the TV.

Connect the cable from the
Output terminal on the back
of the Cable Box to the
Antenna input terminal on the
back of the VCR.

ANTENNA

TERMINALS ON

THE LEFT SIDE

OF THE TV

VCR

CABLE BOX

TERMINAL ON THE BACK

OF THE CABLE BOX

Incoming Cable from
Antenna or Cable TV
System

OUTPUT

INPUT

OUTPUT

INPUT

TO VCR

Connect the cable from the
antenna or cable system to the
Input terminal on the back of the
CABLE BOX.

ANT OUTPUT

ANT INPUT

Connections

Note: When the antenna cable is connected to the TV antenna terminal via a cable box or VCR, set the TV channel

to CH3 or CH4, cable. This does not apply when signal is input from VIDEO INPUT.

ANTENNA

TERMINAL ON

THE LEFT SIDE

OF THE TV

Antenna Connection (Cable Box, no VCR)

Antenna Connection (Cable Box, and VCR)

Содержание TC15LT1 - 15"WIDE LCD TV

Страница 1: ...erence For assistance please call 1 800 211 PANA 7262 or send e mail to consumerproducts panasonic com or visit us at www panasonic com U S A For assistance please call 787 750 4300 or visit us at www panasonic com Puerto Rico For assistance please call 1 800 561 5505 or visit us at www panasonic ca Canada English POWER TV VIDEO DISPLAY CH VOL MUTE MENU RETURN SLEEP ASPECT ENTER RETUNE TC 15LT1 ...

Страница 2: ...during lightning storms or when it will be left unused for long periods of time This will prevent damage to the receiver due to lightning and power line surges 13 Refer all servicing to qualified service personnel Servicing is required when the apparatus has been damaged in any way such as when the power supply cord or plug is damaged liquid has been spilled or objects have fallen into the apparat...

Страница 3: ...shock or other hazards 21 WARNING TO REDUCE THE RISK OF FIRE OR ELECTRIC SHOCK DO NOT EXPOSE THIS APPARATUS TO RAIN OR MOISTURE 22 CAUTION TO PREVENT ELECTRIC SHOCK DO NOT USE THIS PLUG WITH A RECEPTACLE OR OTHER OUTLET UNLESS THE BLADES CAN BE FULLY INSERTED TO PREVENT BLADE EXPOSURE 23 CAUTION USE WITH OTHER STAND MAY RESULT IN INSTABILITY CAUSING POSSIBLE INJURY 24 CAUTION DANGER OF EXPLOSION I...

Страница 4: ... and if not installed and used in accordance with the instructions may cause harmful interference to radio communications If this equipment does cause or receive interference which can be determined by turning equipment off and on the user is encouraged to try to correct the interference by one of the following measures Reorient or relocate the TV antenna Increase the separation between TV and oth...

Страница 5: ... Connecting the Plug to the Wall Outlet 13 How to Turn the Power On 13 Flow Chart of menu 14 Tuning channels Automatic channel programming 16 Tuning channels Manual channel programming 17 Playing a VCR or other peripheral equipment 18 ASPECT Controls 19 Picture Adjustments 20 Adjusting screen position and size 22 Audio Adjustments 23 Selecting STEREO SAP MONO 24 MUTE 24 Customizing the VIDEO INPUT...

Страница 6: ...tore Before you purchase any cables be sure you know what type of output and input connectors your various components require Also determine the length of cable you ll need For optimum quality picture When the LCD is exposed to light from outdoors or lighting fixtures high contrast pictures may not be displayed clearly Turn off florescent lamps near the LCD and place in a location not exposed to o...

Страница 7: ...ce the tray and slide back the latch until it snaps in place Notes Do not drop apply shock to or step on the remote control Do not spill water on the remote control Do not place objects between the remote control and remote control receiver Do not use remote controls for other equipment at the same time If the TV does not operate even when operating the remote control from a close range it is time...

Страница 8: ...nverter box is required for proper reception Check with your local Cable company for its compatibility requirements Connecting the Antenna Cable to the RF In Terminal UHF Antenna RF in Terminal VHF Antenna Mixer 75 Ohm Coaxial Cable Coaxial Antenna Plug Antenna Connection For proper reception of VHF UHF channels an external antenna is required For best reception an outdoor antenna is recommended A...

Страница 9: ...TV Connect the cable from the Output terminal on the back of the Cable Box to the Antenna input terminal on the back of the VCR ANTENNA TERMINALS ON THE LEFT SIDE OF THE TV VCR CABLE BOX TERMINAL ON THE BACK OF THE CABLE BOX Incoming Cable from Antenna or Cable TV System OUTPUT INPUT OUTPUT INPUT TO VCR Connect the cable from the antenna or cable system to the Input terminal on the back of the CAB...

Страница 10: ...S Video input terminal and the video input terminal are connected at the same time Connections Connects VCRs and other peripheral equipment How to connect the input terminals S VIDEO cable VIDEO AUDIO S VIDEO VIDEO R AUDIO L VIDEO AUDIO Connect the S VIDEO or VIDEO Terminal AUDIO OUT COMPONENT VIDEO IN VIDEO Y Pb Pr R AUDIO L VIDEO IN Super VHS VCR DVD STB Audio OUT R L S Video OUT Video OUT Audio...

Страница 11: ...output signals from the AUDIO OUT terminals How to connect the AUDIO OUT Terminals AUDIO IN L R AUDIO OUT COMPONENT VIDEO IN VIDEO Y Pb Pr R AUDIO L ANT Optional M3 plug Connect headphones earphones as follows Connecting Headphones Earphones Use Volume Up or Down button to control volume level Amplifier to speaker system Connections ...

Страница 12: ...gged into the wall outlet and then turned on at the Main POWER switch Direct program number selection buttons Moves cursor to the right during menu mode TV VIDEO button The input mode changes each time this button is pressed See page 18 MENU ADJUST PICTURE AUDIO PICTURE ADJUST POSITION SIZE AUDIO ADJUST SET UP POWER TV VIDEO DISPLAY CH VOL MUTE MENU RETURN SLEEP ASPECT ENTER R TUNE ENTER 30 60 0 9...

Страница 13: ...VIDEO DISPLAY CH VOL MUTE R TUNE POWER POWER 2 2 1 3 S VIDEO VIDEO R AUDIO L DC IN 15V VIDEO IN Connecting the Plug to the Wall Outlet Note The TV and AC adaptor will still consume some power as long as the power cord is still inserted into the wall outlet Turn the power of the TV set off by pressing the POWER switch on the TV when the TV is on or in standby mode Example The screen below is displa...

Страница 14: ...yed If the MENU button is pressed once more the MENU screen will be cleared 1 2 Select desired MENU by pushing Right button or Left button MENU ADJUST PICTURE AUDIO PICTURE ADJUST POSITION SIZE AUDIO ADJUST SET UP ENTER MENU ADJUST SET UP PROGRAM CH LOCK CLOSED CAPTION INPUT LABEL OTHER ADJUST TV VIDEO DISPLAY CH VOL MUTE RETURN SLEEP R TUNE POWER MENU ENTER ASPECT MENU ENTER MENU ADJUST PICTURE A...

Страница 15: ...PONENT CHANGE SETTING LOCK MOTION PICT OFF ON CHANGE SETTING TV PARENTAL OFF ON ENTER CODE FIRST CLOSED CAPTION MODE C1 OTHER ADJUST NATURL CLR VIDEO NR 3D Y C ID 1 IMAGE ADJ 1 2 OFF ON OFF ON OFF ON OFF ON Press to select each item Press to adjust the screen that is displayed TO PICTURE ADJUST menu TO POSITION SIZE TO AUDIO ADJUST menu TO INPUT LABEL selection screen TO LOCK selection screen TO C...

Страница 16: ... YES Press to select NO If YES selection Press to run AUTO PROGRAM Press the MENU button to display the MENU screen and select SET UP ENTER ENTER ENTER ENTER 6 Channels will automatically advance until all channels have been scanned Channel numbers with a video signal present will turn light blue indicating it has been stored in the Channel Scan Memory Press the RETURN button to return to the PROG...

Страница 17: ...een Selecting the PROGRAM CHANNELS menu Adding or deleting channels Press to select channel or number keys 3 4 Press to add channels to memory Channel number turns blue Press to delete channels from memory Channel number turns yellow Refer to previous page Tuning channels step 1 to 3 2 ENTER 5 6 Repeat steps 3 and 4 to continue adding or deleting channels Press the MENU button to exit the set up m...

Страница 18: ... Turning the power on and switching input modes This equipment can also be connected to the rear terminals See Connections for details Note When the remote control is unavailable input modes can also be switched on the TV set using the TV VIDEO button TV VIDEO COMPONEMT Video camera DISPLAY CH VOL MUTE MENU RETURN SLEEP ASPECT ENTER R TUNE TV VIDEO POWER Turn the TV on 1 POWER TV VIDEO To S video ...

Страница 19: ... FULL will display the picture at its maximum size but with slight elongation JUST mode will display a 4 3 picture at maximum size but with aspect correction applied to the center of the screen so that elongation is only apparent at the left and right edges of the screen The size of the picture will depend on the original signal NORMAL 3 4 ZOOM 4 3 FULL 4 3 JUST 4 3 Picture Note The ASPECT mode se...

Страница 20: ...esired level by looking at the picture behind the menu ENTER ENTER See next page MENU ADJUST PICTURE AUDIO PICTURE ADJUST POSITION SIZE AUDIO ADJUST SET UP COOL COOL PICTURE ADJUST NORMAL PIC MODE BACK LIGHT PICTURE BRIGHTNESS COLOR TINT SHARPNESS AI PICTURE 5 0 0 0 0 0 OFF ON STANDARD Press the left or right button to switch between modes STANDARD Displays unaltered image CINEMA Ideal for movies ...

Страница 21: ... viewing of dark pictures such as night scenes or a hair portion COLOR Adjusts slightly to a lighter color TINT Adjust for flesh tone color SHARPNESS Displays a sharp image AI PICTURE Displays black and white colors more clearly when turned ON Picture Adjustments ENTER To adjust each item Select NORMALIZE with the up and down buttons Press ENTER Press MENU button To return to normal viewing To res...

Страница 22: ...LL mode Display in NORMAL mode to view the original image intended by the producer The adjusted setting will remain even when the TV is turned off 1 2 ASPECT MENU Press to display the MENU screen Press to select ADJUST menu ENTER To return to standard Press ENTER To end adjustments Press MENU RETURN MUTE RETURN SLEEP MENU ENTER ASPECT MENU ADJUST PICTURE AUDIO PICTURE ADJUST POSITION SIZE AUDIO AD...

Страница 23: ...ND to ON when stereo is playing Selecting STEREO SAP MONO See Next page MENU Press to end ENTER To reset to standard setting MENU ADJUST PICTURE AUDIO PICTURE ADJUST POSITION SIZE AUDIO ADJUST SET UP AUTO Automatically adjusts quiet sound and loud sound for ease of listening STANDARD Emits the original sound DYNAMIC Gives contrast to sound MUSIC 1 For programs consisting mainly of music Enhances h...

Страница 24: ...used for bilingual audio MONO Use when stereo signal is weak TV VIDEO DISPLAY CH VOL MENU RETURN SLEEP ASPECT ENTER R TUNE POWER MUTE MUTE Press this button to mute the sound Press again to reactivate sound Sound is also reactivated when power is turned off or volume level is changed MUTE AUDIO ADJUST NORMAL MODE BASS TREBLE BALANCE SURROUND STEREO SAP MONO AUTO ON 0 0 0 Useful when answering the ...

Страница 25: ...UT can be changed to match with the connected device VCR DVD Player Example When changing VIDEO to LD 1 2 Press to select INPUT LABEL Press to display the VIDEO INPUT LABEL screen ENTER ENTER Press to change By pressing this button display changes as follows Press to end VIDEO or COMPONENT VCR LD BLANK DTV DVD GAME This button rotates in reverse ENTER ENTER MENU INPUT LABEL VIDEO COMPONENT VIDEO C...

Страница 26: ...le of selecting the U S ratings that are indicated in this manual 1 Input code Enter any 4 digit number as a password These numbers will be needed when deactivating the LOCK function 2 Selecting broadcasts to lock Press to select CHANGE SETTING the menu following MOTION PICT Press to display the MOTION PICT RATING screen TV VIDEO DISPLAY CH VOL MUTE SLEEP R TUNE POWER MENU ENTER ASPECT RETURN MENU...

Страница 27: ...tting MOTION PICT Locking and unlocking the ratings selected above Lock Feature Rating turns red when on G General audience PG Parental guidance suggested PG 13 Parental guidance needed under 13 years old R Restricted NC17 No one under 17 is admitted X Pornography Press to select YES or NO Press to set ENTER ENTER RETURN MENU ENTER VIEW NR PROGRAMS MOTION PICT RATING NO YES G PG PG 13 R NC 17 X CH...

Страница 28: ...GE SETTING the menu following TV PARENTAL Press to display the TV PARENTAL GUIDE screen Setting the TV PARENTAL GUIDE screen VIEW NR PROGRAMS NO Cannot view programs with NR signals YES Can view programs with NR signal SETTING BASIC The up and down buttons change the selected title DETAILED The cursor selecting the title can be moved to select options displayed on the right The down button moves t...

Страница 29: ... OFF CAPTION C1 CAPTION C2 Press to select CC MODE Press to select from the following Recommended mode when Closed Caption is not being used For video related information that can be displayed up to 4 lines of script strategically placed on the television screen so that it does not obstruct relevant parts of the picture Another mode used for video related information CC Mode Activates the On Scree...

Страница 30: ... ID 1 IMAGE ADJ OFF ON OFF ON OFF ON OFF ON 1 2 This feature allows you to set a natural color for the picture Natural Color MENU ADJUST SET UP PROGRAM CH LOCK CLOSED CAPTION INPUT LABEL OTHER ADJUST Adjusting unnatural video images 3D Y C FILTER Note Not available for COMPONENT VIDEO Press to select OTHER ADJUST Press to display the OTHERADJUST screen Press the MENU button to display the MENU scr...

Страница 31: ...ate properly Press to select ID 1 Image Detection Press to set ENTER MENU ADJUST SET UP PROGRAM CH LOCK CLOSED CAPTION INPUT LABEL OTHER ADJUST OTHER ADJUST NATURL CLR VIDEO NR 3D Y C ID 1 IMAGE ADJ OFF ON OFF ON OFF ON OFF ON 1 2 ID 1 OFF ON Press the MENU button to display the MENU screen and select SET UP Press to select OTHER ADJUST Press to display the OTHER ADJUST screen Press to end Press t...

Страница 32: ...s to select IMAGE ADJ Press to select 2 or Press to select 1 ENTER Press to select OTHER ADJUST Press to display the OTHER ADJUST screen ENTER 2 To eliminate noise at the top and bottom of the screen IMAGE ADJ MENU ADJUST SET UP PROGRAM CH LOCK CLOSED CAPTION INPUT LABEL OTHER ADJUST OTHER ADJUST NATURL CLR VIDEO NR 3D Y C ID 1 IMAGE ADJ OFF ON OFF ON OFF ON OFF ON 1 2 Example Example Select 1 Sel...

Страница 33: ...ther remote control Is there deterioration breakage or disconnection of the antenna or antenna wire Is the antenna wire connected correctly Is the system affected by radio wave interference or induced electromagnetic waves by external sources automobiles or trains high voltage wires neon motors magnetized steel frame or iron rain shutters etc Turn off the power supply and try changing the equipmen...

Страница 34: ... or Normal The main unit radiates heat so some parts of the console reach a high temperature This is not a problem for performance or quality Set up at a location with good ventilation Do not cover the ventilation holes of the console with a tablecloth etc and do not place on top of other equipment like a video deck Page 10 11 19 22 CAUTION If water or similar substances get inside the monitor via...

Страница 35: ...CAPTION V Chip N2QAFC000006 Battery CR2025 1 AC Adaptor N0JZHK000003 AC Cord K2CA2EA00005 Temperature 41 F 95 F 5 C 35 C Humidity 5 90 RH non condensing RCA PIN Type 1 1 0 Vp p 75 Ω Mini DIN 4 pin 1 Y 1 Vp p 75 Ω C 0 286 Vp p 75 Ω RCA PIN Type 2 1 0 Vp p 75 Ω D Type Connecter 1 Y Pb Pr RCA PIN Type 2 0 5 Vrms M 3 Stereo Jack 1 0 5 Vrms 16 26 413 mm 12 99 330 mm 7 09 180 mm 16 26 413 mm 11 61 295 m...

Страница 36: ... event of theft or loss and for Warranty Service purposes Model Number Serial Number Panasonic Consumer Electronics Company Division of Matsushita Electric Corporation of America One Panasonic Way Secaucus New Jersey 07094 Panasonic Sales Company Division of Matsushita Electric of Puerto Rico Inc PSC Ave 65 de Infanteria Km 9 5 San Gabriel Industrial Park Carolina Puerto Rico 00985 Printed in Japa...

Отзывы: