background image

36

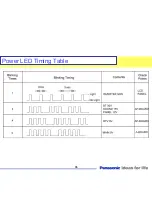
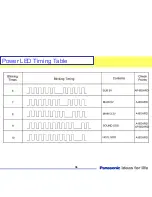
Power LED Timing Table

Содержание TC-32LX85 Operating Manual (English

Страница 1: ...Panasonic Service and Technology Company National Training TC 32LX70 700 TC37LZ85 and TC 32LX85 LCD Display Television Technical Guide ...

Страница 2: ...ise non technical individuals of potential dangers in attempting to service a product Products powered by electricity should be serviced or repaired only by experienced professional technicians Any attempt to service or repair the product or products dealt with in this service information by anyone else could result in serious injury or death Copyright 2008 by Panasonic Services Company All rights...

Страница 3: ...17 Troubleshooting Signal Problems 49 Standby Operation 19 Picture NG and Sound OK LX700 LX70 50 SUB Voltages and Over voltage Protection 21 Picture OK and Sound NG LX700 LX70 51 Main Voltages and Over voltage Protection 22 Picture NG and Sound NG LX700 LX70 52 Inverter_On Command and Protection 23 No Picture from TV Reception 53 Video Process Block Diagram 25 No Picture 54 Audio Process Block Dia...

Страница 4: ...n 80 SOS and Power LED Indication 81 Power LED Blinks 1 Time 82 Power LED Blinks 3 Times 83 Power LED Blinks 4 or 5 Times 84 Power LED Blinks 6 or 7 Times 85 Power LED Blinks 8 or 9 Times 86 Power LED Blinks 1 Time TC 32LX85 87 Power LED Blinks 3 Times TC 32LX85 88 Power LED Blinks 4 or 5 Times TC 32LX85 89 Power LED Blinks 6 or 7 Times TC 32LX85 90 Power LED Blinks 8 or 9 Times TC 32LX85 91 Pictu...

Страница 5: ... Layout 3 Power supply Standby Power on 4 Troubleshooting 5 SOS Circuit 6 Video Audio Processing Circuit 7 Panel Drive Circuit 8 Service Man Mode 9 Self Check 10 Reset 11 Adjustments 12 Service Information for 2008 models Topics 5 ...

Страница 6: ...Purposely Left Blank Purposely left blank 6 ...

Страница 7: ...d m2 Display Capability 1080p 1080i 720p 480P Y Y Motion Picture Pro Y AUDIO Speakers Slim squawker x 2 woofer x 2 L R Full range x 2 L R Audio Output 20 W 10 THD 20 W 10 THD JACKS Integrated ATSC Tuner Y Y SD Memory Card Slot Y SDHC Compatible HDMI Input 2 2 Composite Video Input 3 1 side 3 1 side S Video Input 2 2 Component Video Input Y PB PR 1 1 Monitor Output 1 1 Digital Audio Output 1 1 Head...

Страница 8: ...SP V HDMI KEY Control P C B Layout LX700 P C B Layout LX700 Differences from LX600 GS board for SD card slot is added The inverter PCB of the LX700 is visible AP P A SP DT SP V HDMI KEY Control INV SP SP G 32LX700 GS SP G SP 8 ...

Страница 9: ...32 26LX60 AP P A SP DT SP V HDMI KEY Control 32 26LX70 P C B Layout LX70 P C B Layout LX70 AP P A SP DT SP V HDMI KEY Control G G Differences from LX60 Board structure is almost same 9 ...

Страница 10: ...P C B Layout LX700 Pictorial P C B Layout LX700 Pictorial 10 P Board AP Board DT Board G Board GS Board A Board Inverter PCB V Board Key Control ...

Страница 11: ...P C B Layout LX700 Connectors P C B Layout LX700 Connectors 11 GS8 A7 G4 A8 A5 A6 P5 P6 P3 CN1 CN501 A9 AP4 A4 AP3 A3 To Panel CCFLTs ...

Страница 12: ...P C B Layout LX700 LVDS Connector P C B Layout LX700 LVDS Connector A2 LVDS Connector Remove the 4 Screws and the metal plate to expose the LVDS Connector A2 LVDS Connector 12 ...

Страница 13: ...rd DC DC Power Switch TNPA4155ABS DT Board Digital Tuner Exchange Only TNAG172S G Board Video 3 Headphone Jack TNPA4266S GS Board SD Card Slot TNPA4206S V Board Remote Receiver LED TNPA4152ADS P Board Power AC DC Exchange Only TZRXN010MRR Control Panel ASSY Control Button Non Serviceable Control Panel Assembly should be exchanged for service K0RB00600004 13 ...

Страница 14: ...ed for Motion Picture Pro 3 HQ1L and LVDS TX are used to convert the picture frames from 60 to 120 This process helps to reduce after images 4 The DT board of the 32LX700 provides Channel Data output only The MPEG2 and AC3 Peaks Lite2 decoders are now part of the A board VCTP HDMI CEC FPGA A ATSC DT AUDIO SWITCH LX700 LX70 Peaks Lite2 HDMI CEC HQ1L A ATSC DT VIDEO SWITCH AUDIO SWITCH LVDS TX 32LX7...

Страница 15: ...P Board P Board Main Power Board Main Power Board 15 T801 D821 ...

Страница 16: ...o the LCD panel for conversion into 24Vdc The output of the 24V generator passes through the P board and enters the AP board for conversion into SUB_5V DTV9V SUB_9V and HQ3 3V If the power button main unit or remote control is not pressed within 25 seconds after applying AC to the unit the SUB_ON command goes low to disengage the power relay When the power button is pressed the SUB_ON command goes...

Страница 17: ...Main MPU Power On Commands Main MPU Power On Commands 17 ...

Страница 18: ...to the P board to provide a ground connection for relay RL802 of the power supply board On the AP board The TV_SUB_ON command is used to turn on a circuit not shown in the diagram on the A board that provides STB_5V to relay RL802 As a result the switch of relay RL802 on the P board closes to allow the output of 105Vdc to the LCD panel The TV_Main_ON signal issued by IC1100 appears on pin 6 of con...

Страница 19: ...Standby Operation Standby Operation 19 ...

Страница 20: ... the inverter circuit of the LCD panel to produce the 120Vac that powers the backlight CCFLTs The same 24V passes through the P board and enters the AP board for conversion into other voltages The over voltage protection circuitry affiliated with each of the regulators located on the AP board monitors for over voltage conditions It is designed to turn off the AC power by disabling the SUB_ON comma...

Страница 21: ...or Q7208 into operation causing its collector to become low The low at the collector of Q7208 causes the transistors Q7226 Q7227 and Q7450 to turn off As a result IC7205 IC7209 and IC7233 go into operation to immediately provide the Sub_5V DT9V BT30V and HQ 3 3V output The over voltage protection circuitry affiliated with each of the regulators monitors for excessive current and over voltage condi...

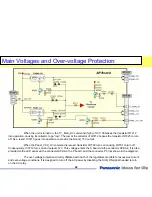
Страница 22: ...15V output When the Panel_VCC_On command is issued transistor Q7702 turns on causing Q7701 to turn off Consequently IC7212 turns on and outputs 12V This voltage enters the A board via the connector AP4 A4 It is also provided to the LCD panel via the connector AP2 A2 the P board and the connector P5 not shown in the diagram The over voltage protection circuitry affiliated with each of the regulator...

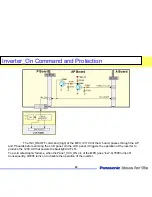
Страница 23: ...ses through the AP and P boards before entering the LCD panel On the LCD panel it triggers the operation of the inverter to produce the 120V AC that powers the backlight CCFLTs To avoid catastrophic failures when the Panel_VCC_ON pin of the MPU goes low Q7805 turns off Consequently Q7806 turns on to disable the operation of the inverter ...

Страница 24: ...Purposely Left Blank Purposely left blank ...

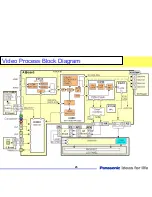
Страница 25: ...Video Process Block Diagram Video Process Block Diagram 25 ...

Страница 26: ... reception of the tuner is output in the form of a transport stream CHODATA The transport stream enters the DTV I F Interface section of IC8001 where the video signal is extracted and converted to YUV data The output is provided to the Video Input switch for selection The JPEG data of the GS board enters the JPEG I F section of IC8001 for conversion into YUV data and output to the video switch The...

Страница 27: ...Audio Process Block Diagram Audio Process Block Diagram 27 ...

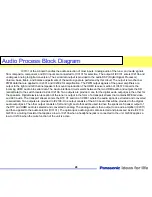
Страница 28: ... outputs the SD serial Data to the switch located inside IC2106 Two outputs are provided one for the digital audio output jack the other for the speakers Digital television reception of the tuner is output in the form of a transport stream that contains MPEG2 video and AC3 audio The transport stream enters the DTV I F section of IC8001 where the audio signal is extracted and converted to serial da...

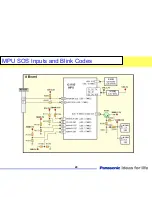
Страница 29: ...MPU SOS Inputs and Blink Codes MPU SOS Inputs and Blink Codes 29 ...

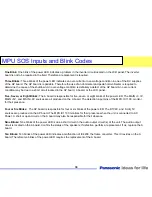
Страница 30: ...e for five seven or eight blinks of the power LED The MAIN 3 3V MAIN 5V and MAIN 9V sources are all produced on the A board The detection input pins of the MPU IC1100 monitor for their presence Four or Six Blinks The AP board is responsible for four or six blinks of the power LED The DTV9V and SUB_5V sources are produced on the AP board The MPU IC1100 monitors for their presence when the unit is c...

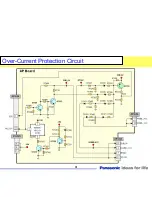
Страница 31: ...Over Over Current Protection Circuit Current Protection Circuit 31 ...

Страница 32: ...ard During standby operation the 24 volt output of the P board biases the transistor Q7208 into conduction causing its collector to become low The low at the collector of Q7208 causes the transistors Q7450 to turn off As a result IC7233 goes into conduction to immediately provide the HQ 3 3V output When the 24 drops below the reverse breakdown voltage of D7206 transistor Q7208 turns off and transi...

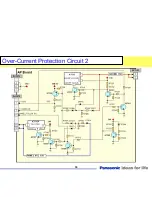
Страница 33: ...Over Over Current Protection Circuit 2 Current Protection Circuit 2 33 ...

Страница 34: ...CC Protection During normal operation the 24 volt output of the P board biases the transistor Q7208 into conduction causing its collector to become low The low at the collector of Q7208 causes the transistor Q7508 to turn off When the PANEL_VCC_ON command high is issued Q7702 turns on Consequently Q7701 turns off and IC7212 goes into conduction to provide the PANEL_12V output When the 24 drops bel...

Страница 35: ...35 Power LED Timing Table ...

Страница 36: ...36 Power LED Timing Table ...

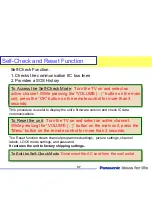
Страница 37: ...tlet To Exit the Self Check Mode Disconnect the AC cord from the wall outlet This procedure is useful to display the unit s firmware version and check IC data communications 37 Self Check and Reset Function To Reset the unit Turn the TV on and select an active channel While pressing the VOLUME button on the main unit press the Menu button on the remote control for more than 3 seconds To Reset the ...

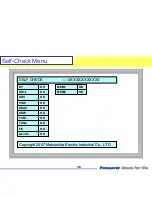
Страница 38: ...38 SELF CHECK XXXXXX XXXXXX DT OK HQ1L OK ADV OK VSW OK ADAV OK ASW OK TUN1 OK TUN2 OK FE OK GenX4 OK MEM1 OK MEM2 OK Copyright 2007 Matsushita Electric Industrial Co LTD Self Check Menu ...

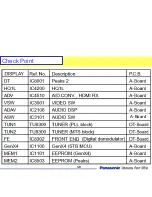
Страница 39: ...39 Check Point A Board ...

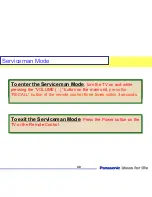
Страница 40: ... seconds To enter the Serviceman Mode turn the TV on and while pressing the VOLUME button on the main unit press the RECALL button of the remote control three times within 3 seconds To exit the Serviceman Mode Press the Power button on the TV or the Remote Control To exit the Serviceman Mode Press the Power button on the TV or the Remote Control 40 Serviceman Mode ...

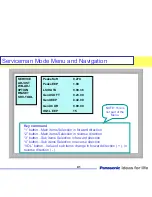
Страница 41: ...DJUST WB ADJ 0PTION RM SET SRV TOOL Key command 1 button Main items Selection in forward direction 2 button Main items Selection in reverse direction 3 button Sub items Selection in forward direction 4 button Sub items Selection in reverse direction VOL button Value of sub items change in forward direction in reverse direction NOTE This is not part of the Menu ...

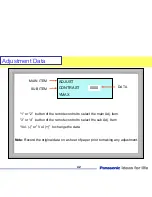
Страница 42: ...mote control to select the main Adj item 3 or 4 button of the remote control to select the sub Adj Item Vol or Vol to change the data Note Record the original data on a sheet of paper prior to making any adjustment MAIN ITEM SUB ITEM DATA Adjustment Data ...

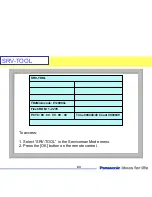
Страница 43: ... TOOL 43 SRV TOOL TD2Microcode 81c0000e Flash ROM 1 227E PCTC 00 00 00 00 00 Time 000040 40 Count 0000049 To access 1 Select SRV TOOL in the Serviceman Mode menu 2 Press the OK button on the remote control ...

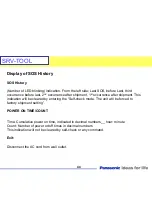
Страница 44: ...ence after shipment This indication will be cleared by entering the Self check mode The unit will be forced to factory shipment setting POWER ON TIME COUNT Time Cumulative power on time indicated in decimal numbers__ hour minute Count Number of power on off times in decimal numbers This indication will not be cleared by self check or any command Exit Disconnect the AC cord from wall outlet ...

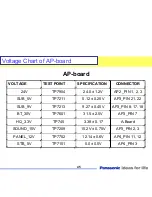
Страница 45: ...1 2V AP2 _PIN 1 2 3 SUB_5V TP7211 5 12 0 25V AP3_PIN 21 22 SUB_9V TP7213 9 27 0 45V AP3_PIN 8 17 18 BT_30V TP7601 31 5 2 5V AP3_PIN 7 HQ_3 3V TP745 3 38 0 17 A Board SOUND_15V TP7209 15 2V 0 75V AP3_PIN 2 3 PANEL_12V TP7702 12 14 0 6V AP4_PIN 11 12 STB_5V TP7151 5 0 0 5V AP4_PIN 3 AP board ...

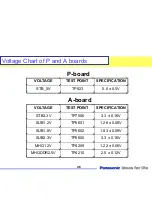
Страница 46: ...T POINT SPECIFICATION STB3 3V TP7006 3 3 0 16V SUB1 2V TP5601 1 26 0 06V SUB1 8V TP5602 1 83 0 09V SUB3 3V TP5600 3 3 0 16V MHQ1 2V TP4209 1 22 0 06V MHQDDR2 5V TP4210 2 5 0 12V VOLTAGE TEST POINT SPECIFICATION STB_5V TP823 5 0 0 5V P board A board ...

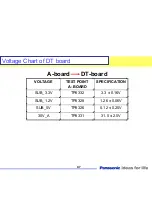
Страница 47: ...Voltage Chart of DT board 47 VOLTAGE TEST POINT A BOARD SPECIFICATION SUB_3 3V TP8332 3 3 0 16V SUB_1 2V TP8328 1 26 0 06V SUB_5V TP8326 5 12 0 25V 30V_A TP8331 31 5 2 5V A board DT board ...

Страница 48: ...Purposely Left Blank Purposely left blank ...

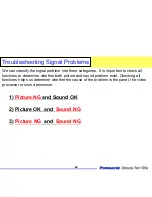
Страница 49: ...Picture NG and Sound NG 1 2 3 49 We can classify the signal problem into three categories It is important to check all functions to determine whether both picture and sound problem exist Checking all functions helps us determine whether the cause of the problem is the panel the video processor or sound processor ...

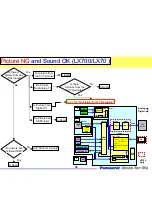
Страница 50: ... picture from the AV Terminal No Yes See slide No Picture from TV Reception No Picture from Analog TV Is there a picture from the AV Terminals A Board LCD Panel VIDEO SWITCH IC3001 STB MCU IC1100 LVDS TX IC4207 HQ1L IC8001 FRON T END TU8300 IC8302 IC4510 IC4200 DTV VIDEO PROCESS SW PROCES S SCALING A D LX700 Only IP CONVER TER PICTURE CORRECT OSD LVDS A Analog Digital G DT Monitor Out AV1 GS AV2 C...

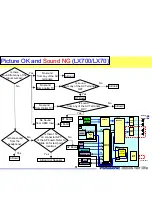
Страница 51: ...als OK A Board Is there sound from the headphone A Board No A Board or Speaker AUDIO SWITCH IC3101 STB MCU IC1100 IC8001 IC451 0 DTV AUDIO PROCESS L R AUDIO AMP AUDIO AMP IC2301 IC2302 LX700 Only G AV3 HEADPHONE FRON T END TU8300 COMPONEN T HP AMP L R L R L R L R L R Peaks Lite2 Audio DSP HDMI I F Analog Digital A DT TUNER HDMI1 HDMI2 MONITOR OUT AV1 IC2106 G AV2 IC830 2 51 Is there 15V on connect...

Страница 52: ...100 LVDS TX IC4207 HQ1L IC8001 FRON T END TU8300 TU8302 IC4510 IC4200 DTV VIDEO PROCESS SW PROCES S SCALING A D LX700 Only IP CONVER TER PICTURE CORRECT OSD LVDS A Analog Digital G DT Monitor Out AV1 GS AV2 COMPONENT AV3 HDMI1 HDMI 2 TUNE R HDMI I F Line where problem might occur AUDIO SWITCH IC3101 STB MCU IC1100 IC8001 IC451 0 DTV AUDIO PROCESS L R AUDIO AMP AUDIO AMP IC2301 IC2302 LX700 Only G ...

Страница 53: ...epair the DTV9V DC DC converter Yes Are DTV 9V And SUB 5V OK Replace defective Regulator and biasing components Reference the power distribution diagram on Slide 21 No Yes Is there video from any of the inputs Replace the A board No Replace the DT board Yes See the troubleshooting flowchart for No picture No Are SUB_3 3V and SUB_1 2V present on the A board Refer to Slide 46 for test point location...

Страница 54: ...hode of D7601 should measure 30V If not repair the DTV9V DC DC converter Yes Are DTV 9V And SUB 5V OK Replace defective Regulator and biasing components Reference the power distribution diagram on Slide 21 No Yes Is there picture from any of the inputs Are SUB_3 3V SUB_1 2V OK Replace the A board No Replace the DT board Yes See the troubleshooting flowchart for No picture No No Picture 54 ...

Страница 55: ...UB5V sources on connector AP3 of the AP board Refer to Slide 45 for test point locations Check the video input connections and termination points for a possible cold solder joint or connection problem Does any input work Replace the A Board Continued on next page Replace defective Regulator and biasing components Refer the power distribution diagram on Slide 21 Yes No Video Dark Blue Screen 55 ...

Страница 56: ...te From where it sits on the A board in order to access the LVDS connector There are four screws that need to be removed See slide 12 Confirm the connection of the LVDS Connector CN A2 Replace the A board Yes No Video Dark Blue Screen Continued 56 Problem Solved No ...

Страница 57: ...er Audio inputs OK Check the L R speaker output connection Reseat connector A5 and A6 Yes Try using a different audio input source Try the Tuner Component S Video or HDMI input Is the Audio ok Change the A board Problem Solved No Audio 57 A Board Change the A Board Is there 15V on pins 2 3 of connector AP3 A3 Check regulator IC7215 and biasing component on the AP Board Replace if defective Yes No ...

Страница 58: ...45 Slide 45 Check for 4 5V on pin 15 of connector AP2 RELAY Check for STBY 5V on pin 16 of connector AP2 5V Present Yes 4 5V Present The Main_SW_Detect signal on Pin 7 of connector AP4 should go low when the Main Power switch is depressed Pin 7 low Replace the AP board No No Yes Replace the P Board No No No Power 58 Is there 105Vdc between pins 1 and 3 of CN P3 Replace the LCD Panel No Is there 24...

Страница 59: ...lem solved From Last Page Make sure connector A4 of the A board is seated properly Unit will exhibit this condition if the connector is unplugged Does the unit come on No Yes Replace the A board No Power 59 ...

Страница 60: ...ne Time INV_SOS 60 Does pin 4 of CN P5 go high before shutdown Yes Replace the LCD panel Change the A board Power LED blinks once Is connector P5 properly seated Yes Connect connector P5 No Turn the unit on Does the unit Power up Yes Problem solved No No ...

Страница 61: ... Yes Check and replace if necessary IC7209 its biasing components and load No Does the cathode of D7220 go low Yes Check and replace if necessary IC7209 its biasing components and load Perform the same procedure for IC7233 No Does the cathode of D7469 go low Yes Check and replace if necessary IC7215 its biasing components and load No Does the cathode of D7472 go low Yes Check and replace if necess...

Страница 62: ... No Turn the unit on Does the unit Power up Yes Problem solved Is there 24V at Pin 1 of CN P6 No Yes Is there 105Vdc between pins 1 and 3 of CN P3 Replace the P board Replace the LCD Panel No Yes Is DTV9V and SUB_5V present on the AP board Refer to slide for test point Yes Replace the AP board Conduct all voltage checks before shutdown Replace the A board No ...

Страница 63: ...2008 LCD Television Models TC 37LZ85U TC32LX85 LCD Display Television Technical Guide 63 ...

Страница 64: ...fortable TVs Life 178 Wide Viewing Angle with IPS Alpha Panel 10 000 1 High Contrast with Intelligent Scene Controller x v Color Deep Color HDMI 1 3 Built in SD Memory Card Slot with HD Photo Viewer Gallery Player read VIERA Link PC Input Horizontal Arch Design 3 37 Class LCD HDTV Measured Diagonally TC 37LZ85 37 ...

Страница 65: ... Inverter AP P LCD Panel LCD Panel Inverter A Inverter Inverter H P DG H and DG boards are integrated to A board Notice New The H and DG board are integrated to A board of the 2008 model Therefore the Input switch system control and signal processing are performed by the A board The AP board is merged with the P board ...

Страница 66: ...6 V 2007 Model ex 32LX70 series 2008 Model ex 32LX85 series New V Inverter AP P P LCD Panel LCD Panel Inverter A Inverter Inverter A AP board is now merged with the P board Notice The A P and V boards are the only printed circuit boards used in the 2008 models ...

Страница 67: ...lock Diagram 67 The A board is responsible for video input selection video processing and audio processing The LVDS output signal is provided to the LCD panel for display and the audio signal to the speakers headphone jack and optical output jack ...

Страница 68: ...85 Signal Circuit Block Diagram 68 The A board is responsible for video input selection video processing and audio processing The LVDS output signal is provided to the LCD panel for display and the audio signal to the speakers headphone jack and optical output jack ...

Страница 69: ...TC37LZ85 Signal Circuit Block Diagram TC37LZ85 Signal Circuit Block Diagram 69 ...

Страница 70: ...DATA The transport stream enters the DTV I F Interface section of IC8001 where the video signal is extracted and converted to YUV data The JPEG data of the GS board enters the JPEG I F section of IC8001 for conversion into YUV data The internal video selector of IC8001 not shown in the diagram selects and outputs the desired picture data to the Video Process circuit The Video Process section of th...

Страница 71: ...TC32LX85 Signal Circuit Block Diagram TC32LX85 Signal Circuit Block Diagram 71 ...

Страница 72: ...er is output in the form of a transport stream CHODATA The transport stream enters the DTV decoder section of IC8001 where the video signal is extracted and converted to YUV data The JPEG data of the GS board enters the SD IF section of IC8001 for conversion into YUV data The internal video selector of IC8001 not shown in the diagram selects and outputs the desired picture data to the Video Proces...

Страница 73: ...TC37LZ85 Audio Circuit Block Diagram TC37LZ85 Audio Circuit Block Diagram 73 ...

Страница 74: ...ransport stream that contains MPEG2 video and AC3 audio The transport stream enters the DTV decoder section of IC8001 where the audio signal is extracted and converted to serial data The DTV audio data is output to the audio DSP Digital Signal Processor IC2106 for processing The DSP IC2106 provides three audio outputs One output is either AC3 or PWM audio connected to the digital audio output jack...

Страница 75: ...TC32LX85 Audio Circuit Block Diagram TC32LX85 Audio Circuit Block Diagram 75 ...

Страница 76: ...MPEG2 video and AC3 audio The transport stream enters the DTV decoder section of IC8001 where the audio signal is extracted and converted to serial data The DTV audio data is then output to IC4003 for processing IC4003 provides three audio outputs One output is either AC3 or PWM audio connected to the digital audio output jack A second output is analog audio provided to IC4002 for amplification an...

Страница 77: ...Power Supply Overview Power Supply Overview 77 ...

Страница 78: ...TC TC 37LZ85 Power Supply Description 37LZ85 Power Supply Description 78 ...

Страница 79: ... is not pressed within 15 seconds after applying AC to the unit the SUB_ON command goes low to disengage the power relay As a result only STB 5V is output to power the system control circuit of the a board When the power button is pressed the SUB_ON command goes high to repeat the same operation The voltages remain present until the unit is turned off The MCU also provides the Panel_ON command to ...

Страница 80: ...Self Self Check and Reset Function Check and Reset Function 80 ...

Страница 81: ...SOS and Power LED Indication SOS and Power LED Indication 81 ...

Страница 82: ...toggle low after the backlights of the LCD panel turn on If the backlights do not come on or pin 4 of CN P2 does not toggle low Reseat the connectors A4 P6 and P2 Confirm the presence of 370Vdc at pin 1 of connector P5 and 12V at pin 1 of connector P2 before replacing the LCD panel ...

Страница 83: ...urrent condition is detected On the power supply board locate the test points for the SUB9V SOUND17V and BT30V Using an ohmmeter determine if there is a short between each of the test point and ground If a test point is shorted disconnect the connector P7 or A3 to isolate the short to either the A or P board ...

Страница 84: ...d the MCU shuts down the unit and blinks the Power LED Reseat the connectors P7 and A3 and turn on the unit If the shutdown persists use a voltmeter to measure the voltage If it is present replace the A board If it is absent use an ohmmeter to determine if there is a short to ground When a short is detected disconnect the connector P7 or A3 to isolate the short to either the A or P board ...

Страница 85: ...s the Power LED Reseat the connectors P7 and A3 and turn on the unit If the shutdown persists use a voltmeter to measure the voltage If it is present replace the A board If it is absent use an ohmmeter to determine if there is a short to ground When a short is detected disconnect the connector P7 or A3 to narrow it to the A or P board A seven blinks shutdown is always caused by the A board ...

Страница 86: ... a short to ground a high is provided to the MCU to trigger a SOS condition The power LED blinks 9 times Use a voltmeter to measure the SOUND 17V source If it is present replace the A board If it is absent use an ohmmeter to determine if there is a short to ground When a short is detected disconnect the connector P7 or A3 to narrow it to the A or P board A eight blinks shutdown is always caused by...

Страница 87: ...16 should toggle low after the backlights of the LCD panel turn on If the backlights do not come on or pin 5 of CN A16 does not toggle low Reseat the connectors A3 P3 and P7 Confirm the presence of 24Vdc at pin 1 of connector P7 and 12V at pin 28 of connector A2 before replacing the LCD panel ...

Страница 88: ...over current condition is detected On the power supply board locate the test points for the SUB9V SOUND15V BT30V and PANEL12V Using an ohmmeter determine if there is a short between each of the test point and ground If a test point is shorted disconnect the connector P3 or A3 to isolate the short to either the A or P board ...

Страница 89: ... or shorted the MCU shuts down the unit and blinks the Power LED Reseat the connectors P3 and A3 and turn on the unit If the shutdown persists use a voltmeter to measure the voltage If it is present replace the A board If it is absent use an ohmmeter to determine if there is a short to ground When a short is detected disconnect the connector P3 or A3 to isolate the short to either the A or P board...

Страница 90: ... and blinks the Power LED Reseat the connectors P7 and A3 and turn on the unit If the shutdown persists use a voltmeter to measure the voltage If it is present replace the A board If it is absent use an ohmmeter to determine if there is a short to ground When a short is detected disconnect the connector P7 or A3 to narrow it to the A or P board A seven blinks shutdown is always caused by the A boa...

Страница 91: ...s develops a short to ground a high is provided to the MCU to trigger a SOS condition The power LED blinks 9 times Use a voltmeter to measure the SOUND 15V source If it is present replace the A board If it is absent use an ohmmeter to determine if there is a short to ground When a short is detected disconnect the connector P3 or A3 to narrow it to the A or P board A eight blinks shutdown is always...

Страница 92: ...d Trouble Upper or Lower Lower Right Left Left or Right All over the screen Panel A Board 1 Part of the screen 2 All over the screen 3 No picture Upper Panel Panel Panel Panel Non uniformity color Many vertical lines Abnormal color OSD trouble Vertical or Horizontal line Panel ...

Страница 93: ... Relation to panel drive location 1 3 or 2 3 area will be troubled NG Area Abnormality means No Picture Picture noise abnormal picture Full Horizontal line etc Actual Symptom Symptom Upper trouble LCD panel Panel Drive Panel Drive Panel Drive Panel Drive Panel Drive Tuner Input Terminal Signal Processor ...

Страница 94: ...fect No Picture Picture noise Full Horizontal line etc Actual Symptom Symptom Right half picture trouble Defective parts Panel Panel drive or A board NG Area LCD panel Panel Drive Panel Drive Panel Drive Panel Drive Panel Drive A Tuner Input Terminal Signal Processor ...

Страница 95: ...cture Defect 4 95 Symptom Horizontal line Actual Symptom Symptom Horizontal line Defective parts Panel NG Area LCD panel Panel Drive Panel Drive A Tuner Input Terminal Signal Processor Panel Drive Panel Drive Panel Drive ...

Страница 96: ...cture Defect 5 96 Symptom Vertical line Actual Symptom Symptom Thin vertical line Defective parts Panel NG Area LCD panel Panel Drive Panel Drive A Tuner Input Terminal Signal Processor Panel Drive Panel Drive Panel Drive ...

Страница 97: ... 97 Symptom Vertical line noise Actual Symptom Symptom Vertical noise Defective parts Panel or A board NG Area LCD panel Panel Drive Panel Drive Vertical noise A Tuner Input Terminal Signal Processor Panel Drive Panel Drive Panel Drive ...

Страница 98: ...ymptom Sub picture NG Actual Symptom Symptom Sub picture NG Defective parts A board NG Area LCD panel Panel Drive Panel Drive Note There is not sub picture function on some models A Tuner Input Terminal Signal Processor Panel Drive Panel Drive Panel Drive ...

Страница 99: ...ure Defect 8 99 Symptom Non uniformity color Actual Symptom Symptom Irregular color NG Area LCD panel Panel Drive Panel Drive Defective parts Panel A Tuner Input Terminal Signal Processor Panel Drive Panel Drive Panel Drive ...

Страница 100: ...rtical lines all over screen Actual Symptom Symptom Vertical line all over screen Defective parts Mainly A board in some cases panel NG Area LCD panel Panel Drive Panel Drive A Tuner Input Terminal Signal Processor Panel Drive Panel Drive Panel Drive ...

Страница 101: ...ctual Symptom Symptom O S D trouble Actual Symptom Symptom OSD trouble Defective parts A board NG Area LCD panel Panel Drive Panel Drive O S D Mixture Color is normal A Tuner Input Terminal Signal Processor Panel Drive Panel Drive Panel Drive ...

Страница 102: ... 102 Actual Symptom Actual Symptom Symptom Abnormal color Actual Symptom Symptom Abnormal color Defective parts A board NG Area LCD panel Panel Drive Panel Drive A Tuner Input Terminal Signal Processor Panel Drive Panel Drive Panel Drive ...

Страница 103: ...nel Drive No Picture and Normal Sound Reason A board Panel Yes No Tuner area Digital Demodulator area HDMI Decoder area SD Processor area Analog TV Picture is NG Digital TV Picture is NG HDMI picture input is NG SD card picture is NG A board Panel Is the test pattern OK Signal Processor area No A Tuner Input Terminal Signal Processor Panel Drive Panel Drive Panel Drive ...

Страница 104: ...dulator area HDMI Decoder area Analog TV sound is NG Digital TV sound is NG HDMI sound is NG A board Audio Signal Processor area A Tuner Input Terminal Signal Processor Speaker Opt Audio Head Phone No Audio Amp area No Is sound from the headphone jack normal Yes Is there a problem with one of the speakers Yes Speaker ...

Страница 105: ...Service Information for 2008 Models Service Information for 2008 Models 105 2008 LCD Display Televisions 1 Panel Free Run System 2 Data copy to SD card 3 Local Maintenance 4 Picture Refresh Mode ...

Страница 106: ...Internal Pattern Generator 1 Internal Pattern Generator 1 106 ...

Страница 107: ...Internal Pattern Generator 2 Internal Pattern Generator 2 107 ...

Страница 108: ...Internal Pattern Generator 3 Internal Pattern Generator 3 108 ...

Страница 109: ...Copy data to SD card 1 Copy data to SD card 1 109 ...

Страница 110: ...Copy data to SD card 2 Copy data to SD card 2 110 ...

Страница 111: ...Copy data to SD card 3 Copy data to SD card 3 111 ...

Страница 112: ...Copy data to SD card 4 Copy data to SD card 4 112 ...

Страница 113: ...Copy data to SD card 5 Copy data to SD card 5 113 ...

Страница 114: ...Copy data to SD card 6 Copy data to SD card 6 114 ...

Страница 115: ...Copy Data from the SD Card to the TV 1 Copy Data from the SD Card to the TV 1 115 ...

Страница 116: ...Copy Data from the SD Card to the TV 2 Copy Data from the SD Card to the TV 2 116 ...

Страница 117: ...Copy Self Check Data to the SD Card 1 Copy Self Check Data to the SD Card 1 117 ...

Страница 118: ...Copy Self Check Data to the SD Card 2 Copy Self Check Data to the SD Card 2 118 ...

Страница 119: ...Copy Self Check Data to the SD Card 3 Copy Self Check Data to the SD Card 3 119 ...

Страница 120: ...Local Maintenance 1 Local Maintenance 1 120 ...

Страница 121: ...Local Maintenance 2 Local Maintenance 2 121 ...

Страница 122: ...Local Maintenance 3 Local Maintenance 3 122 ...

Страница 123: ...Local Maintenance 4 Local Maintenance 4 123 ...

Страница 124: ...Local Maintenance 5 Local Maintenance 5 124 ...

Страница 125: ...Local Maintenance 6 Local Maintenance 6 125 ...

Страница 126: ...Local Maintenance 7 Local Maintenance 7 126 ...

Страница 127: ...Local Maintenance 8 Local Maintenance 8 127 ...

Страница 128: ...Picture Refresh Mode Picture Refresh Mode 128 ...

Отзывы: