background image

14

RQT6457

Recording

SD  A

UD

IO  RECO

RD

ER

MEN

U

ENTER/M

EMO

RY

1

2

AB

C

3

SV

-SR

100

4

G

HI

5

JK

L

6

M

NO

7

PQ

RS

8

TU

V

0

10

>_

_

9

W

XY

Z

DE

F

:

9

SD

 O

PE

N

1

SD

1

CD

1

/

;

OPR O

FF

FUNCTION

DEL

S-XB

S

MODE

2

CD

 O

PE

N

REC

PAU

SE

VOL

UME

DISP

LAY

CHARA

4

3

2

REC

SD

SP

REC

REC

SD

SP

REC

DC IN 4.5V

LINE IN

R

L

STEREO

M

IC

Ë

[LINE IN]

[MIC]

1

a

b

REC

PAUSE

OPR OFF

FUNCTION

ENTER/MEMORY

MENU

:

9

SD

1

SPA

CE

! " #

SD

Preparation:

Release the HOLD mode (

 page 9).

Release the card’s write-protect switch (

 page 8).

Insert an SD card (

 page 9).

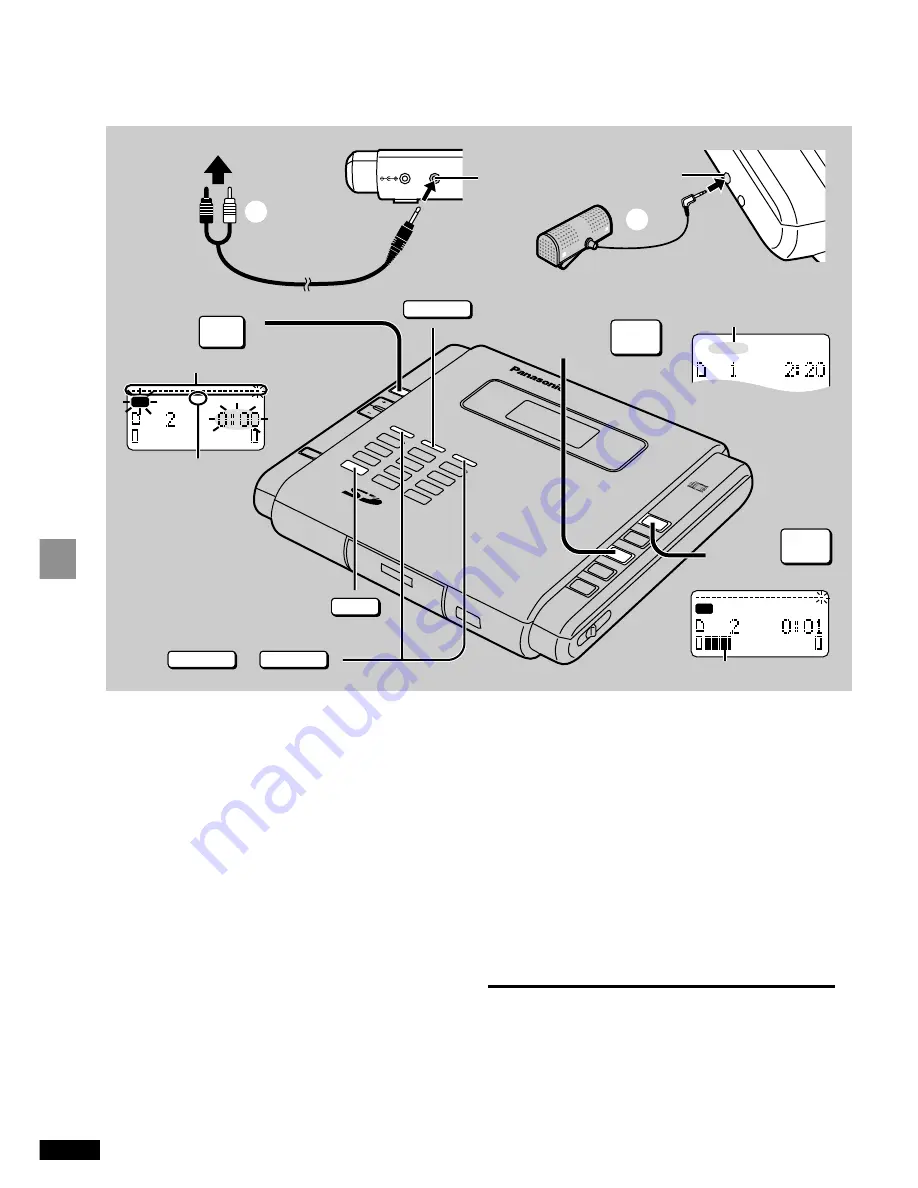
1 Connect the other equipment while

the unit is stopped.

Do not connect a microphone and other equipment
at the same time.

a

Connecting other audio equipment
Purchase a stereo connection (phono) cable.

b

Connecting a microphone
Purchase a stereo microphone.

2 Press [

, OPR OFF, FUNCTION] to

switch to SD.

3 Press [REC PAUSE] to enter the re-

cording standby mode.

4 Press [

1

, SD] to start recording, then

start the source (or face the micro-
phone towards the source).

Recording from a microphone and other
equipment 

(Main unit only)

Recording time meter

Recording mode

Recording level meter

To pause recording

Press [REC PAUSE].
A track mark is added.
Press [

1

, SD] to restart recording.

To stop

Press [

, OPR OFF, FUNCTION].

“CARD Writing” appears on the display while the unit
writes to the card.
The unit turns off about 5 minutes later.

To turn the unit off

Press and hold [

, OPR OFF, FUNCTION] while

stopped until the display goes out.

Note:

Keep the microphone away from the unit so it doesn’t
record sound from the unit itself.

Ensure you do not connect the microphone to the head-
phone jack.

Adjust the volume on the other equipment if you make
the connection through the other unit’s headphone
jack.

Plug type:
3.5 mm
(1/8 in.) stereo

CD

()

SD

(not included)

(not included)

Содержание SVSR100 - SD AUDIO RECORDER

Страница 1: ... Please keep this manual for future reference Note EB on the packaging indicates the United Kingdom For U S A The warranty can be found on pages 22 and 23 RQT6457 P SD AUDIO RECORDER MENU ENTER MEMORY 1 2 ABC 3 SV S R100 4 GHI 5 JK L 6 M NO 7PQRS 8 TU V 0 10 _ _ 9W XYZ DEF 9 SD OPEN1 SD 1 CD 1 OPR OFF FUNCTION DEL S XBS MODE 2 CDOPEN RE C PAUS E VO LUME DISPLAY CH ARA SPAC E This manual was printe...

Страница 2: ... this device This device complies with Part 15 of the FCC Rules Operation is subject to the following two conditions 1 This device may not cause harmful interference and 2 this device must accept any interference received including interference that may cause un desired operation CAUTION THIS PRODUCT UTILIZES A LASER USE OF CONTROLS OR ADJUSTMENTS OR PERFORMANCE OF PROCEDURES OTHER THAN THOSE SPEC...

Страница 3: ...em 17 Convenient functions 18 Changing the display 18 Using the unit with other equipment 19 Specifications 19 Displays 20 Troubleshooting guide 21 Maintenance 21 Limited Warranty U S A 22 Product Service 23 Supplied accessories Please check and identify the supplied accessories For the U S A To order accessories contact 1 800 332 5368 or web site http www panasonic com For other areas To order ac...

Страница 4: ...t into the unit Avoid exposing the unit to excessive smoke dust mechanical vibration and shock 2 Magnetism Situate the unit away from equipment and devic es that generate strong magnetic fields 3 Stacking Do not place any thing on top of this unit 4 Wall and ceiling mounting Do not mount the unit on walls or ceilings unless specified in the instructions Environment 1 Water and moisture Do not use ...

Страница 5: ...e if play time dra matically reduces after recharging Play time may be shorter than usual after recharging batteries for the first time or after they have been unused for a long time Repeatedly recharge and discharge the batteries if this occurs to restore them to normal Care To prevent battery damage electrolyte leakage and short circuiting heed the following points Do not peel off the covering o...

Страница 6: ...open the CD lid 8 SD OPEN 1 to open the SD card lid 9 SD memory card lid CD lid REC PAUSE to put the unit into recording standby mode VOLUME buttons 9 to skip or search and to select menu items ENTER MEMORY to enter menu items and program CD tracks Character numbered buttons MENU to enter and exit menus A DISPLAY CHARA to change the display and type of character B Ë earphone remote control jack C ...

Страница 7: ...g on the ambient temperature and condition of the batteries Disconnect the AC adaptor leaving it connected can discharge the batteries Note You can recharge the batteries before they are fully dis charged Recharging may only be performed when the unit is off It is normal for the AC adaptor and batteries to become warm during recharging The battery indicator This indicator flashes when the batterie...

Страница 8: ...6 MB 512 MB HQ high quality 64 265 535 SP standard play 86 353 713 LP long play 129 530 1070 Recording mode CD and SD card information CDs Choose CDs with this mark Do not use CDs with labels and stickers that are coming off or with adhesive exuding from under labels and stickers attach scratch proof covers or any other kind of accessory write anything on the CD clean CDs with liquids Wipe with a ...

Страница 9: ...epleting the batteries Interruption of play or recording due to a button being accidentally pressed The unit and remote control each have independent HOLD switches To use HOLD Set HOLD to the HOLD position When HOLD on the main unit is on HOLD appears on the display for a few seconds after pressing a button Press on the center of the card to unlock Insert label up with the cut off corner facing in...

Страница 10: ...track if You open the CD or SD lid Resume may work if you change the disc or card while the unit is off Disconnect the power source AC adaptor or batteries while off Auto power off To save the batteries the unit turns off after about five minutes after being stopped unless menus are being used Elapsed play time of the current track 1 Release the HOLD mode 2 Connect the remote control and ste reo e...

Страница 11: ... If you have programmed 24 tracks To check the contents of the program Press ENTER MEMORY during play The track numbers and their sequence appear in order one after the other To clear the program Press OPR OFF FUNCTION during play Note You cannot program tracks on an SD card Tracks are skipped in the programmed order when you press or 9 SD AUDIO RECORDER MENU ENTER MEMORY 1 2 ABC 3 SV S R100 4 GHI...

Страница 12: ...y mode Recording time meter This gives you a rough guide to how much memory is left on the card Recording mode See next page 4 Confirm that REC OK appears then press 1 CD Recording and CD play start Recording starts from the first available space Play and recording stop when the CD ends To stop Press OPR OFF FUNCTION CARD Writing appears on the display while the unit writes to the card The unit tu...

Страница 13: ...sconnect the AC adaptor Do not shake the unit Do not open the card and disc lids Doing any of these can cause recording and play to stop and the data to be corrupted Be especially careful while CARD Writing is on the display as recording may not be completed correctly The anti skip system page 17 is off while recording Recording mode HQ high quality 128 kbps SP standard play default setting 96 kbp...

Страница 14: ...F FUNCTION to switch to SD 3 Press REC PAUSE to enter the re cording standby mode 4 Press 1 SD to start recording then start the source or face the micro phone towards the source Recording from a microphone and other equipment Main unit only Recording time meter Recording mode Recording level meter To pause recording Press REC PAUSE A track mark is added Press 1 SD to restart recording To stop Pre...

Страница 15: ...ty 1 Select LINE REC SENS 2 Press ENTER MEMORY 3 Press or 9 to select the sensitivity Each time you press the button REC SENS H When recording from portable equipment REC SENS L When recording from stereo components C Selecting a marking mode 1 When recording from other equipment Select LINE MARK MODE When recording through a microphone Select MIC MARK MODE 2 Press ENTER MEMORY 3 Press or 9 to sel...

Страница 16: ...L is displayed If the title has 60 characters You cannot enter more than 60 characters Deleting and correcting characters 1 Press or 9 to move the cursor over the character you want to correct or delete 2 Press MODE DEL The character is deleted and characters after it move to the left When correcting a character 3 Insert the character To insert another character 1 Press or 9 to move the cursor to ...

Страница 17: ...in some cases if there are a number of tracks on the card or if it has a large volume You cannot erase tracks that are in play lists created on computer software e g Panasonic Media Manager Formatting SD cards CD All data is erased when you format a card includ ing data recorded with other equipment Preparation Press OPR OFF FUNCTION to select SD Release the write protect switch page 8 1 Press MEN...

Страница 18: ... SD OPE REC PAUSE VOLUME DISPLAY CHARA 9 ENTER MEMORY MENU SPACE DISPLAY CHARA Convenient functions Adjusting the contrast of the display 1 Press MENU while stopped 2 Press or 9 to select DISPLAY CONTRAST 3 Press ENTER MEMORY 4 Press to reduce the contrast or 9 to increase the contrast 5 Press ENTER MEMORY The operation tones A beep sounds when you press buttons on the remote control You can turn ...

Страница 19: ...5 JK L 6 M N O 7PQ R S 8 TU V 0 10 _ _ 9W XYZ D EF 9 REC PA USE VO LU ME DISPL AY CHAR A SD OP EN 1 S D1 C D 1 R O F F CT ION D E L X B S M O D E HOLD MIC Ë L R VOL SP AC E Turn off this unit and the other equipment before connection Do not connect the cable to the PHONO jacks on an amplifier Turn the operation tones off so they are not heard when you press buttons on the remote control page 18 Se...

Страница 20: ... recording mode You haven t inserted a card You haven t inserted a disc You haven t entered an artist name There is no title for the track or card The card doesn t contain audio data Record tracks on the card or replace it with one that already has tracks on it The title contains characters this unit cannot display The unit cannot play the data Rerecord it using a format this unit can play 8 The u...

Страница 21: ...tteries Re connect the power source and continue operation You aren t using the special rechargeable batteries 5 Make sure the card has tracks recorded on it NO TRACK appears if the card is blank The CD play mode may be set to play tracks randomly The resume function has worked Raise the volume Ensure the plugs are inserted fully Wipe the plugs clean with a soft cloth Separate this unit from mobil...

Страница 22: ...arranty ALSO DOES NOT COVER dam ages which occurred in shipment or failures which are caused by products not supplied by the warrantor or failures which result from accidents misuse abuse neglect mishandling misapplica tion alteration faulty installation set up adjustments misadjust ment of consumer controls improper maintenance power line surge lightning damage modification or commercial use such...

Страница 23: ...eb site http www panasonic com sd In Canada contact Panasonic Canada Inc Customer Care Centre at 905 624 5505 web site www panasonic ca or an authorized Servicentre close to you In other areas consult your dealer For Product Information Operating Assistance Literature Request Dealer Locations and all Customer Service inquiries please contact 1 800 211 PANA 7262 Monday Friday 9 am 9 pm Saturday Sun...

Страница 24: ...ER ELLER LIGNENDE IKKE FORVERRER VENTI LASJONSFORHOLDENE SÅ RISIKO FOR ELE KTRISK SJOKK ELLER BRANN FORÅRSAKET AV OVERHETING UNNGÅS APPARATETS VENTILASJONSÅPNINGER MÅ IKKE DEKKES TIL MED AVISER BORDDUKER GARDINER OG LIGNENDE PLASSER IKKE ÅPEN ILD SLIK SOM LEVENDE LYS OPPÅ APPARATET BRUKTE BATTERIER MÅ KASSERES UTEN FARE FOR MILJØET DETTE APPARATET ER BEREGNET TIL BRUK UNDER MODERATE KLIMAFORHOLD A...

Отзывы: