background image

15

RQT7921

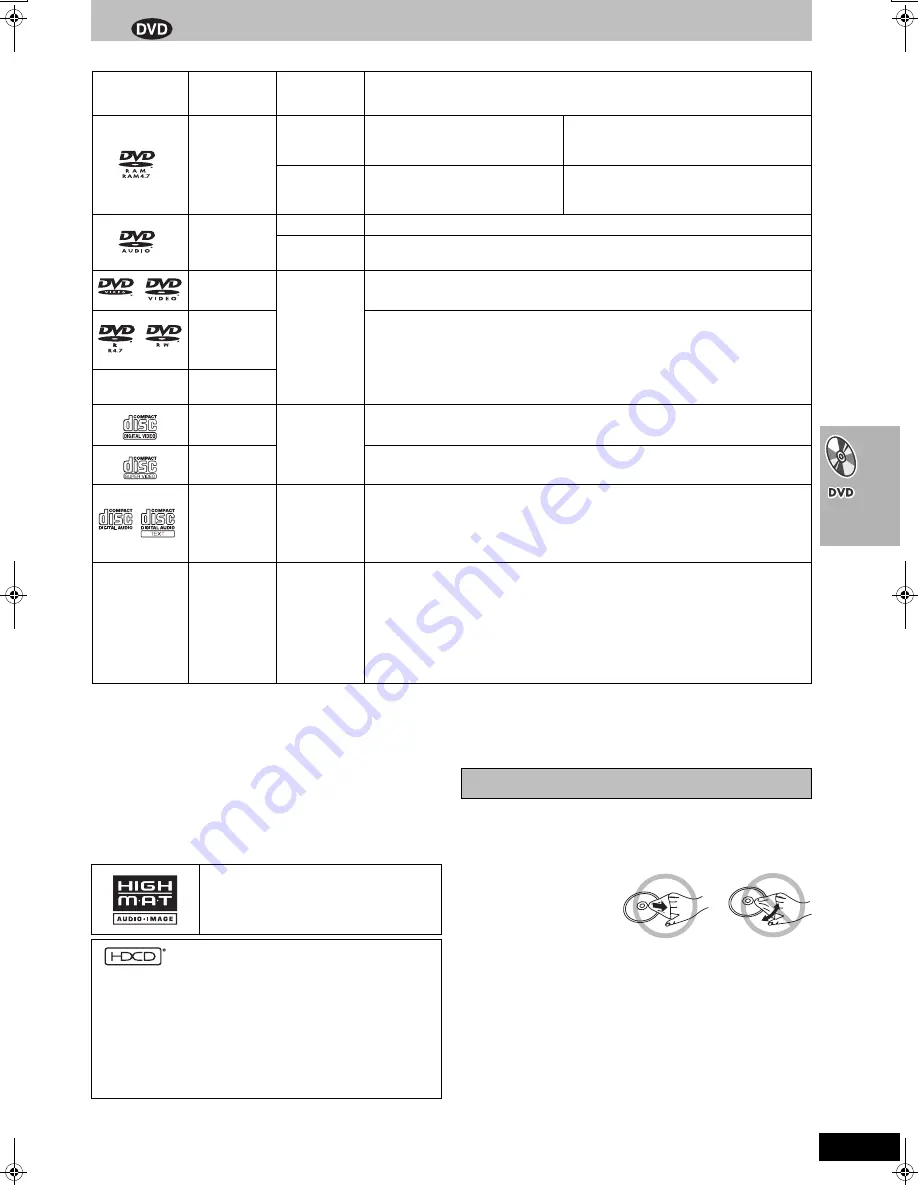
Discs that can be played

§

A process that allows play on compatible equipment.

It may not be possible to play the above discs in all cases due to the type of disc or condition of the recording.

Note about using a DualDisc

The digital audio content side of a DualDisc does not meet the technical specifications of the Compact Disc Digital Audio (CD-DA) format so play 
may not be possible.

Discs that cannot be played

PAL discs (except DVD-Audio), DVD-ROM, CD-ROM, CDV, CD-G, 
SACD, Divx Video Discs and Photo CD, DVD-RAM that cannot be 
removed from their cartridge, 2.6-GB and 5.2-GB DVD-RAM, and 
“Chaoji VCD” available on the market including CVD, DVCD and 
SVCD that do not conform to IEC62107.

To prevent damage

Do not;

load more than one disc per tray.

close the drawer by hand.

To clean discs

Wipe with a damp cloth and 
then wipe dry.

Handling precautions

Do not attach labels or stickers to discs (This may cause disc 
warping, rendering it unusable).

Do not write on the label side with a ball-point pen or other writing 
instrument.

Do not use record cleaning sprays, benzine, thinner, static electricity 
prevention liquids or any other solvent.

Do not use scratch-proof protectors or covers.

Do not use the following discs:
– Discs with exposed adhesive from removed stickers or labels 

(rented discs etc).

– Discs that are badly warped or cracked.
– Irregularly shaped discs, such as heart shapes.

Logo

Disc

Indication in 

operating 

instructions

Remarks

DVD-RAM

[RAM]

Recorded using Version 1.1 of the 
Video Recording Format (a unified 
video recording standard).

Recorded with DVD video recorders, DVD 
video cameras, personal computers, etc.

Remove discs from their cartridges before use.

[JPEG]

Recorded using the DCF (Design 
rule for Camera File system) 
standard Ver 1.0.

Recorded with Panasonic DVD-Video recorders.

To play JPEG files, select “Play as Data 
Disc” in Other Menu (

l

25).

DVD-Audio

[DVD-A]

[DVD-V]

Some DVD-Audio discs contain DVD-Video content.
To play DVD-Video content, select “Play as DVD-Video” in Other Menu (

l

25).

DVD-Video

[DVD-V]

DVD-R 
(DVD-Video)/
DVD-RW 
(DVD-Video)

Discs recorded and finalized

§

 on DVD video recorders or DVD video cameras.

i

R (Video)/

i

RW (Video)

Video CD

[VCD]

SVCD

Conforming to IEC62107

CD

[CD]

This unit is compatible with HDCD, but does not support the Peak Extend function.
(A function which expands the dynamic range of high level signals)
HDCD-encoded CDs sound better because they are encoded with 20 bits, as 
compared with 16 bits for all other CDs.

During HDCD play, “HDCD” lights on the unit’s display.

CD-R
CD-RW

[WMA]

[MP3]

[JPEG]

[CD]

[VCD]

This unit can play CD-R/RW (audio recording disc) recorded with the formats on the 
left. Close the sessions or finalize

§

 the disc after recording.

HighMAT

TM

 discs

WMA, MP3 or JPEG files only.
To play without using the HighMAT

TM

 function, select “Play as Data Disc” in Other 

Menu (

l

25).

[WMA] 

This unit is not compatible with Multiple Bit Rate (MBR: a file that contains the 

same content encoded at several different bit rates).

HighMAT and the HighMAT logo are either 
trademarks or registered trademarks of 
Microsoft Corporation in the United States 
and/or other countries.

, HDCD

®

, High Definition Compatible Digital

®

 and 

Pacific Microsonics™ are either registered trademarks or 
trademarks of Pacific Microsonics, Inc. in the United States and/or 
other countries.

HDCD system manufactured under license from Pacific 
Microsonics, Inc. This product is covered by one or more of the 
following: In the USA : 5,479,168, 5,638,074, 5,640,161, 
5,808,574, 5,838,274, 5,854,600, 5,864,311, 5,872,531, and in 
Australia: 669114, with other patents pending.

Disc handling

RQT7921-P_ENG.book  15 ページ  2005年5月25日 水曜日 午後3時24分

Содержание SCHT830V - DVD THEATER RECEIVER

Страница 1: ...please call In the U S A 1 800 211 PANA 7262 In Canada 1 800 561 5505 Before connecting operating or adjusting this product please read the instructions completely Please keep this manual for future reference For U S A only The warranty can be found on page 49 For Canada only The warranty can be found on page 50 ADVANCED PROGRESSIVE SCAN DVD 8 EASY TO USE 5 DVD CD CHANGER WITH QUICK START CD KEY 1...

Страница 2: ... are using a plasma television keeping these devices as far away as possible Stacking Place the unit in a horizontal position and do not place anything heavy on it The socket outlet shall be installed near the equipment and easily accessible or the mains plug or an appliance coupler shall remain readily operable THE FOLLOWING APPLIES ONLY IN THE U S A CAUTION This equipment has been tested and fou...

Страница 3: ...hen the apparatus has been damaged in any way such as power supply cord or plug is damaged liquid has been spilled or objects have fallen into the apparatus the apparatus has been exposed to rain or moisture does not operate normally or has been dropped Inside of product Tapes You can use tapes with the VHS and S VHS marks but this unit is unable to make full use of the characteristics of S VHS ta...

Страница 4: ...tings 25 Changing the player settings 26 Changing the delay time Speaker Setting 27 Playback 28 Manual tracking 29 Vertical locking adjustment 29 Picture mode 29 Repeat play 29 Manual recording 30 Recording a program 30 Using another source while recording 31 Recording from other equipment 31 Timer recording 32 Convenient functions Jet Navigator VISS On screen display 34 Jet Navigator 34 Saving Je...

Страница 5: ...o prevent short circuit do not cover the connection terminals with the pipe 4 Connect the speaker cables 5 Secure the speaker cable to the base Note You can use the front speakers without assembling with the stands In this case attach the included rubber pads to the base of the speakers This prevents vibration from causing the speakers to move or fall over Use 4 pads per speaker STEP1 Front speake...

Страница 6: ...he wall or speakers 1 Thread the string not included through the slot on the rear of the speaker to prevent it from falling over 2 Loop the string through the screw eye and tie tightly Subwoofer Place to the right or left of the television on the floor or a sturdy shelf so that it won t cause vibration Leave 10 cm 4q at the rear for ventilation Notes on speaker use You can damage your speakers and...

Страница 7: ...negative Blue wires to negative j terminals Incorrect connection can damage the speakers Basic connection STEP4 Video connections AC IN RF IN RF OUT LOOP EXT 75 AM ANT FM ANT LOOP ANT GND A DIGITAL TRANSMITTER DVD VHS EXT DVD L R COMPONENT VIDEO OUT Y PB CB PR CR S VIDEO OUT IN OUT VIDEO VIDEO IN VHF UHF RF IN TO SB WA830 Television not included Video cable included Antenna cable not included usua...

Страница 8: ... OUT terminal The S video terminal achieves a more vivid picture than the VIDEO OUT terminal by separating the chrominance C and luminance Y signals Actual results depend on the television Note Connect to a different terminal group than that you used for the video cable e g VIDEO 2 Picture from this unit s VHS will not appear when you use the same group input terminal connections because the S vid...

Страница 9: ...rd To household AC outlet AC 120 V 60 Hz To disconnect Press the catch and pull out To household AC outlet AC 120 V 60 Hz AC power supply cord Black Set your surround sound free Panasonic SH FX50 Digital Transmitter and Receiver optional When you insert the digital transmitter into the DIGITAL TRANSMITTER slot of the main unit and connect the surround speakers to the receiver you can enjoy wireles...

Страница 10: ... power supply cords 1 Press Í to turn off the unit 2 After BYE on the display disappears unplug the AC power supply cords RF IN RF OU LOOP EXT 75 AM ANT FM ANT LOOP ANT GND 1 1 2 FM outdoor antenna Using a television antenna Disconnect the FM indoor antenna The antenna should be installed by a competent technician Rework your outdoor antenna s 75 coaxial cable as follows 75 coaxial cable not inclu...

Страница 11: ...rning the unit off or due to a power failure 1 Disconnect the AC power supply cord on the main unit and then reconnect it 2 Turn on the main unit To cancel partway Press MENU To start Plug in Auto Tuning again after relocation for example Preparation Press Í to turn on the unit Make sure there is no video cassette tape loaded in the unit Press DVD VHS to select VHS as the source 1 Press and hold W...

Страница 12: ...t To change these settings later Select QUICK SETUP in Others tab l 27 To return to the previous screen Press RETURN Manufacturer Code No Manufacturer Code No Panasonic 01 02 PHILIPS 06 FISHER 14 PIONEER 02 10 19 G E 02 03 07 09 QUASAR 02 GOLD STAR 07 15 RCA 03 07 09 13 23 24 25 HITACHI 05 07 SANYO 14 JVC 12 SHARP 08 21 LXI 03 06 07 10 14 15 SONY 04 MAGNAVOX 06 07 11 15 22 SYLVANIA 06 07 15 MITSUB...

Страница 13: ... numbers 17 Picture mode button 29 Menu button 22 36 Play list button 23 Return button 17 TV volume up button 12 Selection Enter on the television s screen Switch the source on the main unit between DVD and VHS DVD VHS source button 12 Switch the source on the main unit to tuner and change the band Tuner band button 40 Basic operations for play Skip buttons 17 Index search button 35 Slow search bu...

Страница 14: ...tating playing Stopped paused 3 Recording indicator 30 4 Repeat playback indicator 29 5 Tape speed indicator 30 6 Timer program recording indicator 32 7 Channel display Tuner operation 1 Radio broadcast display 40 MONO Forced monaural ST Stereo TUNED Receiving radio signal 2 Band display Main unit and subwoofer OPEN CLOSE EJECT DISC CHECK REW FF STOP PLAY DOWN UP PHONES VOLUME STOP DEMO PLAY H BAS...

Страница 15: ...ed using the DCF Design rule for Camera File system standard Ver 1 0 Recorded with Panasonic DVD Video recorders To play JPEG files select Play as Data Disc in Other Menu l 25 DVD Audio DVD A DVD V Some DVD Audio discs contain DVD Video content To play DVD Video content select Play as DVD Video in Other Menu l 25 DVD Video DVD V DVD R DVD Video DVD RW DVD Video Discs recorded and finalized on DVD ...

Страница 16: ...n the unit POWER Í I 5 Open the disc tray and load the disc Load double sided discs so the label for the side you want to play is facing up 6 Close the disc tray To load discs on the other trays repeat steps 4 6 OPEN CLOSE OPEN CLOSE 7 Start play Press to stop play PLAY 1 Put the remote control in DVD mode DVD 4 Select the disc tray 1 2 3 4 5 DISC 8 Adjust the volume dB N 0dB Minimum Maximum Volum...

Страница 17: ...TI RE MASTER QUICK OSD MIX 2CH ZOOM PROGRESSIVE CD MODE REPEAT PLAY MODE H BASS SUBWOOFER LEVEL C FOCUS SFC TEST SUPER SRND CH SELECT MUTING CM SKIP ADVANCE DISC REVIEW QUICK REPLAY REC SLEEP PL AUDIO RESET TV VIDEO SHIFT SHIFT INPUT SELECTOR SHIFT RETURN MENU TOP MENU DIRECT NAVIGATOR DVD ENTER PROGRESSIVE DISC CANCEL Numbered buttons S10 OPEN CLOSE SHIFT PROGRESSIVE CD MODE i PROG OPEN CLOSE EJE...

Страница 18: ...er Intro Mode or Interval Mode in Advanced Disc Review in the Disc tab l 26 1 Press ADVANCE DISC REVIEW Quick OSD screen is displayed 2 Press 1 play when you find a title program to play This may not work depending on the disc and the play condition RAM DVD V Except iR iRW Play restarts from approximately a minute later Convenient when you want to skip commercials etc During play Press CM SKIP RAM...

Страница 19: ... an item to be repeated RAM PG Program Disc Off During play list play Scene PL Playlist Off DVD A Track Group Off DVD V Chapter Title Off VCD CD Track Disc Off When CD Mode is on Track Disc All CD s Off When CD Mode is on during program and random play Track All CD s Off WMA MP3 Content Group Off When CD Mode is on Content Group All CD s Off When CD Mode is on during program and random play Conten...

Страница 20: ...de is off DVD A DVD V VCD CD WMA MP3 JPEG You can program all the items on a disc in the play position When CD Mode is on VCD CD WMA MP3 You can program all the items on all the discs Random play When CD Mode is off VCD CD You can play all the items on a disc in the play position in random order DVD A DVD V WMA MP3 JPEG You can play selected item on a disc in the play position in random order When...

Страница 21: ... Playback 0 9 to select to start Title Choose a title 1 PLAY e g DVD V Multi Re master Setting DVD A DVD V CD LPCM PPCM Type of music Other discs Effect level 1 High tempo e g pops and rock Light 2 Various tempos e g jazz Medium 3 Low tempo e g classical Strong Off Off Off Sampling frequency Sampling is the process of converting the heights of sound wave analog signal samples taken at set periods ...

Страница 22: ... items in order Playback Menu Playing from the selected item Navigation menu MENU PLAY LIST ENTER STATUS FUNCTIONS DVD Numbered buttons TOP MENU DIRECT NAVIGATOR VOLUME 1 2 3 4 5 6 7 8 0 DISC 9 CH NAVI SKIP SLOW SEARCH MENU ENTER DIRECT NAVIGATOR TOP MENU RETURN STATUS FUNCTIONS TV FM AM DVD VHS DVD TV VHS TUNER PICTURE MODE SETUP OPEN CLOSE EJECT JET REW ENTER PLAY LIST TV VOL TV VOL MULTI RE MAS...

Страница 23: ...tible with ID3 tags Compatible sampling rate 8 11 02 12 16 22 05 24 32 44 1 and 48 kHz JPEG To view JPEG files on this unit Take them on a digital camera that meets the DCF Standard Design rule for Camera File system Version 1 0 Some digital cameras have functions that are not supported by the DCF Standard Version 1 0 like automatic picture rotation which may render a picture un viewable Do not al...

Страница 24: ...us Program Group Title Chapter Track Playlist Content To start from a specific item Time Except iR iRW To skip incrementally or decrementally Time Slip for play only 1 Press ENTER twice to show Time Slip indicator 2 Press 3 4 to enter the time and press ENTER Press and hold 3 4 to alter faster To start from a specific time Time Search To change remaining elapsed time display Audio l 19 To display ...

Страница 25: ...deo Output Mode 480i Interlace 480p Progressive Transfer Mode If you have chosen 480p l above select the method of conversion for progressive output to suit the type of material Auto1 normal For viewing film material Auto2 For viewing film material the same as Auto1 but able to convert 30 frame per second progressive video Video For video material Dolby Pro Logic II l 41 Dialogue Enhancer To make ...

Страница 26: ...aused Automatic Field Frame 1 Shows Setup menu 2 Select the tab 3 Select the item 4 Make the settings 5 Press to exit The settings remain intact even if you switch the unit to standby When you show Setup menu during playback playback will stop and resume function does not work Underlined items are the factory preset VOLUME 1 2 3 4 5 6 7 8 0 DISC 9 CH NAVI CANCEL SPEED PROG SKIP SLOW SEARCH MENU EN...

Страница 27: ...xit Difference Setting Approx 30 cm 1 foot 1 0 ms Approx 60 cm 2 feet 2 0 ms Approx 90 cm 3 feet 3 0 ms Approx 120 cm 4 feet 4 0 ms Approx 150 cm 5 feet 5 0 ms Difference Setting Approx 150 cm 5 feet 5 0 ms Approx 300 cm 10 feet 10 0 ms Approx 450 cm 15 feet 15 0 ms LS RS L R SW b c a C Recommended placement Language code list Abkhazian 6566 Afar 6565 Afrikaans 6570 Albanian 8381 Ameharic 6577 Ara...

Страница 28: ...HIFT INPUT SELECTOR OPEN CLOSE EJECT DISC CHECK REW FF STOP PLAY DOWN UP PHONES VOLUME STOP DEMO PLAY H BASS REC CH S10 2 3 5 6 STOP VOLUME DOWN UP EJECT SHIFT STOP EJECT PAUSE SLOW JET REW 2 Turn on the unit POWER Í I 4 Insert a tape Play starts automatically if you insert a prerecorded tape or one that has had its tab removed 5 Start play PLAY 3 Select VHS INPUT SELECTOR 1 Put the remote control...

Страница 29: ...lear vivid pictures for scenery and sports SOFT for prerecorded tapes Plays a program repeatedly Press and hold 1 play for about five seconds R1 R appears on the television and the main unit At the end of the program the tape rewinds to the beginning of the program and plays it again It only works if there is a five second blank at the end of the program This repeats until you cancel it To cancel ...

Страница 30: ...e recordings you make do not use this system You cannot record from the disc section to the unit Tape speeds There are three tape speeds SP You can record the length shown on the tape EP Three times the length of SP mode VP Five times the length of SP mode You cannot play tapes recorded with VP mode on other equipment It takes more time for automatic tracking to work when playing tapes recorded wi...

Страница 31: ...paration Connect the equipment to this unit s input terminals Turn the unit off before making connections If audio output on the other equipment is monaural use a stereo monaural conversion cable not included Insert the tape ensuring its tab is in place and find the place to start recording 1 Press W CH or X CH to select AV channel 2 Press 1 play to find the place to start recording 3 Press then p...

Страница 32: ...select a category with 3 4 2 1 and confirm with MENU You can also set and change the category in the navigator list l 35 Repeat steps 2 to 8 to make further timer programs 9 Press to put the unit on timer recording standby lights on the unit s display 10Press Í to switch the unit to standby The timer recording works whether the unit is on or not so you can play DVDs or listen to the radio l 31 Swi...

Страница 33: ... program in SP mode The change may start at the beginning of the recording or part way through depending on the remaining tape Before using this function set the length of the tape you are using l 38 It may not work correctly if you use tapes with irregular lengths Note This function does not guarantee recording of the entire program To check correct and cancel timer programs Auto SP EP change DAT...

Страница 34: ... channel date and time of a recording appear on the television when play starts To clear the Jet Navigator list Press MENU To delete the Jet Navigator on a video cassette tape Keep CANCEL pressed for more than 5 seconds while the Jet Navigator list appears appears on the list To delete all the Jet Navigator data stored in the unit s memory l 38 Jet Navigator Saving Jet Navigator data VOLUME 1 2 3 ...

Страница 35: ...gs of at least 15 minutes 25 minutes in VP mode To see these displays set the OSD item in the OPTION menu to ON Press STATUS FUNCTIONS The time and operation details appear on the screen for about 5 seconds Note These displays do not appear when paused or during slow play The on screen display may be disturbed depending on the playback tape or the input signal Setting categories Category Indicatio...

Страница 36: ...nutes slow or fast it can easily be reset to the proper time when it is 12 00 00 1 Display the MANUAL CLOCK SET screen on the TV screen 2 When the current clock displays on the unit is between 11 58 and 12 01 press MENU as soon as you see 12 00 00 This resets the time to 12 00 00 1 Shows VHS MENU 2 Select the item 3 Make the settings 4 Press to exit VOLUME 1 2 3 4 5 6 7 8 0 DISC 9 CH NAVI CANCEL S...

Страница 37: ... program positions are skipped Channel range l right 2 Press 3 4 to select AUTO and press ENTER Auto tuning starts It takes three or more minutes to complete To stop partway through Press MENU You can manually preset channels that are skipped when using the auto channel setting and manually skip channels that are preset 2 Press 3 4 to select MANUAL and press ENTER 3 Press 3 4 to select CH and 2 1 ...

Страница 38: ...levision Sound Stereo reception type MAIN To receive stereo broadcasts SAP To receive SAP when being broadcast MONO To receive monaural broadcasts e g when reception is poor REMOTE CONTROL l 39 1 2 DISPLAY Set the brightness of the unit s display when the unit is in standby mode BRIGHT The display is bright all the time DIM The display dims when the unit is in standby mode OFF The display turns of...

Страница 39: ... of broadcast To change the audio Press SHIFT i AUDIO The audio changes as follows When playing a tape LR L R Monaural audio track b While watching the television LR L R b The table below shows the TV broadcast type MTS settings and audio recording patterns Be sure that MTS is set to MAIN or SAP to record on the Hi Fi audio tracks Note Switch to MONO for viewing or recording if a stereo or SAP bro...

Страница 40: ... in FM Press PLAY MODE to display MONO Press PLAY MODE again to cancel the mode The mode is also canceled when you change the frequency FM frequency step Main unit only The step is factory set to 0 2 MHz but you can change it to receive broadcasts allocated in 0 1 MHz steps 1 Press INPUT SELECTOR on the main unit to select FM 2 Press and hold INPUT SELECTOR After a few seconds the display changes ...

Страница 41: ...o Discs where the dialogue is recorded in the center channel You can make the sound of the center speaker seem like it is coming from within the television Press SHIFT i C FOCUS CENTER FOCUS ON CENTER FOCUS OFF This does not work when Super Surround is turned on This will have less effect when Dolby Pro Logic II is turned on This is one of the ways to get the appropriate surround effect Adjust the...

Страница 42: ...L TV VOL MULTIRE MASTER QUICK OSD MIX 2CH ZOOM PROGRESSIVE CD MODE REPEAT PLAY MODE H BASS SUBWOOFER LEVEL C FOCUS SFC TEST SUPER SRND CH SELECT MUTING CM SKIP ADVANCE DISC REVIEW QUICK REPLAY REC SLEEP PL AUDIO RESET TV VIDEO SHIFT SHIFT CH CH FM AM DVD VHS VHS VOLUME 1 2 3 4 5 6 7 8 0 DISC 9 CH SKIP SLOW SEARCH TV FM AM DVD VHS DVD TV VHS TUNER PICTURE MODE SETUP OPEN CLOSE EJECT JET REW ENTER I...

Страница 43: ...80 mm 71 16z Front speaker Rubber pads Rubber pads Rubber pads Speaker stand not included Plate thickness plus 7 mm to 10 mm plus 9 32q to 13 32q Surround speaker e g 5 mm 3 16q pitch 0 8 mm 1 32q Attach the stands to these metal screw holes 60 mm 23 8q Optional connections A You can record sound from discs video cassette tapes or radio etc to a tape deck 1 Discs Press DVD VHS to select DVD CD as ...

Страница 44: ... operating instructions A twin lead and coaxial plug terminal A twin lead terminal Two twin lead terminals Multiple antenna terminals Connect to one of ANT terminals then change the TV s setting as necessary Connecting a cable TV box satellite receiver OUT IN OUT IN IN RF IN RF OUT LOOP EXT 75 AM ANT FM ANT LOOP ANT GND A DIGITAL TRANSMITTER DVD VHS EXT DVD L R COMPONENT VIDEO OUT Y PB CB PR CR S ...

Страница 45: ...ntrol mode to VHS The unit is in timer recording standby is on on the unit s display The remote control and main unit are using different codes Change the code on the remote control 32 39 Cannot operate the TV Press TV to switch the remote control mode to TV Check the TV manufacturer setting 12 Television reception worsens after connecting the unit This can occur because the signals are being divi...

Страница 46: ...is ghosting when progressive output is on This problem is caused by the editing method or material used on DVD Video but should be corrected if you use interlace output Change Video Output Mode in Picture Menu to 480i 25 Pictures not in progressive output If the unit is connected to the television through VIDEO OUT or S VIDEO OUT output will be interlace Press SHIFT i PROGRESSIVE Or select 480p in...

Страница 47: ... 15 U15 You inserted a DVD R that has not been finalized 15 ERROR Incorrect operation performed Read the instructions and try again REMOTE The remote control and main unit are using different codes Change the code on the remote control 38 H F stands for a number Trouble may have occurred The number following H or F depends on the status of the unit Turn the unit off and then back to ON Alternative...

Страница 48: ...compatible R RW Video compatible 5 CD Audio CD DA 6 Video CD 7 SVCD Conforming to IEC62107 8 CD R CD RW CD DA Video CD SVCD MP3 WMA JPEG formatted discs 9 MP3 WMA Maximum number of tracks and groups recognizable 4000 tracks and 400 groups Compatible compression rate MP3 between 32 kbps and 320 kbps WMA between 48 kbps and 320 kbps 10 JPEG Exif Ver 2 1 JPEG Baseline files Maximum number of pictures...

Страница 49: ...TAL OR CONSEQUENTIAL DAMAGES RESULTING FROM THE USE OF THIS PRODUCT OR ARISING OUT OF ANY BREACH OF THIS WARRANTY As examples this excludes damages for lost time travel to and from the servicer loss of media or images data or other memory content The items listed are not exclusive but are for illustration only ALL EXPRESS AND IMPLIED WARRANTIES INCLUDING THE WARRANTY OF MERCHANTABILITY ARE LIMITED...

Страница 50: ... an authorized Servicentre nearest you Our Customer Care Centre at 905 624 5505 or www panasonic ca A Panasonic Factory Servicentre listed below IF YOU SHIP THE PRODUCT TO A SERVICENTRE Carefully pack and send prepaid adequately insured and preferably in the original carton Include details of the defect claimed and proof of date of original purchase 1 Damage requiring service The unit should be se...

Страница 51: ...ICK OSD 18 Quick replay 18 QUICK SETUP 12 27 Random play 21 Ratings 26 Region number Cover Repeat play 19 Rotate picture 24 Sampling frequency 21 Settings 26 27 Speaker delay time 27 Subtitle 24 S VIDEO 8 WMA 22 23 Zoom 19 Auto bilingual choice function 39 Categories 35 Clock setting Auto clock setting 11 36 Manual clock setting 36 Jet Navigator 34 38 Jet rewind 28 Jet search 28 38 MTS 38 On scree...

Страница 52: ...d level Set the dial and leave it there Taking a minute to do this now will help to prevent hearing damage or loss in the future After all we want you listening for a lifetime EST 1924 Accessories 1 Remote control EUR7722XJ0 2 Batteries for remote control 2 AC power supply cords K2CB2CB00006 1 AM loop antenna N1DAAAA00002 1 FM indoor antenna RSA0007 L 1 Video cable RJL1P016B15A 1 75 coaxial cable ...

Отзывы: