background image

32

VQT2T10

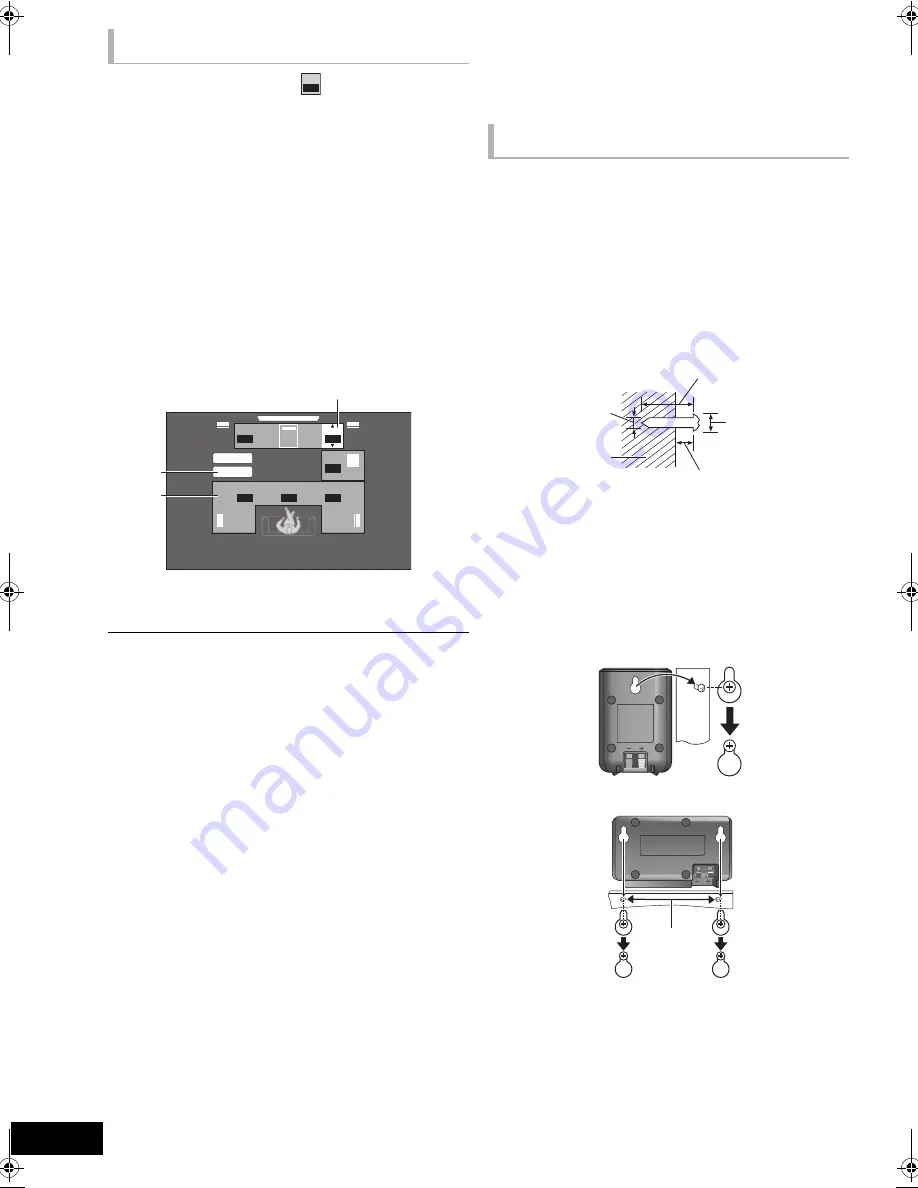
Volume (Channel balance) (

)

(Effective when playing multi-channel audio)

1

Select “Test” and press [OK].

A test signal is output.

2

While listening to the test signal

Press [

3

,

4

] to adjust the volume of each 

speaker.

The volume can be adjusted between 

r

6 dB to 

s

6 dB.

Set each speaker level according to the volume of the 
Front (L) and Front (R) speaker volume respectively.

No signal is output for the subwoofer. To adjust its 
volume, see page 18, “Adjusting speaker level during 
play”.

3

Press [OK].

The test signal stops.

To finish the speaker setting

Press [

3

,

4

,

2

,

1

] to select “Complete” and press [OK].

O ptional speaker settin gs

Speaker installation 
option

You can attach all of the speakers (except subwoofer) to a 
wall.

The wall or pillar on which the speakers are to be attached 
should be capable of supporting 10 k

g

 (22 lbs) per screw. 

Consult a qualified building contractor when attaching the 
speakers to a wall. Improper attachment may result in 
damage to the wall and speakers.

Do not attempt to attach these speakers to walls using 
methods other than those described in this manual.

1

Drive a screw (not included) into the wall.

A

At least 30 mm (1 

3

/

16

q

)

B

‰ 

4.0 mm (

5

/

32

q

)

C

 7.0 mm to 9.4 mm (

9

/

32

to 

3

/

8

q

)

D

Wall or pillar

E

5.5 mm to 7.5 mm (

7

/

32

to 

5

/

16

q

)

2

Fit the speaker securely onto the screw(s) 
with the hole(s).

Front speaker and surround speaker

Center speaker

F

100 mm (3 

15

/

16

q

)

Adjusting speaker level

A

Center (C)

B

Test

C

Left Surround (LS), Right Surround (RS)

dB

0

0

0

0

0.0

0.0

ms

Complete

Test

LS

R

L

RS

dB

dB

dB

ms

C

0

dB

SW


Attaching to a wall

SC-BT228P_VQT2T10_eng.book  32 ページ  2009年12月6日 日曜日 午後4時37分

Содержание SCBT228 - BLU-RAY HOME THEATER-EASY

Страница 1: ...sting this product please read the instructions completely Please keep this manual for future reference As an ENERGY STAR Partner Panasonic has determined that this product meets the ENERGY STAR guide...

Страница 2: ...t installed and used in accordance with the instructions may cause harmful interference to radio communications However there is no guarantee that interference will not occur in a particular installat...

Страница 3: ...d by the manufacturer or sold with the apparatus When a cart is used use caution when moving the cart apparatus combination to avoid injury from tip over 13 Unplug this apparatus during lightning stor...

Страница 4: ...with unit s speakers 23 Surround sound effects 23 Sound modes 23 Making settings for digital audio input 23 Linked operations with the TV VIERA LinkTM HDAVI ControlTM 24 Setting the audio link 24 Eas...

Страница 5: ...States and Puerto Rico on page 42 Operations in these instructions are described mainly with the remote control but you can perform the operations on the main unit if the controls are the same System...

Страница 6: ...ton again or adjust the volume Muting is canceled if the unit is turned off 16 Switch on off Secondary Video Picture in picture 17 Select the source BD SD Select disc drive or SD card drive 17 iPod Se...

Страница 7: ...ards the unit until it clicks into place Then push the succeeding hooks one by one until all have clicked into place 3 Check that the cover now moves correctly If it does not remove it and repeat the...

Страница 8: ...Video AVCHD JPEG DVD R Video AVCHD MP3 JPEG DVD R DL DVD RW Video AVCHD R RW R DL CD Music CD Music CD DA CD R CD RW Music CD DA MP3 JPEG SD SD Memory Card 8 MB to 2 GB Includes miniSD Card and micro...

Страница 9: ...anteed The digital audio content side of a DualDisc does not meet the technical specifications of the Compact Disc Digital Audio CD DA format so playback may not be possible SD card MiniSD Cards micro...

Страница 10: ...esets to delete the user settings 33 To return all settings to the factory preset The operation history may be recorded in the memory of this unit Using the remote control Insert so the poles and matc...

Страница 11: ...ont speakers C Subwoofer D Surround speakers Place the speakers at the same height or higher than ear level Use only supplied speakers Using other speakers can damage the unit and sound quality will b...

Страница 12: ...gital audio connection make settings to suit the type of audio from your digital equipment 23 HDMI The HDMI connection supports VIERA Link HDAVI Control 24 when used with a compatible Panasonic TV Ple...

Страница 13: ...asic connection AV OUT VIDEO OUT AUX 1 L R VIDEO OUT L R AUX L VIDEO IN R AUDIO IN L R AUDIO OUT VIDEO OUT AUX TV A Video cable included B Audio cable not included Connection for the better audio VIDE...

Страница 14: ...digital audio cable not included B Set Top Box cable TV VCR DVD recorder etc Refer to the operating instructions of the respective devices for the optimal connections Radio antenna connection Using an...

Страница 15: ...guage Select the language used on menu screen TV Aspect Select the aspect to suit your TV and preference Speakers position Specify the positioning of the surround speakers Speaker check Check if the c...

Страница 16: ...s OK 6 Press 3 4 to select the code 1 or 2 and press OK To change the code on the remote control 1 While pressing OK Press and hold the numbered button 1 or 2 which has the same number you selected in...

Страница 17: ...s set for TV AUDIO input DIGITAL IN 2 2 To enjoy audio from other devices with this unit s speakers 23 2 CABLE SAT is displayed next to DIGITAL IN when set for CABLE SAT AUDIO input To enjoy sound fro...

Страница 18: ...MUSIC Dolby Pro Logic II Music Adds 5 1 channel effects to stereo sources 7 1CH VS 7 1CH Virtual Surround You can enjoy 6 1 7 1 channel surround like effect using 5 1 channel speakers S SURROUND Super...

Страница 19: ...ns may not work depending on the media and contents Press STOP The stopped position is memorized Resume play function Press 1 PLAY to restart from this position The position is cleared if the tray is...

Страница 20: ...OK 4 Press 3 4 to select Card Management and press OK 5 Press 3 4 to select BD Video Data Erase or Format SD Card and press OK 6 Press 2 1 to select Yes and press OK 7 Press 2 1 to select Start and p...

Страница 21: ...ew screen is displayed Start Slideshow You can display still pictures one by one at a constant interval Slideshow Settings Display Interval Change the display interval Transition Effect Set display me...

Страница 22: ...the same channel preset 1 Press RADIO to select FM 2 Press the numbered buttons to select the channel To select a 1 digit number e g 1 1 B OK To select a 2 digit number e g 12 1 B 2 Alternatively pres...

Страница 23: ...tion on this operation please refer to the Changing the sound modes section on page 18 Select to suit the type of audio from the DIGITAL AUDIO IN terminals on the main unit Press EXT IN several times...

Страница 24: ...UDIO ON If the input channel of the STB on the TV is changed or if you want to change the device allocated for the linked operations select CABLE SAT AUDIO OFF in step 2 above and then repeat steps 1...

Страница 25: ...cally adjusted enabling you to enjoy smooth audio for the picture 30 Audio Delay This function works only when BD DVD SD AUX 1 ARC 1 D IN 1 DIGITAL IN 1 1 or D IN 2 DIGITAL IN 2 2 is selected as the s...

Страница 26: ...display the previous or next page e g music playback screen To exit press TOP MENU DIRECT NAVIGATOR 1 Press iPod to select IPOD 2 Press STATUS several times to select ALL on the unit s display 3 Switc...

Страница 27: ...isplay is selected For music and video playback only Surround sound effect and sound mode are available 18 Advanced operations Playback menu 1 Press BD SD to select BD DVD 2 Press DISPLAY e g BD Video...

Страница 28: ...d other material recorded on DVD Video at 24p are output at 24p Only when you have selected On in 24p Output 30 Sound Effects 1 2 Discs recorded at 48 kHz or less This feature gives you brighter sound...

Страница 29: ...age for subtitle If Automatic is selected and the language selected for Audio Language is not available subtitles of that language will automatically appear if available on that disc Enter a code 37 w...

Страница 30: ...ge HDMI Connection Press OK to show the following settings Dolby D Dolby D Dolby TrueHD DTS DTS HD Select the audio signal to output Select PCM when the connected equipment cannot decode the respectiv...

Страница 31: ...ontrol function when connected with an HDMI cable to a device that supports HDAVI Control Select Off when you do not want to use HDAVI Control Deep Color Output This setting is for selecting whether t...

Страница 32: ...peakers except subwoofer to a wall The wall or pillar on which the speakers are to be attached should be capable of supporting 10 kg 22 lbs per screw Consult a qualified building contractor when attac...

Страница 33: ...is selected as a source press and hold SKIP on the remote control and 1 Play on the unit at the same time for more than 5 seconds The ratings level returns to the factory preset No power Insert the AC...

Страница 34: ...available Instead use an optical digital audio cable or an audio cable to have the TV sound 12 13 If the TV is not ARC compatible and only the HDMI connection is used an extra audio connection is nec...

Страница 35: ...ear and side of the unit U72 U73 The HDMI connection acts unusually jTurn the unit and TV off jDisconnect the HDMI cable between the player and the TV HDMI ONLY Some BD Video discs can only be output...

Страница 36: ...te 44 1 kHz 48 kHz Reference ID3 tags version 1 2 2 2 3 2 4 Only titles and the names of artists JPEG File format JPEG Extension Files must have the extension jpg or JPG Picture resolution between 34k...

Страница 37: ...ish Czech Slovak Hungarian Finnish Arabic Hindi Persian Indonesian Maori Bulgarian Romanian Greek Turkish Others Abkhazian 6566 Afar 6565 Afrikaans 6570 Albanian 8381 Amharic 6577 Arabic 6582 Armenian...

Страница 38: ...tion AVCHD and the AVCHD logo are trademarks of Panasonic Corporation and Sony Corporation SDXC Logo is a trademark of SD 3C LLC Blu ray Disc is trademark BONUSVIEW is trademark of Blu ray Disc Associ...

Страница 39: ...nal format achieved by improving the previous DTS DTS ES and DTS 96 24 formats It is compatible with sampling frequency 96 kHz 48 kHz BD Video supports up to 7 1 channel output DTS HD Master Audio Thi...

Страница 40: ...0 MHz 100 kHz step Antenna terminals 75 unbalanced SPEAKER SECTION FRONT SPEAKERS SB HF480 Type 1 WAY 1 SPEAKER Bass ref Full range 6 5 cm 2 1 2q CONE TYPE Impedance 3 Output sound pressure 78 dB W 1...

Страница 41: ...MI AV output Output format 1080p 1080i 720p 480p Output connector Type A 19 pin HDMI Deep Color x v ColorTM High Bit rate Audio This unit supports HDAVI Control 5 function LASER Specification Class I...

Страница 42: ...allation set up adjustments misadjustment of consumer controls improper maintenance power line surge lightning damage modification introduction of sand humidity or liquids commercial use such as hotel...

Страница 43: ...Reference 43 VQT2T10...

Страница 44: ...mat 20 Frame by frame 19 H HDMI 13 39 High Clarity Sound 28 30 I iPod 26 J JPEG 20 36 L Language Audio 29 Code list 37 Menu 29 On screen 30 Soundtrack 28 Subtitle 28 29 LPCM 39 M Menu Playback 27 Pop...

Отзывы: