background image

RQTX0282

ENGLISH

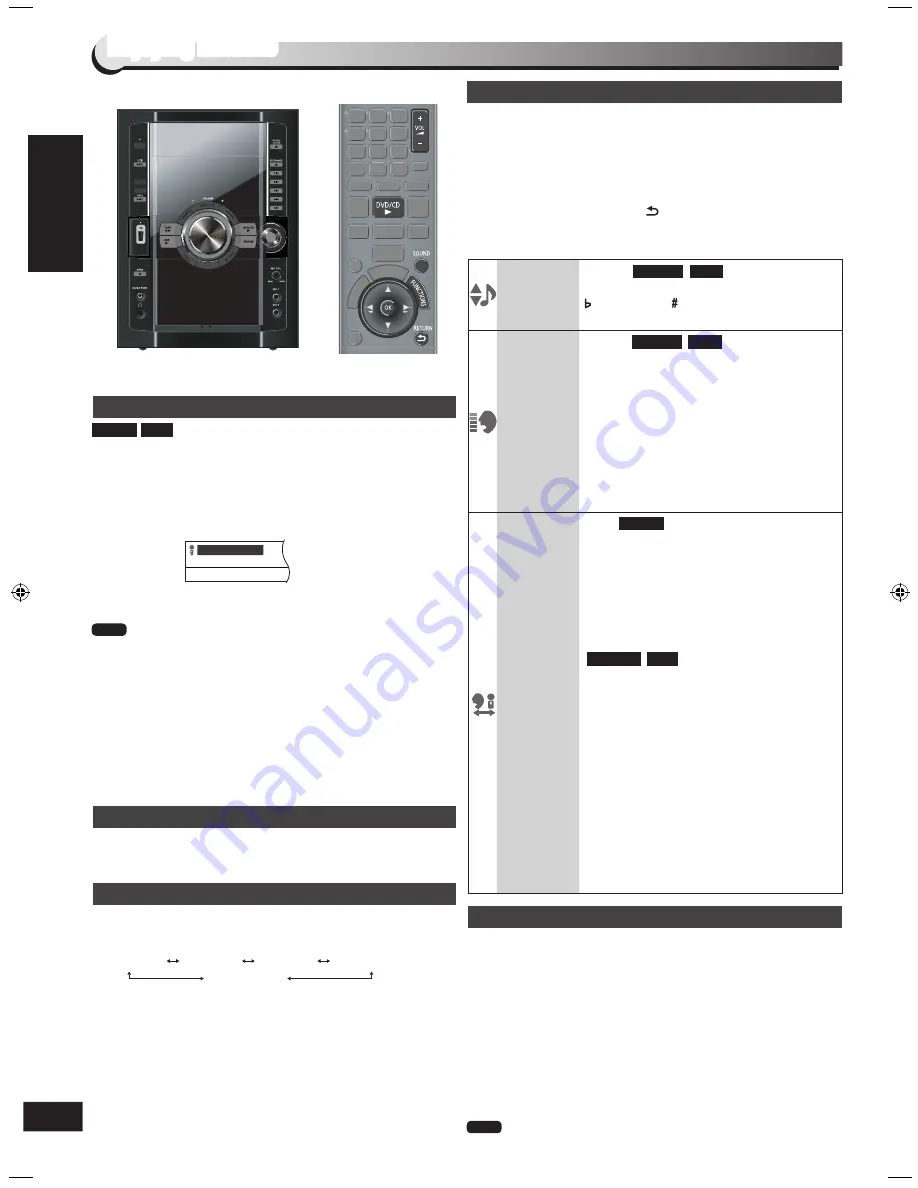
Enjoying karaoke

Enjoying karaoke


1

  Turn [MIN, MIC VOL, MAX] on the main unit to “MIN” and 

connect the microphone (not included). 

Microphone plug type: Ø6.3 mm monaural.

2

  Insert the disc and press [DVD/CD 

q

] to play.

3

  Press [FUNCTIONS] and select On-Screen Menu 4 to 

display KARAOKE mode.

 (

 page 21).


4

  Start singing and adjust volume with [+ VOL -] and  

[MIN, MIC VOL, MAX] (main unit).

If a strange noise (howling) is emitted during use, move 
the microphone away from the speakers, or turn down the 
microphone volume.
When you are not using the microphone, disconnect it from 
the microphone jack, and turn down the microphone volume 
level to minimum.
During CDDA to USB recording time, mic input cannot be 
recorded to USB.
Surround effects (

 page 29) are disabled when mircophone 

is inserted.

DVD-V VCD

KARAOKE MODE

OFF

Note

Every time you turn [MIN, MIC VOL, MAX] on the main unit to 
adjust the level: MIN 

  .... 

  MAX

1

  Press [SOUND] to select “ECHO”.

2

  Press [

w

q

] to change the level.


The effect increases with the level.
Echo effect setting is only available when a microphone is 
connected.


1

  Press [FUNCTIONS] to display the Karaoke mode  

on-screen menu.

2

  To select “ON”, press [OK] followed by [

e

,

r

] and [OK] to 

confirm.

3

  Press [

e

,

r

,

w

q

] to select the item and [OK] to confirm.

4

  Press [

e

,

r

] to make the settings and [OK] to confirm.

To exit the screen, press [     , RETURN].

Items shown differ depending on the type of disc as well as the 
recording format.

Prepare for recording (

 page 25).

Select the audio mode. (

 see above) 

1

  Turn [MIN, MIC VOL, MAX] to adjust the microphone volume.

2

  Press [

*

 REC, TAPE] on the main unit and then start 

singing.

You can also use the microphone without any backing music.

1

  Press [

*

 REC, TAPE] on the main unit and speak through 

the microphone.

2

  Turn [MIN, MIC VOL, MAX] to adjust the microphone volume.

To stop recording

Press [

g

].

To play the recorded tape, be sure to select the “L R” mode.

Note

KEY 
CONTROL

Except 


To change the key of a song

6 (lowest) to  6 (highest)

OFF: Normal

VOCAL 
CANCEL

Except 


Use this function on stereo sources to block 
out the vocals so you can sing along to the 
music.

OFF 


ON

This function is not suitable for the following 
sources.

Monaural recordings
Classical music or works performed by a 
limited number of instruments
Chorus works or duets


AUDIO 
CHANGE

Solo


OFF:

 No vocal

ON:

 Vocal

Duet
OFF:

 No vocal

V1+V2:

 Vocal 1 and 2

V1:

 Vocal 1

V2:

 Vocal 2

Choose “OFF” for karaoke.
Choose “V1” or “V2” to duet with the 
player.


and other sources

Television displays are shown in 
parentheses ( ).

L R:

 Left channel sound is heard from the 

left speaker and right channel sound is 
heard from the right speaker — vocal 
and accompaniment.

L:

 Only left channel sound — no vocal.

R:

 Only right channel sound — vocal.

L+R:

 Left channel sound is mix with the 

right channel sound and the mixed 
signal is output through the left and 
right speakers respectively.

Select “L” for karaoke.
“R” and “L” may be reversed.


DVD-V

VCD

DVD-VR

MPEG4 DivX

MPEG4 DivX

Basic play

Microphone volume adjustment

Adding an echo effect

Using Karaoke mode

To record your karaoke performance

ECHO 1

ECHO 2

ECHO 3

ECHO 4

ECHO OFF

28

SC-VK680_GAGN_EN.indb   28

5/20/2009   10:41:15 AM

Содержание SC-VK680

Страница 1: ...Your unit may not look exactly the same as illustrated Operations in these instructions are described using the remote control but you can do the operations on the main unit if the controls are the same Region number The player plays DVD Video marked with labels containing the region number or ALL Region Number Southeast Asia and Thailand 3 Australia and New Zealand 4 Example Southeast Asia and Th...

Страница 2: ...NFINED SPACE ENSURE THE UNIT IS WELL VENTILATED TO PREVENT RISK OF ELECTRIC SHOCK OR FIRE HAZARD DUE TO OVERHEATING ENSURE THAT CURTAINS AND ANY OTHER MATERIALS DO NOT OBSTRUCT THE VENTILATION VENTS DO NOT OBSTRUCT THE UNIT S VENTILATION OPENINGS WITH NEWSPAPERS TABLECLOTHS CURTAINS AND SIMILAR ITEMS DO NOT PLACE SOURCES OF NAKED FLAMES SUCH AS LIGHTED CANDLES ON THE UNIT DISPOSE OF BATTERIES IN A...

Страница 3: ...e 28 Sound field and sound quality 29 Surround 29 Troubleshooting guide 34 Language code list 37 Memory reset Initialization 37 Playing RAM and DVD R RW DVD VR discs 19 Playing the programs 19 Playing the playlist 19 Discs Using on screen menus 20 On Screen Menu 1 Disc Play 20 On Screen Menu 2 Video 21 On Screen Menu 3 Audio 21 On Screen Menu 4 Karaoke 21 Discs Changing the player settings 22 DISC...

Страница 4: ...be used for a long time Placement Set the unit up on an even surface away from direct sunlight high temperatures high humidity and excessive vibration These conditions can damage the cabinet and other components thereby shortening the unit s service life Place it at least 15 cm away from wall surfaces to avoid distortion and unwanted acoustical effects Do not place heavy items on the unit Do not u...

Страница 5: ...corded using a format different from DVD Video Format therefore some functions cannot be used 6 MPEG4 data recorded with the Panasonic SD multi cameras or DVD video recorders conforming to SD VIDEO specifications ASF standard MPEG4 Simple Profile video system G 726 audio system 7 Functions added with DivX Ultra are not supported 8 A process that allows play on compatible equipment To play a disc t...

Страница 6: ...lder and file names This should be with numbers that have an equal number of digits and should be done in the order you want to play them this may not work at times Files must have the extension below Extension WMA or wma Compatible compression rate between 48 kbps and 320 kbps You cannot play WMA files that are copy protected This unit does not support Multiple Bit Rate MBR 001 root track track t...

Страница 7: ...ou cannot play this content when the number of remaining plays is zero RENTED MOVIE EXPIRED or RENTAL EXPIRED is displayed When playing this content The number of remaining plays is reduced by one if you press or press SETUP you press g Press h pause to pause play you press u i skip or t y search etc and arrive at another content or the start of the content being played The RESUME function page 16...

Страница 8: ... the unit on off 13 30 Clock and timer setting 13 30 PLAY REC timer on off 30 1 Select channels and title numbers etc Enter numbers 16 20 22 33 Show disc information Select a disc 16 17 Play loaded discs in order 17 9 8 7 12 10 Cancel an item 16 18 Deleting an item 27 13 11 Remote control Source select q USB selector and playback 14 26 27 7 TAPE Tape playback and direction 14 24 25 EXT IN FM AM FM...

Страница 9: ...stereo not included Avoid listening for prolonged periods of time to prevent hearing damage Excessive sound pressure from earphones and headphones can cause hearing loss 10 11 12 16 13 14 15 17 Disc trays 7 15 OPEN CLOSE 7 15 EXCHANGE 15 1 q to 5 q disc direct play 15 Enhancing bass sound 29 MIN MIC VOL MAX 28 Microphone MIC 1 MIC 2 jacks 28 Cassette holder 24 25 24 25 21 22 23 19 20 26 27 28 Skip...

Страница 10: ...is perfectly inserted depending on the type of inlet used the front part of the connector may jut out as shown in the drawing However there is no problem using the unit Appliance inlet Connector Approx 3 5 mm AC mains lead To household mains socket FM indoor antenna Tape the antenna where reception is best Before connecting the AC mains lead set the voltage Voltage Selector Use a flat head screwdr...

Страница 11: ...or progressive output Connection using these terminals outputs the colour difference signals PB PR and luminance signal Y separately in order to achieve high fidelity in reproducing colours The description of the component video input terminals depends on the television or monitor e g Y PB PR Y B Y R Y Y CB CR Connect to terminals of the same colour Television not included Television not included ...

Страница 12: ...nt them from falling Take proper precautions to prevent the speakers from falling if you cannot set them up on an even surface Positioning for best effect How you set up your speakers can affect the bass and the sound field Note the following points Place speakers on flat secure bases Placing speakers too close to floors walls and corners can result in excessive bass Cover walls and windows with a...

Страница 13: ...ress the button Within 7 seconds or so Press u 2 REW or i 1 FF to set the time Press CLOCK TIMER to finish setting the time This is a 24 hour clock Displaying the time Press CLOCK TIMER once when the unit is on or in standby mode The time is displayed for a few seconds Setting the time DEMO function Turn on the television and select the appropriate video input on the television to suit the connect...

Страница 14: ...ce is connected you can also access playback or menus from the START menu Example When the on screen control panel appears Example DVDV when Playback Disc is selected from the START menu You can operate the playback with the indicated controls OK RETURN DVD CD Input Selection MENU DVD TOP MENU DVD Playback Disc DVD V DVD V OK RETURN DVD CD Input Selection Note Confirm the audio connection to the A...

Страница 15: ... disc handling procedure Disc tray Label must face upward 1 DVD VR Remove the disc from its cartridge before use Close the disc tray Start play Selecting the desired tray OPEN CLOSE OPEN CLOSE EXCHANGE You can also press 1 q to 5 q to select and play the other loaded discs 2 1 3 4 5 DVD CD Turn on the unit or OPEN CLOSE 2 1 3 4 5 OPEN CLOSE Press again to close the tray DISC CONTINUES TO ROTATE WH...

Страница 16: ...ams page 19 Shows a disc menu Shows a playlist with Playback control PBC Shows disc menu DVD V VCD DVD VR DVD V DVD VR Return to previous screen Skip Frame by frame during pause Press DVD CD q to continue normal play DVDVR VCD Forward direction only DVD V DVD VR VCD VCD DVD VR Pause Press DVD CD q to resume play Slow motion during pause Play speed increases up to 5 steps Press DVD CD q to continue...

Страница 17: ...topped The function also cancels when you open the current disc tray switch the unit to standby or select another source You cannot change the mode during play or while in program or random mode Video CD playback control is disabled WMA VCD CD Note Only when the elapsed play time can be displayed Works with all JPEG contents During play Press REPEAT to select an item to be repeated Example dvd d T...

Страница 18: ...rt play When CD MODE is on page 17 You can program all the items on all the discs 1 Press e r to select the disc and press OK 2 Press e r to select the item and press OK Press ar RETURN to select other discs Repeat steps 1 and 2 to program other items 3 Press DVD CD q Selecting all items Press e r to select ALL and press OK Clearing the program Press q then press e r to select the item and press C...

Страница 19: ...ture in other groups 1 Press e to select the group name 2 Press w q to select the group and press OK 3 Press e r w q to select the picture and press OK JPEG NO 4 1 9 2 C G 1 Group and content number Group name To exit the screen press MENU Titles appear only if the titles are recorded on the disc You cannot edit programs playlists and disc titles DVD VR Playing RAM and DVD R RW DVD VR discs This w...

Страница 20: ...d left right 1 Center 2 Front left Front right 3 Front left Front right Center PLAY SPEED To change play speed from 0 6 to 1 4 in 0 1 units Press DVD CD q to return to the normal play After you change the speed Audio output switches to 2 channel stereo Sampling frequency of 96 kHz is converted to 48 kHz This may not work depending on the disc s recording REPEAT MODE page 17 Repeat play A B Repeat ...

Страница 21: ...is if the edges of the film content appear jagged or rough when AUTO is selected However if the video content is distorted then select AUTO When playing NTSC discs AUTO1 normal Automatically detects the film and video content and appropriately converts it AUTO2 In addition to AUTO1 automatically detects film contents with different frame rates and appropriately converts it VIDEO Select when using ...

Страница 22: ... the on screen instructions PASSWORD Change the password for RATINGS above 1 Select CHANGE and press OK 2 Enter the current password with the numeric buttons then press OK 3 Enter the new password with the numeric buttons then press OK If VERIFY is displayed please verify the password and insert it again Select Confirm Select Confirm Select Confirm Select 1 Language options FRENCH GERMAN DUTCH POL...

Страница 23: ... This does not work during video playback DEFAULTS This returns all values in the Setup menus to the default settings RESET The password screen is shown if RATINGS page 22 is set Please enter the same password and press OK then turn the unit off and on again DivX OTHERS menu DISPLAY menu SETTING STATE Display the current setting of the items below LANGUAGE Choose the language for the on screen mes...

Страница 24: ...nel is erased if another station is preset to that channel Selecting a preset station Press the numeric buttons to select the channel OR Press w q or u 2 REW i 1 FF to select the channel Preset tuning by remote control only Every time you press PLAY MODE One side is played Both sides are played forward reverse Play stops at the end of the reverse side Both sides are played repeatedly until g main ...

Страница 25: ...to record Press DVD CD q and then g Recording specific disc s or tracks Program play page 18 Music Port Using the Music Port page 31 AUX Using an external unit page 32 USB Connect the USB mass storage device USB Play and Recording page 26 Press q USB and then g Recording specific tracks Program play page 18 4 Press and hold REC followed by TAPE main unit REC TAPE to start recording If the tape fin...

Страница 26: ...s File name File extension Still pictures JPG 1 jpg jpeg Music MP3 WMA mp3 wma Video MPEG4 2 asf 1 It may not be possible to play all the files due to the condition on how they were created 2 For Panasonic D Snap DIGA Maximum number of folders 255 Maximum number of files 4000 Maximum length of folder name 28 Maximum length of file name 28 CBI Control Bulk Interrupt is not supported Digital Cameras...

Страница 27: ...r 4 Press w q to choose Yes or No then press OK File will be deleted if you choose Yes and DELETING will blink on the FL display This function allows you to erase unwanted tracks quickly and easily Erasing the recorded items No Yes mp3 002 Is it OK to delete USB WRITE PROTECTED will scroll on FL display if the device is locked Folders containing subfolders or unsupported files cannot be deleted No...

Страница 28: ...ing page 25 Select the audio mode see above 1 Turn MIN MIC VOL MAX to adjust the microphone volume 2 Press REC TAPE on the main unit and then start singing You can also use the microphone without any backing music 1 Press REC TAPE on the main unit and speak through the microphone 2 Turn MIN MIC VOL MAX to adjust the microphone volume To stop recording Press g To play the recorded tape be sure to s...

Страница 29: ...e selection H BASS ON H BASS OFF Pressing H BASS on the main unit will also makes the H BASS H BASS ON H BASS OFF Adjusting the subwoofer Press SOUND to select SUBW LVL and press q to make selection Pressing SUBWOOFER on the main unit also changes the setting Adding an echo effect Enjoying karaoke page 28 MID BASS TREBLE On the main unit 1 Press MANUAL EQ BASS is selected and adjusted by turning B...

Страница 30: ...anges to the source or volume 3 Do steps 3 to 4 left To check the settings Press CLOCK TIMER while the unit is on to select zPLAY or zREC The settings are shown in the following order Play timer start time finish time source volume Record timer start time finish time source When the unit is off 1 Press CLOCK TIMER 2 During the clock display press CLOCK TIMER again If you use the unit after the tim...

Страница 31: ...EP A OFF to select A OFF again The sleep timer will be turned off when you start recording The sleep timer always has priority Be sure not to overlap timer settings You can use the sleep timer in combination with the play record timer Make sure the unit is off before the play record timer s start time The Auto off function is maintained even if the unit is turned off SLEEP 30 SLEEP 60 SLEEP 90 SLE...

Страница 32: ...on Rear panel of this unit Analogue player not included R L Using an external unit FM MUSIC PORT AUX AM Enjoy the powerful movie theater and hall like sound available with multiple channel audio found on DVD Video by connecting an amplifier and speakers Recording Output With DVD the following conditions must be met a the disc does not have protection preventing digital recording and b the recordin...

Страница 33: ...oth steps REMOTE 1 appears on the main unit during step 1 The remote control cannot work with the main unit if their modes are different REMOTE 1 or REMOTE 2 appears on the main unit display when you operate the remote control If REMOTE 1 appears The main unit is in REMOTE 1 mode Press and hold OK and 1 on the remote control for at least 2 seconds If REMOTE 2 appears The main unit is in REMOTE 2 m...

Страница 34: ...e disc has something recorded in it 10 11 You have forgotten your ratings password Reset all the settings to Factory Preset While stopped and DVD CD is the source press and hold g DEMO on the main unit and 10 on the remote control until INITIALIZED disappears from the television Turn the unit off and on again All settings will return to the default values Other products respond to the remote contr...

Страница 35: ...AL television NTSC DISC OUT in VIDEO menu 22 23 Picture stops Picture may stop if the DivX files are greater than 2 GB Menus not displayed correctly Change the zoom ratio to NORMAL Change TV ASPECT in VIDEO menu 21 22 Auto zoom function does not work well Turn off television zoom function Use the other preset aspect ratios or manual adjustment Zoom function may not work well especially in dark sce...

Страница 36: ... FULL Total number of USB folders exceeds 255 26 FILE FULL The numbers of USB files exceeds 4000 26 NO MP3 Select MP3 track before recording can begin 26 F61 Check and correct the speaker cord connections If this does not fix the problem there is a power supply problem Consult the dealer 10 F76 There is a power supply problem Consult the dealer DVD U11 Disc is dirty Wipe it clean 7 ERROR Incorrect...

Страница 37: ...8373 Slovak 8375 Slovenian 8376 Somali 8379 Spanish 6983 Sundanese 8385 Swahili 8387 Swedish 8386 Tagalog 8476 Tajik 8471 Tamil 8465 Tatar 8484 Telugu 8469 Thai 8472 Tibetan 6679 Tigrinya 8473 Tonga 8479 Turkish 8482 Turkmen 8475 Twi 8487 Ukrainian 8575 Urdu 8582 Uzbek 8590 Vietnamese 8673 Volapük 8679 Welsh 6789 Wolof 8779 Xhosa 8872 Yiddish 7473 Yoruba 8979 Zulu 9085 When the following situation...

Страница 38: ... information of a frame still so picture quality is lower I P B I Intra coded picture This picture has the best quality and is the best to use when adjusting the picture P Predictive coded picture This picture is calculated based on past I or P pictures B Bidirectionally predictive coded picture This picture is calculated by comparing past and future I and P pictures so it has the lowest volume of...

Страница 39: ...ut Disc Number of channels FL FR 2 ch USB SECTION USB Port USB Standard USB 2 0 full speed Media file format support MP3 mp3 WMA wma JPEG jpg jpeg DivX divx avi MPEG4 asf USB device file system FAT 12 FAT 16 FAT 32 USB port power 500 mA Max Bit rate up to 4 Mbps DivX USB Recording Bit Rate 128 kbps USB recording speed 1x Recording file format MP3 mp3 CASSETTE DECK SECTION Type Auto Reverse Track s...

Страница 40: ...Panasonic Corporation Web Site http panasonic net RQTX0282 1L H0409AB1059 En ...

Отзывы: