background image

8

VQT4D53

Getting started

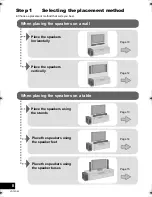
Choose a placement method that suits you best.

Step 1

Selecting the placement method

When placing the speakers on a wall

When placing the speakers on a table

Place the speakers 
horizontally

Page 10

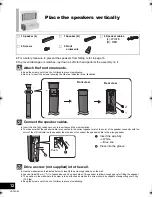
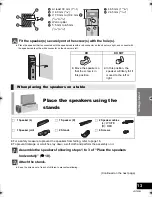
Place the speakers 
vertically

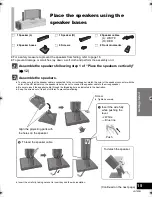
Place the speakers using 
the speaker bases

Place the speakers using 
the stands

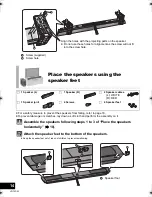
Place the speakers using 
the speaker feet

Page 12

Page 13

Page 14

Page 15

SC-HTB20P_VQT4D53_eng.book  8 ページ  2012年1月16日 月曜日 午後8時3分

Содержание SC-HTB20

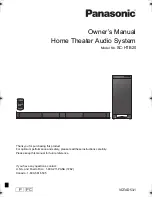
Страница 1: ...hank you for purchasing this product For optimum performance and safety please read these instructions carefully Please keep this manual for future reference If you have any questions contact U S A an...

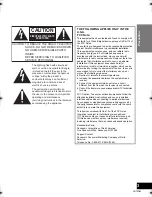
Страница 2: ...Unit To reduce the risk of fire electric shock or product damage j Do not expose this unit to rain moisture dripping or splashing j Do not place objects filled with liquids such as vases on this unit...

Страница 3: ...er there is no guarantee that interference will not occur in a particular installation If this equipment does cause harmful interference to radio or television reception which can be determined by tur...

Страница 4: ...When placing the speakers on a table 13 Speaker fall prevention measures 16 Step 3 Connections 18 Basic connection 18 Connection with other devices 19 Speaker cable connection 20 AC power supply cord...

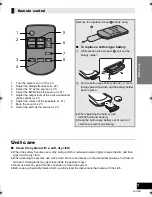
Страница 5: ...ent with the active subwoofer The illustrations shown may differ from your unit Operations in this Owner s Manual are described mainly with the remote control but you can perform the operations on the...

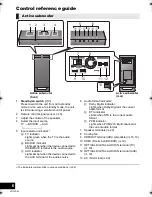
Страница 6: ...icator Lights amber when the device connected to the AUX terminal is the audio source 6 Audio format indicators D Dolby Digital indicator Lights when Dolby Digital is the current audio format E DTS in...

Страница 7: ...e system use a fine cloth Do not use tissues or other materials towels etc that can fall apart Small grains may get stuck inside the speaker cover Never use alcohol paint thinner or benzine to clean t...

Страница 8: ...method When placing the speakers on a wall When placing the speakers on a table Place the speakers horizontally Page 10 Place the speakers vertically Place the speakers using the speaker bases Place t...

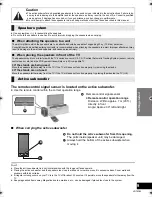
Страница 9: ...ttaching the speakers to a wall The wall or pillar to which the speakers are to be attached should be capable of supporting 33 kg 72 8 lbs per screw Consultation with a qualified building contractor i...

Страница 10: ...versa Be sure to verify the orientation of the speaker with the label on the rear of the speaker Use the screws to secure the speakers to the speaker joint Keep the screws out of reach of children to...

Страница 11: ...enough space for fitting the speaker The position in the wall where the screw is to be attached as well as the screw should be capable of supporting over 33 kg 72 8 lbs Keep the screws out of reach o...

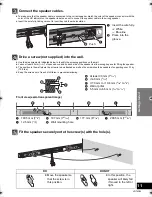
Страница 12: ...the color of the L R indicator on the speaker label so as not to connect the speaker cable to the wrong speaker Drive a screw not supplied into the wall Use the measurements indicated below to identif...

Страница 13: ...e speakers following steps 1 to 3 of Place the speakers horizontally 10 Attach the stands Keep the screws out of reach of children to prevent swallowing Continued on the next page A At least 30 mm 13...

Страница 14: ...10 Attach the speaker feet to the bottom of the speakers Keep the speaker feet out of reach of children to prevent swallowing A Screw supplied B Screw hole Place the speakers using the speaker feet 1...

Страница 15: ...ot to connect the speaker cable to the wrong speaker Be sure to insert the speaker cable through the threading hole as indicated in the illustration Keep the screws out of reach of children to prevent...

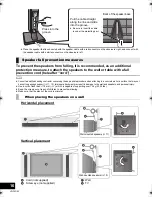
Страница 16: ...ng enough support 11 13 Improper attachment may result in damage to the wall and speakers and personal injury Use a cord of less than 1 5 mm 1 16q which is capable of supporting over 10 kg 22 05 lbs K...

Страница 17: ...ing the speakers on a table Horizontal placement Vertical placement A Cord not supplied B Screw eye not supplied Depending on the placement of the speakers the screwing position of the screw eye may d...

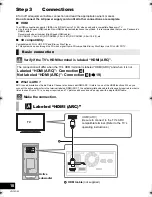
Страница 18: ...tible Blu ray Disc Player to a FULL HD 3D TV Verify if the TV s HDMI terminal is labeled HDMI ARC What is ARC ARC is an abbreviation of Audio Return Channel also known as HDMI ARC It refers to one of...

Страница 19: ...tem to the TV 18 A HDMI cable not supplied B Optical digital audio cable not supplied HDMI standby pass through Even if this system is in standby mode the audio and or video signal from the device con...

Страница 20: ...household AC outlet Speaker cable connection A RED Front speaker Rch B WHITE Front speaker Lch AC power supply cord connection A To a household AC outlet Install this unit so that the power cord can b...

Страница 21: ...ft s while adjusting the speaker volume or the subwoofer level The indicators will not blink when it has reached the maximum or minimum To mute the sound Press MUTE To cancel press the button again or...

Страница 22: ...Depending on audio signals sound other than dialog is emphasized The audio format indicators blink from left to right i or from right to left s while adjusting the dialog effect level The indicators w...

Страница 23: ...ssed 1 Depending on the audio source Dolby Virtual Speaker and 3D surround effect settings are automatically adjusted 2 This indicator will also light when the audio source is Multi channel audio When...

Страница 24: ...turn this system on The availability and function of the settings may vary depending on the TV Refer to the operating instructions for the TV for details Speaker control You can select whether audio o...

Страница 25: ...DVD to change the setting The setting changes each time BD DVD is pressed The setting will be reset to on when this system is turned off When off is selected the dialog effect level cannot be adjusted...

Страница 26: ...check points or if the solutions indicated in the following guide do not solve the problem refer to Customer Services Directory United States and Puerto Rico on page 30 if you reside in the U S A or...

Страница 27: ...nnected to the TV with only an HDMI cable make sure that the TV s HDMI terminal is labeled HDMI ARC If not connect using the optical digital audio cable 18 19 If this system is connected to a Panasoni...

Страница 28: ...25 When the subwoofer level or the dialog effect level is 1 21 22 The indicator blinks for 10 sec When the audio output mode is Auto mode 23 When the subwoofer level or the dialog effect level is 2 21...

Страница 29: ...eflex type Woofer 16 cm 6 1 2q cone typek1 MAIN UNIT GENERAL Power consumption 40 W In standby condition Approx 0 07 W When the other connected devices are turned off Power supply AC 120 V 60 Hz Dimen...

Страница 30: ...her than a Factory Service Center or other Authorized Servicer or damage that is attributable to acts of God THERE ARE NO EXPRESS WARRANTIES EXCEPT AS LISTED UNDER LIMITED WARRANTY COVERAGE THE WARRAN...

Страница 31: ...ion set up adjustments misadjustment of consumer controls improper maintenance power line surge lightning damage modification introduction of sand humidity or liquids commercial use such as hotel offi...

Страница 32: ...D symbol are trademarks of Dolby Laboratories Manufactured under license under U S Patent Nos 5 956 674 5 974 380 6 487 535 other U S and worldwide patents issued pending DTS the Symbol DTS and the S...

Отзывы: