background image

RQT87

2

2

5

Saf

e

ty precau

tio

ns

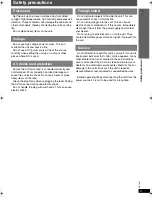
Safety precautions

Set the unit up on an even surface away from direct 

sunlight, high temperatures, high humidity, and excessive 
vibration. These conditions can damage the cabinet and 
other components, thereby shortening the unit’s service 
life. 

Do not place heavy items on the unit.

Do not use high voltage power sources. This can 

overload the unit and cause a fire.

Do not use a DC power source. Check the source 

carefully when setting the unit up on a ship or other 
places where DC is used.

Ensure the AC mains lead is connected correctly and 

not damaged. Poor connection and lead damage can 
cause fire or electric shock. Do not pull, bend, or place 
heavy items on the lead.

Grasp the plug firmly when unplugging the lead. Pulling 

the AC mains lead can cause electric shock. 

Do not handle the plug with wet hands. This can cause 

electric shock.

Do not let metal objects fall inside the unit. This can 

cause electric shock or malfunction.

Do not let liquids get into the unit. This can cause 

electric shock or malfunction. If this occurs, immediately 
disconnect the unit from the power supply and contact 
your dealer.

Do not spray insecticides onto or into the unit. They 

contain flammable gases which can ignite if sprayed into 
the unit.

Do not attempt to repair this unit by yourself. If sound is 

interrupted, indicators fail to light, smoke appears, or any 
other problem that is not covered in these instructions 
occurs, disconnect the AC mains lead and contact your 
dealer or an authorized service center. Electric shock or 
damage to the unit can occur if the unit is repaired, 
disassembled or reconstructed by unqualified persons.

Extend operating life by disconnecting the unit from the 

power source if it is not to be used for a long time.

Placement

Voltage

AC mains lead protection

Foreign matter

Service

HT540En.book  Page 5  Monday, February 27, 2006  8:15 PM

Содержание SC-HT540

Страница 1: ...ing this product please read the instructions completely Please keep this manual for future reference Note EB on the packaging indicates the United Kingdom 2 ALL 3 5 2 Advanced progressive scan Provides a smoother and sharper image page 12 Compatible with a variety of media formats DVD RAM DVD Audio DVD Video DivX and more page 16 High performance sound effects Sound quality enhancement Bass enhan...

Страница 2: ...ange of finished products take a browse on our website for further details Interested in purchasing an extended guarantee Please call 0870 240 6284 or visit our website www panasonic co uk guarantee Unless otherwise indicated illustrations in these operating instructions are of SC HT540 Operations in these instructions are described mainly with the remote control but you can perform the operations...

Страница 3: ...screen menus 24 Main menu 24 Other Settings 25 Changing the player settings 28 Changing the delay time of the speakers 31 Using the radio 32 Presetting stations automatically 32 Selecting the preset channels 32 Manual tuning 32 RDS broadcasting 33 Using an outdoor antenna optional 33 Using sound effects 34 Changing the sound quality Sound Field Control 34 Enhancing the sound from the center speake...

Страница 4: ... may not correspond with the coloured markings identifying the terminals in your plug proceed as follows The wire which is coloured Blue must be connected to the terminal which is marked with the letter N or coloured Black or Blue The wire which is coloured Brown must be connected to the terminal which is marked with the letter L or coloured Brown or Red WARNING DO NOT CONNECT EITHER WIRE TO THE E...

Страница 5: ... the plug with wet hands This can cause electric shock Do not let metal objects fall inside the unit This can cause electric shock or malfunction Do not let liquids get into the unit This can cause electric shock or malfunction If this occurs immediately disconnect the unit from the power supply and contact your dealer Do not spray insecticides onto or into the unit They contain flammable gases wh...

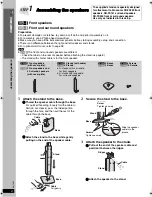
Страница 6: ...ll the rest of the cable through the base 2 Attach the stand to the base while gently pulling on the end of the speaker cable 2 Secure the stand to the base 3 Attach the speaker to the stand 1 Pull out the end of the speaker cable and position it between the ridges 2 Attach the speaker to the stand STEP1 Assembling the speakers The supplied stands are specially designed for attachment to Panasonic...

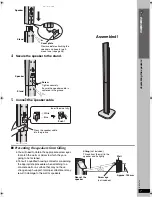
Страница 7: ... or a surface that may not have strong enough support Improper attachment may result in damage to the wall or speakers Speaker Stand Cover plate Remove before attaching the speaker and keep for wall mount use page 38 Speaker Stand Screw Tighten securely Ensure the speaker cable is centered in the groove _ White Blue Push Press the speaker cable into the groove Insert the wire fully Assembled Strin...

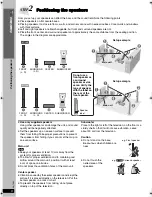
Страница 8: ...tion To allow for proper ventilation and to maintain good airflow around the main unit position it with at least 5 cm of space on all sides Do not block the ventilation holes of the main unit Center speaker Vibration caused by the center speaker can disrupt the picture if it is placed directly on the television Put the center speaker on a rack or shelf To prevent the speakers from falling do not p...

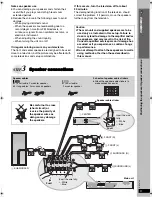
Страница 9: ... to damage to the amplifier and or the speakers and may result in the risk of fire Consult a qualified service person if damage has occurred or if you experience a sudden change in performance Do not attempt to attach these speakers to walls using methods other than those described in this manual STEP3 Speaker connections 4 4 2 2 6 6 5 3 5 3 1 1 SURROUND Rch Rch SURROUND Rch Rch FRONT WOOFER SUB L...

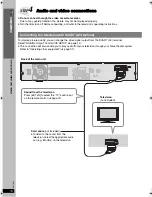
Страница 10: ... you to play audio from your television through your home theater system Refer to Operating other equipment page 37 Connecting to a television with SCART AV terminal STEP4 Audio and video connections PB PR Y INTERLACE PROGRESSIVE COMPONENTVIDEO OUT VIDEO VIDEO OUT OUT r s S VIDEO S VIDEO OUT OUT R L AUX AUX AV Television not included Back of the main unit Scart cable not included To listen to the ...

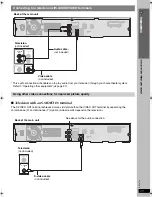
Страница 11: ...O S VIDEO OUT OUT AV r s R L AUX AUX VIDEO VIDEO OUT OUT AUDIO OUT L R VIDEO IN AUDIO IN VIDEO OUT This audio connection will enable you to play audio from your television through your home theater system Refer to Operating other equipment page 37 Television not included Back of the main unit Video cable not included Audio cable not included PB PR Y INTERLACE PROGRESSIVE COMPONENTVIDEO OUT VIDEO V...

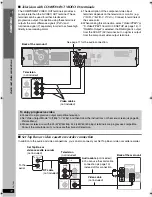
Страница 12: ...e television Set Video Output Mode to 480p or 576p and then follow the instructions on the menu screen page 26 Picture Menu Panasonic televisions with 625 576 50i 50p 525 480 60i 60p input terminals are progressive compatible Consult the manufacturer if you have another brand of television PB PR Y R L AUX AUX INTERLACE PROGRESSIVE COMPONENTVIDEO OUT VIDEO VIDEO OUT OUT S VIDEO S VIDEO OUT OUT AV r...

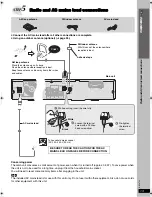
Страница 13: ...pe To household mains socket AC 230 240 V 50 Hz AC mains lead Main unit AM loop antenna Stand the antenna up on its base Place the antenna where reception is best Keep loose antenna cable away from other wires and cables Click AM loop antenna FM indoor antenna AC mains lead FM indoor antenna Affix this end of the antenna where reception is best Connect the AC mains lead after all other connections...

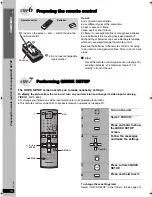
Страница 14: ...ary settings To display the picture from the main unit turn on your television and change its video input mode e g VIDEO 1 AV 1 etc To change your television s video input mode refer to its operating instructions This remote control can perform some basic television operations page 37 To change these settings later Select QUICK SETUP in the Others tab page 30 STEP6 Preparing the remote control R6 ...

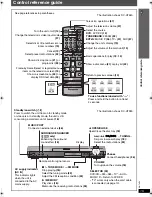
Страница 15: ...nnected page 10 OPEN CLOSE Open Close the disc tray 18 TUNE MODE FM MODE Stop playing 18 Select the tuning mode 32 Adjust the FM reception condition 32 1 MEMORY Play discs 18 Memorize the receiving radio stations 32 4 5 X TUNING W Skip or slow search play 18 Select the radio stations 32 Standby on switch Í I Press to switch the unit from on to standby mode or vice versa In standby mode the unit is...

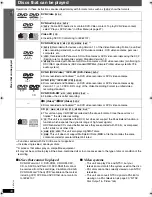
Страница 16: ...Format a unified video recording standard such as DVD video recorders DVD video cameras personal computers etc JPEG Recorded with Panasonic SD multi cameras or DVD video recorders using the DCF Design rule for Camera File system Standard Version 1 0 MPEG4 Recorded with Panasonic SD multi cameras or DVD video recorders conforming to SD VIDEO specifications ASF standard MPEG4 Simple Profile video sy...

Страница 17: ...ge 30 DivX Registration in Others tab We recommend that you make a note of this code for future reference After playing DivX VOD content for the first time another registration code is then displayed in DivX Registration Do not use this registration code to purchase DivX VOD content If you use this code to purchase DivX VOD content and then play the content on this unit you will no longer be able ...

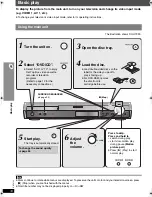
Страница 18: ... SURROUND ENHANCER VOLUME Press to skip Press and hold to search during play start slow motion play during pause Motion picture part Press 1 Play to start normal play 6 Adjust the volume 5 Start play The tray is automatically closed To change the sound quality page 34 3 Open the disc tray Stop 2 Select DVD CD Select AUX or TV to enjoy Set Top Box video cassette recorder or television programs Refe...

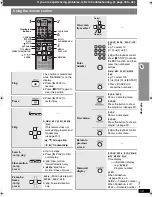
Страница 19: ...1 2 5 6 SLOW SEARCH RETURN SKIP STOP PAUSE TOP MENU DIRECT NAVIGATOR MENU PLAY LIST FL DISPLAY ENTER CANCEL Numbered buttons On screen item select Enter number DVD VR DVD A DVD V VCD CD e g To select 12 S10 1 2 VCD with playback control Press STOP to cancel the PBC function and then press the numbered buttons WMA MP3 JPEG MPEG4 DivX e g To select 123 1 2 3 ENTER Press CANCEL to cancel the number s...

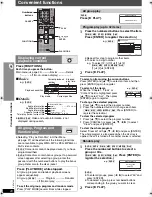
Страница 20: ... playback condition All group Program and Random play Press PLAY MODE while stopped All group program and random playback screens appear sequentially All group DVD A _ Program Random off Normal play __ _ To exit the all group program and random mode Press PLAY MODE several times while stopped CANCEL FUNCTIONS PLAY MODE ENTER PLAY Numbered buttons FUNCTIONS Chapter Time 4 Title 1 0 41 23 Program Pl...

Страница 21: ...ing data discs WMA MP3 JPEG MPEG4 DivX Playing items in order Playback Menu 1 Press TOP MENU To exit the screen press TOP MENU 2 Press 3 4 to select All Audio Picture or Video and press ENTER Playing from the selected item Navigation Menu 1 Press MENU To exit the screen press MENU 2 Press 2 followed by 3 4 to select the group and press ENTER 3 To play content in the group in order Press ENTER To s...

Страница 22: ...ty Penguin Formura one Soccer Baseball Neanderthal Cartoons Trilobites e g CD text 2 Prev 3Return Next 1 New Playlist Item Long Name Display Te PAGE 1 3 Menu1 Menu2 Menu3 Play list1 Play list2 Play list3 Menu Takes you to the next menu which shows playlists or another menu Playlist play starts e g Playlist Group Content All By Artist ENTER RETURN to play to select to exit 0 9 Content title No 1 Fe...

Страница 23: ...upport ID3 tags Compatible sampling rates DVD RAM DVD R RW 11 02 12 22 05 24 44 1 and 48 kHz CD R RW 8 11 02 12 16 22 05 24 32 44 1 and 48 kHz JPEG Extension JPG jpg JPEG or jpeg JPEG files taken on a digital camera that conform to DCF Standard Design rule for Camera File system Version 1 0 are displayed Files that have been altered edited or saved with computer picture editing software may not be...

Страница 24: ...ay only 1 Press ENTER twice to show the Time Slip indicator 2 Press 3 4 to select the time and press ENTER To change the steps more quickly press and hold 3 4 To start from a specific time Time Search To change remaining elapsed time display Video MPEG4 DivX To display pixel number DivX fps frame per second is also displayed Audio DVD A DVD V DivX with multiple soundtracks To select audio soundtra...

Страница 25: ...el stereo Sampling frequency of 96 kHz is converted to 48 kHz This function may not work depending on the disc s recording Repeat DVD VR Program All Off During playlist play Scene Playlist Off DVD A Track Group Off DVD V Chapter Title Off VCD CD Track All Off WMA MP3 MPEG4 DivX Content Group Off JPEG Group Off All is displayed during all group DVD A program or random play A B Repeat Except JPEG DV...

Страница 26: ... of the above numbers is displayed Transfer Mode If you have chosen xxx p progressive above select the method of conversion for progressive output to suit the type of material The setting will return to Auto or Auto1 when the disc tray is opened the unit is turned off or another source is selected When playing PAL discs MPEG4 or DivX video contents Auto Automatically detects the film and video con...

Страница 27: ... feature use it instead for a better effect Just Fit Zoom To select the appropriate screen size to fit your television screen DVD A Motion picture part DVD VR DVD V VCD Auto 4 3 Standard European Vista 16 9 Standard American Vista Cinemascope1 Cinemascope2 MPEG4 DivX Standard a0 25 full screen Original actual recorded size Full full screen This may not work depending on the discs recording Manual ...

Страница 28: ...Video Audio Display Others Disc Setup Audio English Menus English AdvancedDiscReview Intro Mode Subtitle Automatic Ratings Level 8 ENTER RETURN to select and press to exit Tab Setting Item 1 Press and hold to show the Setup menu If you have not performed QUICK SETUP page 14 the QUICK SETUP screen appears 2 Select the tab 3 Select the item 4 Make the settings 5 Press and hold to exit Select Go righ...

Страница 29: ...d 8 No Limit 1 to 7 0 Lock All To prevent play of discs without rating levels When you select your ratings level a password screen is shown Follow the on screen instructions Do not forget your password A message screen will be shown if a DVD Video disc exceeding the rating level is inserted in the unit Enter your password and then follow the on screen instructions TV Aspect Choose the setting to s...

Страница 30: ... night viewing Only works with Dolby Digital Speaker Settings page 31 Set the delay time for your center and surround speakers Center 0 0 1 0 2 0 3 0 4 0 5 0 ms Surround L R 0 0 5 0 10 0 15 0 ms Menu Language English Français Deutsch Italiano Español Polski Svenska Nederlands On Screen Messages On Off Background during Play Select background during JPEG MPEG4 and DivX video playback Black Grey FL ...

Страница 31: ...e Language code list Abkhazian 6566 Afar 6565 Afrikaans 6570 Albanian 8381 Ameharic 6577 Arabic 6582 Armenian 7289 Assamese 6583 Aymara 6589 Azerbaijani 6590 Bashkir 6665 Basque 6985 Bengali Bangla 6678 Bhutani 6890 Bihari 6672 Breton 6682 Bulgarian 6671 Burmese 7789 Byelorussian 6669 Cambodian 7577 Catalan 6765 Chinese 9072 Corsican 6779 Croatian 7282 Czech 6783 Danish 6865 Dutch 7876 English 697...

Страница 32: ...AL Each time you press the button MANUAL PRESET 3 Press X TUNING W to tune to the lowest frequency FM 87 50 AM 522 4 Press and hold MEMORY Release the button when FM AUTO or AM AUTO is displayed The tuner presets all the stations it can receive into the channels in ascending order SET OK is displayed when the stations are set and the radio tunes to the last preset station ERROR is displayed when a...

Страница 33: ...s not in use Do not use the outdoor antenna during an electrical storm RDS broadcasting PTY displays NEWS VARIED FINANCE COUNTRY AFFAIRS POP M CHILDREN NATIONAL INFO ROCK M SOCIAL A OLDIES SPORT M O R M RELIGION FOLK M EDUCATE LIGHT M PHONE IN DOCUMENT DRAMA CLASSICS TRAVEL TEST CULTURE OTHER M LEISURE ALARM SCIENCE WEATHER JAZZ Using an outdoor antenna optional Leave the AM loop antenna connected...

Страница 34: ...vision Press and hold C FOCUS Each time you press and hold the button C FOCUS ON C FOCUS OFF This does not work when Sound Field Control MOVIE SPORT or MUSIC is turned on This also works when Dolby Pro Logic II is turned on Except DivX Dolby Pro Logic II is an advanced decoder that derives 5 channel surround Left and Right Front Center Left and Right Surround from stereo sound sources whether or n...

Страница 35: ...e display and is not adjustable when ÎPLII is lit S appears on the display when MOVIE SPORT or MUSIC is selected with Sound Field Control page 34 In this case you can adjust both surround speaker levels at the same time using 3 4 S 6 dB to i6 dB 2 Press 3 increase or 4 decrease to adjust the speaker level for each speaker C RS LS SW 6 dB to i6 dB L R Only the balance is adjustable To adjust the ba...

Страница 36: ...qualizer function of your external device is turned off Setting the sleep timer Muting the sound VOLUME EXT IN MUTING SLEEP MONO SLP ST H BASS SRD PGM HDCD E 1 W MONO SLP ST MODE AC PRG RDS DTS PL A PS PTY CD DVD D Using headphones 1 Reduce the volume and connect the headphones not included Headphone plug type 3 5 mm stereo mini plug 2 Adjust headphone volume with VOLUME Audio is automatically swi...

Страница 37: ...e television on off Press Í TV Switching the television s video input mode Press TV AV Adjusting the volume Press r s TV VOLUME To play audio from your television through your home theater system Press EXT IN to select AUX or TV as the source reduce the volume on the television to its minimum and control the volume on the main unit Each time you press the button MUSIC P TV AUX You can enjoy 5 1 ch...

Страница 38: ... the cover plate to the front speaker or surround speaker HT540 front speaker only 2 Drive a screw not included into the wall 3 Fit the speaker securely onto the screw s with the hole s Preparation for front speakers and surround speakers HT540 front speakers only 1 Remove the speaker cable from the stand 2 Connect the cable page 7 HT540 2 Cover plates HT990 4 Cover plates HT540 2 Screws HT990 4 S...

Страница 39: ...akers HT990 Ensure the stands meet these conditions before purchasing them Note the diameter and length of the screws and the distance between screws as shown in the diagram The stands must be able to support over 10 kg The stands must be stable even if the speakers are in a high position Screw Press the cable into the groove Approx 15 cm Cable Speaker stand not included Plate thickness plus 7 mm ...

Страница 40: ...ettings to Factory Preset While stopped and DVD CD is the source press and hold Stop on the main unit and S10 on the remote control until Initialised disappears from the television Turn the unit off and on again All settings will return to the default values It takes time before play starts Play may take time to begin when an MP3 track has still picture data Even after the track starts the correct...

Страница 41: ...system or PAL television The system used on the disc does not match your television PAL discs cannot be correctly viewed on an NTSC television This unit can convert NTSC signals to PAL 60 for viewing on a PAL television NTSC Disc Output in Video tab Ensure that the unit is connected directly to the television and is not connected through a video cassette recorder Mobile telephone chargers can caus...

Страница 42: ...lem consult the dealer 7 9 DVD U11 Disc may be dirty Wipe it clean 17 ERROR Incorrect operation performed Read the instructions and try again DVD H DVD F stands for a number Trouble may have occurred The numbers following H and F depend on the status of the unit Turn the unit off and then back on Alternatively turn the unit off disconnect the AC mains lead and then reconnect it If the service numb...

Страница 43: ...y is lower I P B MPEG 2 the video compression standard adopted for use with DVD Video codes frames using these 3 picture types I Intra coded picture This picture has the best quality and is the best to use when adjusting the picture P Predictive coded picture This picture is calculated based on past I or P pictures B Bidirectionally predictive coded picture This picture is calculated by comparing ...

Страница 44: ...DL DVD Video DVD VR 5 DVD RW DVD Video DVD VR MP3 2 6 JPEG 2 3 MPEG4 2 4 DivX 1 2 6 iR iRW Video 7 iR DL Video 8 CD CD R RW CD DA Video CD SVCD 5 MP3 2 6 WMA 2 7 JPEG 2 3 MPEG4 2 4 DivX 1 2 HighMAT Level 2 Audio and Image 1 Plays all versions of DivX video including DivX 6 with standard playback of DivX media files Certified to the DivX Home Theater Profile GMC Global Motion Compensation is not su...

Страница 45: ...put sound pressure 81 dB W 1 0 m Cross over frequency 7 kHz Frequency range 82 Hz 30 kHz j16 dB 96 Hz 25 kHz j10 dB Dimensions WtHtD 252 mmk1123 mmk234 mm Mass 3 7 kg HT990 Surround speakers SB FS540 Type 1 way 1 speaker system Bass reflex Speaker unit s Impedance 3 Full range 6 5 cm Cone type Input power IEC 125 W Max Output sound pressure 80 dB W 1 0 m Frequency range 87 Hz 25 kHz j16 dB 98 Hz 2...

Страница 46: ...Microsoft Corporation in the United States and or other countries HDCD High Definition Compatible Digital and Pacific Microsonics are either registered trademarks or trademarks of Pacific Microsonics Inc in the United States and or other countries HDCD system manufactured under license from Pacific Microsonics Inc This product is covered by one or more of the following In the USA 5 479 168 5 638 0...

Страница 47: ...RQT8722 47 MEMO ...
Страница 48: ...d easily accessible or the mains plug or an appliance coupler shall remain readily operable THIS UNIT IS INTENDED FOR USE IN MODERATE CLIMATES Information on Disposal for Users of Waste Electrical Electronic Equipment private households This symbol on the products and or accompanying documents means that used electrical and electronic products should not be mixed with general household waste For p...

Отзывы: