background image

10

RQTV0294

Remote control

Main unit

To pause track

To skip a track
(During play/pause)

To search the current 
track
(During play/pause)

press and hold

press and hold

When you select another source or turn the main unit off, the iPod turns off.

iPod will start recharging regardless of whether this unit is in On or 
Standby condition.
“IPOD 

” will be shown on the main unit’s display during iPod charging 

in main unit standby mode.
Check iPod to see if the battery is fully recharged.
If you are not using iPod for an extended period of time after recharging 
has completed, disconnect it from main unit, as the battery will be 
depleted naturally. (Once fully recharged, additional recharging will not 
occur.)


External unit

Note

iPod is a trademark of Apple Inc., registered in the U.S. and other 
countries.

Preparation:

Reduce the volume of the main unit.
Confirm the iPod connection. (

➡ 

above)

Confirm the USB cable is removed. (

➡ 

PC Sync, right)

 Press [iPod 

q

/

h

] to play the iPod.

 Adjust the volume of the main unit.


g

 Charging the iPod

g

 Playing the iPod

3

2

1

g

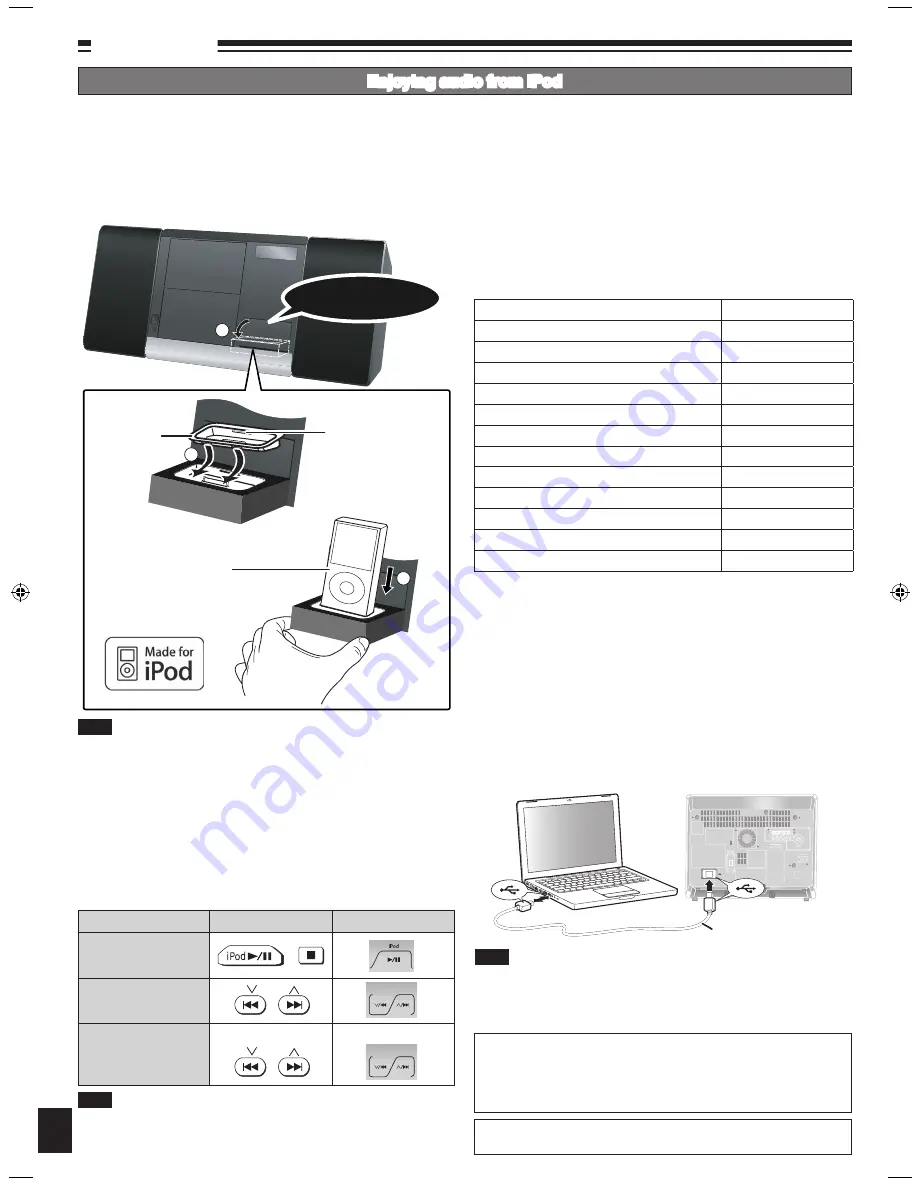
 Inserting the iPod

 Push to open the Built-in iPod Dock and then press down until a 

click sound is heard.

 Insert the suitable dock adapter for your iPod.

 Insert your iPod into the dock.

Hold the dock when connecting/disconnecting the iPod.
Recharging starts when the iPod is inserted.


iPod

(not included)

Note

When removing, insert 
your fingernail or a flat 
object and lift upwards.

Push and then 

press down.

➡ 

Page 3 for the buttons position of remote control and main unit.

■ 

Compatible iPod

Name

Memory size

iPod touch

8GB, 16GB

iPod nano 3rd generation (video)

4GB, 8GB

iPod classic

80GB, 160GB

iPod nano 2nd generation (aluminum)

2GB, 4GB, 8GB

iPod 5th generation (video)

60GB, 80GB

iPod 5th generation (video)

30GB

iPod nano 1st generation

1GB, 2GB, 4GB

iPod 4th generation (colour display)

40GB, 60GB

iPod 4th generation (colour display)

20GB, 30GB

iPod 4th generation

40GB

iPod 4th generation

20GB

iPod mini

4GB, 6GB

Compatibility depends on the software version of your iPod.

g

 PC Sync

Enables data synchronization between PC and iPod without unplugging 
iPod from the set.

Preparation:

Confirm the iPod is well inserted into the dock. (

 left)

 Connect your PC to the main unit through USB cable. 

(PC will 

automatically detect iPod.)
To transfer songs to iPod, refer to iPod instruction manual.

 Before disconnecting the USB cable, make sure the procedure of 

safe eject of hardware from PC is done.

PC Sync will function only when the main unit is in Standby or On condition.

Note

Recording and operating problems may occur on some computer 
systems.
Please note that Panasonic and Panasonic dealers cannot be held liable 
for any lost audio data or other direct or indirect damage except in cases 
of intentional or gross negligence.

Dock adapter 

(not included)

USB cable 

(not included)

It is recommended to use the dock adapter from Apple.

Enjoying audio from iPod

To pause play

Press 

[USB 

q

/

h

]

.

Press again to resume play.

To stop play

Press 

[

g

]

.

“RESUME” is displayed. The position is 
memorized.
Press 

[USB 

q

/

h

]

 to resume play.

OR
Press 

[

g

]

 again to clear the position.

To skip track

Press 

[

u

2

]

 or 

[

i

1

]

.

To skip album

Press 

[    or    , ALBUM]

 in the play mode.

Press 

[    or    , ALBUM]

 once and then the 

numbered buttons in the stop mode.

Direct access play
(Play starts with the 
track you select.)

 Press 

[    or    , ALBUM ]

 to select the album.

 Press 

[

i

1

]

 once and then press the 

numbered buttons to select the desired track.

SC-EN38DB_EB (RQTV0294)_MP.indd   10

2/18/2008   2:13:33 PM

Содержание SC-EN38DB

Страница 1: ... manual for future reference System SC EN38DB Main unit SA EN38DB Speakers SB EN38 EB on the packaging indicates the United Kingdom Note Supplied accessories 2 The remote control 2 Attach the stand to the unit 2 Placement of speakers 2 Control guide 3 Connections 4 Disc operations 5 Radio operations 6 DAB 7 External unit 10 Timer 12 Sound adjustment 12 Troubleshooting guide 13 Specifications 14 Sa...

Страница 2: ...n Use the speakers only with the recommended system Failure to do so may lead to damage to the amplifier and or speakers and may result in the risk of fire Consult a qualified service person if damage has occurred or if you experience a sudden change in performance Do not attach these speakers to walls or ceilings Attach the stand to the unit Support stand included Rear of the main unit Placement ...

Страница 3: ...e selection 12 DAB MENU 8 9 14 Enter cancel DAB Menu mode DAB SECONDARY 8 Select the secondary service 1 2 9 8 7 6 5 4 3 10 11 12 13 14 15 16 17 18 19 20 21 22 23 24 25 Remote control signal sensor Display Built in iPod Dock USB port Music port jack 5 CD q g Selector switch to CD CD Play Stop button 12 Play timer on off z PLAY 5 Open and Close CD lid OPEN CLOSE 5 6 8 11 Numbered buttons 1 9 0 10 T...

Страница 4: ...e buttons position of remote control and main unit Connections PC Sync Connect your PC to the PC Sync port Refer to page 10 for further information 1 3 USB connection Connect your USB enabled device to the USB port Refer to page 11 for further information Bluetooth connection Connect the Bluetooth Receiver to the option port Refer to page 11 for further information AC mains lead To household AC ma...

Страница 5: ...nnot search through MP3 files You can only search within the current track during program play one track repeat and random play Skip album Press or ALBUM in the play mode Press or ALBUM once and then the numbered buttons in the stop mode Direct access play Play starts with the track you select Press the numbered buttons to select the desired track Press or ALBUM to select the album Press i 1 once ...

Страница 6: ...l tuning Memory preset Note The unit can play MP3 a method of compressing audio without overly hurting audio quality When creating MP3 files to play on this unit Maximum number of tracks and albums 999 tracks and 256 albums Compatible compression rate Between 64 kbps and 320 kbps stereo 128 kbps stereo is recommended Disc formats ISO9660 level 1 and level 2 except for extended formats The time for...

Страница 7: ...ing on the time of day etc If this occurs NO SERVICE is displayed Station Memory Updating When there is a station name change or a new station begins broadcasting the unit memory is automatically updated when The previous station name is displayed by selecting STATION TUNE One of the stations already broadcasting on the same frequency with the new station is displayed by selecting STATION TUNE Del...

Страница 8: ...s ENTER Select ADJUST OFF to turn the automatic clock adjustment function off To exit Press DAB MENU again DAB Auto Scan Press and hold PLAY MODE until DAB AUTO SCAN appears When a frequency is tuned by Auto scanning on this unit the ensemble corresponding to the frequency is displayed for approximately 2 seconds When updating memory with Auto scan preset stations are not erased or changed When a ...

Страница 9: ...es to memory Press DAB MENU to enter menu mode Within 10 seconds press or ALBUM to select DAB SCAN MODE and then press ENTER Within 10 seconds press or ALBUM to select UNITED KINGDOM or ALL BAND III and then press ENTER Auto scan begins automatically after the change has been made To exit Press DAB MENU again When the DAB SCAN MODE is changed the DAB preset channels are erased and if the DAB play ...

Страница 10: ...When removing insert your fingernail or a flat object and lift upwards Push and then press down Page 3 for the buttons position of remote control and main unit Compatible iPod Name Memory size iPod touch 8GB 16GB iPod nano 3rd generation video 4GB 8GB iPod classic 80GB 160GB iPod nano 2nd generation aluminum 2GB 4GB 8GB iPod 5th generation video 60GB 80GB iPod 5th generation video 30GB iPod nano 1...

Страница 11: ...s in the stop mode Direct access play Play starts with the track you select Press or ALBUM to select the album Press i 1 once and then press the numbered buttons to select the desired track g Display function Press DISPLAY repeatedly during play or pause For other operating functions they are similar as those described in Disc Operations page 5 and 6 To remove the USB mass storage device Select a ...

Страница 12: ...tarting time Press CLOCK TIMER to confirm Repeat steps 2 and 3 to set the finishing time To activate the timer Press zPLAY to turn on the timer Press to turn off the unit To Action Change the settings Repeat steps 1 to 4 and 6 Change the source or volume Press zPLAY to clear zPLAY indicator from the display Make changes to the source or volume Perform steps 5 and 6 Check the settings when the unit...

Страница 13: ...ged the AC mains lead in for the first time and there was a power failure recently Set the time page 12 PGM FULL The number of programmed tracks is limited to 24 No further tracks can be programmed NO PLAY A CD ROM disc that is not CD DA or MP3 format is inserted It cannot be played ERROR Incorrect operation performed Read the instructions and try again F76 There is a power supply problem Consult ...

Страница 14: ...power IEC 3 W Max Dimensions W x H x D 120 mm x 202 8 mm x 133 5 mm g GENERAL Power supply AC 230 to 240 V 50 Hz Power consumption 30 W Dimensions W x H x D 252 5 mm x 202 8 mm x 133 5 mm Mass With speakers Approx 3 20 kg Without speakers Approx 1 90 kg Operating temperature range 0 C to 40 C Operating humidity range 35 to 80 RH no condensation Power consumption in standby mode 2 6 W approx Notes ...

Страница 15: ...ace heavy items on the lead Grasp the plug firmly when unplugging the lead Pulling the AC mains lead can cause electric shock Do not handle the plug with wet hands This can cause electric shock Do not let metal objects fall inside the unit This can cause electric shock or malfunction Do not let liquids get into the unit This can cause electric shock or malfunction If this occurs immediately discon...

Страница 16: ... to the terminal which is marked with the letter L or coloured Brown or Red WARNING DO NOT CONNECT EITHER WIRE TO THE EARTH TERMINAL WHICH IS MARKED WITH THE LETTER E BY THE EARTH SYMBOL OR COLOURED GREEN OR GREEN YELLOW THIS PLUG IS NOT WATERPROOF KEEP DRY Before use Remove the connector cover How to replace the fuse The location of the fuse differ according to the type of AC mains plug figures A...

Отзывы: