background image

RQT6183

12

Disc operations

ENTER

VCR

TV

TUNER/BAND

AUX

TV/VIDEO

FL DISPLAY

TOP MENU

MENU

SKIP

PLAY

PAUSE

DISC SKIP CHANNEL

VOLUME

SFC

MUTING

SUBWOOFER

LEVEL

STOP

RETURN

DISPLAY

SLOW


/SEARCH

DVD/CD

MAIN UNIT

DISC

MANAGER

MIX 2ch

SUPER

SURROUND

TEST

PRO LOGIC

ANGLE

AUDIO

SUB TITLE

ACTION

TV VOL

1

2

3

CH SELECT

4

5

6

7

8

9

0

PLAY MODE

GROUP

PAGE

MARKER

DISC1

DISC2

DISC4

DISC5

DISC3

CANCEL

CENTER

FOCUS

CINEMA

P.MEMORY

TIMER

REPEAT

A-B

REPEAT

SEAT

POSITION

DISC

Í

RETURN

6

5

SLOW/SEARCH

MENU

3

4

2

1

ENTER

TOP MENU

P.MEMORY

POWER

VOLUME

DISC

1

2

3

4

5

WAKE


/ I

OPEN /CLOSE

TUNING

DISC SKIP

MEMORY

TUNE MODE FM MODE

PROGRESSIVE OUT

SUBWOOFER LEVEL

DOWN

UP

SELECTOR

PHONES

5

:

/

6

5

/

9

 STOP

:

9

SKIP

4

1

2

;

 PAUSE

1

[HT95\

 only

PROGRESSIVE
OUT

4

Í

/I

POWER

Disc 
indicators

2

5

;

PROGRESSIVE OUT

[HT95\

 only

PROGRESSIVE
OUT indicator

    10/ENTER

2

3

Disc tray

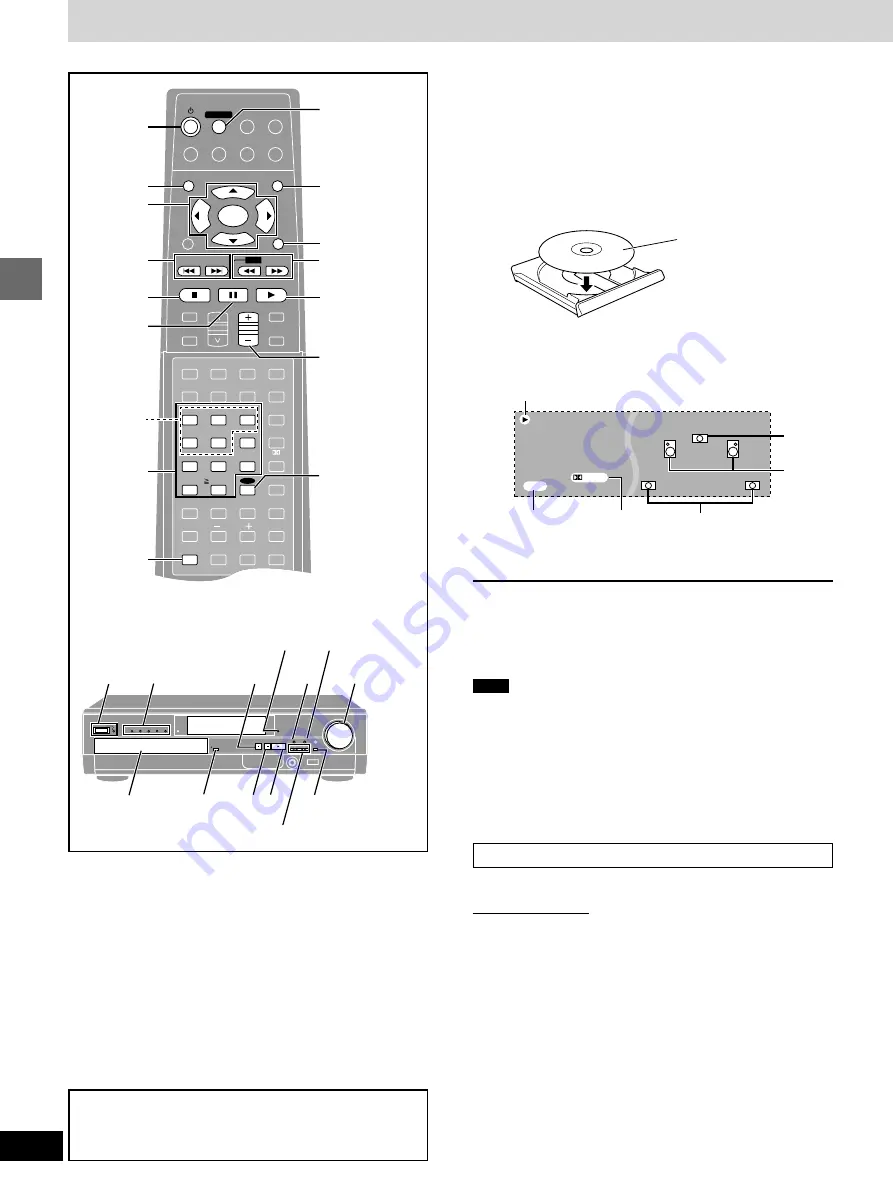
Discs—Basic play

2

Press [DISC SKIP] to select a tray.

The indicator lights.
Play starts if a disc is in the tray. (One touch play)
Remote control:
Press [DISC] and then press [1]–[5] corresponding to the re-
quired tray.

3

Press [

<

] to open the disc tray and in-

sert a disc.

Press again to close and start play.

Repeat steps 2 and 3 to insert other discs.

4

If play doesn’t start after step 3

Press [

1

] (PLAY).

5

Adjust the volume.

To stop play

Press [

] (

 page 13, Resume function).

To pause play

Press [

;

] during play.

Press [

1

] (PLAY) to restart play.

Note

If “

$

” appears on the television

The operation is prohibited by the unit or disc.

The disc continues to rotate while the menu is displayed even after
you finish playing an item. Press [

] when you finish to preserve

the unit’s motor and your television screen.

Volume may be lower when playing DVDs than when playing other
discs or during television broadcasts.
If you turn the volume up, be sure to reduce the volume again be-
fore playing other sources so that a sudden increase in output does
not occur.

When a menu appears on the television

[DVD-A] [DVD-V]

[VCD]

Remote control only

Press the numbered buttons to select an item.

To select a 2-digit number
Example: To select item 23, press [

S

10/ENTER] 

 [2] 

 [3].

When playing DVDs, you can also use [

3

4

2

1

] to select

items. Press [ENTER] to confirm your selection.

Play of the selected item now begins.

Other buttons used to operate menus
Read the disc’s instructions for further details about operation.
[

9

]: Shows the next menu.

[

:

]: Shows the previous menu.

[RETURN]: Shows the menu screen. 

[VCD]

[TOP MENU]: Shows the first menu screen. 

[DVD-A] [DVD-V]

[MENU]: Shows the menu screen. 

[DVD-V]

[DVD-A] [DVD-V]

[CD]

 [VCD]

Preparation

Turn on the television and select the appropriate video input on the
television to suit the connections for the player.

Press [

Í

/I POWER] to turn on the unit.

1

Press [SELECTOR] to select “DVD/CD”.

Each time you press the button:
DVD/CD

>

FM

>

AM

>

TV

>

VCR

>

AUX


 ^---------------------------------------------------------}

Remote control: Press [DVD/CD].

[HT95]

For progressive output:
Press [PROGRESSIVE OUT] so the indicator lights.

Label must face upward.
(With double-sided discs,
load so the label for the side
you want to play faces up.)

Numbered

buttons

Front
speakers

Center
speaker

Lights during play.

DIGITAL

DVD

Lights when Dolby
Digital is detected.

Lights if disc is
DVD-Video.

Surround speakers

NOTE

This unit does not output video signals from the VIDEO
OUT and S-VIDEO OUT terminals when the
“PROGRESSIVE OUT” indicator is on.

Содержание SAHT75 - RECEIVER

Страница 1: ... AUDIO VIDEO As an ENERGY STAR Partner Panasonic has determined that this product meets the ENERGY STAR guidelines for energy efficiency The illustration shows SC HT75 This unit responds to the region number in formation on DVD Video The unit can only play DVD Video if the region number of the disc matches the region number of this unit See page 5 for details For U S A only The servicenter list an...

Страница 2: ...re that may be of suffi cient magnitude to constitute a risk of electric shock to persons CAUTION CAUTION TO REDUCE THE RISK OF ELECTRIC SHOCK DO NOT REMOVE SCREWS NO USER SERVICEABLE PARTS INSIDE REFER SERVICING TO QUALIFIED SERVICE PERSONNEL The exclamation point within an equilateral triangle is intended to alert the user to the presence of important operating and maintenance servicing instruct...

Страница 3: ...l antenna connections 33 Reference Troubleshooting guide 34 Maintenance 35 Glossary 36 Language code list 36 Specifications 37 Servicenter List U S A 38 Limited Warranty U S A 39 Product Service U S A and Canada 39 Dear customer Thank you for purchasing this product For optimum performance and safety please read these instructions carefully SC HT95 SA HT95 SB AFC286 SB AFC286 SB AFC95 SB W81 Syste...

Страница 4: ...ese operating instructions handy for future reference Safety 1 Power source Connect the unit to a power source of the type described in these instructions or as marked on the unit 2 Polarization The unit is equipped with a polarized power plug where one blade is wider than the other This safety feature en sures that the plug fits into your household AC outlet only one way If the plug doesn t fit o...

Страница 5: ...t be played PAL discs the audio on DVD Audio can be played DVD ROM DVD RAM CD ROM CDV CD G iRW DVD RW CVD SVCD SACD Divx Video Discs and Photo CD Region Management Information DVD Video only This unit responds to the Region Management Information recorded on DVD Video You cannot play the disc if the region number on the DVD Video does not correspond to the region number on the unit Read the disc s...

Страница 6: ... How you set up your speakers can affect the bass and the sound field Note the following points Place speakers on flat secure bases Placing speakers too close to floors walls and corners can result in excessive bass Cover walls and windows with thick curtain Front 12 surround 34 speakers Center speaker 5 Laying down Standing 6 DISC 1 2 3 4 5 120 30 30 3 4 2 5 1 Panasonic Panasonic Panasonic Panaso...

Страница 7: ...to the terminals of same color so the num bers on the stickers match the numbers under the terminals Never short circuit positive i and negative j speaker wires Be sure to connect only positive red or gray wires to positive i terminals and negative black or gray with blue stripe wires to negative j terminals Incorrect connection can damage the speakers After you have completed setup and connection...

Страница 8: ...nt panel so the indicator lights page 12 Connect directly to your television Do not connect the unit through a video cassette recorder because the picture may not be played correctly due to the copy guard NOTE This unit does not output video signals from the VIDEO OUT and S VIDEO OUT terminals when the PROGRESSIVE OUT indicator is on COMPONENT VIDEO IN Y PB PR COMPONENT VIDEO OUT 480P 480I Y PB PR...

Страница 9: ...area is 115 V or 120 V please set the voltage selector as follows For 115 V Set to 110 V For 120 V Set to 127 V Note The included AC power supply cord is for use with this unit only Do not use it with other equipment Conserving power The unit consumes power for U S A and Canada approx 0 28 W for Latin America and others approx 0 8 W even when it is turned off with Í To save power when the unit is ...

Страница 10: ...d 4 3 aspect soft ware the picture is stretched horizontally to fill the screen If your television can change the aspect when input is progressive Use the television to change the aspect to the correct one If your television cannot change the aspect when input is progressive Press PROGRESSIVE OUT so the PROGRESSIVE OUT indicator goes out Output will now be interlace Batteries Insert so the poles i...

Страница 11: ...utton ANGLE 18 O Audio button AUDIO 18 P Speaker channel select button CH SELECT 25 Q Marker button MARKER 14 R Test button TEST 25 S Sound field and effect buttons 25 26 T Cancel button CANCEL 14 U Mix 2ch button MIX 2ch 25 V Repeat buttons REPEAT A B REPEAT 16 Main unit W Standby on switch POWER 12 Press to switch the unit from on to standby mode or vice versa In standby mode the unit is still c...

Страница 12: ...sh playing an item Press when you finish to preserve the unit s motor and your television screen Volume may be lower when playing DVDs than when playing other discs or during television broadcasts If you turn the volume up be sure to reduce the volume again be fore playing other sources so that a sudden increase in output does not occur When a menu appears on the television DVD A DVD V VCD Remote ...

Страница 13: ...E lights on the display Press 1 PLAY to start play from the memorized position The position is cleared When playing DVD Video Chapter Preview below Chapter Preview DVD V The message Press PLAY to Preview Chapters appears immedi ately after you press 1 PLAY Press 1 PLAY while the message is displayed and the beginning portions of each chapter up to the current one are played Full play resumes from ...

Страница 14: ...ser mode Marking places to play again MARKER DVD A DVD V CD VCD When the elapsed play time is displayed Remote control only You can mark up to 5 points on a disc to return to later 1 During play Press MARKER 2 Press ENTER at the point you want to mark To select another marker press 2 1 To play from a marked position Press 2 1 to select a marker number and press ENTER To clear a marker Press 2 1 to...

Страница 15: ...till pictures Page Skip DVD A Remote control only During play Press PAGE The page changes each time you press the button Using the disc manager CD VCD Remote control only The disc manager allows you to choose one track or disc to play or to play all five discs in succession 1 While stopped Press DISC MANAGER to select the desired method Each time you press the button 1 TRACK One track play 1 DISC ...

Страница 16: ...REPEAT at the starting point A 2 Press A B REPEAT at the finishing point B A B repeat starts To cancel Press A B REPEAT until is displayed Note Some subtitles recorded around point A or B may fail to appear The unit automatically determines the end of a title track as point B when the end of the title track is reached A A B T G OFF T C T OFF C ENTER VCR TV TUNER BAND AUX TV VIDEO FL DISPLAY TOP ME...

Страница 17: ...and 2 to program other tracks CD VCD Step 1 is unnecessary when programming tracks on the same disc DVD A To select a track using the cursor buttons Press ENTER and 3 4 to select a group or track then press ENTER again to register the number All the tracks in the selected group are selected when you select ALL 3 Press 1 PLAY Play now begins in the programmed sequence When play is stopped and the p...

Страница 18: ...restarts from the beginning of the soundtrack when changing DVD Audio soundtracks that are accompanied by still pictures Even if a second soundtrack isn t recorded on a DVD Audio two soundtrack numbers will normally be shown when you press AUDIO The soundtrack currently playing is number 1 You can also use this button to turn the vocals on and off on karaoke discs Read the disc s instructions for ...

Страница 19: ...change the position of the menus 1 Press 2 1 to select the rightmost icon 2 Press 3 4 to move the menus There are 5 positions DVD A DVD V Remote control only On Screen Menu Icons are menus that contain information about the disc or unit These menus allow you to perform operations by chang ing this information Common procedures 1 Press DISPLAY Each time you press the button e g DVD Video Disc infor...

Страница 20: ...abbreviations b Audio signal type See B at right for details Karaoke vocal on off Karaoke DVD only Solo OFF or ON Duet OFF V1iV2 V1 or V2 T 2 C 2 1 46 50 1 Vocal OFF 2 G 1 ENG 3 2 1 ch Digital Î b a Page 1 Play menu Content A B repeat page 16 ENTER start point ENTER finish point To cancel ENTER Repeat play page 16 DVD A Track T Whole group G OFF J During All group Program or Random play mode A is ...

Страница 21: ...ems are also displayed when you select U Contrast j7 to i7 Increases the contrast between white and black parts of the picture Brightness 0 to i15 Brightens the picture Color j7 to i7 Adjust the shade of the picture s color N 0 0 0 Video menu HT95 When the progressive indicator is on page 12 Icon Content Digital picture mode N Normal mode C Cinema mode page 14 Transfer MODE Select the method of co...

Страница 22: ...adcasts are automatically played as they are received Allocation settings Main unit only Each country allocates broadcast bands according to their particular system For U S A Canada and units with PX printed on the outer packaging You can change the FM step The step is factory set to 0 2 MHz but you can change it to receive broadcasts allocated 0 1 MHz steps For Latin America You can change the AM...

Страница 23: ... 3 Press TUNING X X X X X or W W W W W to select a channel 4 Press MEMORY The station occupying a channel is erased if another station is preset in that channel Selecting channels 1 Press TUNER BAND to select FM or AM Main unit Press SELECTOR Each time you press the button DVD CD FM AM TV VCR AUX 2 Press the numbered buttons or CHANNEL W W W W W or X X X X X to select the channel To select a 2 dig...

Страница 24: ...ntified with this mark DVD CD Video CD Laser Disc Video tape Seat position Center focus Seat position Center focus SFC Sound Field Control page 25 Use SFC effects to change the sound quality and add reverbera tion Any source Other effects Seat position page 26 This mode helps maintain the sound position even if the listening position itself is changed Center focus page 26 This mode makes it seem l...

Страница 25: ...rease Changing sound field and quality Press SFC to select a setting Each time you press the button HEAVY Adds punch to rock factory preset CLEAR Clarifies higher sounds SOFT For background music DISCO Reverberates sound to make you feel like you were in a disco LIVE Makes vocals more alive HALL Expands sound to make you feel like you were in a hall FLAT Canceled no effect is added Remote control ...

Страница 26: ...__ Note You cannot adjust the bass while you are using headphones ERROR appears on the display Remote control only SUPER SURROUND Press SUPER SURROUND to select MUSIC or MOVIE Each time you press the button MUSIC l l l l l l l MOVIE l l l l l l off Note Turn super surround off when playing a DVD recorded with Dolby Digital or DTS The surround effects will not be reproduced correctly if this is lef...

Страница 27: ...e the setting Repeat the procedure from the beginning Using headphones 1 Reduce the volume and connect the headphones not included Headphone plug type 6 3 mm 1 4q stereo 2 Adjust headphone volume with VOLUME Audio is automatically switched to stereo 2 channel If sound is dis torted turn on dynamic range compression page 28 Audio D Range Compression Note Avoid listening for prolonged periods of tim...

Страница 28: ...ulti channel DVD through two channels when headphones are connected or when using the MIX 2ch mode On Off Audio will still be heard during search with some DVD Audio English Français Español On Off Off DVD Audio are played as DVD Audio On DVD Video contents found on DVD Audio can be played Items Audio DVD A DVD V Choose the preferred audio language Subtitle DVD A DVD V Choose the preferred subtitl...

Страница 29: ...ging the delay time 1 Press 3 4 2 1 to select the delay time box and press ENTER 2 Press 3 4 to adjust the delay time and press ENTER Values If distance a or b is greater than or equal to distance c set to 0 If distance a or b is less than distance c set as follows a Center speaker b Surround speakers When you are finished Press 2 to select Exit and press ENTER Disc Audio Subtitle Menus Ratings En...

Страница 30: ...evision input Turning the television on off Press Í Changing channels Press CHANNEL W W W W WorX X X X X You can also select the channel with the numbered buttons To select a 2 digit number Example To select channel 23 press S10 ENTER 2 3 Adjusting the volume Press TV VOL s s s s s or r r r r r Switching the television s video input mode Press TV VIDEO Operating a video cassette recorder Switching...

Страница 31: ...TING SUBWOOFER LEVEL STOP RETURN DISPLAY SLOW SEARCH DVD CD MAIN UNIT DISC MANAGER MIX 2ch SUPER SURROUND TEST PRO LOGIC ANGLE AUDIO SUBTITLE ACTION TV VOL 1 2 3 CH SELECT 4 5 6 7 8 9 0 PLAY MODE GROUP PAGE MARKER DISC1 DISC2 DISC4 DISC5 DISC3 CANCEL CENTER FOCUS CINEMA P MEMORY TIMER REPEAT A B REPEAT SEAT POSITION DISC TV VCR 10 ENTER Numbered buttons Panasonic 01 02 26 Sony 04 Fisher 14 G E 02 ...

Страница 32: ...D MAIN UNIT VCR DVD CD AUX TUNER BAND R L VCR AUDIO IN AUX LINE OUT AUDIO OUT PLAY OUT REC IN A B L R You can playback the sound from a video cassette recorder through this unit s speaker 1 Press VCR Main unit Press SELECTOR Each time you press the button DVD CD FM AM TV VCR AUX 2 Start play A A A A A You can playback the sound from a tape deck laser disc player etc through this unit s speaker 1 P...

Страница 33: ...r convenient location Leave the loop antenna connected Note Disconnect the outdoor antenna when the unit is not in use Do not use the outdoor antenna during an electrical storm B AM ANT FM ANT 75h GND LOOP EXT A 1 2 1 2 AM ANT FM ANT 75h GND LOOP EXT 5 12 m 1 Remove a piece of the outer insulator 2 Twist the shield braid 3 Expose the core wire AM outdoor antenna AM loop antenna FM outdoor antenna ...

Страница 34: ...ate some televisions or video cassette recorders N O Condensation has formed Wait 1 to 2 hours for it to evaporate This unit cannot play discs other than DVD Audio DVD Video CD and Video CD 5 You can only play DVD Video if their region number is the same or includes the same region number as the unit or if the DVD Video is marked ALL Confirm the region number for the unit on the rear panel 5 The d...

Страница 35: ... disc insert one You haven t inserted the disc correctly insert it correctly Check and correct the speaker cord connections 7 If this does not fix the problem there is a power supply problem Call 1 800 211 7262 for support The disc is dirty Wipe it with a soft cloth 5 Incorrect operation performed Read the instructions and try again The track playing has been recorded with a nonstandard system Tro...

Страница 36: ...al and can reproduce up to 7 kHz DTS Digital Theater Systems This surround system is used in many movie theaters around the world There is good separation between the channels so realistic sound effects are possible Dynamic range Dynamic range is the difference between the lowest level of sound that can be heard above the noise of the equipment and the highest level of sound before distortion occu...

Страница 37: ...l range 8 cm 31 8z cone type Impedance 6 Input power 60 W music Output sound pressure level 79 dB W 1 0 m Frequency range 80 Hz 22 kHz j16 dB 110 Hz 20 kHz j10 dB Dimensions Wk k k k kHk k k k kD 88k135k112 mm 315 32zk511 32zk47 16z Mass Approx 0 8 kg 1 8 Ib HT95 SB AFC286 Front and center speakers Type 2 way 2 speaker Bass ref Speaker unit Woofer 10 cm 4z cone type Tweeter 6 cm 23 8z cone type Im...

Страница 38: ...Ave 65 de Infanteria Km 9 5 San Gabriel Industrial Park Carolina Puerto Rico 00985 Phone 787 750 4300 Fax 787 768 2910 F08130 As of AUG 01 Factory Servicenters Locations CALIFORNIA 6550 Katella Avenue Cypress CA 90630 800 Dubuque Avenue S San Francisco CA 94080 3878 Ruffin Road Suite A San Diego CA 92123 FLORIDA 3700 North 29th Avenue Suite 102 Hollywood FL 33020 GEORGIA 8655 Roswell Road Suite 10...

Страница 39: ...RRANTIES INCLUDING THE WARRANTIES OF MERCHANTABILI TY AND FITNESS FOR A PARTICULAR PURPOSE ARE LIMITED TO THE AP PLICABLE WARRANTY PERIOD SET FORTH ABOVE Some states do not allow the exclusion or limitation of incidental or consequential damages or limitations on how long an implied warranty lasts so the above exclusions or limitations may not apply to you This warranty gives you specific legal ri...

Страница 40: ...io equipment such as the unit you ve just purchased is only the start of your musical enjoyment Now it s time to consider how you can maximize the fun and excitement your equipment offers This manufacturer and the Electronic Industries Association s Con sumer Electronics Group want you to get the most out of your equipment by playing it at a safe level One that lets the sound come through loud and...

Отзывы: