background image

R

Q

T

861

1

29

Usin

g oth

e

r us

eful 

funct

ions

Using other useful functions

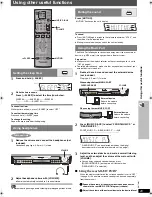
To cancel the timer

While the time is shown, press [—SLEEP] to select “OFF”.

To confirm the remaining time

Press and hold [—SLEEP] again.

To change the setting

Repeat the procedure from the beginning.

[Note]

To prevent hearing damage, avoid listening for prolonged periods of time.

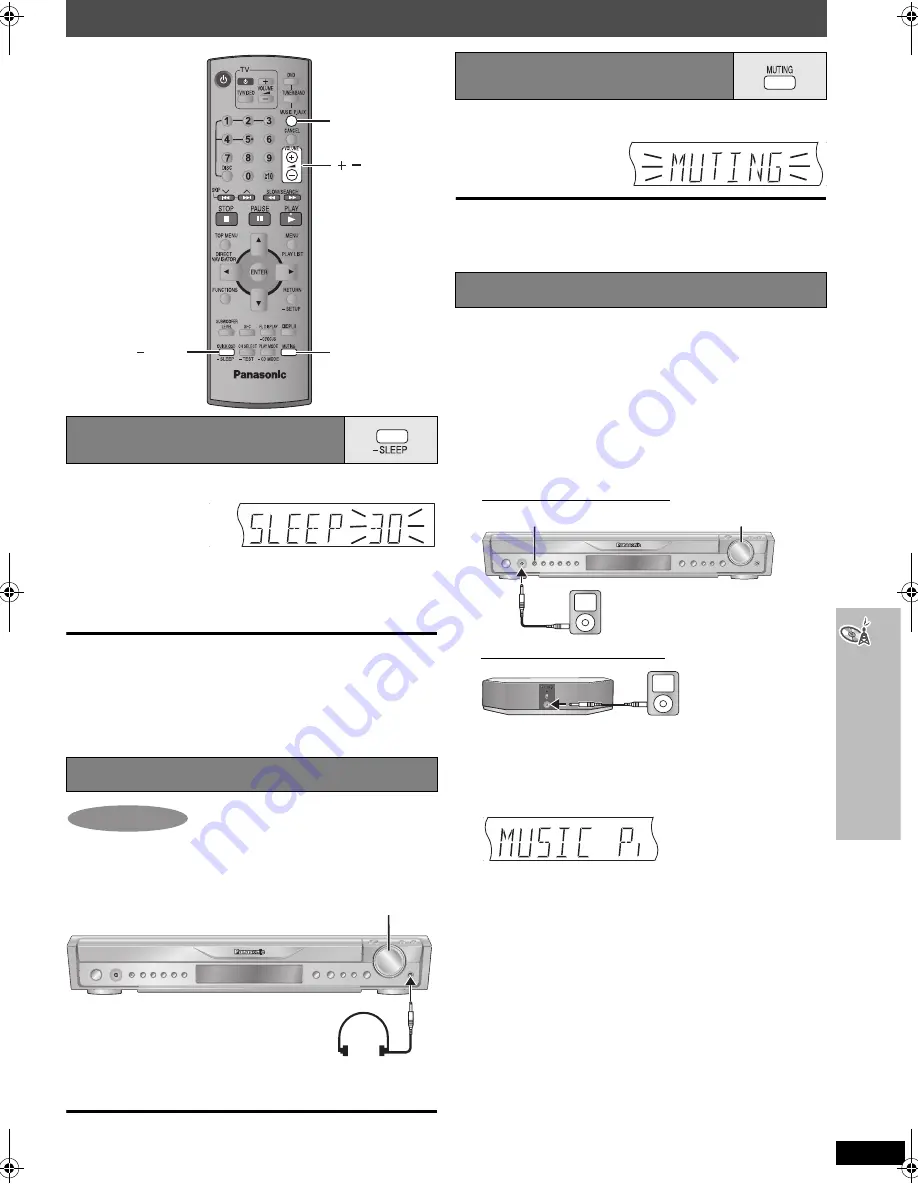
Press [MUTING].

“MUTING” flashes on the unit’s display.

To cancel

Press [MUTING] again or reduce the volume to minimum “VOL 0”, and 
then raise it to the required level.

Muting is canceled when you switch the unit to standby.

The Music Port allows you to connect and enjoy music from an external 
device (e.g. MP3 player) through your home theater system.

Preparation

Make sure that the wireless selector on the surround speaker is set to 
“ON” (

page 9).

To avoid distorted sound, make sure that any equalizer function of your 
external device is turned off.

Using the rear MUSIC PORT

When the wireless selector on the surround speaker is set to “OFF” 
(

page 9), the wireless surround speaker can be used separately 

from the main unit.

1

Reduce the volume of the external device and connect as 
shown in the rear MUSIC PORT diagram (

above).

2

Adjust the volume of the external device to the desired level.

Setting the sleep timer

1

Press and hold [—SLEEP].

2

While the time is shown

Press [—SLEEP] to select the time (in minutes).

SLEEP 30

_----)

SLEEP 60

_----)

SLEEP 90

^""""" 

OFF

(_ 

SLEEP120

(__}

Using headphones

1

Reduce the volume and connect the headphones (not 
included).

Headphone plug type: 3.5 mm (

1

/

8

z

) stereo

2

Adjust headphone volume with [VOLUME].

Audio is automatically switched to 2-channel stereo.

VOLUME

MUSIC P./AUX

MUTING

SLEEP

MONO

SLP

ST

MODE

AC

PRG

RDS

DTS

PL

A

PS

PTY

H.BASS

SRD

PGM

HDCD

E.

1

CD

DVD

W

D

M

ain unit only

VOLUME

Muting the sound

Using the Music Port

1

Reduce the volume and connect the external device 
(not included).

Plug type: 3.5 mm (

1

/

8

z

) stereo

2

Press [MUSIC P./AUX] to select “FRONT MUSIC P.” or 
“REAR MUSIC P.”.

FRONT MUSIC P.

---)

REAR MUSIC P.

§

---)

AUX

^------------------------------------------------------------------}

§

“REAR MUSIC P.” can be selected only when the digital 
transceiver card is inserted into the main unit (

page 7).

3

Adjust the external device volume to a normal listening 
level, and then adjust the volume of the main unit with 
[VOLUME].

You can enjoy surround sound when you press 
[SURROUND MUSIC] on the main unit (except when 
“REAR MUSIC P.” is selected).

MONO SLP ST

MODE

AC

PRG

RDS

DTS

PL

A

PS

PTY

CD

DVD

D

VOLUME

SURROUND MUSIC

When using the front MUSIC PORT

When using the rear MUSIC PORT

External device

Reduce the volume 
before connecting.

External device

Reduce the volume 
before connecting.

MONO

ST

DE

AC

RG

S

H.B

SR

H

W

HT640W.book  Page 29  Friday, January 20, 2006  5:50 PM

Содержание SAHT640 - DVD THEATER RECEIVER

Страница 1: ...g this product please read the instructions completely Please keep this manual for future reference If you have any questions contact In the U S A 1 800 211 PANA 7262 In Canada 1 800 561 5505 1 ALL 2 4 1 Wireless surround sound Wireless surround speaker connection page 4 Advanced progressive scan Provides a smoother and sharper image page 6 High performance sound effects Sound quality enhancement ...

Страница 2: ...IDS SUCH AS VASES SHALL BE PLACED ON THE APPARATUS The socket outlet shall be installed near the equipment and easily accessible or the mains plug or an appliance coupler shall remain readily operable The lightning flash with arrowhead symbol within an equilateral triangle is intended to alert the user to the presence of uninsulated dangerous voltage within the product s enclosure that may be of s...

Страница 3: ...ng a track using CD text 16 Playing HighMATTM discs 17 Playing RAM discs 17 Using on screen menus 18 Main menu 18 Other Settings 19 Changing the player settings 21 Changing the delay time of the speakers 23 Using the radio 24 Presetting stations automatically 24 Selecting the preset channels 24 Manual tuning 24 Using an outdoor antenna optional 25 Using sound effects 26 Changing the sound quality ...

Страница 4: ...nd quality When turning the unit on or off Additional note for wireless setup To avoid possible interference do not place the surround speaker near any of the following devices The surround speaker uses the same radio frequencies as other devices that may be present in your home The surround speaker will automatically seek a clear channel if any of these other devices interfere with its communicat...

Страница 5: ...e speaker wires as doing so may damage the speakers Speaker installation options 30 to 35 mm 13 16q to 13 8q 7 5 to 9 4 mm 19 64q to 3 8q 4 0 to 7 0 mm 5 32q to 9 32q Wall or pillar 3 0 to 4 0 mm 1 8q to 5 32q 200 mm 77 8z Center speaker Front speaker e g In this position the speaker will likely fall if moved to the left or right Move the speaker so that the screw is in this position Speaker stand...

Страница 6: ...V box or video cassette recorder connection Basic audio connection STEP3 Audio and video connections Video cable AUX AUX VIDEO OUT S VIDEO OUT COMPONENTVIDEOOUT PB PR Y L R RF IN AUDIO OUT L R VIDEO IN AUDIO IN VIDEO OUT Television not included Back of the main unit Audio cable not included Basic video connection Other video connections for improved picture quality COMPONENTVIDEOOUT PB PR Y S VIDE...

Страница 7: ...OUT VIDEO S VIDEO OUT AM ANT EXT LOOP Y PB R P OUT Adhesive tape Main unit AM loop antenna Stand the antenna up on its base Place the antenna where reception is best Keep loose antenna cable away from other wires and cables AM loop antenna FM indoor antenna FM indoor antenna Affix this end of the antenna where reception is best Using an outdoor antenna optional page 25 Re tighten the terminal scre...

Страница 8: ...essary settings To display the picture from the main unit turn on your television and change its video input mode e g VIDEO 1 AV 1 etc To change your television s video input mode refer to its operating instructions This remote control can perform some basic television operations page 28 To change these settings later Select QUICK SETUP in the Others tab page 22 STEP 6 Preparing the remote control...

Страница 9: ...ip to the next disc tray 12 OPEN CLOSE Open Close the disc drawer 12 5 DISC SELECTOR Select the disc tray 12 TUNE MODE FM MODE Stop playing 12 Select the tuning mode 24 Adjust the FM reception condition 24 1 MEMORY Play discs 12 Memorize the receiving radio stations 24 4 5 X TUNING W Skip or slow search play 12 Select the radio stations 24 Standby on switch POWER Í I Press to switch the unit from ...

Страница 10: ... DVD Video DVD V DVD Audio DVD A DVD V DVD V Some DVD Audio discs contain DVD Video content To play DVD Video content select Play as DVD Video in Other Menu page 20 Video CD VCD Including SVCD Conforming to IEC62107 DVD RAM DVD VR JPEG DVD VR Recorded with devices using Version 1 1 of the Video Recording Format a unified video recording standard such as DVD video recorders DVD video cameras person...

Страница 11: ...re are about 30 frames shown each second One frame is made up of two fields A regular television shows these fields one after the other to create frames A still is shown when you pause a moving picture A frame still is made up of two alternating fields so the picture may appear blurred but overall quality is high A field still is not blurred but it has only half the information of a frame still so...

Страница 12: ...up To load discs on the other trays press DISC SKIP on the main unit Play will start from the disc in the front left position of the tray For DVD RAM remove the disc from its cartridge before use Do not load more than one disc per tray touch the drawer or the carousel while they are in motion rotate the carousel by hand close the drawer by hand Stop 5 DISC SELECTOR 2 Select DVD CD Select AUX to en...

Страница 13: ...CH RETURN SKIP STOP PAUSE TOP MENU DIRECT NAVIGATOR FL DISPLAY MENU PLAY LIST CANCEL ENTER Numbered buttons On screen item select Enter number DVD VR DVD A DVD V VCD CD e g To select 12 S10 1 2 VCD with playback control Press STOP to cancel the PBC function and then press the numbered buttons WMA MP3 JPEG e g To select 123 1 2 3 ENTER Press CANCEL to cancel the number s DVD A DVD V Shows a disc to...

Страница 14: ... play If you want to play a DVD press and hold CD MODE again to cancel CD Mode CD Mode is also canceled when you switch the unit to standby select another source or change the disc in the play position DVD and JPEG are skipped without being played Checking the disc type in each tray 1 Press DISC to show the Disc information screen To exit the screen press DISC 2 Press the numbered buttons 1 5 to s...

Страница 15: ... 2 1 to select Clear and press ENTER To clear the whole program Select Clear all with 3 4 2 1 and press ENTER The whole program is also cleared when the disc is moved out of the play position the unit is turned off or another source is selected When CD Mode is off VCD CD You can play all the items on a disc in the play position in random order DVD A DVD V WMA MP3 JPEG You can play selected item s ...

Страница 16: ...ect All Audio or Picture and press ENTER Playing from the selected item Navigation Menu 1 Press MENU To exit the screen press MENU 2 Press 3 4 2 1 to select the group and press ENTER 3 To play content in the group in order Press ENTER To start play from the selected content Press 3 4 to select and ENTER TOP MENU DIRECT NAVIGATOR FUNCTIONS MENU PLAY LIST ENTER SLOW SEARCH STOP Numbered buttons Play...

Страница 17: ...WMA MP3 JPEG 1 Press TOP MENU To exit the screen press STOP To change the menu background to the one recorded on the disc press FUNCTIONS 2 Press 3 4 2 1 to select the item and then press ENTER Repeat this step if necessary Selecting from the list 1 During play Press MENU To exit the screen press MENU 2 Press 2 then 3 4 to switch among Playlist Group and Content lists 3 Press 1 then 3 4 to select ...

Страница 18: ...DVD V with multiple soundtracks To select audio soundtrack DVD VR VCD To select L R or LR DVD V Karaoke disc To select On or Off for vocals Read the disc s instructions for details Signal type data LPCM PPCM ÎDigital DTS MPEG Signal type kHz Sampling frequency bit ch Number of channels e g 3 2 1ch 1 Low frequency effect 1 not displayed if there is no signal 0 No surround 1 Mono surround 2 Stereo s...

Страница 19: ...lay Markers you add are cleared when you change the disc in the play position or switch the unit to standby Advanced Disc Review DVD VR Except still picture part DVD V Except iR iRW Allows you to browse the disc contents and start playing from the selected position You can select either Intro Mode or Interval Mode in Advanced Disc Review in the Disc tab page 21 When you find a title program to pla...

Страница 20: ...he screen Zoom Expands all images to fill the screen If your television has a similar feature use it instead for a better effect Just Fit Zoom To select the appropriate screen size to fit your television screen DVD A Motion picture part DVD VR DVD V VCD Auto 4 3 Standard European Vista 16 9 Standard American Vista Cinemascope1 Cinemascope2 Manual Zoom To zoom in and out manually s in 0 01 unit ste...

Страница 21: ...ess and hold to exit Select Go right Select Register Select Register QUICK SETUP enables successive settings of the items in the shaded area Audio Choose the audio language English French Spanish Original 1 Other 2 Subtitle Choose the subtitle language Automatic 3 English French Spanish Other 2 Menus Choose the language for disc menus Changing the menu language in QUICK SETUP also changes this set...

Страница 22: ...y is lower Frame Overall quality is high but the picture may appear blurred Black Level Control Change the black level of the picture if you connected a television through the COMPONENT VIDEO OUT terminals Lighter When connected through VIDEO OUT or S VIDEO OUT Darker When connected through COMPONENT VIDEO OUT Y PB PR Dynamic Range Compression Off On Adjusts for clarity even when the volume is low...

Страница 23: ... time Exit Surround delay time Language code list Abkhazian 6566 Afar 6565 Afrikaans 6570 Albanian 8381 Ameharic 6577 Arabic 6582 Armenian 7289 Assamese 6583 Aymara 6589 Azerbaijani 6590 Bashkir 6665 Basque 6985 Bengali Bangla 6678 Bhutani 6890 Bihari 6672 Breton 6682 Bulgarian 6671 Burmese 7789 Byelorussian 6669 Cambodian 7577 Catalan 6765 Chinese 9072 Corsican 6779 Croatian 7282 Czech 6783 Danis...

Страница 24: ... select MANUAL Each time you press the button MANUAL PRESET 3 Press X TUNING W to tune to the lowest frequency FM 87 9 or 87 5 AM 520 4 Press and hold MEMORY Release the button when FM AUTO or AM AUTO is displayed The tuner presets all the stations it can receive into the channels in ascending order SET OK is displayed when the stations are set and the radio tunes to the last preset station ERROR ...

Страница 25: ...na during an electrical storm Main unit only Using an outdoor antenna optional FM ANT 75 AM ANT EXT LOOP LOOP ANT GND 2 1 1 Leave the AM loop antenna connected AM outdoor antenna Using a vinyl wire Run a piece of vinyl wire horizontally across a window or other convenient location 5 to 12 m 16 to 39 feet FM outdoor antenna Using a television antenna Disconnect the FM indoor antenna The antenna sho...

Страница 26: ... C FOCUS Each time you press and hold the button C FOCUS ON C FOCUS OFF This does not work when Surround Music page 12 or Sound Field Control MOVIE SPORT or MUSIC is turned on This also works when Dolby Pro Logic II is turned on Dolby Pro Logic II is an advanced decoder that derives 5 channel surround Left and Right Front Center Left and Right Surround from stereo sound sources whether or not it h...

Страница 27: ...d speaker levels at the same time using 3 4 S 6 dB to i6 dB 2 Press 3 increase or 4 decrease to adjust the speaker level for each speaker C RS LS SW 6 dB to i6 dB L R Only the balance is adjustable To adjust the balance of the front speakers while L or R is selected press 2 1 Adjusting the volume of each speaker Speaker level adjustments 1 While stopped and no on screen display is shown Press and ...

Страница 28: ...not work properly with some models Aim the remote control at the television Turning the television on off Press Í TV Switching the television s video input mode Press TV VIDEO Adjusting the volume Press r s TV VOLUME To play audio from your television through your home theater system Select AUX as the source reduce the volume on the television to its minimum and control the volume on the main unit...

Страница 29: ...ernal device to the desired level Setting the sleep timer 1 Press and hold SLEEP 2 While the time is shown Press SLEEP to select the time in minutes SLEEP 30_ SLEEP 60_ SLEEP 90 OFF _ SLEEP120 __ Using headphones 1 Reduce the volume and connect the headphones not included Headphone plug type 3 5 mm 1 8z stereo 2 Adjust headphone volume with VOLUME Audio is automatically switched to 2 channel stere...

Страница 30: ...al Folders on a data CD are not displayed correctly WMA MP3 JPEG Folders deeper than the eighth layer are displayed as the eighth layer A menu screen appears during skip or search VCD This is normal for Video CDs Playback control menu does not appear VCD with playback control Press STOP twice and then press 1 PLAY Program and Random play do not work DVD V These functions do not work with some DVD ...

Страница 31: ...ckers or doesn t light Adjust the position of the FM or AM antenna Use an outdoor antenna 25 A beat sound is heard Turn the television off or move it away from the unit A low hum is heard during AM broadcasts Separate the antenna from other cables The display is dark Select Bright in FL Dimmer in the Others tab 22 NOPLAY You inserted a disc the unit cannot play insert one it can You inserted a bla...

Страница 32: ... Y green PB blue PR red 1 system Front speakers SB FS640 Type 1 way 1 speaker system Bass reflex Speaker unit s Impedance 3 Full range 6 5 cm 21 2z Cone type Input power IEC 110 W 6 Max Output sound pressure 80 dB W 1 0 m Frequency range 110 Hz 25 kHz j16 dB 122 Hz 22 kHz j10 dB Dimensions WtHtD 92 mmk135 mmk95 4 mm 35 8zk55 16zk33 4z Mass 0 75 kg 1 65 lbs Surround speaker SB SA640 Type 1 way 1 sp...

Страница 33: ...ABLE FOR INCIDENTAL OR CONSEQUENTIAL DAMAGES RESULTING FROM THE USE OF THIS PRODUCT OR ARISING OUT OF ANY BREACH OF THIS WARRANTY As examples this excludes damages for lost time travel to and from the servicer loss of media or images data or other memory content The items listed are not exclusive but are for illustration only ALL EXPRESS AND IMPLIED WARRANTIES INCLUDING THE WARRANTY OF MERCHANTABI...

Страница 34: ...ase receipt or other proof of date of original purchase is required before warranty service is performed THIS EXPRESS LIMITED WARRANTY IS IN LIEU OF ALL OTHER WARRANTIES EXPRESS OR IMPLIED INCLUDING ANY IMPLIED WARRANTIES OF MERCHANTABILITY AND FITNESS FOR A PARTICULAR PURPOSE IN NO EVENT WILL PANASONIC CANADA INC BE LIABLE FOR ANY SPECIAL INDIRECT OR CONSEQUENTIAL DAMAGES In certain instances som...

Страница 35: ...ctured under license from Dolby Laboratories Dolby Pro Logic and the double D symbol are trademarks of Dolby Laboratories DTS and DTS Digital Surround are registered trademarks of Digital Theater Systems Inc Apparatus Claims of U S Patent Nos 4 631 603 4 577 216 and 4 819 098 licensed for limited viewing uses only This product incorporates copyright protection technology that is protected by metho...

Страница 36: ...ou made your purchase If you see this symbol THE FOLLOWING APPLIES ONLY IN CANADA 1 Remote control N2QAYZ000001 2 Remote control batteries 1 Video cable K2KA2BA00001 1 AM loop antenna N1DAAAA00002 1 FM indoor antenna RSA0007 L 2 AC power supply cords K2CB2CB00018 1 Digital transceiver 2 Sheets of speaker cable stickers 4 4 2 2 6 6 5 3 5 3 1 1 SURROUND Rch Rch SURROUND Rch Rch FRONT WOOFER SUB Lch ...

Отзывы: