background image

3

RQT9129

Table of contents

Accessory information ..................................... 2
Preparing the remote control........................... 3
IMPORTANT SAFETY INSTRUCTIONS............ 3

Control reference guide.................................. 10
Disc and card information.............................. 12

Basic play (Playing video contents).............. 14
Enjoying TV with this unit’s speakers........... 17
Enjoying the FM/AM radio .............................. 18
Playing music .................................................. 19
Playing an iPod on this unit ........................... 20

Playing still pictures ....................................... 22
Different kinds of playback for BD-Video ..... 24
Showing FUNCTIONS menu........................... 25
Changing audio quality/sound field .............. 26
Enjoying surround sound .............................. 27
Linked operations with the TV

(VIERA Link

TM

 “HDAVI Control

TM

”)............... 28

Changing settings with the on-screen menu ... 30
Changing settings with the setup menu ....... 32

Optional connections and settings ............... 35
Frequently asked questions........................... 37
Messages ......................................................... 38
Troubleshooting guide ................................... 39
Disc and card handling................................... 42
Maintenance .................................................... 42
Glossary ........................................................... 43
Specifications .................................................. 44
Limited Warranty (ONLY FOR U.S.A.) ........... 46
Limited Warranty (ONLY FOR CANADA) ...... 47
Product Service ............................................... 47
Index .................................................. Back cover

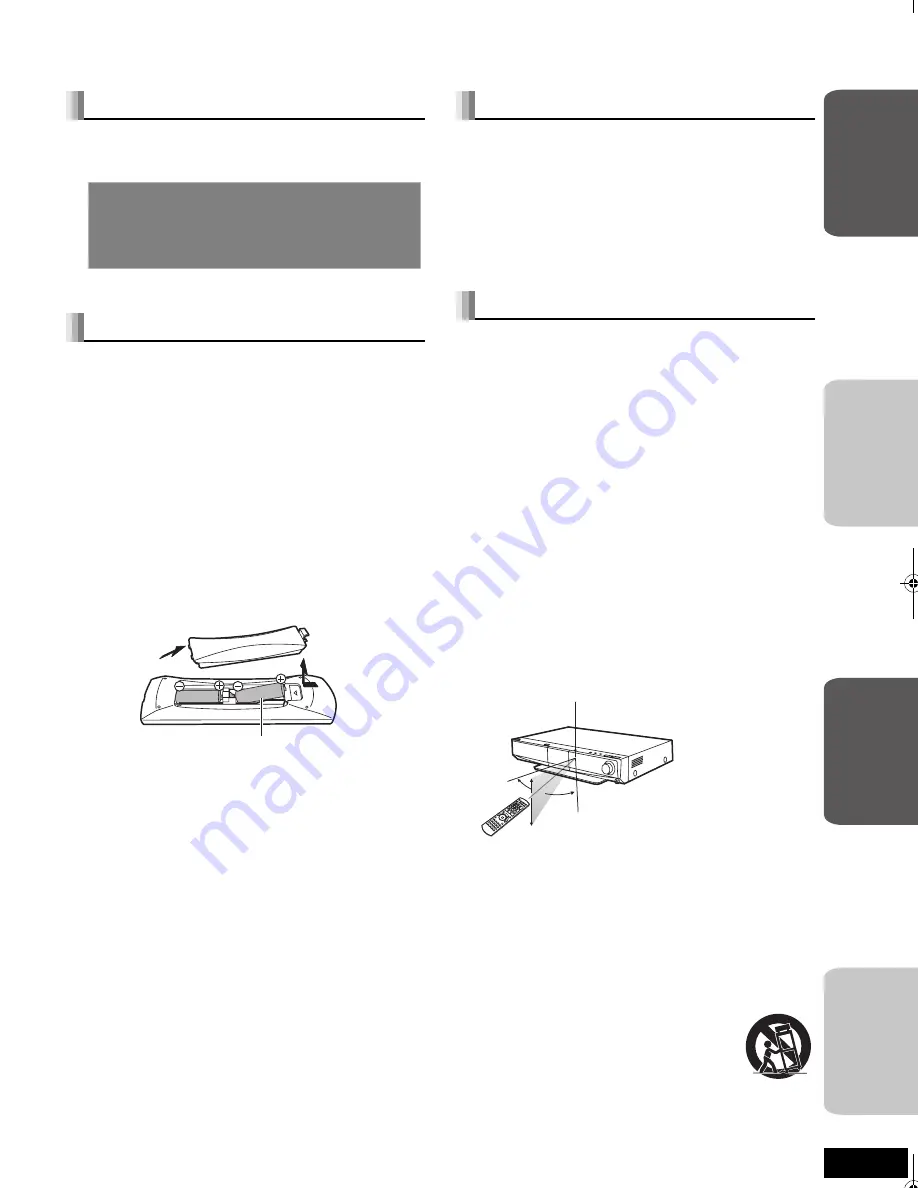
Preparing the remote control

Batteries

Insert so the poles (

i

 and 

j

) match those in the remote control.

When closing the lid, insert it from the 

j

 (minus) side.

Do not use rechargeable type batteries.

Do not mix old and new batteries.

Do not use different types at the same time.

Do not heat or expose to flame.

Do not lea

v

e the battery(ies) in an automobile exposed to direct 

sunlight for a long period of time with doors and windows closed.

Do not take apart or short circuit.

Do not attempt to recharge alkaline or manganese batteries.

Do not use batteries if the co

v

ering has been peeled off.

Mishandling of batteries can cause electrolyte leakage which can 
damage items the fluid contacts and may cause a fire.
Remo

v

e batteries if the remote control is not going to be used for a 

long period of time. Store in a cool, dark place.

Use

IMPORTANT SAFETY INSTRUCTIONS

Read these operating instructions carefully before using the unit. Follow the safety instructions on the unit and the applicable safety instructions 
listed below. Keep these operating instructions handy for future reference.

Getting started

Quick Start Guide

STEP 1 Positioning ....................................4

STEP 2 Basic connections........................6

STEP 3 Setting up the unit ........................9

Basic operations

Advanced operations

Reference

R6/LR6, AA

30˚

30˚

30˚

10˚

Remote control signal sensor

7 m (23 ft.) directly in front of the unit

If you cannot operate the unit using the remote control after 
changing the batteries, please re-enter the codes (

>

42).

1)

Read these instructions.

2)

Keep these instructions.

3)

Heed all warnings.

4)

Follow all instructions.

5)

Do not use this apparatus near water.

6)

Clean only with dry cloth.

7)

Do not block any 

v

entilation openings. Install in accordance with 

the manufacturer’s instructions.

8)

Do not install near any heat sources such as radiators, heat 
registers, sto

v

es, or other apparatus (including amplifiers) that 

produce heat.

9)

Do not defeat the safety purpose of the polarized or 
grounding-type plug. A polarized plug has two blades with one 
wider than the other. A grounding-type plug has two blades and 
a third grounding prong. The wide blade or the third prong are 
pro

v

ided for your safety. If the pro

v

ided plug does not fit into your 

outlet, consult an electrician for replacement of the obsolete 
outlet.

10) Protect the power cord from being walked on or pinched 

particularly at plugs, con

v

enience receptacles, and the point 

where they exit from the apparatus.

11) Only use attachments/accessories specified by the 

manufacturer.

12) Use only with the cart, stand, tripod, bracket, or 

table specified by the manufacturer, or sold with 
the apparatus. When a cart is used, use caution 
when mo

v

ing the cart/apparatus combination to 

a

v

oid injury from tip-o

v

er.

13) Unplug this apparatus during lightning storms or 

when unused for long periods of time.

14) Refer all ser

v

icing to qualified ser

v

ice personnel. Ser

v

icing is 

required when the apparatus has been damaged in any way, 
such as power-supply cord or plug is damaged, liquid has been 
spilled or objects ha

v

e fallen into the apparatus, the apparatus 

has been exposed to rain or moisture, does not operate 
normally, or has been dropped.

Ge

tti

ng s

ta

rte

d

Basi

c

ope

ra

ti

o

n

s

Ad

v

a

nce

d


ope

ra

tions

Ref

e

re

nce

SC-BT100P-ENG.book  3 ページ  2008年2月20日 水曜日 午後6時22分

Содержание SABT100 - BLU-RAY DVD HOME THEATER SOUND SYSTEM

Страница 1: ...s unit plays BD Video marked with labels containing the region code A Example DVD Video This unit plays DVD Video marked with labels containing the region number 1 or ALL Example 2 4 1 ALL 1 For Canada only The word Participant is used in place of the word Partner As an ENERGY STAR Partner Panasonic has determined that this product meets the ENERGY STAR guidelines for energy efficiency If you have...

Страница 2: ...nt operating and maintenance servicing instructions in the literature accompanying the appliance RISK OF ELECTRIC SHOCK DO NOT OPEN THE FOLLOWING APPLIES ONLY IN THE U S A FCC Note This equipment has been tested and found to comply with the limits for a Class B digital device pursuant to Part 15 of the FCC Rules These limits are designed to provide reasonable protection against harmful interferenc...

Страница 3: ...ow Keep these operating instructions handy for future reference Getting started Quick Start Guide STEP 1 Positioning 4 STEP 2 Basic connections 6 STEP 3 Setting up the unit 9 Basic operations Advanced operations Reference R6 LR6 AA 30 30 30 10 Remote control signal sensor 7 m 23 ft directly in front of the unit If you cannot operate the unit using the remote control after changing the batteries pl...

Страница 4: ...his is the normal operation of the product working to assure the best possible performance of your home theater system If the interference persists try moving the other devices to another location outside the range of the wireless system or move the wireless system nearer to the main unit Enjoying 7 1 channel surround sound Optional Panasonic wireless accessory SH FX67 Optional Panasonic speaker s...

Страница 5: ... mm 315 16q away from the wall Fixing the position for the center speaker screws 1 Drive in a screw 50 5 mm 2q left of the right side of the center speaker as seen directly from the front 2 Drive another screw 160 mm 6 5 16q left of the first screw 3 Fit the speaker securely onto the screw s with the hole s Except subwoofer Ensure the stands meet these conditions before purchasing them Note the di...

Страница 6: ...URR SURR SURR Do Do not Do not Do not use a front speaker as a surround speaker or vice versa Verify the type of speaker with the label on the rear of the speaker Do not insert or remove the digital transmitter while the main unit is on Insert the wires fully Be careful not to cross short circuit or reverse the polarity of the speaker wires as doing so may damage the speakers OPTICAL IN L R DIGITA...

Страница 7: ...le you to play audio from your television through your home theater system 17 OPTICAL IN L R DIGITAL COMPONENT VIDEO OUT VIDEO OUT Y AUX PR PB SURROUND SURROUND BACK AV OUT SPEAKERS R L 6ǡ 6ǡ CENTER 6ǡ SUBWOOFER FRONT 6 5 2 1 FM ANT ANT EXT LOOP AM 75ǡ GND ANT LOOP AC IN OUT OPTICAL IN L R DIGITAL COMPONENT VIDEO OUT VIDEO OUT Y AUX PR PB AV OUT L FRONT 1 FM ANT ANT EXT LOOP AM 75ǡ GND ANT LOOP AV...

Страница 8: ...it s display for about 30 seconds and power is turned off automatically AM loop antenna FM Indoor antenna OPTICAL IN L R DIGITAL COMPONENT VIDEO OUT VIDEO OUT Y AUX PR PB SPEAKERS SURROUND SURROUND BACK FM ANT ANT EXT LOOP AM 75ǡ AV OUT R L 6ǡ 6ǡ CENTER 6ǡ SUBWOOFER FRONT 6 5 2 1 GND ANT LOOP AC IN TRANSMITTER DIGITAL OUT FM indoor antenna included Affix this end of the antenna where reception is ...

Страница 9: ...cted to a Panasonic TV VIERA supporting HDAVI Control 2 or HDAVI Control 3 via an HDMI cable then the On screen Language and TV Aspect setting information on the TV are captured from the TV 2 Follow the on screen instructions and make the settings with 3 4 and OK On screen Language 33 and TV Aspect 33 are set You can perform this setup anytime by selecting Easy Setting in the Setup menu 32 You can...

Страница 10: ...6 MUTING Mute the sound 16 AD Transmit the remote control signal AE TV operation buttons Aim the remote control at the Panasonic TV and press the button Í TV Turn the TV on and off TV VIDEO Switch the input channel i j VOL Adjust the TV volume This may not work properly with some models AF Select the source BD DVD CD SD FM AM IPOD D IN AUX AG Adjust the volume of the main unit 15 AH Select audio 1...

Страница 11: ...ator blinks when the wireless link is inactive for a long time Main display section iPod indicator Audio signal indicator Main unit D S P 7 1CH BOOST SW SELECTOR Place your finger on the 4 section and open it diagonally downwards The unit s display 96 24 DTS ST M MONO TUNED SLP SD iPod DISC W4S W2S D D NEO 6 PL x HD Lights when disc is ready to play Lights when iPod is ready to play Lights when SD...

Страница 12: ... a few seconds at portions spliced due to deletion or edition Switch the write protect switch to the LOCK position to protect the content from accidental erasure Packaged discs Type of media Logo Features Indicated as Type of media Logo Features Indicated as BD Video High Definition HD movie and music discs BD V DVD Video High quality movie and music discs DVD V CD Compact Discs CD s that contain ...

Страница 13: ...ersion 1 0 of DVD RW R 8 cm 3z DVD ROM CD ROM CDV SACD Photo CD MV Disc and PD DVD Audio Video CD and SVCD WMA discs DivX discs PAL discs HD DVD Other discs that are not specifically supported Regarding BD Video Note about using a DualDisc Tips for making MP3 JPEG discs File format MP3 JPEG Playable media CD R RW 1 CD R RW 1 DVD RAM 2 BD RE 3 SD card Extension Files must have the extension mp3 or ...

Страница 14: ...lor buttons on the remote control If the menu is displayed press 3 4 2 1 to select the item and press OK e g BD V SCENE SELECTION LANGUAGES MAIN MENU SPECIALFEATURES DIRECT NAVIGATOR Title View Video Picture 01 02 03 04 05 06 07 08 09 10 9 5 9 5 9 5 9 6 9 6 9 6 9 7 9 7 9 7 9 7 Wed Wed Wed Thu Thu Thu Fri Fri Fri Fri IN 2 IN 2 VHS VHS IN 2 IN 2 10 00AM 11 30AM 11 59PM 10 00AM 11 30AM 11 59PM 10 00A...

Страница 15: ... 9 5 on the main unit BD V AVCHD DVD VR DVD V Audio is heard during first level of forward search CD MP3 The speed is fixed to a single step Slow motion While paused press 6 or 5 Press and hold 6 or 9 5 on the main unit BD V AVCHD Forward direction 5 only DVD VR If continued for approx 5 minutes slow motion play pauses automatically Skip Skip to the title chapter or track you want to play Each pre...

Страница 16: ...left and right sides of the screen you can enlarge the image to fill the screen 1 Press SUB MENU 2 Press 3 4 to select Screen Aspect and press OK 3 Press 2 1 to select Side cut or Zoom Normal Normal output Side cut The black bars on the right and left sides of the 16 9 image disappear and the image is enlarged Please note that the right and left sides of the image are cut off when the black bar is...

Страница 17: ...detailed information on this operation please refer to the Enjoying surround sound section on page 27 Making settings for digital audio input Select to suit the type of audio from the OPTICAL IN terminal on the main unit 1 Press N O SELECT several times to select D IN DIGITAL IN Main unit Press SELECTOR 2 Press SETUP 3 Press 3 4 to select DUAL DRC or PCM FIX and press OK 4 While the selected mode ...

Страница 18: ...number e g 1 1 OK To select a 2 digit number e g 12 1 2 Alternatively press 9 or 2 1 to select the channel If noise is excessive When FM is selected Press FM MODE to display MONO Press the button again to cancel the mode The mode is also canceled when you change the frequency This setting can be preset for each broadcasting station When MONO appears follow procedures 3 and 4 in Presetting stations...

Страница 19: ...TURN Discs containing data in different file formats To switch from the JPEG menu to MP3 menu perform steps below 1 Press FUNCTIONS 2 Press 3 4 to select Menu and press OK 3 Press 3 4 to select MP3 Music and press OK You can use search and skip functions 15 When the Screen Saver Function is set to On 33 the screen switches to Screen Saver mode if there is no operation for 10 minutes after starting...

Страница 20: ...ng in main unit standby mode Check iPod to see if the battery is fully recharged If you are not using iPod for an extended period of time after recharging has completed disconnect it from main unit as the battery will be depleted naturally Once fully recharged additional recharging will not occur Place your finger on the 4 section and open it diagonally downwards Main unit Dock for iPod NOTE iPod ...

Страница 21: ...splay 3 Switch the TV input to video in 4 Play a slideshow or video on your iPod The picture will be displayed on your TV You can also use the remote control to operate iPod menu 3 4 To navigate menu items OK To go to the next menu RETURN To return to the previous menu You can enjoy surround sound effect when you press ÎPLIIx or NEO 6 27 Playback Enjoy music EXTENDED mode Items Selection playback ...

Страница 22: ...Press 2 1 CD R RW Discs containing data in different file formats To switch from the MP3 menu to JPEG menu perform steps below 1 Press FUNCTIONS 2 Press 3 4 to select Menu and press OK 3 Press 3 4 to select Pictures and press OK To return to the previous screen Press RETURN To exit the screen Press DIRECT NAVIGATOR OK 3 4 2 1 FUNCTIONS DIRECT NAVIGATOR RETURN SUB MENU STATUS 1 PLAY 9 B SELECTOR BD...

Страница 23: ...otate Left and press OK The rotation information will be stored until the unit is turned off or the media is removed Start Slideshow Slideshow settings To video Display Interval Cancel Set Repeat Play Normal On Set time delay between pictures and continuous wrap around play Slideshow settings RETURN Zoom out Rotate Right Rotate Left OK RETURN SUB MENU S Zoom out This function is only available for...

Страница 24: ...n SD card The methods for copy and playback and the required available capacity on the card may vary with the disc For details refer to the instructions for the disc To use the above functions it is recommended that you format the card on this unit Format the card using the following procedures BD Video data such as secondary video recorded on the card can also be erased with the following procedu...

Страница 25: ...8 AM To enjoy the AM radio 18 iPod To play iPod Press 3 4 to select Music or Videos Photos and press OK Music 21 Step 2 in Enjoy music EXTENDED mode Videos Photos 21 Step 3 in Enjoy videos photos SIMPLE mode Digital in To enjoy TV broadcasts with this unit s speakers 17 AUX TV To enjoy TV broadcasts with this unit s speakers 17 TV is displayed next to items set for TV SOUND input 28 Setting the TV...

Страница 26: ...effect 4 Press 3 4 to select ON or OFF This function is effective when playing audio containing surround channel sound or when Dolby Pro Logic IIx Dolby Pro Logic II or DTS NEO 6 is on This sound effect have no effect when receiving AM radio broadcast You can enhance the surround effect for low volume 5 1 channel sound Convenient for late night viewing 4 Press 3 4 to select ON or OFF This function...

Страница 27: ...7 1 channel You cannot select EX when playing 2 channel stereo sources You cannot use this function when playing titles recorded in the DTS ES format DTS NEO 6 When 5 1ch speakers connected The technology enables you to play 2 channel stereo sources on 5 1 channel When 7 1ch speakers connected 4 Enjoying 7 1 channel surround sound The technology enables you to play 2 channel stereo or 5 1 channel ...

Страница 28: ...cted as the source on this unit What is VIERA Link HDAVI Control VIERA LinkTM is a new name for EZ SyncTM VIERA Link HDAVI Control is a convenient function that offers linked operations of this unit and a Panasonic TV VIERA under HDAVI Control You can use this function by connecting the equipment with an HDMI cable See the operating instructions for connected equipment for operational details Prep...

Страница 29: ...anel You can operate the playback with the indicated controls Note Depending on the menu some button operations cannot be performed from the TV s remote control You cannot input numbers with the numbered buttons on the TV s remote control 0 to 9 Use this unit s remote control to select the playlist etc When you want to leave the TV on and set only this unit to standby mode Press Í on this unit s r...

Страница 30: ...Video recording method Soundtrack AVCHD DVD V Select the type of audio or language D below Language Audio attribute DVD VR The disc s audio attributes appear D below Audio attribute Subtitle BD V AVCHD DVD V Turn the subtitle on off and select the language D below Language DVD VR Only discs that contain subtitle on off information Turn the subtitle on off Subtitle Style BD V Select the subtitle st...

Страница 31: ...e shade of the picture s color j7 to i7 Gamma Adjusts the brightness of dark portions of the screen 0 to i5 3D NR Reduces the rough noise in the background to give a greater feeling of depth 0 to i4 When BD Video 24p Output is set to On this function may not operate 33 Integrated NR Smooths block noise and reduces the smudging that appears around contrasting sections of the picture 0 to i3 Progres...

Страница 32: ...orary Unlock BD Video Ratings Set an age limit of BD Video play No Limit All BD Video can be played 0 to 254 year s Prohibits play of BD Video with corresponding ratings recorded on them Unlock Player Change Password Change Level Temporary Unlock Audio Language Choose the language for audio subtitle and disc menus BD V DVD V Some discs start in a certain language despite any changes you make here ...

Страница 33: ...t screen is displayed as a horizontally stretched 16 9 image Time Delay When connected with a Plasma display adjust if you notice the audio is out of sync with the video Auto 0ms 20ms 40ms 60ms 80ms 100ms 120ms 140ms When using VIERA Link HDAVI Control with HDAVI Control 3 compatible TV 28 select Auto Audio and video will automatically be set in sync This works only when BD DVD SD AUX or D IN is s...

Страница 34: ...lect when the center speaker is not connected or not in use Surround Select when the surround speakers are connected and in use Select when the surround speakers are not connected or not in use Surround back 1 Select when using the optional Panasonic wireless system SH FX67 and speaker system SB HS100A to enjoy 7 1ch surround sound connecting an amplifier to the SURROUND BACK terminal at the back ...

Страница 35: ...on progressive video Connect to a TV that supports 480p or higher Set Component Video Resolution to 480p 720p or 1080i 33 Set HDMI Video Mode to Off 33 Otherwise the video is output as 480i OPTICAL OUT RF IN RF OUT AUDIO OUT VIDEO IN AUDIO IN RF IN L R L R OPTICAL IN L R DIGITAL COMPONENT VIDEO OUT VIDEO OUT Y AUX PR PB SURROUND AV OUT AKERS R L 6ǡ ER FRONT 2 1 FM ANT ANT EXT LOOP AM 75ǡ GND ANT L...

Страница 36: ... convenient location FM outdoor antenna Using a TV antenna not included Disconnect the FM indoor antenna The antenna should be installed by a competent technician 75 coaxial cable not included Antenna plug not included 5 m to 12 m 16 ft to 39 ft Main unit 1 Remove a piece of the outer vinyl insulator 2 Carefully pull the tabs apart to remove the cover 3 Install the coaxial cable Clamp the cable co...

Страница 37: ...ta recorded with a digital camera etc Playback AVCHD motion pictures recorded with Panasonic High Definition Video Camera If a BD Video disc supporting this function is used it is possible to copy secondary video recorded on the disc to the card and play it back together with the images on the disc Virtual package 22 14 24 What kinds of cards can be used SD Memory Cards from 8 MB to 2 GB SDHC Memo...

Страница 38: ...lect a position with good ventilation when installing the unit Do not block the cooling fan on the rear of the unit W2S or W4S is flashing There is no link between the main unit and the wireless system Check that the wireless system is plugged into the AC outlet and is turned on Ensure that the digital transmitter is fully inserted into the slot of the main unit Perform the steps bellow 1 While pr...

Страница 39: ...Don t place the signal sensor in direct sunlight or in areas that may be subject to sunlight exposure It may be necessary to set the code on the remote control again after changing the batteries 42 3 3 42 The unit is on but cannot be operated Confirm the correct source is selected Some operations may be prohibited by the disc The unit is hot U59 appears on the display Wait for U59 to disappear One...

Страница 40: ... aspect Refer to your TV s operating instructions When using an HDMI cable set TV Aspect to 16 9 When using a component video cable set Progressive to Off If the situation is not restored after that set TV Aspect to 4 3 Pan Scan 33 31 33 There is a lot of after image when playing video Turn 3D NR or Integrated NR off if it is on 31 When playing DVD Video using progressive output one part of the pi...

Страница 41: ...3 on the remote control W2S or W4S lights on the main unit 4 Turn off and on the wireless system Make sure the indicator on the wireless system lights up green 6 8 9 6 The indicator on the wireless system keeps flashing between red and green There is a power supply problem Consult the dealer Audio and video momentarily pause This occurs between playlist chapters or scenes AVCHD When playing a titl...

Страница 42: ...e time for more than 5 seconds Remote Control Code Press and OK together for more than 5 seconds on the remote Set Code 1 Set Code 2 NOTE The unit s remote control code DO DO NOT Lens cleaner RP CL720PP This lens cleaner is sold as specific for DIGA but can be used without problem on this unit as well Java and all Java based trademarks and logos are trademarks or registered trademarks of Sun Micro...

Страница 43: ...ly better A field still shows less picture information so it may be rougher but there is no blurring HDMI High Definition Multimedia Interface HDMI is a digital interface for consumer electronic products Unlike conventional connections it transmits uncompressed digital video and audio signals on a single cable JPEG Joint Photographic Experts Group This is a system used for compressing decoding col...

Страница 44: ... folders 9999 picture contents and 300 folders 7 AVCHD format V1 0 Signal system NTSC Video output Output level 1 0 Vp p 75 Output connector Pin jack 1 system Component video output 1080i 720p 480p 480i Y output level 1 0 Vp p 75 PB output level 0 7 Vp p 75 PR output level 0 7 Vp p 75 Output connector Pin jack Y green PB blue PR red 1 system HDMI AV output Output format 480p 525p 1080i 1125i 720p ...

Страница 45: ...art of your musical enjoyment Now it s time to consider how you can maximize the fun and excitement your equipment offers This manufacturer and the Electronic Industries Association s Consumer Electronics Group want you to get the most out of your equipment by playing it at a safe level One that lets the sound come through loud and clear without annoying blaring or distortion and most importantly ...

Страница 46: ... is attributable to acts of God THERE ARE NO EXPRESS WARRANTIES EXCEPT AS LISTED UNDER LIMITED WARRANTY COVERAGE THE WARRANTOR IS NOT LIABLE FOR INCIDENTAL OR CONSEQUENTIAL DAMAGES RESULTING FROM THE USE OF THIS PRODUCT OR ARISING OUT OF ANY BREACH OF THIS WARRANTY As examples this excludes damages for lost time cost of having someone remove or re install an installed unit if applicable travel to ...

Страница 47: ... warranties so the above limitations and exclusions may not be applicable WARRANTY SERVICE FOR PRODUCT OPERATION ASSISTANCE please contact Our Customer Care Centre Telephone 905 624 5505 1 800 1 800 561 5505 Fax 905 238 2360 Email link Customer support on www panasonic ca FOR PRODUCT REPAIRS please locate your nearest Authorized Servicentre at www panasonic ca Link ServicentresTM locator under Cus...

Страница 48: ...btitle 30 Subwoofer boost 26 Subwoofer level 26 Surround Enhancer 26 T Transfer 31 U Unit care 42 V VIERA Link HDAVI ControlTM 28 Virtual package 24 43 w Whisper mode Surround 26 Z Zoom 23 24p 33 43 If you see this symbol Inside of product C 2008 Matsushita Electric Industrial Co Ltd Printed in Malaysia Information on Disposal in other Countries outside the European Union This symbol is only valid...

Отзывы: