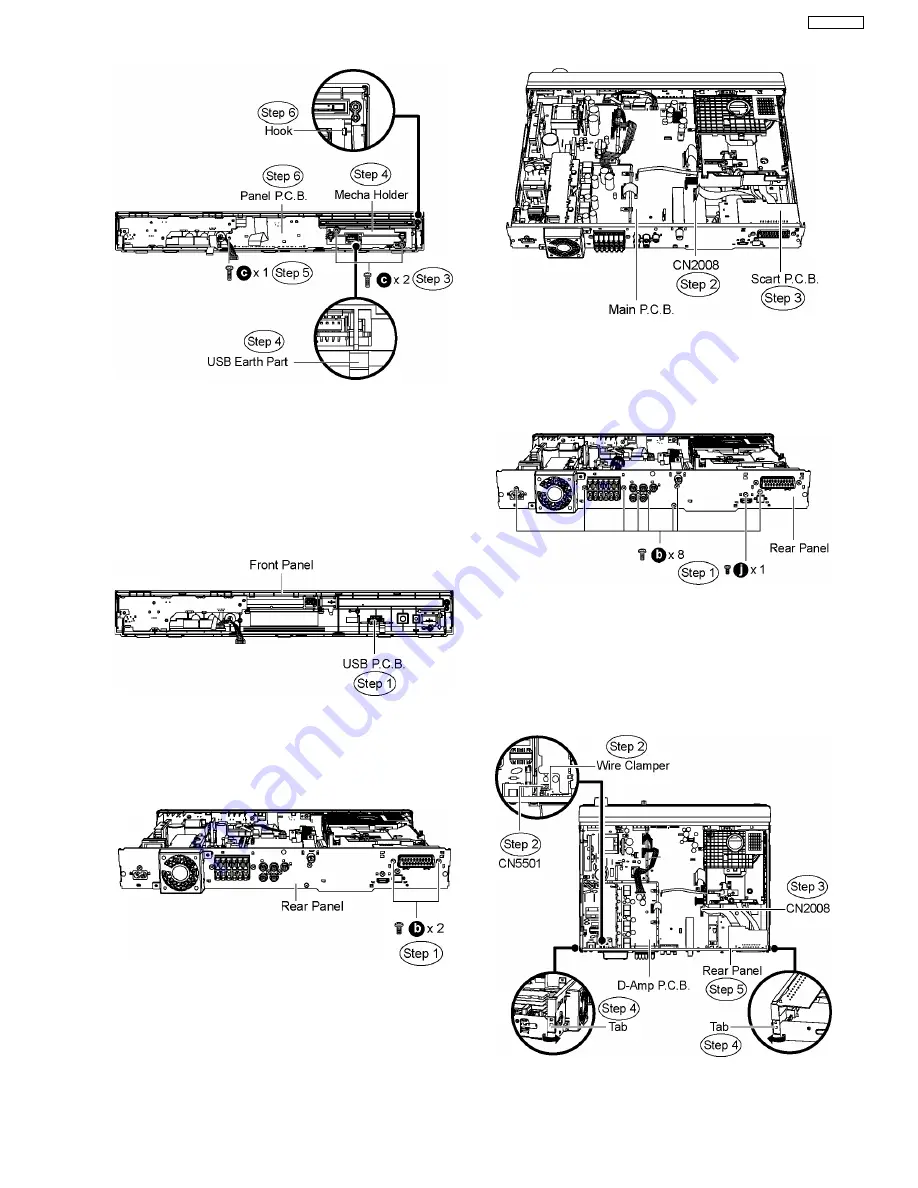
10.9. Disassembly of USB P.C.B.
·
Follow (Step 1) to (Step 3) of Item 10.3.
·
Follow (Step 1) to (Step 4) of Item 10.4.
·
Follow (Step 1) to (Step 6) of Item 10.5.
·
Follow (Step 1) to (Step 6) of Item 10.8.
Step 1
Remove USB P.C.B. from the front panel.
10.10. Disassembly of Scart P.C.B.
·
Follow (Step 1) to (Step 3) of Item 10.3.
Step 1
Remove 2 screws from the rear panel.
Step 2
Detach FFC cable from the connector (CN2008) on
Main P.C.B.
Step 3
Remove Scart P.C.B.
10.11. Disassembly of Rear Panel
·
Follow (Step 1) to (Step 3) of Item 10.3.
Step 1
Remove 9 screws from the rear panel.
Step 2
Remove the wire clamper to detach the fan unit
connector (CN5501) on D-Amp P.C.B.
Step 3
Detach FFC cable from the connector (CN2008) on
Main P.C.B.
Step 4
Release the tab on each side of the rear panel in the
direction of arrow.
Step 5
Remove the rear panel.
43
SA-PT850EE
Содержание SA-PT850EE
Страница 3: ...3 SA PT850EE ...
Страница 12: ...12 SA PT850EE ...
Страница 22: ...8 New Features 8 1 About HDMI 8 1 1 What is HDMI 8 1 2 Advanced Digital Pictures 22 SA PT850EE ...
Страница 23: ...8 1 3 Advanced Digital Sound 8 1 4 Easy to Use 8 1 5 HDMI Compatible Products 23 SA PT850EE ...
Страница 39: ...10 2 Main Components and P C B Locations 39 SA PT850EE ...
Страница 54: ...Step 3 Remove the middle chassis Step 4 Remove the traverse unit 54 SA PT850EE ...
Страница 70: ...SA PT850EE 70 ...
Страница 72: ...SA PT850EE 72 ...
Страница 82: ...82 SA PT850EE ...
Страница 114: ...25 Exploded Views 114 SA PT850EE ...
Страница 115: ...25 1 Cabinet Parts Location SA PT850EE 115 ...
Страница 116: ...SA PT850EE 116 ...
Страница 117: ...25 2 Packaging SA PT850EE 117 ...


