10.1. Caution
Below is the list of disassembly sections
Below shown is part no. of different screws types used:
10 Assembling and Disassembling
Special Note:
This model uses a new CD changer unit CRS1. In this following section does not contain the necessary disassembly &
assembly information for the CD changer unit (CRS1) except the disasembly & assembly of traverse unit. Kindly refer to the
original service manual for the CD changer unit. (Order No. MD0509368C0).
“ATTENTION SERVICER”
Some chassis components may have sharp edges. Be careful when disassembling and servicing.
1. This section describes procedures for checking the operation of the major printed circuit boards and replacing the main
components.
2. For reassembly after operation checks or replacement, reverse the respective procedures.
Special reassembly procedures are described only when required.
3. Select items from the following index when checks or replacement are required.
4. Refer to the Parts No. on the page of “Parts Location and Replacement Parts List” (Section 24), if necessary.
Caution:
After replacing of CD Changer Unit, ageing test is necessary. Please confirm operation for CD Changer Unit.
·
Disassembly of Top Cabinet
·
Disassembly of Rear Panel
·
Disassembly of CD Changer Unit (CRS1)
·
Disassembly of Main P.C.B.
·
Disassembly of Transformer P.C.B.
·
Disassembly of Power P.C.B.
·
Disassembly of Front Panel Unit
·
Disassembly of Panel P.C.B.
·
Disassembly of Tact Switch P.C.B.
·
Disassembly of Deck Mechanism Unit
·
Disassembly for Deck P.C.B.
·
Disassembly of Traverse Unit
·
Disassembly of Deck Mechanism
·
Disassembly of Deck Mechanism P.C.B.
·
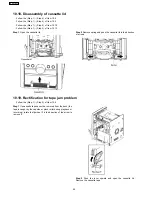
Disassembly of cassette lid
·
Rectification for tape jam problem
26
SA-AK250PL
Содержание SA-AK250
Страница 8: ...8 SA AK250PL ...
Страница 12: ...7 Operating Procedures 7 1 Main Unit Key Buttons Operations 12 SA AK250PL ...
Страница 13: ...7 2 Remote Control Key Buttons Operations 13 SA AK250PL ...
Страница 15: ...With reference to page 15 of the operating instruction manual 15 SA AK250PL ...
Страница 17: ...17 SA AK250PL ...
Страница 20: ...20 SA AK250PL ...
Страница 22: ...9 4 2 Error Code Table For CD Changer Block 22 SA AK250PL ...
Страница 23: ...23 SA AK250PL ...
Страница 24: ...24 SA AK250PL ...
Страница 28: ...10 3 Main Parts Location 28 SA AK250PL ...
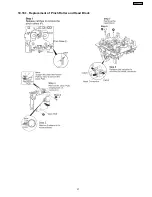
Страница 37: ...10 16 1 Replacement of Pinch Roller and Head Block 37 SA AK250PL ...
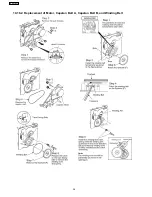
Страница 38: ...10 16 2 Replacement of Motor Capstan Belt A Capstan Belt B and Winding Belt 38 SA AK250PL ...
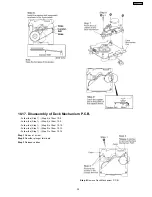
Страница 41: ...Note Follow 10 18 Disassembly of cassette lid Step1 to Step 3 Remove the cassette tape 41 SA AK250PL ...
Страница 44: ...12 4 Checking and Repairing of Power P C B 44 SA AK250PL ...
Страница 46: ...46 SA AK250PL ...
Страница 50: ...15 3 Main P C B 50 SA AK250PL ...
Страница 51: ...15 4 Panel P C B Transformer P C B 15 5 Power P C B 51 SA AK250PL ...
Страница 52: ...15 6 Waveform Chart 52 SA AK250PL ...
Страница 54: ...54 SA AK250PL ...
Страница 62: ...SA AK250PL 62 ...
Страница 64: ...64 SA AK250PL ...
Страница 76: ...SA AK250PL 76 ...
Страница 84: ...SA AK250PL 84 ...
Страница 89: ...23 Exploded Views 23 1 Cabinet Parts Location SA AK250PL 89 ...
Страница 90: ...SA AK250PL 90 ...
Страница 91: ...23 2 Deck Mechanism Parts Location RAA4403 S SA AK250PL 91 ...
Страница 92: ...23 3 Packaging SA AK250PL 92 ...


