background image

Preparation

10

Connecting a Bluetooth

®

 device

1

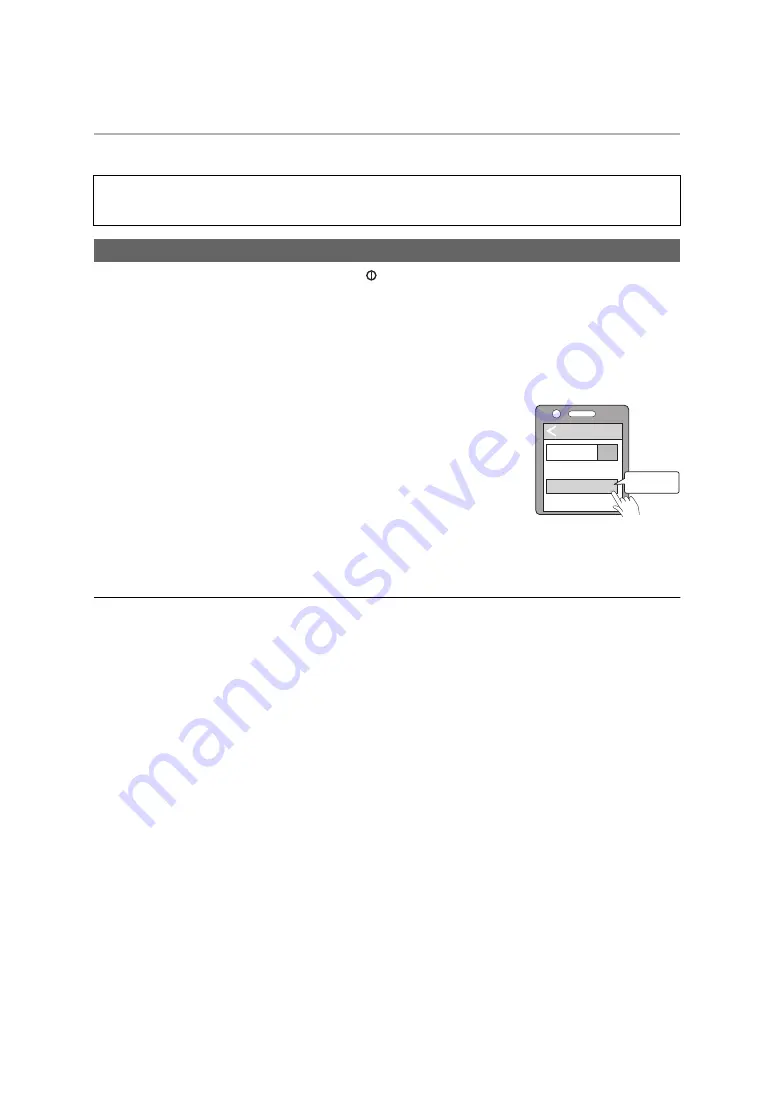
In the power-off state, press and hold [ ] of this unit until the LED blinks.

• The unit starts to search for the Bluetooth

®

 device for connection, and the LED will blink in blue and red 

alternately.

2

Turn on the power of the Bluetooth

®

 unit, and enable the Bluetooth

®

 function.

3

Select “RP-BTS55” from the Bluetooth

®

 device’s menu.

• A MAC address (an alphanumeric character string that is displayed by 

and unique to the device) may be displayed before “RP-BTS55” is 
displayed.

• If prompted for a passkey, input the passkey “0000 (four zeros)” of this 

unit.

4

Check the connection with the Bluetooth

®

 device on the 

unit.

• The LED will blink in blue and red alternately until the connection with the device is completed. When the LED 

(blue) blinks twice every approx. 2 seconds, pairing (registration) is completed. (Connection established)

Note

• If connection to a device is not established within approximately 5 minutes, the unit will be turned off. Perform pairing 

again.

• You can pair up to 8 Bluetooth

®

 devices with this unit. If a 9th device is paired, the device with the oldest connection 

will be replaced. To use it, perform pairing again.

Preparation

• Place the Bluetooth

®

 device within approx. 1 m (3.3 feet) from the unit.

• Check the device operation using its operation instructions as required.

Pairing (Registration) this unit with the Bluetooth

®

 device for connection

When pairing a device for the first time:

 approx. 3 seconds

When pairing a second or subsequent devices:

 approx. 5 seconds

Bluetooth

Bluetooth

ON

RP-BTS55

Device

e.g.

Select

Содержание RP-BTS55

Страница 1: ...ase read these instructions carefully before using this product and save this manual for future use TQBM0248 until 2017 8 9 Register online at http shop panasonic com support U S customers only If you have any questions visit In the U S A http shop panasonic com support In Canada www panasonic ca english support ...

Страница 2: ...vide reasonable protection against harmful interference in a residential installation This equipment generates uses and can radiate radio frequency energy and if not installed and used in accordance with the instructions may cause harmful interference to radio communications However there is no guarantee that interference will not occur in a particular installation If this equipment does cause har...

Страница 3: ...er resistant Water resistance is not guaranteed under all conditions Cautions for using around water Conform to following Improper use may result in a malfunction Securely close the USB lid Do not open or close the USB lid with wet hands or when water droplets are on this unit Doing so may cause malfunction such as terminal rusting with the water droplets Do not connect and use a USB charging cord...

Страница 4: ...gs this security may not be sufficient Transmit data wirelessly to this unit with caution This unit cannot transmit data to a Bluetooth device Range of use Use this unit at a maximum range of 10 m 33 feet The range can decrease depending on the environment obstacles or interference Interference from other devices This unit may not function properly and troubles such as noise and sound jumps may ar...

Страница 5: ...1 How to wear the earphones 12 Adjusting the clips for your ears 12 Operation Listening to music 13 Remote controlling 13 Making a phone call 14 Useful functions 15 Activating voice functions 15 Blue edge LEDs 15 Resetting the unit 15 Auto power off 15 Battery level notification 15 Other Restoring to the factory settings 16 Copyright etc 16 Troubleshooting 17 General 17 Power supply and charging 1...

Страница 6: ...this unit with a dry and soft cloth Do not use solvents including benzine thinner alcohol kitchen detergent a chemical wiper etc This might cause the exterior case to be deformed or the coating to come off Keeping the battery performance During the long period of disuse full charge this unit once every 6 months to keep the battery performance Expressions used in this document Pages to be referred ...

Страница 7: ...mote controller C Left earphone 1 Clip 2 USB lid 3 Earpiece 4 Blue edge LEDs 5 Cord adjuster 6 Raised dot indicating the left side 7 Microphone 8 LED indicator light 1 2 9 Charging terminal DC IN 10 button 11 button 12 button Lighting red Charging is in progress Blinking alternately in blue and red Bluetooth pairing registration standby Blinking slowly blue 3 Bluetooth connection standby Blinking ...

Страница 8: ... the charging terminal cover securely Attention Do not touch the charging terminal with wet hand If sweat or liquid is attached to the charging terminal malfunction may occur Note The Bluetooth feature cannot be used when this unit is connected to a computer using the USB charging cord Charge in a room temperature between 10 oC and 35 oC 50 oF and 95 oF Outside of this temperature range charging m...

Страница 9: ...e LED blue blinks A beep will sound and the LED on the right earphone will blink To turn the power off Press and hold for approximately 3 seconds A beep will sound and the power will be turned off Note When the unit is not operated for approximately 5 minutes the power will automatically turn off l 15 Auto power off LED ...

Страница 10: ... red alternately until the connection with the device is completed When the LED blue blinks twice every approx 2 seconds pairing registration is completed Connection established Note If connection to a device is not established within approximately 5 minutes the unit will be turned off Perform pairing again You can pair up to 8 Bluetooth devices with this unit If a 9th device is paired the device ...

Страница 11: ...Bluetooth device for connection l 10 When the LED blue blinks twice every approx 2 seconds pairing registration is completed Connection established Note This unit remembers the device lastly connected Connection may be automatically established after step 1 see above If connection to a device is not established within approximately 5 minutes the unit will be turned off Turn on the unit again Conne...

Страница 12: ...nsure the most comfortable and secure fit 1 Expand the clip by bending the clip away from the earphone 2 Place the earphone on your ear 3 Bend the clip around your ear 4 Adjust another earphone Attention Do not bend the clip more than necessary The clip can not be adjusted if it is damaged Note If the pair of earpieces is not the right size the way the sound is heard will be adversely affected You...

Страница 13: ...on the usage conditions Attention The unit might leak sound depending on the volume level When the volume is increased to near maximum level music may sound distorted Decrease the volume until the distortion is cleared You can control the Bluetooth device using the unit Depending on the Bluetooth device or the app even if you press buttons on the unit some functions may not respond or may operate ...

Страница 14: ...all During an incoming call ringtone will sound from the earphones and the LED will blink HFP only To reject the incoming call press twice quickly 3 Start talking The LED will repeatedly blink 2 times during a call The volume can be adjusted during a phone call For setting instructions see page 13 4 Press to end the phone call A beep will sound Note There may be instances when hands free setting n...

Страница 15: ...s A beep will sound Note When the battery level is getting low the blue edge LEDs will be turned off When the blue edge LEDs are turned on the LED indicator light will be turned off When the blue edge LEDs are turned on operating time will be shorter The blue edge LEDs do not turn on while the LED indicator light is blinking alternately in blue and red This unit can be reset when all operations ar...

Страница 16: ...actory settings Attention When pairing a device again delete the registering information Device RP BTS55 from the Bluetooth device s menu and register this unit with the Bluetooth device again l 10 Copyright etc The Bluetooth word mark and logos are registered trademarks owned by the Bluetooth SIG Inc and any use of such marks by Panasonic Corporation is under license Other trademarks and trade na...

Страница 17: ...rging times of the installed battery Approximately 300 LED does not light during charging Charging takes longer Is the USB charging cord supplied connected firmly to the USB terminal of the computer l 8 Make sure to charge in a room temperature between 10 oC and 35 oC 50 oF and 95 oF The power does not turn on Is the unit being charged The power cannot be turned ON during charging l 8 The device c...

Страница 18: ...r the other person Make sure that the unit and the Bluetooth enabled phone are turned on Check if the unit and the Bluetooth enabled phone are connected l 10 Check the audio settings of the Bluetooth enabled phone Switch the calling device to the unit if it is set to the Bluetooth enabled phone l 10 If the volume of the other person s voice is too low increase the volume of both the unit and the B...

Страница 19: ... 1 SBC mode Approx 6 hours Charging time 2 25 oC 77 oF Approx 1 5 hours Charging temperature range 10 oC to 35 oC 50 oF to 95 oF Operating temperature range 0 oC to 40 oC 32 oF to 104 oF Operating humidity range 35 RH to 80 RH no condensation Mass Weight Approx 22 g 0 8 oz Water resistant 3 IPX5 equivalent Bluetooth system specification Ver 4 1 Wireless equipment classification Class 2 2 5 mW Freq...

Страница 20: ...t a doctor immediately In the event of fluid leaking from the battery take the following measure and do not touch the fluid with bare hands Fluid entering into an eye may cause loss of eyesight Wash the eye with water immediately without rubbing it and then consult a doctor Fluid getting on your body or clothes may cause inflammation of the skin or injury Sufficiently rinse with clean water and th...

Страница 21: ...nough for a space under the upper cover 2 Use the screwdriver for leverage and push the upper cover A upward Be careful not to touch the battery with the screwdriver 3 Hold the battery B and remove it 4 Pull off the battery B and separate it from the left earphone by cutting off the wires one by one with scissors Insulate the wire parts of the removed battery with cellophane tape Do not damage or ...

Страница 22: ...90 Panasonic Corporation of North America Panasonic Canada Inc 5770 Ambler Drive Mississauga Ontario L4W 2T3 www panasonic com http shop panasonic com Panasonic Corporation 2018 Panasonic Corporation http www panasonic com TQBM0248 F0118HA0 ...

Отзывы: