


V-Chip Control Feature
Special VCR Features (continued)
C H
+
VOL
C H
V
C
R
+
VOL
VIDEO IN
VIDEO IN
AUDIO IN
AUDIO IN
POWER
POWER
VOL
VOL
CH
CH
STOP/EJECT
STOP/EJECT
REW/
REW/
PLAY/REPEAT
PLAY/REPEAT
FF/
FF/
REC
REC
TIMER/FM
TIMER/FM
ACTION
ACTION
REC
REC
ON TIMER
ON TIMER
PROG TIMER
PROG TIMER
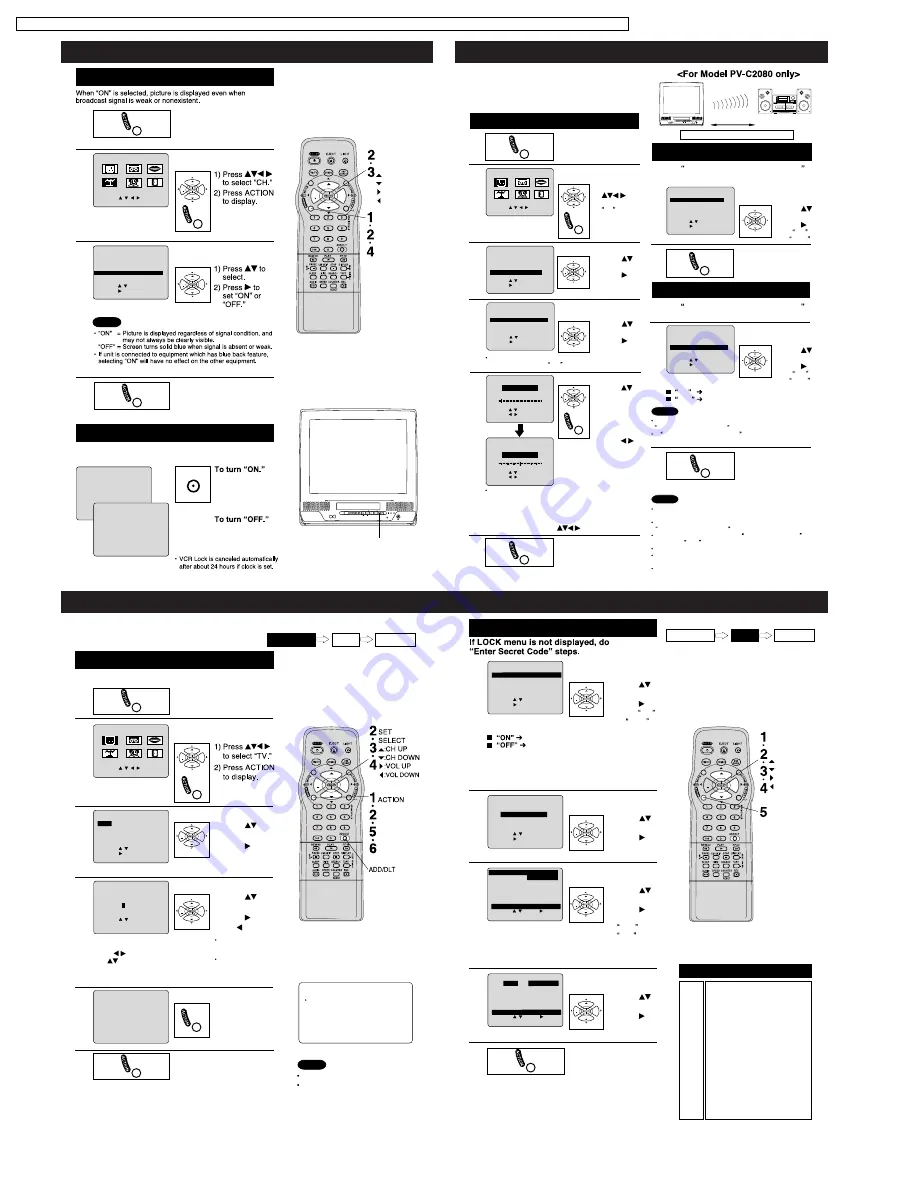
Weak Signal Display ON/OFF
1
Display MAIN MENU.
Press ACTION*.
Display SET UP CH
screen.
Select WEAK SIGNAL
DISPLAY.
Return to the normal
screen.
Press ACTION twice.
2
4
3
VCR Lock
All operations are prohibited except Timer recording and tape
eject. Useful for families with small children.
In stop mode, hold
down REC on the
unit without a
cassette inserted for
7 seconds.
Repeat above with
or without cassette.
REC
Notes
C H
+
VOL
VOL
C H
C H
+
VOL
VOL
C H
ANTENNA : CABLE
AUTO SET
CHANNEL CAPT I ON
WEAK S
EAK S
I GNAL
GNAL
D I SPLAY
SPLAY
: OFF
OFF
CABLE BOX SET UP
VCR P l u s+ CH SET UP
SELECT : KEY
SET : KEY
END : ACT I ON KEY
SET UP CHANNEL
ACTION
SET
SELECT
:CH UP
:CH DOWN
:VOL UP
:
VOL DOWN
Model PV-C2060 unit is shown here.
REC
VCR LOCK ACT I VATED
VCR LOCK OFF
M A I N MENU
CLOCK
C H
SET : ACT I ON KEY
SELECT : KEY
VCR
T V
EX I T
LANGUAGE
1) Press
to select the
desired
frequency
range.
(93-97 or
99-103MHz)
2) Press
to select
the Carry
Frequency.
3) Press
ACTION to set.
(Then screen
in step 4 is
redisplayed.)
1) Press
to select.
2) Press
to display.
FM Transmitter is ...
a feature whereby this unit s sound signal can be heard on your
FM Radio. First, tune your radio to a frequency (93 ~ 97, 99 ~
103 MHz) that is not being broadcast on by a radio station.
Then, set this unit to the same carry frequency (see below.)
Now, fine-tune your radio so the sound comes in clearly.
2
Display MAIN MENU.
Press ACTION*.
1
Select SET UP FM.
3
M A I N MENU
T V
VCR
EX I T
CLOCK
C H
LANGUAGE
SET : ACT I ON KEY
SELECT : KEY
1) Press
to select
TV .
2) Press
ACTION
to display.
C H
+
VOL
VOL
C H
Select SET UP FM
TRANSMITTER.
4
5
R
AUDIO IN
AUDIO IN
POWER
POWER
VOL
VOL
CH
STOP/EJECT
STOP/EJECT REW/
REW/
PLAY/REPEAT
PLAY/REPEAT FF/
REC
REC
TIMER/FM
TIMER/FM
ACTION
ACTION
REC
REC ON TIMER
ON TIMER PROG TIMER
PROG TIMER
VIDEO IN
VIDEO IN
L
Send Wireless
Audio equipment
with FM Radio
FM Transmitter ON/OFF
Display SET UP TV
screen.
C H
+
VOL
VOL
C H
1) Press
to select.
2) Press to
display.
SELECT : KEY
SET : KEY
END : ACT I ON KEY
SET UP TV
LOCK
CAPT I ON
I NPUT SELECT : TUNER
V I DEO ADJUST
SET UP FM
SET UP FM
SPEAKER : ON
SELECT : KEY
SET : KEY
END : ACT I ON KEY
SET UP FM
FM ANTENNA : INT
FM TRANSMITTER
: ON
SET UP FM TRANSMITTER
SET UP FM TRANSMITTER
SPKR W/FM TRANS
: OFF
End setup
Press ACTION three times.
6
To Make Corrections,
select frequency with CH
, then repeat step 5.
1
Do FM Transmitter Carry Frequency
steps 1~3. (See left.)
Select SET UP FM
TRANSMITTER.
2
C H
+
VOL
VOL
C H
1) Press
to select.
2) Press to
set ON
or OFF.
SELECT : KEY
SET : KEY
END : ACT I ON KEY
SET UP FM
FM ANTENNA : INT
FM TRANSMITTER
FM
TRANSMITTER
: ON
:
ON
SET UP FM TRANSMITTER
SPKR W/FM TRANS
: OFF
End setup
Press ACTION three
times.
3
Notes
Speaker with FM Transmitter ON/OFF
The Carry Frequency shown by the selector bar is a guide
only. Please listen to the sound and adjust accordingly.
The unit will transmit sound when unit power is on and
FM TRANSMITTER : ON is selected.
When unit power is turned off, FM TRANSMITTER
returns to OFF setting.
Please put your FM Radio within 157 inch of the unit.
Interference occurs when you select CATV channels
95, 96, or 97, while FM Transmitter is operating.
FM Transmitter will not work in FM Radio Mode.
1
Do FM Transmitter Carry Frequency
steps 1~3. (See left.)
2
1) Press
to select.
2) Press to
set ON
or OFF.
End setup
Press ACTION three
times.
3
Select Speaker with
Transmitter.
SELECT : KEY
SET : KEY
END : ACT I ON KEY
SET UP FM
FM ANTENNA : INT
FM TRANSMITTER
: ON
SET UP FM TRANSMITTER
SPKR W/FM TRANS
SPKR W/FM TRANS
: ON
: ON
If you select...
ON
Internal Speaker ON with Transmitter
OFF
Internal Speaker MUTE with Transmitter
Notes
This operation has effect only when
FM TRANSMITTER : ON (see above.)
If SPKR W/FM TRANS : OFF , the MUTE and VOLUME
key will not function.
FM Transmitter Carry Frequency Setup
Within 157 inch
SELECT : KEY
SET : KEY
END : ACT I ON KEY
SET UP FM TRANSMITTER
93MHz
97MHz
93MHz
93MHz
- 97MHz
97MHz
99MHz - 103MHz
SELECT : KEY
SET : KEY
END : ACT I ON KEY
SET UP FM TRANSMITTER
99MHz
103MHz
93MHz - 97MHz
99MHz
99MHz
- 103MHz
103MHz
Carry Frequency : 93 ~ 97, 99 ~ 103 MHz
When step 4 is done, FM TRANSMITTER
is automatically set to ON.
Set the Carry Frequency.
The selector bar returns
to center position when
frequency range is
switched.
C H
+
VOL
VOL
C H
C H
+
VOL
VOL
C H
C H
+
VOL
VOL
C H
FM Transmitter
C H
+
VOL
C H
V
C
R
+
VOL
1
2
Display MAIN MENU.
Press ACTION*.
Enter Secret Code
Display SET UP TV
screen.
V-Chip Feature is...
This unit has built-in V-Chip Control which allows you to
block unwanted TV usage based on US MOVIES and
US TV PROGRAMS ratings.
A 4-digit code must be entered to view a blocked program or
change rating settings.
DO NOT forget your secret code.
Once rating are set, restricted tapes or
programs cannot be accessed unless
the secret code is entered.
Process of V-Chip Feature
Setup
Blocking
Enter Code
Notes
3
1) Press
to select.
2) Press
to display.
Select Lock.
LOCK
CAPT I ON
I NPUT SELECT : TUNER
V I DEO ADJUST
FM ANTENNA : I NT
SELECT : KEY
SET : KEY
END : ACT I ON KEY
SET UP TV
<For model PV-C2060 only>
4
1) Press
to
select a number.
2) Press
( or ) to set.
Enter your secret code.
SELECT : KEY
END : ACT I ON KEY
LOCK
ENTER 4-D I G I T CODE
-
---
To Make Corrections
Press to move the cursor
and
to make the correction.
Repeat step 4 until
all 4-digits are
entered.
Take care that you
are not observed
entering the
secret code.
5
Press ACTION.
Save 4-DIGIT CODE.
6
Press ACTION.
Or,
to exit, press ACTION
four times.
Display LOCK menu
for rating screen.
C H
+
VOL
VOL
C H
LOCK
RECOGN I ZED
CHANGE CODE : ADD / DLT KEY
CONT I NUE : ACT I ON KEY
M A I N MENU
T V
VCR
EX I T
CLOCK
C H
LANGUAGE
SET : ACT I ON KEY
SELECT : KEY
Changing your secret code
You will need your current code.
Do steps 1~4. In step 5, press
ADD/DLT to clear current code.
Repeat steps 4 and 5 to enter
new code.
C H
+
VOL
VOL
C H
C H
+
VOL
VOL
C H
C H
+
VOL
C H
V
C
R
+
VOL
1
2
Select US MOVIES
STATUS.
1) Press
to select.
2) Press
to display.
Setup US MOVIES Ratings
Select CHANGE
SETTINGS.
3
1) Press
to select.
2) Press
to set
YES or
NO.
Select VIEW NR
PROGRAMS?
4
1) Press
to select.
2) Press
to set.
Select ratings to be
blocked. (See right.)
5
Press ACTION
Or,
to exit, press ACTION
four times.
Redisplay LOCK menu
to continue setup.
NR (Not Rated) PROGRAMS
Some movies, such as old movies
or foreign movies usually have no ratings.
Process of V-Chip Control Feature
Setup
Blocking
Enter Code
If you select US MOVIES STATUS:
V-Chip Control is activated.
V-Chip Control is deactivated.
G
PG
PG-13
R
NC-17
X
GENERAL AUDIENCE:
All ages admitted.
PARENTAL GUIDANCE:
Some material may not be
suitable for children.
PARENTS CAUTIONED:
Some material may be
inappropriate for children under
13.
RESTRICTED:
Children under 17 must be
accompanied by a parent or
adult.
OVER AGE 17 ONLY:
No one 17 and under admitted.
ADULTS ONLY:
US MOVIES RATINGS
1) Press
to select.
2) Press
to set ON
or OFF.
US MOVIES
US MOVIES
: OFF
CHANGE SETT I NGS
US TV PROGRAMS : OFF
CHANGE SETT I NGS
SELECT : KEY
SET : KEY
END : ACT I ON KEY
LOCK
NEXT PAGE
G
PG
PG-13
R
NC-17
X
V I EW NR
NR PROGRAMS?
? :
YES
CONTA I NS NO RAT
NS NO RAT I NG
SELECT : SET :
END : ACT I ON KEY
UNLOCKED
G
PG
PG-13
R
NC-17
X
V I EW NR PROGRAMS? : YES
GENERAL AUD
GENERAL AUD I ENCE
SELECT : SET :
END : ACT I ON KEY
UNLOCKED
C H
+
VOL
VOL
C H
C H
+
VOL
VOL
C H
C H
+
VOL
VOL
C H
C H
+
VOL
VOL
C H
ACTION
SET
SELECT
:CH UP
:CH DOWN
:VOL UP
:VOL DOWN
US MOVIES : OFF
CHANGE
SETT I NGS
US TV PROGRAMS : OFF
CHANGE SETT I NGS
SELECT : KEY
SET : KEY
END : ACT I ON KEY
LOCK
NEXT PAGE
10
PVQ-1310 / PV-C1320 / PV-C1330W / VV-1300 / VV-1310W / PV-C1340 / PV-C1350W / PV-C2010 / PV-C2020 / PV-C2030W / VV-2000 / PV-C2060
Содержание QUASAR PV-C1320
Страница 59: ...59 PVQ 1310 PV C1320 PV C1330W VV 1300 VV 1310W PV C1340 PV C1350W PV C2010 PV C2020 PV C2030W VV 2000 PV C2060...
Страница 60: ...60 PVQ 1310 PV C1320 PV C1330W VV 1300 VV 1310W PV C1340 PV C1350W PV C2010 PV C2020 PV C2030W VV 2000 PV C2060...
Страница 106: ...106 PVQ 1310 PV C1320 PV C1330W VV 1300 VV 1310W PV C1340 PV C1350W PV C2010 PV C2020 PV C2030W VV 2000 PV C2060...


