background image

10

For assistance, please call : 1-800-211-PANA(7262) or send e-mail to : [email protected]

10

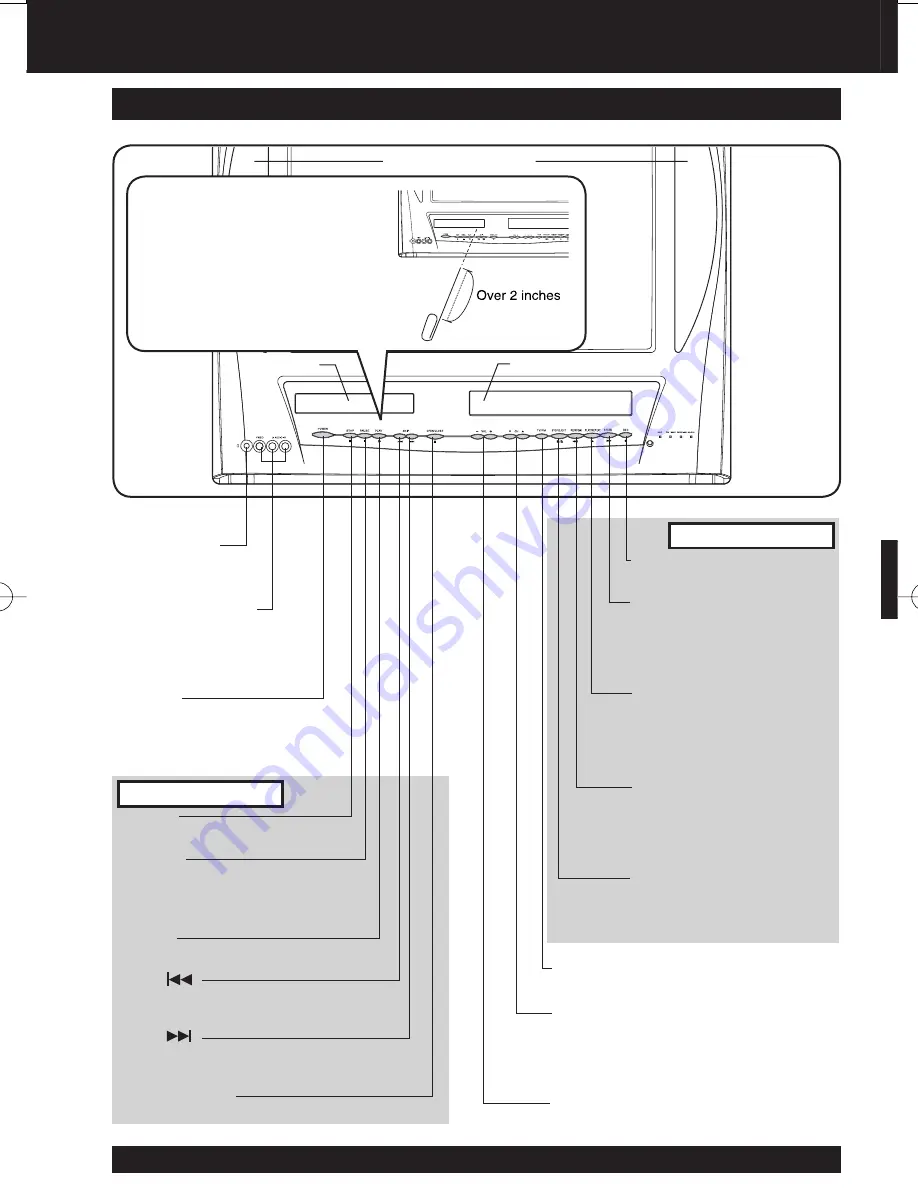
Built In Speaker

 If the disc cannot be removed,
First unplug unit. 
Then, prepare a rigid wire (e.g. 
an extended paper clip, etc.) and, 
applying moderate force, insert it 
straight into the hole at the base 
of the tray. The tray will eject a 
little. Now, pull the tray all the way 
out and remove the disc. 

 Front View of the unit 

<Model PV-DM2093 unit shown>

Location of Controls (continued)

 Disc Tray

 Cassette Compartment

Phones Jack
Connect an earphone 
or headphones.

 Audio/Video Input 
Connector
Connect from other 
component.

POWER
Turns the unit on or off.

STOP
Stops playback.

PAUSE 
Pauses picture in Playback mode 
and frame advance picture in Still 
mode.

PLAY
Begins playback.

OPEN/CLOSE 
Opens or closes the disc tray.

SKIP 


Skips one chapter or track. 
Goes to next screen.

SKIP 


Skips back one chapter or track. 
Goes to previous menu screen.

REC 
Records a program.

FAST FORWARD/SEARCH
Fast forwards tape and 
forward visual search. 
Increases slow motion 
speed in Still mode.

PLAY
Begins playback.
REPEAT
Set to see a recording over 
and over.

REWIND/SEARCH 
Rewinds tape and searches 
reverse scene. Decreases 
slow motion speed in Still 
mode.

STOP
Stops playback.
EJECT
Eject the tape.

TV/FM
Sets to TV/FM mode.

CHANNEL UP/DOWN
Selects a channel.
TRACKING UP/DOWN 
Reduces picture noise during Playback 
and Slow Motion.

VOLUME UP/DOWN
Adjusts volume.

Disc Operation

Tape Operation

Содержание PVDM2793 - TV/VCR/DVD COMBO

Страница 1: ...elines for energy efficiency Please read these instructions carefully before attempting to connect operate or adjust this product Please save this manual Spanish Quick Use Guide is included Guía para rápida consulta en español está incluida This operating instruction book is designed for use with models PV DM2093 and PV DM2793 Illustrations in this manual show the PV DM2093 Features may vary so pl...

Страница 2: ... inspected by a qualified service technician before use 3 ELECTRICAL STORMS During a lightning storm or before leaving unit unused for extended periods of time disconnect all equipment from the power source as well as the antenna and cable system 4 WHEN UNIT IS PLUGGED IN DO NOT OPERATE IF liquid has spilled into unit unit was dropped or otherwise damaged unit emits smoke odours or noises Immediat...

Страница 3: ... comply with part 15 of the FCC Rules These limits are designed to provide reasonable protection against harmful interference when operated in a residential environment If this equipment does cause interference to radio or television reception which can be determined by turning the equipment off and on use the equipment in another location and or utilize an electrical outlet different from that us...

Страница 4: ...ed properly it will bring you and your family years of enjoyment Please fill in the information below The serial number is on the tag located on the back of your unit Remote Control LSSQ0372 Date of Purchase Dealer Purchased From Dealer Address Dealer Phone No Model No Serial No Accessories Battery replacement caution Do not mix old and new batteries Do not mix alkaline with manganese batteries 1 ...

Страница 5: ...eration 22 MTS Broadcast TV Stereo System 23 Closed Caption System 24 TV Timer Features 26 On Screen Display OSD 27 FM Radio 28 Timer Recording 30 Tape Operation 32 Special VCR Features 36 V Chip Control Feature 38 Audio Features 42 Video Audio Menu 44 Video Audio Adjustment 45 Disc Operation 46 DVD Operation using On Screen Displays 51 MP3 WMA JPEG Playback Operation 54 DVD Lock Feature 57 Settin...

Страница 6: ...el Hi Fi Audio Sound Tuner Broadcast Channels VHF 2 13 UHF 14 69 CABLE Channels Midband A through I 14 22 Superband J through W 23 36 Hyperband AA EEE 37 64 Lowband A 5 A 1 95 99 Special CABLE channel 5A 01 Ultraband 65 94 100 125 FM Radio Band Range 87 5 MHz 108 1 MHz General Power Source 120 V AC 60 Hz Power Consumption Power On Approx 134 W PV DM2093 Approx 170 W PV DM2793 Power Off Approx 3 5 ...

Страница 7: ...ars at the bottom of the screen Time Number The elapsed play time from the start of a disc or title Use to quickly find scenes May not work with some discs Title Number For DVD discs with two or more titles the title is numbered as title 1 title 2 etc Track Number Numbers assigned to tracks on Video CDs and CDs to allow specific tracks to be quickly located Video CD CD containing picture and sound...

Страница 8: ...an set Timer Program and On Timer REC Records a program ANGLE Selects the desired angle in DVD mode TV VCR Sets to TV VCR mode DVD Sets to DVD mode NUMBER Keys Selects a channel directly ADD DELETE CLEAR Adds or deletes a channel Cancels an item on the screen MENU Displays DVD menu SELECT Controls navigation around on screen menu SET Sets a selected menu VOLUME UP DOWN Adjusts volume PLAY Begins p...

Страница 9: ...Remote Sensor ANGLE Indicator RED Lights when a scene recorded at a different angles is detected DVD only Pg 47 ON TIMER Indicator ORANGE Lights when the On Timer is set Pg 26 PROG TIMER Indicator GREEN Lights when the unit is set for Timer Recording It flashes when a Timer Recording has been set with no tape inserted the clock is not set or the tape is in motion Pg 30 REC Indicator RED Lights dur...

Страница 10: ...s the unit on or off STOP Stops playback PAUSE Pauses picture in Playback mode and frame advance picture in Still mode PLAY Begins playback OPEN CLOSE Opens or closes the disc tray SKIP Skips one chapter or track Goes to next screen SKIP Skips back one chapter or track Goes to previous menu screen REC Records a program FAST FORWARD SEARCH Fast forwards tape and forward visual search Increases slow...

Страница 11: ...udio output connector Pg 12 Connections For ANT Cable Connect the cable from Antenna Cable to the VHF UHF terminal on the unit For DSS Cable Box Connect the OUT jack on your cable box to the VHF UHF terminal on the unit with a RF cable IN from ANT CABLE Cable TV Converter Box VHF UHF VHF UHF VHF UHF INfrom ANT CABLE VHF UHF Model PV DM2093 unit shown Overtightening Nut type RF coaxial cables may d...

Страница 12: ...ction digital and analog Connect an amplifier with Dolby Digital and DTS decoders to enjoy surround sound You can also enjoy stereo sound with sampling frequencies of 48 kHz if the material isn t copy protected and the equipment you connect is compatible with these signals Connect an amplifier to enjoy high quality stereo sound with sampling frequencies of 96 kHz Analog connection Digital connecti...

Страница 13: ... output from the unit s optical digital audio output connector For your reference Dolby Digital is a digital sound compression technique developed by the Dolby Laboratories Licensing Corporation Supporting 5 1 channel surround sound as well as stereo 2 channel sound this technique enables a large quantity of sound data to be efficiently recorded on a disc Linear PCM is a signal recording format us...

Страница 14: ... to Play Please make all cable or antenna connections before powering on Press POWER on the remote or unit The unit comes on and auto channel and clock set starts Settings are made automatically When setup is done this screen appears If AUTO CLOCK SET IS INCOMPLETE screen appears set the clock using MANUAL CLOCK SET procedure on next page CH AUTO SET PROCEEDING Press TV VCR on the remote for TV VC...

Страница 15: ...n on the remote and try the button again Manual Clock Set If AUTO CLOCK SET was incomplete manually set the clock as follows Press ACTION on the remote to display SET CLOCK Menu screen 1 Press to select the month and press SET to set In the same manner select and set the date year time and DST Daylight Saving Time 2 Press ACTION twice to start CLOCK and exit 3 Reset all unit Memory Functions When ...

Страница 16: ... 2 Press SET 1 2 For English For Spanish For French Example MANUAL CLOCK SET screen Continued on the next page SET SET BACK START ACT I ON SET CLOCK DST ON 2 6 2003 THU 12 00PM SELECT HOUR SELECT MAIN MENU DVD LOCK CH CLOCK TV LANGUAGE END ACT I ON SELECT SET SET 5 3 1 MAIN MENU DVD LOCK CH CLOCK TV LANGUAGE END ACT I ON SELECT SET SET 5 3 1 MENU PRINCIPAL DVD BLOQUEO CANAL RELOJ TV IDIOMA TERMINA...

Страница 17: ...tart the clock and exit this mode 3 Press to select TIME ZONE ADJUST and press or to subtract or add hour s as necessary 4 Press ACTION twice to exit TIME ZONE ADJUST returns to 0 if clock is set manually Only when Auto Clock is set Add or Delete a Channel Time Zone Adjust 1 Press to select CLOCK 2 Press SET To add channel Select channel with NUMBER keys and press ADD DLT ADD DLT SELECT SET ACTION...

Страница 18: ...CH or NUMBER keys to select a channel For LINE input see bottom of next page 2 3 4 Press SPEED to select recording speed see page 4 Press REC to start recording To edit out unwanted portions press STILL PAUSE to pause and resume recording You cannot view another channel during recording After the unit has been in Rec Pause mode for 5 minutes it will stop automatically to protect the tape and the v...

Страница 19: ... using this unit Caution Perform operation of steps 4 and 5 on both units at same time STOP Copy Your Tapes Dubbing Press REC then press STILL PAUSE immediately to put in Standby mode Press STILL PAUSE to start dubbing Press STOP to stop dubbing Method 1 Press CH The display will change as follows Method 2 a Press ACTION for MAIN MENU b Press to select TV then press SET for SET UP TV screen c Pres...

Страница 20: ...cenes or information can be interactively selected from a menu that appears on the screen Operation using unit buttons Press PLAY Insert disc Press OPEN CLOSE 2 6 3 2 Press STOP 5 Press POWER 1 TITLE MENU Castles Lovers Birds Dogs TITLE MENU Castles Lovers Birds Dogs Example 1 Example 2 To return to MENU play stops Press TITLE MENU or RETURN DVD Press RETURN Video CD Press STOP to stop play 5 6 Pr...

Страница 21: ...lect desired track play begins Check disc for track numbers Press 1 to start at beginning of disc To Resume Menu use Press STOP and press PLAY then the menu appears Now go to step 4 previous page Enjoy Video CDs featuring playback control without using menus Video CDs only Important If a remote control button does not work when pressed press the DVD button on the remote and try the button again Ch...

Страница 22: ... Press R TUNE to display the last channel you were watching Audio Mute Press MUTE to instantly mute the sound Press again to restore the previous sound level Phones Connect an earphone not supplied or headphones not supplied to the Phones Jack PHONES Jack POWER VOL VOL CH Important If a remote control button does not work when pressed press the TV VCR button on the remote and try the button again ...

Страница 23: ...lect STEREO audio mode If stereo broadcast is weak and the display flickers select MONO audio mode for possible improvement SAP broadcast Secondary Audio Program sub language Select SAP audio mode for the sub language Audio Mode for TV Viewing Press AUDIO to select the desired audio mode as described above Arrow shows selection Each press of AUDIO will change the audio mode as shown below SAP is s...

Страница 24: ...5 Press ACTION three times to return to the normal screen 2 1 Press to select TV 2 Press SET to display SET UP TV screen 3 1 Press to select CAPTION 2 Press SET to display CAPTION screen OFF CAP C1 TEXT C1 CAP C2 TEXT C2 4 1 Press to select CAPTION MODE 2 Press SET repeatedly to select mode See left CAPTION CAPT I ON MODE CAP C1 CC ON MUTE CAP C1 SET SET SELECT END ACT I ON MAIN MENU DVD LOCK CH C...

Страница 25: ...Press to select CAPTION 2 Press SET to display CAPTION screen MAIN MENU DVD LOCK CH CLOCK TV LANGUAGE END ACT I ON SELECT SET SET 5 3 1 SELECT END ACT I ON SET UP TV SET SET CAPTION I NPUT SELECT TUNER SET UP VIDEO AUD I O DVD VOL ADJUST 2 FM ANTENNA INT 4 1 Press to select CAPTION MODE 2 Press SET repeatedly to select OFF NO CAP C1 CAP C2 5 1 Press to select CC ON MUTE 2 Press SET repeatedly to s...

Страница 26: ...e ON TIMER time or ON TIMER mode Make sure a tape is inserted if Playback mode is selected Make sure a disc is inserted if DVD DVD Video CD CD mode is selected See FM Radio on pages 28 and 29 for instructions on how to preset FM stations 4 Press to select ALARM ON or OFF When ON is selected an alarm will gradually increase in volume for one minute or until canceled by pressing any button including...

Страница 27: ...de or when the selected channel has no broadcast signal with the Weak Signal Display Feature set to OFF see page 36 the screen will turn solid blue REC 12 00PM 0 25 CH08 0 12 34 SP STEREO SAP MONO Function Status Current Time Rec Time Remaining OTR mode only see page 18 Counter Tape Speed See page 4 Receivable Broadcast Types See page 23 Channel DISPLAY ADD DLT PROG Important If a remote control b...

Страница 28: ...r 1 To Make Corrections select station with a NUMBER keys then do step 3 again To exit FM mode press TV VCR or DVD on the remote or TV FM on the unit 3 FM Radio Setup Press FM on the remote or TV FM on the unit to display FM radio mode FM Radio is This unit has an FM radio with built in antenna 9 station preset and a band range of 87 5 108 1 MHz You can set the On Timer page 26 to wake up to your ...

Страница 29: ...ce stations are set the selected station and current time are displayed when FM Radio mode is entered To remove time press DISPLAY If DISPLAY is pressed again the unit status screen appears Important If a remote control button does not work when pressed press the FM button on the remote and try the button again Audio Mode for FM Radio Press AUDIO repeatedly to select STEREO or MONO in FM Radio mod...

Страница 30: ...ct TIMER PROGRAMMING 2 Press SET to display screen If a program is already in memory press and SET to select an unused program number Press to select and SET or to set the recording DATE 1 31 One time DAILY MON FRI WEEKLY SUN SAT Same time once a week Repeat step 3 to set Start time Stop time Channel or LINE for outside source Speed SP LP SLP Today s Date Example 4 5 PROG TIMER Indicator DAILY 7 2...

Страница 31: ...in Stop mode If the start times of two programs overlap the lower numbered program will have priority If the start time for a Timer Recording comes up during a normal recording or One Touch Recording page 18 the Timer Recording will not be performed If there is a power interruption of more than one minute the recording may not be performed or continued If INCOMPLETE appears after all items have be...

Страница 32: ...er see below Index Search Go directly to the desired recording If Index Search is started very close to an index mark that index mark may not be counted in the search 2 Playback begins at search end To search forward or back 1 index press FF or REW while screen left is displayed 10 seconds NOTE indicates start points of each recording 6 1 5 7 2 3 4 To calculate the Index Number 1 7 5 3 4 6 2 Examp...

Страница 33: ...peat Play Set to see a recording over and over PLAY REPEAT ON To turn ON press PLAY REPEAT on the unit repeatedly in Playback mode to select REPEAT ON To turn OFF repeat above to select REPEAT OFF Playback repeats when tape end is reached or an unrecorded portion longer than 30 seconds is detected For repeat play in DVD mode see page 53 PLAY REPEAT Note ...

Страница 34: ...ch To quickly return to a specific tape counter location 1 2 Press STOP 4 5 3 Continue playback rewind or fast forward Press COUNTER RESET at the desired position to reset to 0 00 00 Press DISPLAY during playback to display the Counter Press CM ZERO in stop mode to start ZERO SEARCH 0 00 00 SLP PLAY 12 00 PM Unit goes into FF or REW mode and stops at the last point the Counter was set to 0 00 00 D...

Страница 35: ...utes Power turns off This feature is canceled if any button is pressed during above conditions Auto Playback Insert a tape in Power off mode Power turns on Playback begins if tape has no record tab Auto Rewind except for Recording Tape reaches its end Rewind Stop Playback Auto Eject Repeat Play is OFF Tape with no record tab reaches its end Rewind Stop Eject Auto Operation Functions Important If a...

Страница 36: ...sent or weak If unit is connected to equipment which has blue back feature selecting ON will have no effect on the other equipment 4 Press ACTION to display MAIN MENU 1 Press to select CH 2 Press SET to display SET UP CHANNEL screen Press ACTION twice to return to the normal screen 1 Press to select WEAK SIGNAL DISPLAY 2 Press SET to set ON or OFF MAIN MENU DVD LOCK CH CLOCK TV LANGUAGE END ACT I ...

Страница 37: ...unit without a cassette inserted for 7 seconds to turn ON Please ignore NO CASSETTE warning Repeat above with or without cassette to turn OFF VCR Lock is canceled automatically after about 24 hours if clock is set REC Important If a remote control button does not work when pressed press the TV VCR button on the remote and try the button again VCR LOCK ACT IVATED VCR LOCK OFF ...

Страница 38: ...p Blocking Enter Code Press SET to display US Ratings menu see pages 39 40 Or Press ACTION twice to exit 4 1 Press NUMBER keys to enter your secret code 2 Enter same code again for confirmation 3 Step 2 not necessary when changing rating or secret code Take care that you are not observed entering the secret code To Make Corrections Press repeatedly to move the cursor Press NUMBER keys to make the ...

Страница 39: ... ACTION to redisplay LOCK menu and continue with US TV PROGRAMS Ratings Setup page 40 Or press ACTION three times to exit NEXT PAGE displays CANADIAN V Chip setting menu Not necessary except when viewing Canadian tapes or broadcasts US MOVIES OFF CHANGE SETT I NGS US TV PROGRAMS OFF CHANGE SETT I NGS DVD LOCK OFF CHANGE SETT I NGS SELECT SET SET END ACT I ON LOCK NEXT PAGE SELECT SET SET END ACT I...

Страница 40: ...g chart 2 4 Press to select and SET to set ratings to be blocked See ratings charts on this page Ratings highlighted in green will be blocked Ratings in white letters will not be blocked V I EW NR PROGRAMS YES FOR ALL CH I LDREN SELECT SET SET END ACT I ON TV Y TV Y7 TV G TV PG TV 14 TV MA FV V S L D V S L D V S L UNLOCKED 5 Press ACTION three times to exit this mode NEXT PAGE displays CANADIAN V ...

Страница 41: ...arily Deactivate V Chip Control Enter your secret code ACCESS CODE in the Blocking Message screen V Chip Control is reactivated when power is turned off or power failure occurs Deactivate V Chip Control Enter your secret code steps 1 3 page 38 Then set US MOVIES and or US TV PROGRAMS to OFF using and SET Ratings set on pages 39 and 40 is retained and will be in effect when V Chip Control is activa...

Страница 42: ...ape section on page 18 to playback the tape Only tapes recorded in Hi Fi stereo will playback with true stereo sound Standard stereo tapes will playback with monaural sound To listen to Hi Fi stereo playback the unit AUDIO L R jacks must be connected to a stereo amp and speakers There may be a difference in audio level between Hi Fi and normal audio playback 2 This screen appears when you press AU...

Страница 43: ...y a surround like effect if you are using two front speakers only The effect is broadened and sound seems to come from virtual speakers on either side if the disc has surround signals recorded on it Press VSS in DVD mode The Surround sound effects can be changed by pressing VSS repeatedly as shown by the figure below V S S effects is available in DVD mode only Turn off the surround effects on the ...

Страница 44: ...to select desired mode See below 4 SELECT SET SET END ACT I ON SET UP VIDEO AUD I O VIDEO MENU NORMAL VIDEO ADJUST AUDIO MENU MUSIC AUDIO ADJUST 5 Press ACTION three times to end setup 1 Press to select TV 2 Press SET to display SET UP TV screen 2 MAIN MENU DVD LOCK CH CLOCK TV LANGUAGE END ACT I ON SELECT SET SET 5 3 1 1 Press to select SET UP VIDEO AUDIO 2 Press SET to display SELECT END ACT I O...

Страница 45: ...ESS Control Adjust picture brightness PICTURE Control Adjust picture intensity by adjusting both contrast and color level in the proper balance SHARPNESS Control Adjust picture sharpness f Press ACTION four times to end setup d e BASS TREBLE BALANCE STANDARD ADJUST SELECT END ACT I ON AUDIO ADJUST AUDIO Adjustment BASS Control To adjust the intensity of low frequency sound TREBLE Control To adjust...

Страница 46: ...nguage Audio soundtrack language Change the No by pressing and press SET You can change the audio soundtrack language selected at the Settings for DVD Operation to a different language if available See page 58 This operation works only with discs on which multiple audio soundtrack languages are recorded Press AUDIO in Play mode to display the audio selection on screen Audio Soundtrack Language DVD...

Страница 47: ...ect the desired angle b 1 Press or to select as shown below 2 Press or to set DVD only Number of angle being played back You can enlarge specific portions of a picture and select the zoom ratio using the ZOOM button on the remote during DVD playback Set Zoom size Press ZOOM repeatedly to change display as follows Picture Zoom DVD only You can enlarge the center portion of the image to one of 2 mag...

Страница 48: ...c Although contents and operation may vary the following steps show basic steps for using the menu a b Press MENU in Play mode to display DVD menu 1 Press or NUMBER key s to select an item 2 Press SET or PLAY to access DVD menu DVD only 2 1 Press or NUMBER key s to select a title 2 Press SET or PLAY to start play Step 2 not necessary when using NUMBER key s Example Example Example Example Step 2 n...

Страница 49: ...numbers on disc are displayed 2 Press SET to set Repeat step 5 to select another track The selected track is added on the right side MAIN MENU DVD LOCK CH CLOCK TV LANGUAGE END ACT I ON SELECT SET SET 5 3 1 DVD MAIN MENU SELECT SET SET END ACTION 4 3 Pan Scan PLAY MODE SELECT SET SET END ACTION PROGRAM PLAY SELECT SET SET END ACTION DISC PROGRAM 1 6 11 16 5 8 2 7 12 17 15 6 3 8 13 18 1 13 4 9 14 1...

Страница 50: ...to display screen 2 MAIN MENU DVD LOCK CH CLOCK TV LANGUAGE END ACT I ON SELECT SET SET 5 3 1 1 Press to select PLAY MODE 2 Press SET to display screen 3 DVD MAIN MENU SELECT SET SET END ACTION 4 3 Pan Scan 1 Press to select RANDOM PLAY 2 Press SET to begin random play To cancel press STOP during play then press CLEAR 4 PLAY MODE SELECT SET SET END ACTION CLEAR ACTION STOP Important If a remote co...

Страница 51: ...of DVD SELECT SET SET NEXT DISPLAY T I TLE 12 DVD CHAPTER 11 0 12 34 SELECT SET SET NEXT DISPLAY T I TLE 12 DVD CHAPTER 24 0 12 34 2 1 Press or to select an item 2 Press SET to set Example of Video CD SET SET NEXT DISPLAY TRACK 12 VIDEO CD PBC OFF 0 12 34 SET SET NEXT DISPLAY TRACK 17 VIDEO CD PBC OFF 0 12 34 When DISPLAY is pressed during play of a Video CD with play control the NUMBER keys are n...

Страница 52: ...ssed while making entries unit returns to the condition before entries were made 1 SELECT SET Notes A Track No Select TRACK and press SET Change the No by pressing or NUMBER keys and press SET B Playback control ON OFF Video CD with playback control only ON Video CD menu play is displayed OFF Video CD menu play is not displayed C Disc currently being played Video CD CD D Elapsed playing time 1 TIT...

Страница 53: ...lect REPEAT and press SET Change the desired mode during play by pressing and press SET Important If a remote control button does not work when pressed press the DVD button on the remote and try the button again For repeat play in VCR mode see page 33 b Play mode Video CD CD only See page 49 or 50 a b track track track TRACK REPEAT DISC REPEAT NORMAL PLAY CURRENT PLAYBACK POSITION DVD CHAPTER REPE...

Страница 54: ... ACTION again to return to the MP3 WMA JPEG MENU PLAY MODE MP3 WMA Playback JPEG Playback Slide show NORMAL All MP3 WMA files are selected and played back one time only All JPEG files are selected and played back one time only SINGLE REPEAT The selected MP3 WMA file is played back repeatedly The selected JPEG file is played back repeatedly FOLDER REPEAT The MP3 WMA files contained in the selected ...

Страница 55: ...der that were saved while being displayed are displayed You can play JPEG images Displayable Image Size 32x32 7680x7680 pixels Some JPEG format may not be played back Forward Reverse Search Press FF SLOW or REW SLOW during play Press PLAY to release Search speed slow at first increases with each additional press of the button up to 5 levels Forward Reverse Track Skip Press SKIP or SKIP during play...

Страница 56: ...e image to one of 2 magnifications Operation can be done during Rotation below Use the and buttons to move the position up down left and right JPEG Playback Zoom JPEG Playback Rotation During JPEG Playback You can rotate a JPEG picture using the ANGLE button on the remote during JPEG Playback The JPEG picture will be rotated 90 clockwise Set rotation Press ANGLE repeatedly to change display as bel...

Страница 57: ... enter your 4 digit secret code When NO is selected blocked programs cannot be viewed Ratings which are highlighted in Green will be blocked those not highlighted white letters will not be blocked Perform DVD Lock setting in TV mode Enter your secret code to display LOCK menu Perform Enter Secret Code steps on page 38 US MOVIES OFF CHANGE SETT I NGS US TV PROGRAMS OFF CHANGE SETT I NGS DVD LOCK OF...

Страница 58: ...ecially DVDs each time DISC LANGUAGES See below Any languages offered on the disc can be set If a language not offered is set the original disc language will be selected AUDIO OUTPUT See page 59 You can set the audio output that comes from the digital audio output terminal STILL MODE See page 60 To select FIELD or FRAME to prevent jitter or to make small text or fine patterns clearly visible in a ...

Страница 59: ...r below for copyright protection Dolby Digital selections Bitstream Dolby Digital bitstream 1ch 5 1ch is output Factory preset PCM When you have connected a amplifier that doesn t have a built in Dolby Digital decoder dts selections Bitstream dts bitstream is output Factory preset PCM When you have connected a amplifier that doesn t have a built in dts decoder DRC Dynamic Range Compression selecti...

Страница 60: ...1 and 2 on page 58 4 3 Pan Scan Widescreen video data is played in Pan Scan style left and right of screen is trimmed Video data not formatted in Pan Scan will play in letterbox style 4 3 Letterbox Widescreen video data is played in Letterbox style top and bottom of screen has black margin Set the screen display style for widescreen video material playback 4 3 Pan Scan Factory preset 4 3 Letterbox...

Страница 61: ...manian 8285 Russian 8365 Sanskrit 8368 Sindhi 8372 Serbo Croatian 8373 Singhalese Code Language 7079 Faroese 7082 French 7089 Frisian 7165 Irish 7168 Scots Gaelic 7176 Galician 7178 Guarani 7185 Gujarati 7265 Hausa 7273 Hindi 7282 Croatian 7285 Hungarian 7289 Armenian 7365 Interlingua 7378 Indonesian 7383 Icelandic 7384 Italian 7387 Hebrew 7465 Japanese 7473 Yiddish 7487 Javanese 7565 Georgian 757...

Страница 62: ...cannot be watched Make sure the selected channel is in unit s memory P 16 Channel cannot be selected Only the channel being recorded can be viewed on this unit VCR Correction TV program cannot be recorded Make sure your antenna system TV or CABLE is correctly set P 11 Make sure cassette record tab is intact P 4 Timer recording cannot be performed Check that clock is set to current time and date Ma...

Страница 63: ...btitle language cannot be selected Alternative language cannot be selected with discs which do not contain more than one language For some discs alternative language cannot be selected with the AUDIO or SUB TITLE button Try selecting it from the DVD MAIN MENU if available Angle cannot be changed This function is dependent on software availability Even if disc has multiple angles they may be record...

Страница 64: ... is about to begin P 30 31 VIDEO HEADS MAY NEED CLEANING PLEASE INSERT HEAD CLEANING CASSETTE OR REFER TO MANUAL END PLAY If head cleaning becomes necessary while playing back a tape P 6 VCR LOCK ACTIVATED If you press a function button other than STOP EJECT or POWER while the unit is in VCR Lock mode P 37 PLEASE CHECK THE DISC AND FOR STAINS OR SCRATCHES ON DISC If you press PLAY or the unit read...

Страница 65: ...CANAL RELOJ TV IDIOMA TERMINAR ACT I ON ELEGIR FIJAR SET 2 6 2003 THU 12 00PM DST ON AUTO CLOCK SET COMPLETED SETTING CH 10 PLEASE SET CLOCK BY PRESSING ACTION KEY AUTO CLOCK SET I S I NCOMPLETE FIJACION AUTOMATICA MANUAL AJUSTE ZONA HORA 0 ELEGIR FIJAR SET TERMINAR ACTION FIJAR RELOJ FIJAR RELOJ VERANO ACT 2 6 2003 JUE 12 00PM ELEGIR HORA ELEGIR FIJAR SET I NICIAR ACTION RETROCEDER CH AUTO SET PR...

Страница 66: ...rabar con temporizador El indicador PROG TIMER se enciende en el videograbador combinado Presione REC para comenzar la grabación Para no editar ó grabar partes de una grabación presione STILL PAUSE para hacer una pausa durante la grabación No podrá ver otro canal durante la grabación Para parar Presione STOP Si se desea que el videograbador deje de grabar a una hora prefijada Grabación de un toque...

Страница 67: ...co se cierra automáticamente Si está usando un DVD interactivo Interactive DVD o un Vídeo CD con contol de reproducción playback control y aparece un menú de títulos TITLE MENU en la pantalla siga al paso 4 Presione OPEN CLOSE para expulsar el disco 1 Presione o las teclas numéricas para seleccionar el artículo deseado 2 Presione SET para la reproducción Si usa las teclas numéricas la reproducción...

Страница 68: ...E 2 Presione para seleccionar el ángulo deseado Visión desde otro ángulo DVD solamente Ampliación de la imagen DVD solamente Algunos discos con películas por ejemplo vienen con dos o más títulos Si el disco tiene un menú de títulos grabados el botón TITLE podrá utilizarse para seleccionar el título de la película 1 2 Presione TITLE durante la reproducción Ahora se visualiza una lista de los título...

Страница 69: ...ccion programa 1 Presione para seleccionar REPRODUCCION ALEATORIA 2 Presione SET Comienza la reproducción arbitraria Para cancelar presione STOP durante la reproducción y luego presione CLEAR 1 2 Reproducción programada Vídeo CD CD Reproducción arbitraria Vídeo CD CD MENU PRINCIPAL DVD BLOQUEO CANAL RELOJ TV IDIOMA TERMINAR ACT I ON ELEGIR FIJAR SET 5 3 1 DVD MENU PRINCIPAL ELEGIR FIJAR SET TERMIN...

Страница 70: ...n de fábrica Si el idioma seleccionado en la preparación de AUDIO se utiliza durante la reproducción los subtítulos no aparecerán Si se utiliza otro idioma durante la reproducción los subtítulos aparecerán en el idioma seleccionado en la preparación de AUDIO Inglés Español Francés Japones OTRO Se puede seleccionar el otro idioma Seleccione MENU Inglés Español Francés Japones Fijación de fábrica in...

Страница 71: ...A JPEG y la ejecución se iniciará automáticamente Se visualizará el directorio del CD Estado de la función Área de las carpetas La carpeta visualizada actualmente se volverá verde Contador Carpeta principal Área de archivos El archivo la carpeta se visualiza con un cursor MODO DE REPRODUCCIÓN 1 2 3 REPROD MODE DE REPRODUCCION NORMAL 00 00 00 ROOT My favorite CAR1 TECHNO CAR2 POPS END_WALTZ JAZZ PI...

Страница 72: ... new product which was not sold as is A purchase receipt or other proof of the original purchase date is required for warranty service Carry In Mail in or In Home Service For Carry In Mail In or In Home Service as applicable in the United States call toll free contact number listed above or visit Panasonic Web Site http www panasonic com For assistance in Puerto Rico call Panasonic Sales Company 7...

Страница 73: ...esult from accidents misuse abuse neglect mishandling misapplication alteration faulty installation set up adjustments misadjustment of consumer controls improper maintenance power line surge lightning damage modification or commercial use such as in a hotel office restaurant or other business rental use of the product service by anyone other than a Factory Servicenter or other Authorized Servicer...

Страница 74: ...ime 6 E EJECT button 8 9 Eject tape 18 F Fast Forward 18 FF SLOW button 8 18 FM button 8 28 29 FM Radio 28 29 Forward Search 18 Frame by Frame Advance 18 Front Panel Indicators 9 Function Display 27 H Head Cleaning 6 I Important Safeguards and Precautions 2 Information Unit Cassette Disc 6 7 Initial Setup 14 Index Search 32 Indicators on the Front Panel 9 Input Mode 19 L Language 16 Limited Warran...

Страница 75: ...o CDs 21 PLAY button 8 20 Program Play Video CD CD 49 Program Repeat Play Video CD CD 49 R Random Play Video CD CD 50 Region number 3 Repeat Play 53 RESUME function 21 RETURN button 8 20 REW FF SLOW button 8 20 21 55 56 S Settings for DVD Operation 58 60 SKIP SKIP 8 20 21 54 56 Slow Motion DVD Video CD 21 STILL MODE 60 Still Pause Picture 21 STILL PAUSE button 8 21 Subtitle language DVD 46 SURROUN...

Страница 76: ...tric Corporation of America One Panasonic Way Secaucus New Jersey 07094 Panasonic Sales Company PSC Division of Matsushita Electric of Puerto Rico Inc Ave 65 de Infantería Km 9 5 San Gabriel Industrial Park Carolina Puerto Rico 00985 Printed in Indonesia LSQT0667C S0203 2033 P ...

Отзывы: