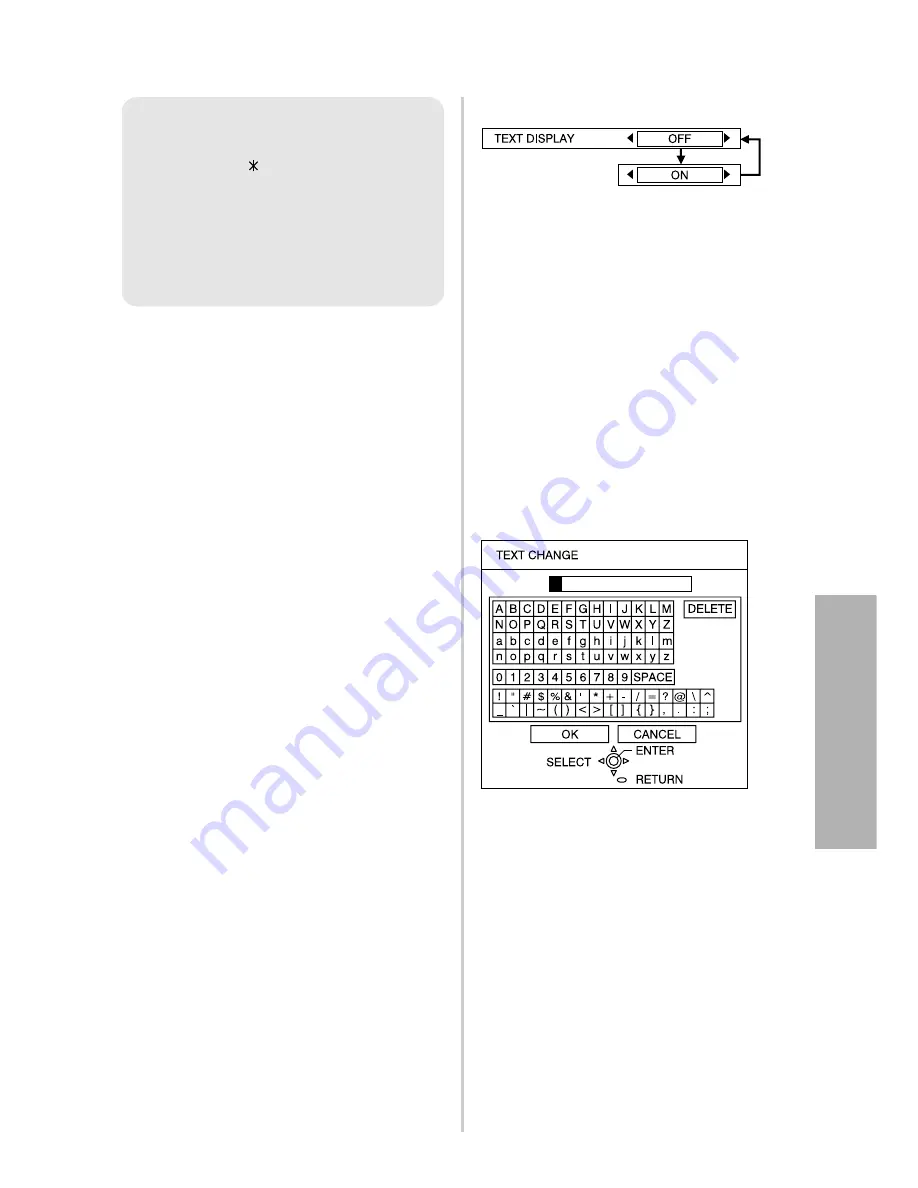
background image

E

NGLISH

-55

TEXT DISPLAY

You can set text to be displayed at
the bottom of the projected image at
all times.

OFF

“TEXT DISPLAY” is disabled.

ON

“TEXT DISPLAY” is enabled.

TEXT CHANGE

The text which is displayed when
“TEXT DISPLAY” is set to “ON” can
be changed.
Press the ENTER button to display
the “TEXT CHANGE” screen.

#

Press the 

F

G

I

and 

H

buttons to select the characters,
then press the ENTER button.
(You can enter 22 characters
continuously.)

C

Select “DELETE” to delete a
character.

$

Press the 

F

G

I

and 

H

buttons to select “OK”, then press
the ENTER button.

C

Select “CANCEL” to cancel the
change.

NOTE:

B

The entered password will
appear as   . It will not be
displayed on the screen.

B

If you enter the wrong
password, an error message
will be displayed. Enter the
correct password again.


Adjustments

and

settings

Содержание PT-LB60NTE

Страница 1: ...ISH R Before operating this product please read the instructions carefully and save this manual for future use LCD Projector Operating Instructions Model No PT LB60NTE PT LB55NTE TQBJ 0195 Commercial...

Страница 2: ......

Страница 3: ...ith general household waste For proper treatment recovery and recycling please take these products to designated collection points where they will be accepted on a free of charge basis Alternatively i...

Страница 4: ...40 PICTURE MODE CONTRAST BRIGHTNESS COLOR TINT SHARPNESS COLOR TEMPERATURE Projecting sRGB compatible pictures DAYLIGHT VIEW AI DETAILED SETUP Adjusting the position 44 REALTIME KEYSTONE KEYSTONE POS...

Страница 5: ...or the cabinet is broken disconnect the mains plug from the mains socket BContinued use of the projector in this condition may result in fire or electric shocks BContact an Authorised Service Centre...

Страница 6: ...or to overheat which can cause burns fire or damage to the projector Do not place liquid containers on top of the projector BIf water spills onto the projector or gets inside it fire or electric shock...

Страница 7: ...ht result BThe lamp can easily become damaged if struck against hard objects or dropped and injury or malfunctions may result When replacing the lamp allow it to cool for at least one hour before hand...

Страница 8: ...leak and fire injury or contamination of the battery compartment and surrounding area may result Do not put your weight on this projector BYou could fall or the projector could break and injury may re...

Страница 9: ...he projector at least once a year BIf dust is left to build up inside the projector without being cleaned out it can result in fire or problems with operation BIt is a good idea to clean the inside of...

Страница 10: ...on or shocks The internal parts can be damaged which may cause malfunctions or accidents Avoid setting up in places which are subject to sudden temperature changes such as near an air conditioner The...

Страница 11: ...Screen Do not apply any volatile substances which may cause discolouration to the screen and do not let it become dirty or damaged Lamp The lamp may need to be replaced earlier due to variables such...

Страница 12: ...ble theft prevention cable manufactured by Kensington This security lock is compatible with the Microsaver Security System from Kensington Leg adjuster buttons L R page 27 These buttons are used to un...

Страница 13: ...not place your hands or face or objects which cannot withstand heat close to this port allow at least 15 cm 6 of space otherwise burns or damage could result NOTE BDuring projection of an image the co...

Страница 14: ...0 2 1 5 4 3 Projector control panel PC INPUT indicator This indicator illuminates when a signal is being input to the connector PC 1 IN or PC 2 IN selected using the input select buttons Menu operati...

Страница 15: ...If this button is pressed while a RGB signal is being projected the position of the image and the settings for DOT CLOCK and CLOCK PHASE will be adjusted automatically MENU button pages 36 and 38 This...

Страница 16: ...tons 2SHUTTER button page 32 This button is used to momentarily turn off the picture and sound You can also select this function from the on screen menu refer to page 53 3DEFAULT button page 39 This b...

Страница 17: ...put AUDIO IN L R connectors for S VIDEO VIDEO page 23 Menu operation page 14 VIDEO IN connector page 23 This connector is used to input video signals from video equipment such as a video deck VARIABLE...

Страница 18: ...g a translucent screen Menu item Setting FRONT DESK INSTALLATION Menu item Setting FRONT CEILING INSTALLATION Menu item Setting REAR DESK INSTALLATION Menu item Setting REAR CEILING INSTALLATION NOTE...

Страница 19: ...ed H1 L SH L SW Projector position L Projection distance SH Image height SW Image width H1 Distance from centre of lens to bottom edge of projected image Top edge of screen Screen Bottom edge of scree...

Страница 20: ...m 7 1 16 0 22 m 8 21 32 0 30 m 11 25 32 0 37 m 14 9 16 0 44 m 17 5 16 NOTE BThe dimensions in the table above are approximate BFor details about projected image distances refer to page 67 Wide LW Tele...

Страница 21: ...ker In such cases it will be necessary to connect a TBC time base corrector BRefer to the list on page 68 for details on compatible signals which can be input to the projector BOnly one audio system c...

Страница 22: ...off while DIGITAL ZOOM or INDEX WINDOW is being used these functions will be cancelled pages 33 and 34 Connecting to video equipment 1 D sub15 pin male BNCx5 male adapter cable DVD player with compon...

Страница 23: ...ENGLISH 23 Getting started Connecting to video equipment 2 DIN 8 pin male DVD player Video deck Computer for control use Serial adapter ET ADSER sold separately Audio system...

Страница 24: ...aces of the receptor Furthermore the remote control unit can be operated from an angle of 30 to the left or right and 15 above or below the receptor BIf the buttons on the remote control unit are kept...

Страница 25: ...ENGLISH 25 Getting started...

Страница 26: ...ojector will flash green After a short period it will illuminate green and the startup logo will be displayed If you would like the startup logo not to be displayed set STARTUP LOGO to OFF Refer to pa...

Страница 27: ...set the projector up first and when you change the placement after original setup Press the AUTO SETUP button when RGB signals are being input BSettings such as the position of the image will be corr...

Страница 28: ...R button BThe POWER OFF confirmation screen will be displayed Press the POWER button again BThe lamp unit will switch off and the picture will stop being projected The POWER button on the projector wi...

Страница 29: ...be projected Flashing Illuminated Illuminated Flashing Green Orange Projector status Direct power off function You can disconnect the mains lead during projection or immediately after use and move the...

Страница 30: ...WIRELESS VIDEO Press the DIRECT INPUT SELECT buttons BYou can select the input signal directly DIRECT INPUT SELECT buttons Remote control unit Changing signals The signal that is being input to the PC...

Страница 31: ...carried out NOTE B SIGNAL SEARCH will also be carried out When SIGNAL SEARCH is set to ON refer to page 51 for details BIf the dot clock frequency is 100 MHz or higher DOT CLOCK and CLOCK PHASE will n...

Страница 32: ...mode Press the SHUTTER button BThe picture and sound will be turned off BPress any button on either the projector or remote control unit to return to normal operating mode NOTE BYou can also select SH...

Страница 33: ...being input the enlargement ratio can be changed within the range of 1x to 3x except when the FRAME LOCK is set to ON page 47 BIf the type of signal being input changes while the digital zoom functio...

Страница 34: ...io will also change Make sure that you fully understand the notes on ASPECT on page 47 before using the INDEX WINDOW function BYou can also select INDEX WINDOW from the on screen menu refer to page 53...

Страница 35: ...the pointer Press the FGIH buttons to move the pointer You can select the pointer in POINTER SELECT from 3 types refer to page 50 Pointer1 Pointer2 Pointer3 Displaying the pointer POINTER You can disp...

Страница 36: ...nus The general arrangement of these menus is shown below Menu Screen When a VIDEO signal is being input POSITION menu page 44 BPress the MENU button to display the menu screen Refer to page 38 for de...

Страница 37: ...ENGLISH 37 Adjustments and settings 2 2 LANGUAGE menu page 48 SECURITY menu page 54 WIRELESS menu page 56 OPTION menu page 49 G F G F...

Страница 38: ...e ENTER button Menu operation guide The menu screen will be displayed The selected item will be displayed in orange The sub menu for the selected item will be displayed on the right side You can selec...

Страница 39: ...tting to the factory default If you press the DEFAULT button on the remote control unit you can return settings to the factory default settings However the operation of this function varies depending...

Страница 40: ...ive setting or a bar scale the individual adjustment screen will be displayed For DETAILED SETUP press the ENTER button to display the next screen When an S VIDEO VIDEO signal is being input When WIRE...

Страница 41: ...nes in the picture The flesh tones are greenish I button The flesh tones are reddish H button SHARPNESS To soften the picture details I button To sharpen the picture details H button COLOR TEMPERATURE...

Страница 42: ...correctly if any objects are placed on the projector B AUTO will be disabled when INSTALLATION in the OPTION menu is set to REAR DESK or REAR CEILING AI ON The lamp is controlled according to the inpu...

Страница 43: ...e flickering of still images vertical flicker set STILL MODE to ON This should normally be set to AUTO If the signal is of such poor quality that the correct format cannot be automatically distinguish...

Страница 44: ...KEYSTONE to OFF and correct the vertical keystone distortion manually Adjusting the position Press the MENU button to display the menu screen Select the POSITION menu from the main menu and then press...

Страница 45: ...NOTE BVertical keystone distortion can be corrected to 30 of the angle of tilt However the greater the correction amount the more the picture quality will deteriorate and the harder it will become to...

Страница 46: ...thout change 16 9 The picture is compressed to a ratio of 16 9 and projected S1 video signals B S1 video signals are a type of video signal with an aspect ratio of 16 9 which include a detector signal...

Страница 47: ...M REALTIME KEYSTONE KEYSTONE or INDEX WINDOW will not function FRAME LOCK RGB only If the picture s condition is bad while an RGB moving picture is projected set FRAME LOCK to ON Refer to page 68 for...

Страница 48: ...U button to display the menu screen Select the LANGUAGE menu from the main menu and then press the ENTER button Press the F F or G G button to select a language and then press the ENTER button 1 2 G I...

Страница 49: ...f the input signal will be displayed STARTUP LOGO ON The Panasonic logo will be displayed when the power is turned on OFF The Panasonic logo will not be displayed when the power is turned on INPUT GUI...

Страница 50: ...n page 61 and reset LAMP RUNTIME to 0 POINTER SELECT If you press the POINTER button on the remote control unit the pointer will be displayed You can select the pointer from 3 types as shown below ref...

Страница 51: ...nal is input to the projector for the duration of the period you set the projector will return to standby mode The period can be set from 15 minutes to 60 minutes in 5 minute intervals If you don t us...

Страница 52: ...eaker and VARIABLE AUDIO OUT connector INSTALLATION This setting should be changed in accordance with the projector setting up method Refer to page 18 FRONT DESK When the projector is placed on a desk...

Страница 53: ...input to the projector DETAILED SETUP Press the ENTER button to display the DETAILED SETUP menu INDEX WINDOW This functions in the same way as the INDEX WINDOW button on the remote control unit Refer...

Страница 54: ...can be set Press the ENTER button Enter the password again for confirmation Press the ENTER button When you use the SECURITY function for the first time Press the F H G I F H G and I buttons in order...

Страница 55: ...T CHANGE screen Press the F G I and H buttons to select the characters then press the ENTER button You can enter 22 characters continuously CSelect DELETE to delete a character Press the F G I and H b...

Страница 56: ...n controlling the projector with a personal computer by means of the wireless network PASSWORD CHANGE Passwords can be changed WEB CONTROL To control the projector with a personal computer by means of...

Страница 57: ...es may be covered BThe ambient temperature in the place of use may be too high BThe air filter may be blocked BUncover the ventilation holes BSet up the projector in a place where the temperature is b...

Страница 58: ...until the lamp unit cools down before turning the power back on again BThere may be an abnormality in the lamp circuit BThe lamp unit may be blown BDisconnect the mains lead by following the procedur...

Страница 59: ...the procedure given on page 28 Gently turn the projector upside down and then remove the air filter cover NOTE BIf the dust cannot be cleaned by a vacuum cleaner remove the air filter and soak it in w...

Страница 60: ...al is 2 000 hours but it is possible that the lamp may need to be replaced earlier due to variables such as a particular lamp s characteristics usage conditions and the installation environment Early...

Страница 61: ...t and then use a Phillips screwdriver to securely tighten the lamp unit fixing screws When inserting the new lamp unit be sure to push it in at the point A and B LAMP indicator On screen display Illum...

Страница 62: ...onds The LAMP RUNTIME screen will be displayed Press the POWER button to turn off the power Disconnect the mains lead after the POWER button on the projector illuminates red This will reset the cumula...

Страница 63: ...be attached to the lens BThe lens focus may not have been set correctly BThe projector may not be at the correct distance from the screen BThe lens may be dirty BThe projector may be tilted too much...

Страница 64: ...N menu is set to OUTPUT when the signals are input to PC 2 IN PC 1 OUT connector Page 43 68 69 14 50 Before carrying out cleaning and maintenance be sure to disconnect the mains plug from the mains so...

Страница 65: ...B55NTE 2 500 lm Scanning frequency for RGB signals Horizontal scanning frequency 15 kHz 91 kHz Vertical scanning frequency 50 Hz 85 Hz Dot clock frequency Less than 100 MHz YPBPR signals 480i 576i 480...

Страница 66: ...t stereo compatible 0 V rms 2 0 V rms variable SERIAL DIN 8 pin RS 232C compatible Cabinet Moulded plastic PC ABS Dimensions Width 327 mm 12 27 32 Length 233 mm 9 5 32 without lens cover Height 83 mm...

Страница 67: ...ojection distance for a 16 9 screen the 4 3 images will overflow the screen at the top and bottom In such cases set ASPECT to S4 3 Refer to page 46 for details The values obtained from the formulas ab...

Страница 68: ...72 8 31 5 A OK RGB 640 x 480 37 5 75 0 31 5 A OK RGB 640 x 480 43 3 85 0 36 0 A OK RGB 800 x 600 35 2 56 3 36 0 A OK RGB 800 x 600 37 9 60 3 40 0 A OK RGB 800 x 600 48 1 72 2 50 0 A OK RGB 800 x 600...

Страница 69: ...e output setting Manufacturer Keyboard command Manufacturer Keyboard command Panasonic NEC TOSHIBA SHARP HP FUJITSU EPSON DELL IBM SONY Apple Other Fn F3 Fn F5 Fn F10 Fn F8 Fn F7 Fn F7 NOTE BThe actua...

Страница 70: ...ps None Character length 8 bits Stop bit 1 bit X parameter None S parameter None STX Command Parameter ETX Start byte 02h 3 bytes 1 byte 1 byte 5 bytes End byte 03h DIN 8 pin male Serial adapter ET AD...

Страница 71: ...Adjustment value 0 63 Input signal selection IIS Parameter VID VIDEO SVD S VIDEO RG1 PC1 RG2 PC2 NWP WIRELESS Shutter function OSH Operation will be switched between ON and OFF each time the command...

Страница 72: ...rademark of Apple Computer Inc BS VGA is a registered trademark of the Video Electronics Standards Association BThe font used in the on screen displays is a Ricoh bitmap font which is manufactured and...

Отзывы: