background image

26

27

Basic

Operation

Returning a setting to
the factory default

If you press the NORMAL button on
the remote control unit, you can
return settings to the factory default
settings. However, the operation of
this function varies depending on
which screen is being displayed.

B

When a menu screen is being
displayed

All items displayed will be returned
to their factory default settings, and
the bar scale will appear white.

B

When an individual adjustment
screen is being displayed

Only the item displayed will be
returned to the factory default
setting, and the bar scale will
appear white.

NOTE:

B

Triangle symbols above and
below a menu bar indicate the
factory default setting. Items
which do not have these triangle
symbols cannot be returned to
the factory default setting.

Indicates the standard factory
default setting

Indicates the current adjustment
value

B

The positions of triangle symbols
vary depending on the type of
signal being input.

Using the freeze function

The picture will alternate between a still picture and a moving picture each
time the FREEZE button on the remote control unit is pressed.

Still picture

Moving picture

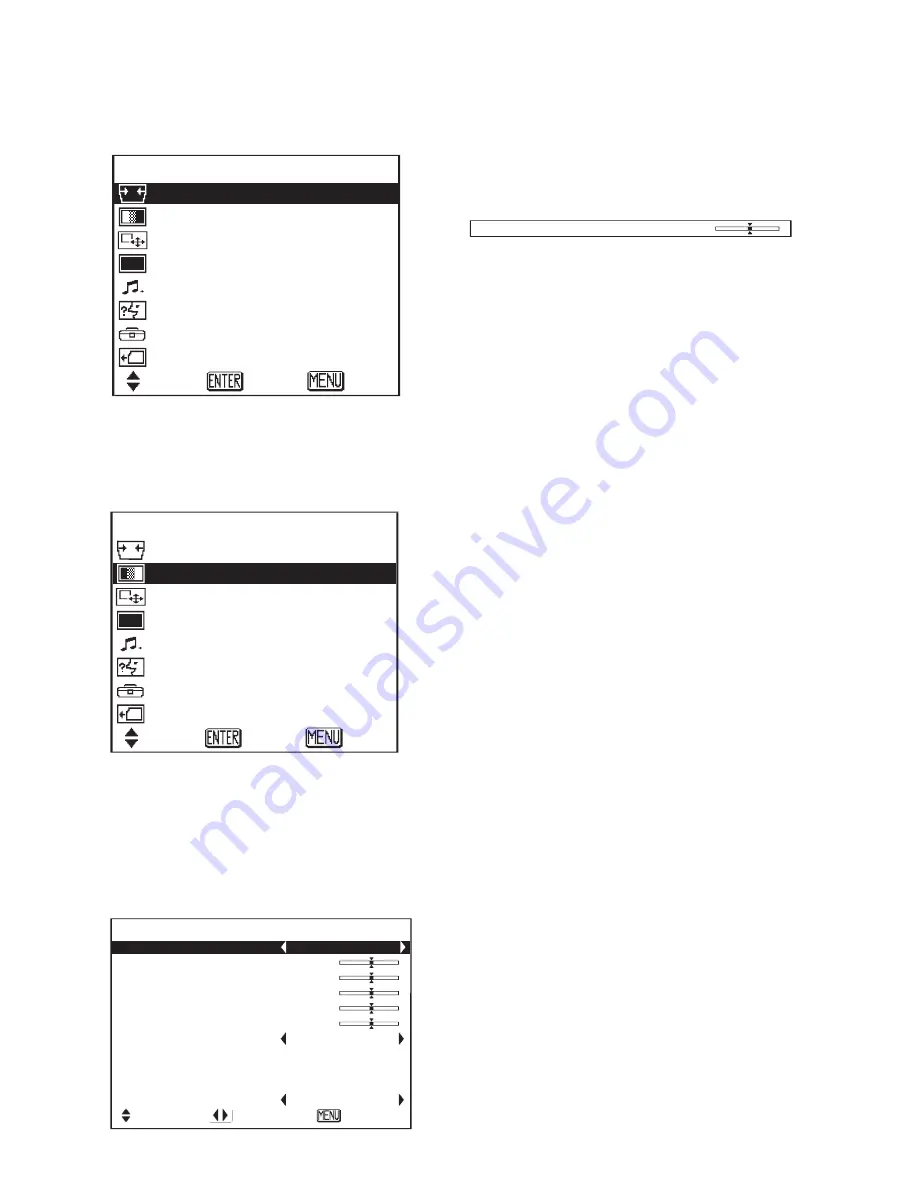
Menu operation guide

#

Press the MENU button.

The MAIN MENU screen will be
displayed.

$

Press the 

F

or 

G

arrow

buttons to select an item.

Selected items will be displayed
in blue.

%

Press the ENTER button to
accept the selection.

The selected menu screen or
adjustment screen will then be
displayed.
(Example: PICTURE menu)

M E N U

K E Y S T O N E

P I C T U R E

P O S I T I O N

S H U T T E R

V O L U M E

L A N G U A G E

O P T I O N

S D   M E N U

S E L E C T           E N T E R             E X I T

M E N U

K E Y S T O N E

P I C T U R E

P O S I T I O N

S H U T T E R

V O L U M E

L A N G U A G E

O P T I O N

S D   M E N U

S E L E C T           E N T E R             E X I T

              P I C T U R E

P I C T U R E   M O D E     N O R M A L

C O N T R A S T               0

B R I G H T                   0

C O L O R                     0

T I N T                       0

S H A R P N E S S             0

C O L O R   T E M P .           0

G A M M A   A D J U S T

M E M O R Y   S A V E

M E M O R Y   L O A D

T V - S Y S T E M           A U T O 1

    S E L E C T     A D J           E S C

&

Press the 

F

or 

G

buttons to

select an item, and then press
the 

I

or 

H

buttons to change

or adjust the setting.

An individual adjustment screen
such as the one shown below will
be displayed for bar-scale items.

The bar scale will turn green
when any adjustment changes
the setting from the factory set
value.
For items without any selective
arrow or bar-scale, press the
ENTER button. The menu screen
for the item will then be
displayed.

Unavailable on-screen
menu items

This projector has unadjustable
items and unusable functions
depending on the signal being input.
When an item cannot be adjusted or
a function cannot be used, the
corresponding on-screen menu
display does not appear, and the
item or function will not work even if
the ENTER button is pressed.

Returning to the
previous screen

If you press the MENU button while
a menu screen is being displayed,
the display will return to the
previous screen.
If you press the MENU button while
the MAIN MENU screen is being
displayed, the MAIN MENU screen
will be cleared.

B R I G H T                   0

              P I C T U R E

P I C T U R E   M O D E     N O R M A L

C O N T R A S T               0

B R I G H T                   0

C O L O R                     0

T I N T                       0

S H A R P N E S S             0

C O L O R   T E M P .           0

G A M M A   A D J U S T

M E M O R Y   S A V E

M E M O R Y   L O A D

T V - S Y S T E M           A U T O 1

    S E L E C T     A D J           E S C

B R I G H T                   0

Содержание PT-L300

Страница 1: ...PC POWER LIGHT INPUT ENTER MENU FREEZE NORMAL ASPECT USER MEMORY VOLUME PICTURE MODE SD MUTE SD TIME MENU LCD PROJECTOR VIDEO CMPNT COMPONENT KEYSTONE TQBJ 0120 1 Before operating this product please read the instructions carefully and save this manual for future use ...

Страница 2: ...hin an equilateral triangle is intended to alert the user to the presence of uninsulated dangerous voltage within the product s enclosure that may be of sufficient magnitude to constitute a risk of electric shock to persons The exclamation point within an equilateral triangle is intended to alert the user to the presence of important operating and maintenance servicing instructions in the literatu...

Страница 3: ...ence to radio or television reception which can be determined by turning the equipment off and on the user is encouraged to try to correct the interference by one or more of the following measures Reorient or relocate the receiving antenna Increase the separation between the equipment and receiver Connect the equipment into an outlet on a circuit different from that to which the receiver is connec...

Страница 4: ...Adjusting the picture 34 PICTURE MODE 34 CONTRAST 34 BRIGHT 34 COLOR 34 TINT 35 SHARPNESS 35 TV SYSTEM 35 Color Hue Setting 35 WHITE BALANCE R G B 36 SIGNAL MODE 36 GAMMA ADJUST 36 MEMORY SAVE 36 MEMORY LOAD 36 Projecting sRGB compatible pictures 37 Adjusting the position 38 HORIZONTAL POSITION 38 VERTICAL POSITION 38 DOT CLOCK 38 CLOCK PHASE 38 ASPECT 39 AUTO SETUP 39 Advanced Operation Option se...

Страница 5: ... over and severe injury or damage could result Installation work such as ceiling suspension should only be carried out by a qualified technician BIf installation is not carried out correctly there is the danger that injury or electric shocks may occur If foreign objects or water get inside the projector or if the projector is dropped or the cabinet is broken turn off the power and disconnect the p...

Страница 6: ...ed on top of a surface which is sloped or unstable it may fall down or tip over and injury or damage could result Do not place the projector into water or let it become wet BFailure to observe this may result in fire or electric shocks Do not place liquid containers on top of the projector BIf water spills onto the projector or gets inside it fire or electric shocks could result BIf any water gets...

Страница 7: ...places where the projector may come into contact with smoke or steam BUsing the projector under such conditions may result in fire or electric shocks When disconnecting the power cord hold the plug not the cord BIf the power cord itself is pulled the cord will become damaged and fire short circuits or serious electric shocks may result Always disconnect all cables before moving the projector BMovi...

Страница 8: ...ice Center to clean inside the projector at least once a year BIf dust is left to build up inside the projector without being cleaned out it can result in fire or problems with operation BIt is a good idea to clean the inside of the projector before the season for humid weather arrives Ask your nearest Authorized Service Center to clean the projector when required Please discuss with the Authorize...

Страница 9: ...01 x1 AAA batteries for remote control unit x2 Accessories Check that all of the accessories shown below have been included with your projector PC POWER LIGHT INPUT ENTER MENU FREEZE NORMAL ASPECT USER MEMORY VOLUME PICTURE MODE SD MUTE SD TIME MENU LCD PROJECTOR VIDEO CMPNT COMPONENT KEYSTONE Carrying bag TPEP008 x1 ...

Страница 10: ...may be subject to electromagnetic interference if it is set up near high voltage power lines or motors If installing the projector to the ceiling ask a qualified technician to carry out all installation work If the projector is to be suspended from the ceiling you will need to purchase the separate installation kit Model No ET PKE300 Furthermore all installation work should only be carried out by ...

Страница 11: ...cision technology giving you fine picture details Occasionally a few non active pixels may appear on the screen as a fixed point of blue green or red Please note that this does not affect the performance of your LCD Before carrying out cleaning and maintenance be sure to disconnect the power cord plug from the wall outlet Wipe the cabinet with a soft dry cloth If the cabinet is particularly dirty ...

Страница 12: ...ck the front adjustable legs Press to adjust the angle of tilt of the projector Air filter page 53 Remote control signal receptor page 17 MAIN POWER switch pages 22 and 23 SD memory card slot page 42 Insert the SD memory card into here after opening the cover Access lamp page 42 Flashes while the projector is being accessed for reading or writing the data in the SD memory card 0Projector control p...

Страница 13: ...jection of an image the cooling fan will operate emitting a small noise as it operates Turning the lamp on or off will cause this noise to increase a little BBy using the OPTION menu to set LAMP POWER to LOW the operating sound of the fan can be reduced Refer to page 40 Security lock This can be used to connect a commercially available theft prevention cable manufactured by Kensington This securit...

Страница 14: ...tton pages 22 and 23 MENU button page 24 This button is used to display menu screens When a menu screen is being displayed it can be used to return to a previous screen or to clear the screen Arrow F F G G I I and H H buttons page 26 These buttons are used to select and adjust items in the on screen menu screens ENTER button page 26 This button is used to accept and to activate items selected in t...

Страница 15: ...the buttons on the remote control unit 0FREEZE button page 36 This button is used to momentarily freeze projection so that a still picture is displayed 1MODE PICTURE button page 32 This button is to display the PICTURE MODE menu 2MEMORY USER button page 36 This button is to display the MEMORY LOAD menu 3VOLUME buttons These buttons are used to adjust the volume of the sound output from the project...

Страница 16: ... S VIDEO compatible equipment such as a video deck The connector is compatible with S2 and S1 signals and projector aspect is automatically adjusted according to the type of signal received DVI D IN connector page 20 This connector is used to input DVI D signals RGB input connector page 20 This connector is used to input RGB signals from a PC YPBPR CBCR input jacks page 19 These jacks are used to ...

Страница 17: ...the screen used NOTE BDo not drop the remote control unit BKeep the remote control unit away from liquids BRemove the batteries if not using the remote control unit for long periods BDo not use rechargeable batteries Operating range If the remote control unit is held so that it is facing directly in front of the remote control signal receptors on the front of the projector the operating range is w...

Страница 18: ...ruction manual for each system component carefully before connecting it BTurn off the power supply for all components before making any connections BIf the cables necessary for connecting a component to the system are not included with the component or available as an option you may need to fashion a cable to suit the component concerned To video output Video Audio cable accessory To audio output ...

Страница 19: ...e YPBPR signals which can be input to the projector BOnly one audio system circuit is available for the AUDIO IN L R jacks so if you wish to change the audio input source you will need to remove and insert the appropriate plugs DVD player To YPBPR output To audio output This illustration is an example of connection for the PT L300U ...

Страница 20: ...ecting a computer BOnly one audio system circuit is available for the AUDIO IN L R jacks so if you wish to change the audio input source you will need to remove and insert the appropriate plugs BThe PT L200U does not have a DVI D input DVI D IN connector Example of connecting to computer Computer Computer To RGB output To audio output To audio output To DVI D output This illustration is an example...

Страница 21: ... method Projector position The projection range of this projector is 1 2 m 7 4 m The lower edge of the projected image falls about 0 1 m from the center of the lens For details about projected image distances refer to page 65 DESK CEILING DESK CEILING Projection Distance Projection Distance 0 9 m 2 11 1 2 m 3 11 1 4 m 4 7 1 9 m 6 2 2 2 m 7 2 2 5 m 8 2 2 9 m 9 6 3 1 m 10 2 3 7 m 12 1 4 7 m 15 5 5 6...

Страница 22: ...er The power indicator on the projector will illuminate red Press the POWER button The power indicator on the projector will flash green After a short period the button will illuminate green and a picture will be projected While pressing the adjuster buttons adjust the forward back angle of tilt of the projector If there is keystone distortion in the projected images carry out keystone correction ...

Страница 23: ...efore the lamp unit has cooled down the lamp unit may not turn on straight away but it will turn on automatically after a short period During this time the power indicator on the projector will flash orange BWhen the projector is in standby mode the power indicator on the projector is illuminated red the projector will still draw a maximum 1 5 W of power even when the cooling fan has stopped BIf t...

Страница 24: ... I T I O N S H U T T E R V O L U M E L A N G U A G E O P T I O N S D M E N U SELECT ENTER EXIT O P T I O N O S D O N N R O N P C P R I O R I T Y N O R M A L B A C K C O L O R B L A C K 4 3 H P O S C E N T E R F R O N T R E A R F R O N T D E S K C E I L I N G D E S K F A N C O N T R O L N O R M A L L A M P P O W E R H I G H L A M P R U N T I M E 5 H SELECT A D J E S C L A N G U A G E E N G L I S H ...

Страница 25: ... M E M O R Y L O A D S I G N A L M O D E 5 2 5 I SELECT A D J E S C P I C T U R E P I C T U R E M O D E N O R M A L C O N T R A S T 0 B R I G H T 0 S H A R P N E S S 0 C O L O R T E M P 0 W B A L R 0 W B A L G 0 W B A L B 0 G A M M A A D J U S T M E M O R Y S A V E M E M O R Y L O A D S I G N A L M O D E X G A SELECT A D J E S C PICTURE menu page 34 When an S VIDEO VIDEO signal is being input When...

Страница 26: ...E S C Press the F or G buttons to select an item and then press the I or H buttons to change or adjust the setting An individual adjustment screen such as the one shown below will be displayed for bar scale items The bar scale will turn green when any adjustment changes the setting from the factory set value For items without any selective arrow or bar scale press the ENTER button The menu screen ...

Страница 27: ...symbols above and below a menu bar indicate the factory default setting Items which do not have these triangle symbols cannot be returned to the factory default setting Indicates the standard factory default setting Indicates the current adjustment value BThe positions of triangle symbols vary depending on the type of signal being input Using the freeze function The picture will alternate between ...

Страница 28: ...ures Press the KEYSTONE button to display the KEYSTONE menu To correct vertical keystone distortion Select V KEYSTONE by pressing the F or G buttons and then press the ENTER button To correct the horizontal keystone distortion Select H KEYSTONE by pressing the F or G buttons and then press the ENTER button Press the MENU button The display will then return to the previous screen K E Y S T O N E H ...

Страница 29: ...will deteriorate and the harder it will become to achieve a good level of focus To obtain the best picture quality set up the projector and screen in such a way that the amount of keystone correction required is as minimal as possible BThe picture size will also change when correction of keystone distortion is carried out For PT L200U Vertical keystone distortion can be corrected by following proc...

Страница 30: ...nal picture Keep this in mind when selecting the aspect ratio BIf using this projector in places such as cafes or hotels with the aim of displaying programmes for viewing for a commercial purpose or for public presentation note that if the aspect ratio 16 9 selection function is used to change the aspect ratio of the screen picture you may be infringing the rights of the original copyright owner f...

Страница 31: ... image Center of image is less distorted ZOOM Letter box signal Expansion preserves original ratio V SCROLL 4 3 Input signal Enlarges image approximately 1 2 times Vertical position can be adjusted by the G and F buttons ASPECT Input signal Projected Image S4 3 S16 9 PT L300U only 4 3 Input signal Image which is projected at an aspect ratio of 4 3 or 16 9 without being expanded vertically ...

Страница 32: ...brightness of the room is at a standard level DYNAMIC When the room is brighter CINEMA1 When watching movies CINEMA2 When watching movies with lighter and clearer pictures MUSIC When watching music programs such as concerts or live performances SPORTS When watching sports programs such as baseball or soccer games NATURAL To project the image faithfully from the image source P I C T U R E M O D E N...

Страница 33: ...d from the projector when the projector is not being used for short periods of time such as during breaks in meetings or when carrying out preparation The projector uses less power in shutter mode than it does in normal projection mode Select SHUTTER from the MAIN MENU screen and then press the ENTER button Press any button on either the projector or remote control unit to return to normal operati...

Страница 34: ...D J U S T M E M O R Y S A V E M E M O R Y L O A D S I G N A L M O D E 5 2 5 I SELECT A D J E S C B W BAL R W BAL G and W BAL B are not displayed when DVI signal is being input PICTURE MODE Refer to page 32 for details CONTRAST This adjusts the contrast of the picture Press the H button to make the picture brighter and press the I button to make the picture darker Adjust the BRIGHT setting first if...

Страница 35: ...o adjust the white areas of the picture if they appear bluish or reddish USER PT L300U only This item lets you make fine adjustments to the color temperature Press the I or H buttons to select the USER and press the ENTER button Press the F or G buttons to select an item and adjust the setting by pressing the I or H buttons If the white area of the picture appears bluish adjust CONTRAST B or BRIGH...

Страница 36: ...TER button to display the MEMORY SAVE menu Up to 3 settings can be saved in the PICTURE menu Select the number in which you wish to save the setting by pressing the F or G buttons and then press the ENTER button The confirmation screen will then be displayed Select OK by pressing the I or H buttons and press the ENTER button MEMORY LOAD Press the ENTER button to display the MEMORY LOAD menu If any...

Страница 37: ...n sRGB compatible pictures to be reproduced more faithfully make the following settings Press the F or G button to select PICTURE MODE and then use the I or H button to select NATURAL Press the NORMAL button on the remote control unit Select the LAMP POWER item in the OPTION menu by pressing the F or G buttons and set to HIGH by pressing the I or H buttons NOTE BsRGB is only enabled when RGB signa...

Страница 38: ...e the picture down and press the H button to move the picture up DOT CLOCK PC only Periodic striped pattern interference noise may occur when a striped pattern such as the one below is projected If this happens use the I and H buttons to adjust so that any such noise is minimised CLOCK PHASE PC only Adjust the DOT CLOCK setting first before carrying out this adjustment Use the I and H buttons to a...

Страница 39: ...K F A N C O N T R O L N O R M A L L A M P P O W E R H I G H L A M P R U N T I M E 5 H SELECT A D J E S C Reduction feature set it to OFF PC PRIORITY PC only NORMAL displays the PC screen data in a 4 3 aspect ratio WIDE displays the PC screen data in a 16 9 aspect ratio BACK COLOR This sets the color which is projected onto the screen when no signal is being input to the projector This sets the bac...

Страница 40: ...the ceiling bracket which is sold separately FAN CONTROL If using of this projector at high D E S K C E I L I N G D E S K C E I L I N G elevations above 1 400 m set FAN CONTROL to HIGH LAMP POWER This setting changes the lamp brightness When set to LOW the luminance of the lamp is reduced but the projector uses less power and the operating noise is also reduced The LOW position is recommended for ...

Страница 41: ...till pictures and moving pictures using the SD memory card Data that can be played back Still image data BDCF compliant still image data See page 64 for details on DCF compliance Moving image data BMPEG4 movie data audio G 726 compliant However only files in ASF format can be played back Note when using SD memory cards Do not turn off the projector s power or remove an SD memory card from the proj...

Страница 42: ...ard to go in the wrong way it may damage the SD memory card and the card slot Close the slot cover Removing the SD memory card Open the slot cover Check that the access indicator at the upper left corner of the card slot is not flashing the SD memory card is not being accessed NOTE BAlways be sure to check that the access indicator is not flashing before removing the SD memory card If the SD memor...

Страница 43: ...IDE SHOW page 45 This lets you play back still image data in a certain order VIDEO page 49 This lets you play back moving image data PICTURE SLIDE SHOW VIDEO BIf the SD menu is not displayed when the SD button is pressed press the SD MENU button repeatedly until it is displayed or the previous menu screen or image on an SD CARD screen may be displayed or played back NOTE BWhen the SD CARD screen i...

Страница 44: ...es that are saved in the folder can be displayed in a single row If there are four or more folders use the F and G buttons to scroll through the pages Use the F G I and H buttons to select the still image to be enlarged and then press the ENTER button C File name of selected still image D Number of selected still image Total number of still images BIf there are 10 or more still images in a folder ...

Страница 45: ... played back and then press the ENTER button all still images in the selected folder are played back in order USER If the user selects the desired still images the still images that were selected by the user can be played back in order When using user playback you must select the still images to be played back using the USER command in the SETTING screen When USER is selected use the I and H butto...

Страница 46: ...l image E Number of selected still image Total number of still images 1 11 100 0001 1 0 D E C A B See the next page for details on how to edit user settings AUTO MODE The still images are played back automatically in order according to the following setting REPEAT ENTER button Use the I and H buttons to select how many times automatic playback is to be repeated INTERVAL Use the I and H buttons to ...

Страница 47: ...ll images that have been selected in the user settings Use the F G I and H buttons to select the still images to be added or moved and then press the ENTER button BWhen moving images only images that have already been added to the user settings can be moved Select ADD or MOVE and then press the ENTER button Use the F G I and H buttons to move the cursor to the place where the image is to be added ...

Страница 48: ...ack interval is displayed the still images will be played back at the interval set for automatic playback on page 46 BThe setting screen can also be displayed by selecting a still image and then pressing and holding the ENTER button for one second or more DELETE This describes how to delete images from the user settings Use the F G I and H buttons to select the still image to be deleted from the u...

Страница 49: ... button Fast rewind playback I button Play back next movie G button Play back previous movie F button Pause cancel pause ENTER button Stop playback Press the ENTER button for 1 second or more Display hide playback time SD TIME button Select moving image file SD MENU button If you press the I button during movie playback then playback will start again from the beginning of the current movie NOTE BI...

Страница 50: ... a thumbnail image it means that the image cannot be displayed because there is no data or the data is incompatible BIf is displayed instead of a thumbnail image it means that only the thumbnail data cannot be found UNEXPECTED ERROR BAn error occurred during an operation If the problem cannot be reset by pressing the SD MENU button turn off the projector s power while referring to Turning off the ...

Страница 51: ...rature has suddenly changed BThe ventilation holes may be covered BThe ambient temperature in the place of use may be too high BThe air filter may be blocked BUncover the ventilation holes BSet up the projector in a place where the temperature is between 0 C 32 F and 40 C 104 F and the humidity is between 20 and 80 with no condensation If you set the FAN CONTROL to HIGH page 40 set up the projecto...

Страница 52: ... away after it was turned off BWait for a while until the lamp unit cools down before turning the power back on again BThere may be an abnormality in the lamp circuit BTurn off the MAIN POWER switch by following the procedure given on page 23 and then contact an Authorised Service Center LAMP indicator NOTE BBe sure to turn off the MAIN POWER switch by following the procedure given in Turning off ...

Страница 53: ...de down NOTE BPlace the projector on top of a soft cloth so that it will not become scratched Remove the air filter Put your fingernails under the air filter and pull the air filter out of the projector Clean the air filter Use a vacuum cleaner to clean off any accumulated dust NOTE BBe careful not to let the air filter get sucked into the vacuum cleaner Install the air filter NOTE BBe sure to ins...

Страница 54: ...er than the one with the product number indicated above Lamp unit replacement period The lamp is a consumable product Even when the full life of the bulb has not been exhausted the brightness of the light will gradually decline Therefore periodic replacement of the lamp is necessary The intended lamp replacement interval is 2000 hours but it is possible that the lamp may need to be replaced earlie...

Страница 55: ...nit cover from the projector Use a Phillips screwdriver to loosen the two lamp unit fixing screws until the screws turn freely Then hold the handle of the lamp unit and gently pull it out from the projector Insert the new lamp unit while making sure that the direction of insertion is correct and then use a Phillips screwdriver to securely tighten the lamp unit fixing screws Lamp indicator warning ...

Страница 56: ... P C P R I O R I T Y N O R M A L B A C K C O L O R B L A C K 4 3 H P O S C E N T E R F R O N T R E A R F R O N T D E S K C E I L I N G D E S K F A N C O N T R O L N O R M A L L A M P P O W E R H I G H T I M E R E S E T P O W E R O F F SELECT A D J E S C Install the lamp unit cover and then use a Phillips screwdriver to securely tighten the lamp unit cover fixing screws NOTE BBe sure to install the...

Страница 57: ...lection setting may not be correct Refer to page 22 BThe BRIGHT adjustment setting may be at the minimum possible setting Refer to page 34 BThe shutter function may be in use Refer to page 33 BThe lens cover may still be attached to the lens BThe lens focus may not have been set correctly Refer to page 23 BThe projector may not be at the correct distance from the screen Refer to page 21 BThe lens ...

Страница 58: ...al may not be selected Refer to page 22 BThe signal format TV system may not be set correctly Refer to page 35 BThere may be a problem with the video tape or other signal source BA signal which is not compatible with the projector may be being input Refer to page 61 BThe cable may be too long BThe external video output for the laptop computer may not be set correctly You may be able to change the ...

Страница 59: ...kHz 70 kHz Vertical scanning frequency 50 Hz 87 Hz Dot clock frequency Less than 100 MHz YPBPR signals 525i 480i 625i 525p 480p 750p 720p 1125i 1080i Color system 7 NTSC NTSC 4 43 PAL PAL M PAL N PAL60 SECAM Projection size 1016 mm 5080 mm 40 200 Throw distance 1 2 m 7 4 m 3 11 24 3 Optical axis shift 17 1 fixed Screen aspect ratio 16 9 Installation Front Rear Ceiling Desk Menu selection method Sp...

Страница 60: ...ens PT L200U 278 5 mm 10 15 16 including lens Weight 2 9 kg 6 4 lbs Operating environment Temperature 0 C 40 C 32 F 104 F When the FAN CONTROL is set to HIGH page 40 0 C 35 C 32 F 95 F Humidity 20 80 no condensation Certifications UL60950 C UL FCC Class B Remote control unit Power supply 3 V DC AAA battery x2 Operating range Approx 7 m 23 when operated directly in front of signal receptor Weight 7...

Страница 61: ...x 480 37 500 75 000 31 500 A AA PC 640 x 480 43 269 85 008 36 000 A AA PC 720 x 400 37 927 85 038 35 500 A A PC 856 x 480 30 057 60 114 31 500 A AA PC DV1 800 x 600 35 156 56 250 36 000 A A PC 800 x 600 37 879 60 317 40 000 A A PC DV1 800 x 600 48 077 72 188 50 000 A A PC 800 x 600 46 875 75 000 49 500 A A PC 800 x 600 53 674 85 061 56 250 A A PC 832 x 624 49 725 74 550 57 283 A A PC 1 072 x 600 3...

Страница 62: ... the RGB input connector are shown below Pin No Signal R G G SYNC B SDA HD SYNC 0 VD 1 SCL Pin is spare Pins and are for earth Pins and 1 functions are only valid when supported by the computer External view 1 External view Connector pin wiring BThe pin layout and signal names for the S2 VIDEO input connector are shown below ...

Страница 63: ...ta 5 T M D S data 1 7 T M D S data 5 T M D S data 1 8 T M D S clock shield T M D S data1 3 shield T M D S data 3 T M D S clock 5 T M D S data 0 5 shield 9 T M D S clock 3 2 Projection dimensions calculation methods The following methods will allow you to calculate dimensions such as screen diagonal length and projection distances Units in all calculations are metre SD SW 16 9 LW LT H1 SH Screen Wi...

Страница 64: ...ree digit combination folder number cannot be created BFor example if two folders exist named 100abcde and 100fghij respectively the projector will not recognise them Folder sub hierarchies are not supported BFor example if a folder called 323fghij is created as a sub folder of the 102abcde folder the projector will not be able to recognise the sub folder File names File names must consist of four...

Страница 65: ...1 Trademark acknowledgements BThe SD logo is a trademark BVGA and XGA are trademarks of International Business Machines Corporation BMacintosh is a registered trademark of Apple Computer Inc BS VGA is a registered trademark of the Video Electronics Standards Association All other trademarks are the property of the various trademark owners ...

Страница 66: ...le de la flèche en forme d éclair dans un triangle avertit l usager de la présence de tensions dangereuses à l intérieur du produit qui peuvent être de force suffisante pour constituer un risque de choc électrique aux personnes Le point d exclamation dans un triangle avertit l usager de la présence d instructions importantes concernant l utilisation et l entretien réparation dans la littérature ac...

Страница 67: ... surveillance Ne pas installer ce projecteur dans un endroit qui n est pas assez résistant pour supporter le poids du projecteur BSi l emplacement d installation n est pas assez résistant le projecteur risque de tomber et causer de graves blessures et ou des dommages Demander à un technicien qualifié d installer le projecteur par exemple s il est installé au plafond BSi l installation n est pas fa...

Страница 68: ... faire réparer par un centre technique agréé Ne pas manipuler le cordon d alimentation avec les mains mouillées BCela peut entraîner des chocs électriques Brancher la fiche du cordon d alimentation fermement dans la prise de courant BSi la fiche n est pas complètement insérée cela peut entraîner des chocs électriques ou la faire surchauffer BSi la fiche est endommagée ou la plaque de la prise est ...

Страница 69: ...rne élevée Elle peut facilement s endommager si cognée contre des objets durs ou si elle tombe cela peut causer des blessures ou des mauvais fonctionnements Lors du remplacement de la lampe la laisser refroidir pendant au moins une heure avant de la manipuler BLe couvercle de la lampe devient très chaud et on risque de se brûler si on le touche Avant de remplacer la lampe veiller à débrancher le c...

Страница 70: ...i l on insère les piles incorrectement elles risqueront d exploser ou de fuir ce qui peut causer un incendie des blessures ou une contamination du logement des piles et de la zone environnante Ne pas peser de tout son poids sur ce projecteur BOn risque de tomber ou de casser l appareil ce qui peut causer des blessures BVeiller tout particulièrement à ce que des enfants ne montent pas sur l apparei...

Страница 71: ...électrique à haute tension ou de moteurs Le projecteur peut être sujet à une interférence électromagnétique s il est installé près de lignes d alimentation électrique à haute tension ou de moteurs Si le projecteur est installé au plafond demander à un technicien qualifié de faire tous les travaux d installation Si le projecteur doit être suspendu au plafond il faut acheter le kit d installation sé...

Страница 72: ...de très haute précision permettant d obtenir des images très détaillées Parfois il est possible que des pixels non actifs apparaissent sur l écran sous forme de points fixes bleus verts ou rouges Bien noter que ceci n affecte pas le fonctionnement du LCD Avant de faire le nettoyage et l entretien s assurer de débrancher la fiche du cordon d alimentation de la prise de courant Essuyer le boîtier av...

Страница 73: ...celui indiqué ci dessus Période de remplacement du bloc de lampe La lampe est un produit qui doit être remplacé Même si la durée de vie complète de l ampoule n est pas encore épuisée la luminosité de la lampe diminuera progressivement Il faut donc remplacer périodiquement la lampe L intervalle de remplacement de la lampe prévu est de 2000 heures il est toutefois possible qu il faille remplacer la ...

Страница 74: ...té de lampe Poignée Vis de fixation du couvercle du bloc de lampe Vis de fixation du bloc de lampe Mettre hors circuit l interrupteur d alimentation principale MAIN POWER suivant la méthode donnée dans Mise hors circuit de l alimentation à la page 23 puis débrancher la fiche du cordon d alimentation de la prise de courant et vérifier que les pièces autour du bloc de lampe se sont refroidies Utilis...

Страница 75: ...L L A T I O N F A Ç A D E S O L P L A F O N D S O L V E N T I L A T E U R N O R M A L P U I S L A M P E C H A U D E I N I T C O M P T P O W E R O F F S É L E S C Installer le couvercle du bloc de lampe puis utiliser un tournevis Phillips pour resserrer fermement les vis de fixation du couvercle du bloc de lampe REMARQUE BS assurer de bien installer le bloc de lampe et le couvercle du bloc de lampe...

Страница 76: ...poration of America One Panasonic Way 4E 7 Secaucus NJ 07094 201 392 4443 3330 Cahuenga Blvd West Los Angels CA 90068 323 436 3500 Technical Support 800 524 1448 800 526 6610 FAX 201 392 6514 E Mail pbtssupport panasonic com R These Operating Instructions are printed on recycled paper Printed in Japan S1202 1023B ...

Отзывы: