background image

For assistance, please call : 1-888-VIEW PTV(843-9788) or, contact us via the web at: http://www.panasonic.com/contactinfo

24

POWER

SAP

LIGHT

MENU

1

2

3

4

5

6

7

8

0

9

RETURN

CH

CH

VOL

VOL

R-TUNE

REW

TV/VCR

SPLIT       SWAP

DVD/VCR CH

OPEN/CLOSE

PLAY

PAUSE

STOP

REC

FF

PROG

TV/VIDEO

SLEEP

EXIT

TV

VCR

DVD

DTV

RCVR

DBS/CBL

AUX

OK

M

U

TE


 AS

PECT    FAVORITE    

RE

CA

LL

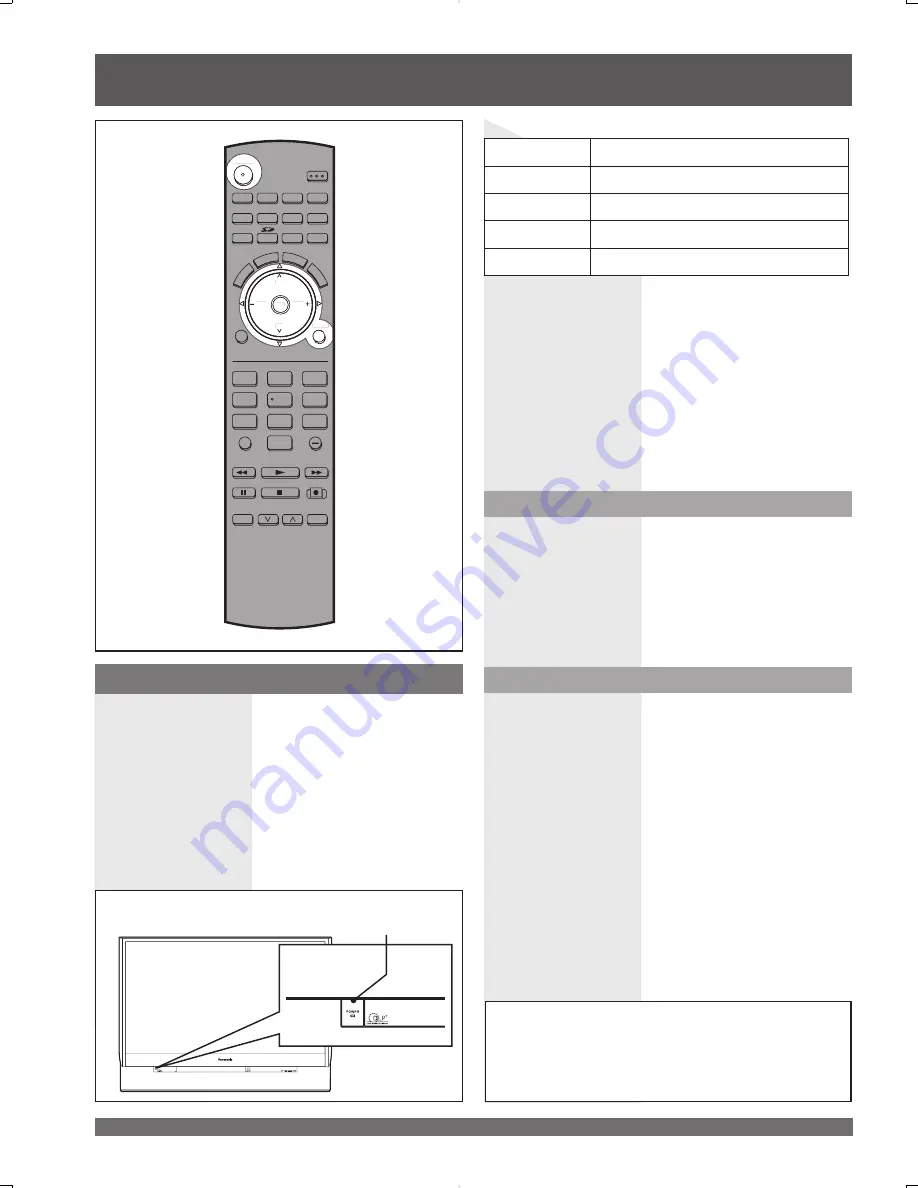
Always be sure to follow the procedure given below to 
turn the Projection Display power ON and OFF.

• The lamp cooling fan will continue to operate for 

approximately 1 minute after the power is turned off. During

this time, the POWER indicator will blink Red.

Press  POWER on Projection Display or Remote Control 
to turn power on.
The Power Indicator blinks Green for about 15 seconds 
and then turns solid Green.

The Power Indicator

Notes:

• If the POWER button is accidentally turned off during use, 

after power is turned back on, it may take a short period 
before the lamp automatically comes on.

• After the unit is turned on, maximum picture brightness will be 

achieved in 5-10 minutes. This is normal.

• This unit consumes approx. 0.1 W (15 W when CableCARD

TM


is inserted.) in OFF condition when plugged into an AC outlet.

Press POWER on Projection Display or Remote Control 
to turn power off.

Note:

• When the power cord is disconnected, the internal cooling 

fan stops op er at ing. In this case, the lamp will be insufficiently 
cooled and will take a while to turn ON again.

Power ON

Power OFF

The Power Indicator blinks Red for about 1 minute and 
then LED turns off.

Turning the Power ON and OFF

LED

ACTION

Off

Power – OFF

Red (blinking)

Power – OFF (Now cooling)

Green

Power – ON

Green (blinking) Power – ON (Preparing to light lamp)

Power shuts off after a Black Screen is displayed for a 
few seconds.

Note:

• If the POWER button is pressed during the Black Screen 

display, Power is turned back on.

Do not disconnect the power cord from the outlet 
and do not open the circuit breaker (unless 
necessary) while the cooling fan is still operating. Do 
not disconnect the power cord from the power outlet 
while the power indicator blinks Red.

POWER

Power ON / OFF

 Auto shut off

To extend lamp life, if there is no signal to the 
set’s tuner for 5 minutes, the lamp will shut off 
automatically.

 POWER  button/
POWER indicator

U

RETURN

CH

CH

VOL

VOL

OK

NU

NU

N

Содержание PT-61DLX75

Страница 1: ...at www panasonic com register For assistance please call 1 888 VIEW PTV 843 9788 or contact us via the web at http www panasonic com contactinfo Puerto Rico For assistance please call 787 750 4300 or...

Страница 2: ...ed by the manufacturer 12 Use only with the cart stand tripod bracket or table specified by the manufacturer or sold with the apparatus When a cart is used use caution when moving the cart apparatus c...

Страница 3: ...t sunlight extreme temperatures or moisture as this can result in serious irreparable damage 3 This Projection Display has a High Intensity Discharge HID lamp that contains a small amount of mercury I...

Страница 4: ...These limits are designed to provide reasonable protection against harmful interference in a residential installation This equipment generates uses and can radiate radio frequency energy and if not i...

Страница 5: ...it screen 37 Picture Adjustments 39 Audio Adjustments 42 Sleep Timer Feature 44 Lock Feature 45 Photo Viewer 49 Setup Features 54 Remote Control Quick Reference Guide Operating peripheral equipment 58...

Страница 6: ...nt lighting can reduce Remote Control transmitter range Adequate ventilation is essential to prevent internal component failure Keep away from areas of excessive heat or moisture Optional External Equ...

Страница 7: ...se the batteries to leak leading to personal injury and or damage to the remote control Observe the following precautions 1 Batteries should always be replaced as a pair Always use new batteries when...

Страница 8: ...nition Television Television with improved picture quality by increasing vertical and horizontal resolution Glossary and Acronyms ATSC Advanced Television Systems Committee Standardization body that d...

Страница 9: ...DVD mode press to rewind 13 PLAY While remote is in VCR or DVD mode press to play 14 PAUSE While remote is in VCR or DVD mode press to pause 15 TV VCR Press to switch to TV or VCR 16 SAP In analog mod...

Страница 10: ...Remote Control Sensor Receives infrared signal from Remote Control 3 LAMP indicator Lights up when the lamp unit is malfunctioning P 65 4 S Video Input Connector 3 Connect from other component Video...

Страница 11: ...Video 1 9 Audio Input Connector 1 Connect from other component Video 1 1 2 3 4 7 8 10 14 16 18 9 11 15 17 19 10 S Video Video Input Connector 2 Connect from other component Video 2 11 Audio Input Conn...

Страница 12: ...ing a component to the system are not included with the component or available as an option you may need to fashion a cable to suit the component concerned Read the instruction manual for each system...

Страница 13: ...n terminal on the back of the Projection Display Or In from cable Use this configuration when connecting the projection display to a cable TV system Notes Certain cable systems offset some channels to...

Страница 14: ...on is required Do not insert a PC card into the CableCARDTM INTERFACE Follow the instructions on screen In from cable 1 Connect the cable antenna to VHF UHF Cable In input on the back of the unit 2 In...

Страница 15: ...e desired VIDEO input position by pressing the TV VIDEO button P 32 When connecting video cables priority is given to the S Video cable when the S Video input terminal and the video input terminal are...

Страница 16: ...ndication will differ according to the output device Y PB PR Please read the operating instructions included with the output device DVD Player COMPONENT VIDEO AUDIO Mode type Signal data Information m...

Страница 17: ...cted to the HDMI input of the unit no video or audio output is allowed AV Out signal is available when receiving digital channel However all formats will be down converted to NTSC Never connect the VI...

Страница 18: ...sten to the audio through a separate stereo system connect an external audio amplifier to AUDIO OUT on back of unit Notes AUDIO OUT terminals cannot be connected directly to external speakers AV termi...

Страница 19: ...ubwoofer channel For a full Home Theater sound experience an external Dolby Digital decoder and a multichannel amplifier must be connected to the Digital Audio Out jack on the unit Procedure Connect t...

Страница 20: ...with this set Do not set the horizontal and vertical scanning frequencies for PC signals which are above or below the specified frequency range Select the desired PC input position by pressing the TV...

Страница 21: ...onds Notes Input signals other than those listed with a mark will give you a beautiful stable picture The D SUB15P connector can accept RGB H V sync separate When an external video processor scaler is...

Страница 22: ...of this unit high definition pictures can be displayed on the screen in their digital form The HDMI input terminal is not intended to be used with personal computers This unit is compatible with 1080i...

Страница 23: ...yed with unnatural colors as if red and blue are reversed Refer to Color Corr on page 41 Procedure When digital audio is included in the HDMI connection the compatible sampling frequencies are 48 kHz...

Страница 24: ...This is normal This unit consumes approx 0 1 W 15 W when CableCARDTM is inserted in OFF condition when plugged into an AC outlet Press POWER on Projection Display or Remote Control to turn power off...

Страница 25: ...ch as the on screen displays language Press to select Language First time setup Language Auto program Language Language English Press to display Language screen 1 CH CH VOL VOL OK CH CH VOL VOL OK Pre...

Страница 26: ...Normal PC Adjust Other Adjust Adv Adjust Example If RETURN is pressed from Adv Adjust Menu Adv Adjust Normal No Gamma Adj Full Blk Extension 10 R Level 10 G Level 10 B Level 10 Picture Audio Timer Lo...

Страница 27: ...o r 5 Sub Menu Field Next Icon Other Adjust Video NR On 3D Y C Filter On Color Matrix SD MPEG NR On Black Level Light 3D I P On Color Corr On Other Adjust Video NR On 3D Y C Filter On Color Matrix SD...

Страница 28: ...display Allows you to select the language used for On Screen Displays Press MENU to display the Main Menu screen Press to select Setup icon Press to display the Setup menu 1 Picture Audio Timer Lock...

Страница 29: ...en you select the input signal for the first time or whenever you change the antenna configuration Press to select ANT In 4 Press to select Antenna or Cable Press to select Mode 5 Press to select All...

Страница 30: ...ll Language Program channel Input labels CC Other adjust CH CH VOL VOL OK Edit CH 1 2 3 4 5 6 7 8 9 10 No No No No No No No No No No Caption Favorite Add Apply CH CH VOL VOL OK Press to select Edit Pr...

Страница 31: ...or No Preview CH You can display a program by selecting it in the small window at the top left of the screen This preview only appears if a channel was added by selecting Yes Press to enter you selec...

Страница 32: ...onent 1 Signal of source connected to COMPONENT VIDEO INPUT 1 is displayed Component 2 Signal of source connected to COMPONENT VIDEO INPUT 2 is displayed Component 3 Signal of source connected to COMP...

Страница 33: ...n Channel Banner Display 1 Press 1 1 2 Press 5 15 3 Press OK 15 Unit Status display Channel Banner Minimized Press CH to minimize the displayed channel banner It will display the channel number and th...

Страница 34: ...9 and 0 to highlight a channel on the list Selecting a channel number from the list with the Number keys and then pressing OK will display the channel directly 2 Hold down FAVORITE for several seconds...

Страница 35: ...pressing SLEEP If you continue to press SLEEP the sleep time setting mode will be entered Sleep time may also be set from the Menu screen P 44 The on screen display will flash 3 2 and 1 to indicate t...

Страница 36: ...that by using the aspect ratio 16 9 selection function to change the aspect ratio you may be infringing on the rights of the original copyright owner of that program under copyright protection laws I...

Страница 37: ...he aspect mode can not be changed using the Split screen function Splitting the screen Press to split The previously selected screen appears on the left Returning to one screen Left screen Press to re...

Страница 38: ...ure quality may change according to the combination of signals input to the left and right screens Select desired input mode of the Right screen Press to select the desired input mode If SKIP is set a...

Страница 39: ...lor 10 Tint 10 Sharpness 10 Normal Picture Brightness Color Tint Sharpness Color Temp Item Explanations Normal Resets all picture adjustments to factory default settings Picture Adjusts white areas of...

Страница 40: ...or contour blurring which may occur in computer images Signal Display input signal Lets you choose one of three pre set Picture Modes that best suits the program to which you are viewing Selecting th...

Страница 41: ...the picture Color Matrix Select SD or HD SD When the input signal is a normal TV system NTSC HD When the input signal is a High Definition system ATSC Displays 480p input signals in natural color fro...

Страница 42: ...eble Balance Item Explanations Normal Reset Bass Treble and Balance adjustments to factory default settings Bass Increase or decrease the bass response Treble Increase or decrease the treble response...

Страница 43: ...al transmitted via separate RCA terminals Audio Normal No Audio Mode Standard Bass 10 Treble 10 Balance 10 BBE Off Other Adjust Other Adjust AI Sound On Surround On Speakers On HDMI 1 In Auto HDMI 2 I...

Страница 44: ...off after a preselected amount of time Notes Pressing the RECALL button with sleep timer set displays remaining time The on screen display will flash 3 2 and 1 to indicate the last three 3 remaining...

Страница 45: ...nch Language Ratings These categories are used as guidelines for blocking the programs The default mode for the Lock category is the Unlocked state In this state you can surf the various categories of...

Страница 46: ...OK Lock Mode Off Channel Program Change password Channel lock CH 1 3 0 CH 2 CH 3 CH 4 CH 5 CH 6 CH 7 Press to select Channel Press to display the channel lock screen Press to select CH 1 7 Press to se...

Страница 47: ...cked All children The themes and elements in this program are specifically designed for a very young audience including children from ages 2 6 TV Y7 FV Fantasy Violence Viewable Blocked Directed to ol...

Страница 48: ...tion However the ratings selection will be retained Block cannot be canceled during Split Screen mode Return to a single screen to cancel Message Possible cause Game locked The TV VIDEO button was pre...

Страница 49: ...data loss or device malfunction Please note that our company shall not accept any liability for damage or loss of stored data 1 Always insert card in the correct direction Failure to do so may result...

Страница 50: ...e Proceed with all operations after Accessing has disappeared from the screen 2 Total Total number of JPEG images on the inserted card is displayed 3 Info Selected picture information is displayed No...

Страница 51: ...0001 102 0007 102 0008 MENU RETURN OK Select Select Card Warning Messages Message description Is memory card in A card may not be inserted or the card format may not be supported Use SD cards formatt...

Страница 52: ...to Viewer is exited JPEG thumbnail Total 8 Info No 102 0006 Date 01 01 2000 Pixel 2048x1536 102 0002 102 0003 102 0005 102 0006 102 0004 102 0001 102 0007 102 0008 MENU RETURN OK Select Select Exit Si...

Страница 53: ...to return to the Card Menu Screen Exit Slide Show mode Navigation Display Pressing RECALL during Slide Show mode allows you to display or remove the Navigation Area Example If Display Mode is set to S...

Страница 54: ...OK 2 1 Setup Features Picture Audio Timer Lock Memory Card Setup Press MENU to display the Main Menu screen Press to select Setup icon Press to display the Setup menu CH CH VOL VOL OK CH scan CH CH VO...

Страница 55: ...not affect the analog input If a digital program is being output in analog format the CC data will also be output in analog format If digital connected equipment is used for input CC should be set On...

Страница 56: ...tomatic CC Reset Press to select Digital settings Press to enter the Digital setting menu Press to select the each item Press to select the setting Reset the CC settings CC Mode Off Analog CC1 Digital...

Страница 57: ...en is displayed Select Yes and press OK Note Performing Reset will clear all items set with Setup such as channel settings Use Reset with care Press to select Other Adjust Press to display the Other A...

Страница 58: ...ook in the table for the code If the component does not operate with the Remote Control repeat the procedure using another code Some brands have multiple codes If an incorrect code is entered or if th...

Страница 59: ...l is capable of operating many brands of peripheral equipment Refer to page 58 and 59 for programming procedures Notes The Remote Control memory is limited and therefore some models may not operate Th...

Страница 60: ...Codes For Cable Box Brand Code ABC 124 Archer 125 132 Cableview 105 132 Citizen 105 122 Curtis 112 113 Diamond 124 125 132 Eagle 129 Eastern 134 GCbrand 105 132 Gemini 122 General Instrument Jerrold 1...

Страница 61: ...Sansui 210 246 Sanyo 205 Scott 210 246 Sharp 242 243 Sherwood 220 Sony 228 Soundesign 244 Teac 212 216 218 Technics 224 225 227 Victor 240 241 245 Yamaha 202 203 204 AUX Codes For Cassette Decks Bran...

Страница 62: ...Input mode for VCR TV VIDEO Change Channels up down SPLIT SWAP DVD VCR CH Record REC Play PLAY Stop STOP Fast Forward FF Rewind the Tape REW Pause PAUSE Change to TV or VCR Mode TV VCR On screen VCR...

Страница 63: ...REW Pause PAUSE Operating a Cassette Deck Operating a Receiver TO DO THIS PRESS Turn on off POWER Audio Mute RCVR VOl Up Down CH CH VOL VOL OK Tuner Pre set stations Up Down CH CH VOL VOL OK To select...

Страница 64: ...anually TO DO THIS PRESS Turn on off POWER Display PVR menu MENU PVR Navigation CH CH VOL VOL OK Select a Channel 1 2 3 4 5 6 7 8 0 9 Play PLAY Record REC Pause PAUSE Back to previous channel R TUNE E...

Страница 65: ...Indicator Flashes orange 1 times Power shuts off Malfunction 1 Contact service center Flashes orange 2 times Power shuts off Malfunction 2 Contact service center Flashes orange 3 times Power shuts of...

Страница 66: ...ease allow the lamp to cool before handling or replacing the lamp unit 3 If replacement of the lamp unit becomes necessary during the operation of the Projection Display follow the procedure below Lam...

Страница 67: ...or replacing the lamp unit 1 Insert the new Lamp Unit being careful of the insertion direction Press on the arrow mark to make sure insertion is done correctly 2 Tighten the Lamp Unit Screw with a scr...

Страница 68: ...time passes Depending on the connected device a 1080i input signal may cause the picture to flicker If the connected device has a format selection switch set the format to 720p Color patches or no co...

Страница 69: ...analog 0 7 Vp p 75 D SUB15P AUDIO 0 5 Vrms RCA Pin Jack 2 AV INPUT 1 3 VIDEO 1 0 Vp p 75 RCA Pin Jack S VIDEO Y 1 Vp p 75 C 0 286 Vp p 75 Mini DIN 4 pin AUDIO L R 0 5 Vrms RCA Pin Jack 2 COMPONENT VID...

Страница 70: ...nformation and Operating Assistance locate your nearest Dealer or Servicenter purchase Parts and Accessories or make Customer Service and Literature requests by visiting our Web Site at http www panas...

Страница 71: ...e caused by products not supplied by the warrantor or failures which result from accidents misuse abuse neglect mishandling misapplication alteration faulty installation set up adjustments misadjustme...

Страница 72: ...3 software developed by the third parties and available under certain terms and conditions For the software categorized as 1 and 2 please refer to the terms and conditions of the following GNU GENERAL...

Страница 73: ...License since you have not signed it However nothing else grants you permission to modify or distribute the Program or its derivative works These actions are prohibited by law if you do not accept th...

Страница 74: ...attach them to the start of each source file to most effectively convey the exclusion of warranty and each file should have at least the copyright line and a pointer to where the full notice is found...

Страница 75: ...oblems that might be introduced by others Finally software patents pose a constant threat to the existence of any free program We wish to make sure that a company cannot effectively restrict the users...

Страница 76: ...supplied function or table used by this function must be optional if the application does not supply it the square root function must still compute square roots These requirements apply to the modifie...

Страница 77: ...y together in an executable that you distribute 7 You may place library facilities that are a work based on the Library side by side in a single library together with other library facilities not cove...

Страница 78: ...CORRECTION 16 IN NO EVENT UNLESS REQUIRED BY APPLICABLE LAW OR AGREED TO IN WRITING WILL ANY COPYRIGHT HOLDER OR ANY OTHER PARTY WHO MAY MODIFY AND OR REDISTRIBUTE THE LIBRARY AS PERMITTED ABOVE BE L...

Страница 79: ...PEG thumbnail 50 L LAMP indicator 10 65 68 Left screen 37 LIGHT button 9 M MPAA 8 45 46 MSO 7 8 MUTE button 9 34 N NTSC 8 Number keys 9 33 O OK button 9 P Password 8 45 48 PCM 8 19 23 PC input termina...

Страница 80: ...d in identification in the event of theft or loss and for Warranty Service purposes Panasonic Sales Company PSC Division of Panasonic Puerto Rico Inc Ave 65 de Infanter a Km 9 5 San Gabriel Industrial...

Отзывы: