


- 30 -
Service Manual
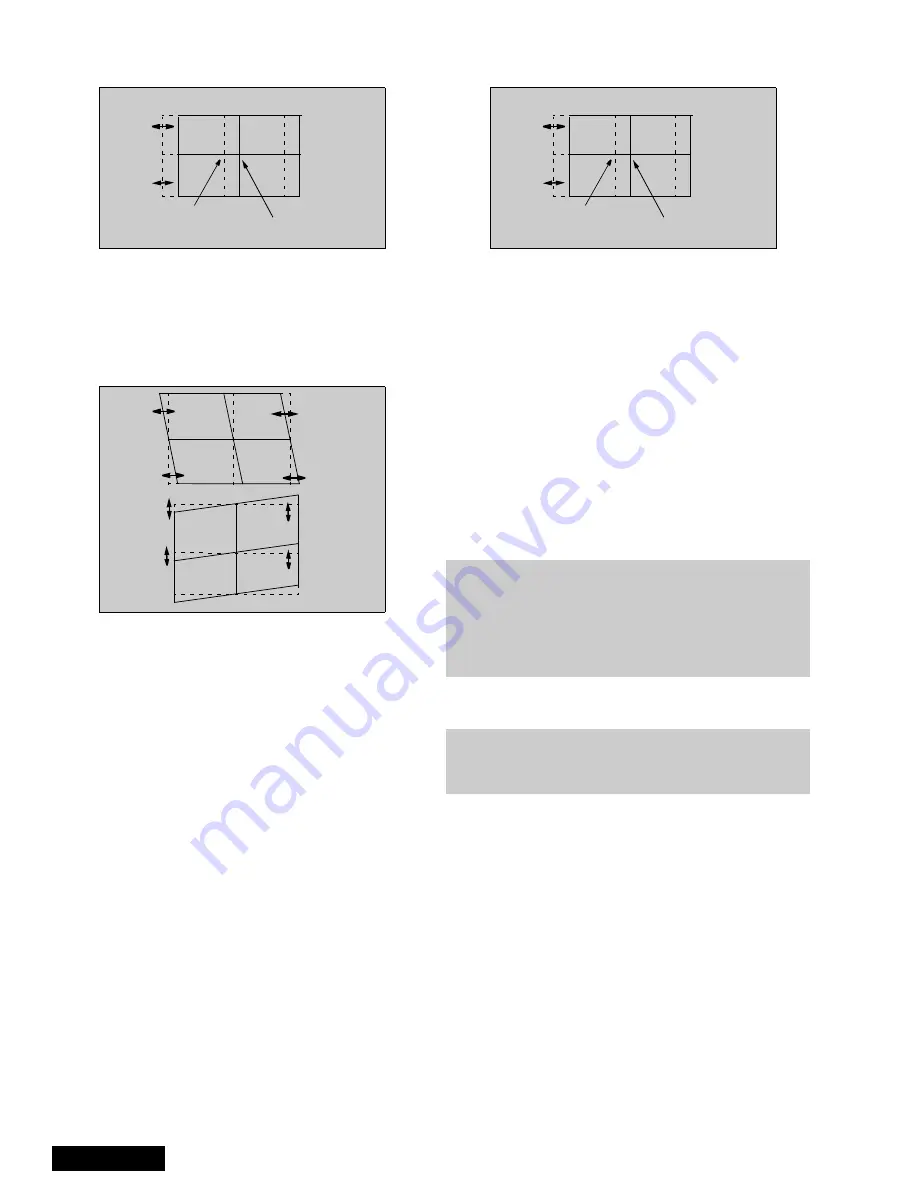
21. Adjust “R-STATIC” so that the center of red
overlaps with the center of green.
Figure 49. STATIC mode adjustment
22. Enter to SKEW “R-SKEW” mode by pressing TV/
VIDEO
23. Adjust “R-SKEW” so that the vertical and horizontal
line of center overlaps with green (see figure 50)
24. Press “7” then “ACTION” key on remote to save
changes.
Figure 50. SKEW adjustment
Note:
Remember always save data following each
adjustment by pressing “7” key on remote, then
ACTION.
25. Enter
to
LINEARITY
“R-LINEAR”
mode
by
pressing TV/VIDEO.
26. Adjust Horizontal linearity (see figure 45)
27. Enter to SIZE “R-SIZE” mode by pressing TV/
VIDEO
28. Adjust so that the line on the border closes to the
screen frame at top, bottom, left and right (see
figure 44)
29. Enter to PIN “R-PIN” mode by pressing TV/VIDEO
30. Adjust horizontally and vertically (see figure 46)
31. Enter to CORNER “R-CORNER” mode by pressing
TV/VIDEO.
32. Adjust corners (see figure 47)
33. Enter to KEY “R-KEY” mode by pressing TV/
VIDEO
34. Adjust KEY (see figure 48)
35. Display pattern of border and cross, then check
that red overlaps green pattern, if it is not
satisfactory, repeat from step 19.
36. Enter to STATIC “B-STATIC” mode.
37. Press “1 or 3” key repeatedly on remote until only
green and blue pattern are displayed
38. Adjust B-STATIC so that the center of blue
overlaps with the center of green (see figure 51).
Figure 51. B-STATIC adjustment
39. Perform all adjustments for blue (B-SKEW, B-
LINEAR, B-SIZE, B-PIN, B-CORNER, B-KEY)
40. Display border and cross pattern and confirm that
blue overlaps with green pattern, if it is not
satisfactory, repeat for blue.
41. Press “1 or 3” key repeatedly on remote until
green, red and blue (white), confirm that red and
blue overlaps with green pattern.
42. Press “7” key on remote, then ACTION to save
changes.
43. Press POWER then ACTION to exit adjustments or
press TV/VIDEO for at least 3 seconds to change
to Fine Adjustment Mode.
Fine adjustment mode (FINE)
(convergence)
Remote functions:
•
1, 3. . . . . . . . . . . . change color view adj
•
2. . . . . . . . . . . . . . . . . . . change pattern
•
7. . . . . . . . . . . . . . . . . . . . . . . .save data
•
5. . . . . . . . . . . . . . . . . . . . . . . . . overlap
•
POWER . . . . . . . . . . . . . . . . . . . . .to exit
•
RECALL. . . . . . . . . . . . . . display values
•
R-TUNE . . . . . . . . . . . . . . . . cycle colors
•
TV/VIDEO . . . . . . . . . . . . change mode
3 secs . . . . . . . . change options
•
MUTE (“fine”) . . . . . .cursor & data mode
About pattern:
•
NTSC to adjust 480ip (same for interlace and
progressive)
•
1080i to adjust 1080i
•
480i with ptv in zoom aspect to adjust
Z480i
red
green
blue
green
Note:
It is strongly recommended to first read and
understand the following section prior to
make any adjustment.
Convergence adjustment must be perform
for 480i-p (same for interlace & progressive),
1080i and ZOOM 480i.
The easiest way to adjust convergence is to begin
from the center of the screen, to the border in all the
convergence adjustments.
Helpful hint:
Содержание PT-51HX42CF
Страница 37: ... 37 K Board layout K Board schematic K Board ...
Страница 38: ... 38 G Board layout G Board schematic G Board ...
Страница 39: ... 39 NOTES ...
Страница 40: ...Printed in USA K02042127PL0508 ...
Страница 105: ... 65 Notes PARTS LIST ...
Страница 106: ... 66 D Board Schematic ...
Страница 107: ... 67 D Board Schematic ...
Страница 108: ... 68 D Board Schematic ...
Страница 109: ... 69 Jumper between pin 7 and pin 1 D Board Schematic ...
Страница 110: ... 70 D Board Schematic ...
Страница 111: ... 71 D Board Schematic ...
Страница 113: ... 73 NOTES NOTES ...
Страница 114: ... 74 D Board Layout ...
Страница 115: ... 75 D Board Layout ...
Страница 116: ... 76 A Board Schematic ...
Страница 117: ... 77 A Board Schematic ...
Страница 118: ... 78 A Board Schematic ...
Страница 119: ... 79 A Board Schematic ...
Страница 120: ... 80 A Board Schematic ...
Страница 121: ... 81 A Board Schematic ...
Страница 122: ... 82 A Board Schematic ...
Страница 123: ... 83 A Board Schematic ...
Страница 124: ... 84 Board section Top A Board Layout Top left portion ...
Страница 125: ... 85 Board section Top A Board Layout Top right portion ...
Страница 126: ... 86 Board section Top A Board Layout Bottom left portion ...
Страница 127: ... 87 Board section Top A Board Layout Bottom right portion ...
Страница 128: ... 88 Board section Bottom side A Board Layout Top left portion ...
Страница 129: ... 89 Board section Bottom A Board Layout Top right portion ...
Страница 130: ... 90 Board section Bottom A Board Layout Bottom left portion ...
Страница 131: ... 91 Board section Bottom A Board Layout Bottom right portion ...
Страница 132: ... 92 LG Board schematic TNP2AA112 LG Board schematic ...
Страница 134: ... 94 LR Board schematic TNP2AA111 LR Board schematic ...
Страница 136: ... 96 LB Board schematic TNP2AA110 LB Board schematic ...
Страница 138: ... 98 K Board schematic TNP2AA089 K Board layout TNP2AA089 K Board schematic and layout ...
Страница 139: ... 99 G Board schematic TNP2AA090 G Board layout TNP2AA090 G Board schematic and layout ...
Страница 144: ...Printed in USA K02042127PL0429 ...


