background image

13

Setting Up

AUTO CHANNEL SET

       PROCEEDING

END

:  MENU

2

AUTO TUNING IS
COMPLETED.

END:  MENU

Disappears


2

3

Select a program number on the TV which
you wish to use as the video viewing
channel. Then tune in the TV to the picture
from the screen being auto tuned or the
screen selected with the 

I

 and 

J

 buttons

of the VCR.
– During Auto Tuning, the TV program

screen does not appear, and the Auto
Tuning screen appears instead.

To Cancel Auto Tuning Mid-
Operation

Press


[MENU]


during Auto Tuning. Auto Tuning

is cancelled.

To Restart Plug in Auto Tuning

1

Press [EJECT] and remove the video
cassette.

2

Keep the 

I

 and 

J

 buttons on the VCR

pressed simultaneously for 3 seconds or
more during the VCR on.
– The channel displayed on the VCR display

disappears for a moment then changes to
2.

3

Disconnect the mains lead and then
reconnect it.

4

Turn off the VCR and then turn it on.
Press [VCR/TV] to select the VCR mode.
– Auto Tuning commences.

If Auto Tuning stops halfway by turning the
VCR off, playback or a power failure:
1

Disconnect the mains lead and then
reconnect it.

2

Turn off the VCR and then turn it on.
– Auto Tuning commences.

To Change the RF Output
Channel

In some rare cases after tuning the TV to your
VCR, interference may be visible on the
picture. To get rid of this interference, you can
manually adjust the RF output channel a few
channels up and down from the current setting.
The procedure is described below.

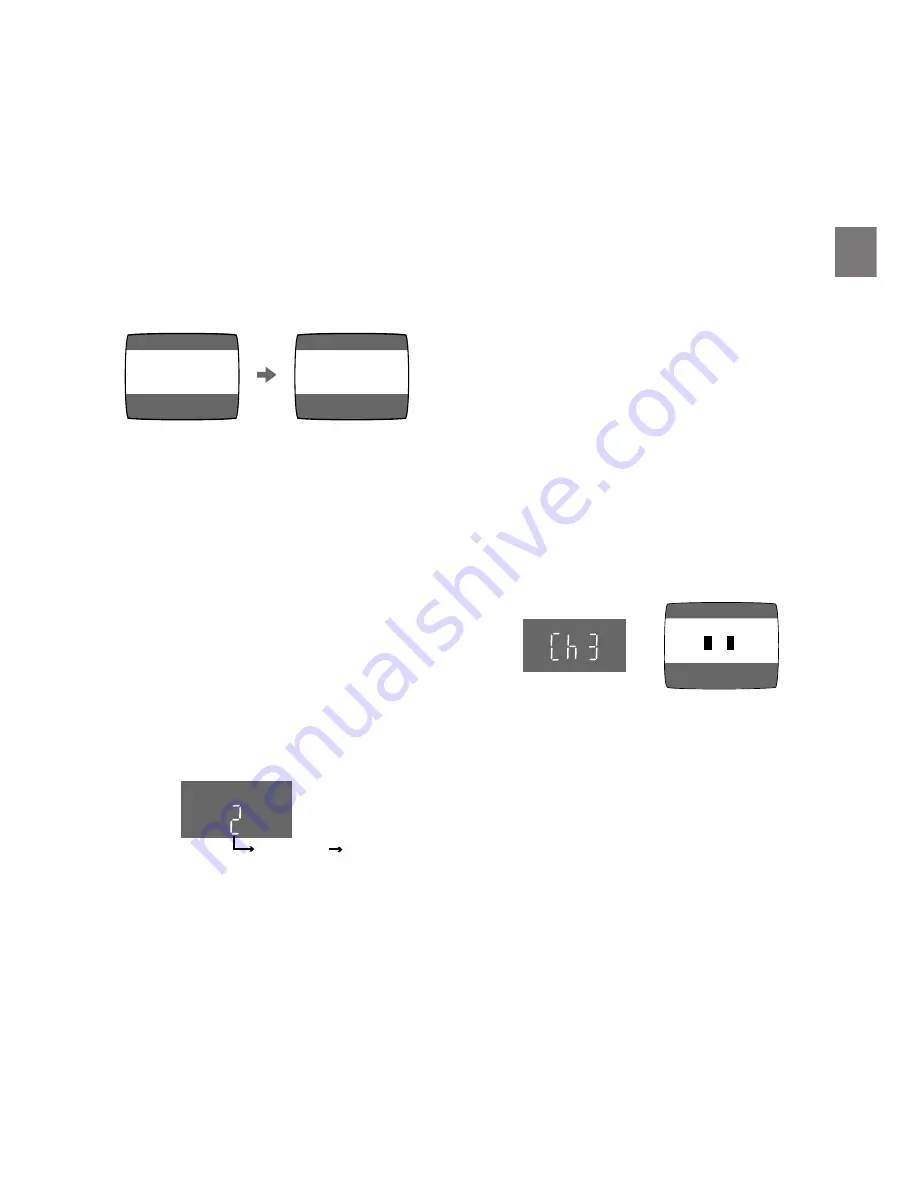
1

Hold down [MENU] for 5 seconds or more.
– The VCR display changes as shown below

and the VCR picture on the TV displays
this pattern.

2

Enter the desired channel number (US3 or
US4) by the 

I

 and 

J

 buttons.

3

()

4

3

Press [MENU] to finish the setting mode.

4

Retune your TV to the new RF channel for
the VCR.

Note:

– Even if the RF output channel has been

changed, it is not necessary to perform Auto
Tuning.

Panasonic    VCR

END:  MENU

Содержание ProLine AG-1340

Страница 1: ...s AG EJECT POWER Í I PLAY STOP 1 SEARCH X W 5 6 REC OTR PICTUREMODE TIMER RECÁ V REW FF W VQT9136 Video Cassette Recorder Before attempting to connect operate or adjust this product please read these instructions completely ...

Страница 2: ...and can radiate radio frequency energy and if not installed and used in accordance with the instructions may cause harmful interference to radio communications If this equipment does cause or receive interference which can be determined by turning equipment off and on the user is encouraged to try to correct the interference by one of the following measures Reorient or relocate the receiving anten...

Страница 3: ...ERSONNEL WARNING TO REDUCE THE RISK OF FIRE OR SHOCK HAZARD DO NOT EXPOSE THIS EQUIPMENT TO RAIN OR MOISTURE CAUTION TO REDUCE THE RISK OF FIRE SHOCK HAZARD AND ANNOYING INTERFERENCE USE THE RECOMMENDED ACCESSORIES ONLY DO NOT BLOCK ANY OF THE VENTILATION OPENINGS INSTALL IN ACCORDANCE WITH THE MANUFACTURER S INSTRUCTIONS DO NOT PLACE THIS APPARATUS INTO AN AUDIO RACK BOOK SHELF OR SIMILAR LOCATIO...

Страница 4: ...REW FF STOP PLAY 1 2 5 6 4 11 10 12 13 14 3 9 8 7 RF OUT IN IN AV1 OUT VIDEO AUDIO 15 16 17 21 20 18 19 AC IN SECTEUR Controls and Connection Sockets This section describes in detail the function of each button switch and connection socket To mains supply ...

Страница 5: ...lay 11 REC OTR 24 26 12 SEARCH 33 13 REW REWIND 6 21 14 FF FAST FORWARD 5 21 REAR 15 VIDEO IN AV1 34 16 VIDEO OUT 10 17 RF IN 9 18 AUDIO IN AV1 34 19 AUDIO OUT 10 20 RF OUT 9 21 AC Input Socket 9 TV VCR VOLUME AV INPUT SELECT VCR TV RESET OSD DISPLAY PICTURE MODE REC NAVI r W s X W X SEARCH INDEX OK AUDIO 1 3 2 1 5 6 9 Í Í D MENU TIMER Á PROG CHECK SPEED ON r s OFF r s DATE r s W X CANCEL 4 1 2 3 ...

Страница 6: ...Operation Buttons 14 MENU OK 3421 06 D PAUSE SLOW 21 07 Timer Recording Operation Buttons 27 29 I J DATE ON OFF PROG CHECK CANCEL SPEED TIMER Á 08 VCR TV 12 09 AUDIO This button is not used to operate this VCR 10 INDEX 9 33 11 REC 24 12 NAVI 30 TV VCR VOLUME AV INPUT SELECT VCR TV RESET OSD DISPLAY PICTURE MODE REC NAVI r W s X W X SEARCH INDEX OK AUDIO 1 3 2 1 5 6 9 Í Í D MENU TIMER Á PROG CHECK ...

Страница 7: ...f the TV 16 I J Selects the required program position TV station of the TV Ensure that VCR TV switch is set to TV TV VCR VOLUME AV INPUT SELECT VCR TV RESET OSD DISPLAY PICTURE MODE REC TIMER Á NAVI PROG CHECK SPEED ON r s OFF r s DATE r r s W W X s X W X SEARCH CANCEL INDEX OK AUDIO 1 3 4 2 1 5 6 9 Í Í D MENU 1 2 3 4 13 15 14 16 TV OPERATION Only Panasonic TVs can be operated with the provided re...

Страница 8: ...se Precautions for Battery Replacement Load the new batteries with their polarity and aligned correctly Do not apply heat to the batteries or an internal short circuit may occur If you do not intend to use the remote controller for a long period of time remove the batteries and store them in a cool and dry place Remove spent batteries immediately and dispose of them Do not use an old and a new bat...

Страница 9: ...ntenna TV etc When the VCR is turned on after connecting the antenna cable and the AC power cord Plug in Auto Tuning starts automatically Basic Connections The following connections are required to record and play back the video cassette through the TV TV Set Not supplied Antenna Not supplied Antenna Input Connector To mains supply ...

Страница 10: ...N IN AV1 OUT VIDEO AUDIO 3 4 1 2 AC IN SECTEUR Connection to a TV using the Audio Video Input Sockets Antenna Input Connector TV Set Not supplied Antenna Not supplied VIDEO IN AUDIO IN Not supplied To mains supply ...

Страница 11: ...ith Cable Converter Descrambler Boxes The cable hook up shown at the bottom left allows VCR TV functions except for viewing one channel while recording another The above cable hook up allows VCR functions including viewing one channel while recording another but it requires two cable TV Converter Descrambler Boxes one Switch Box and one 2 Way Splitter Since the VCR has an extended range of tuning ...

Страница 12: ... like a normal TV and can be preset to receive up to 181 TV broadcast stations Plug in Auto Tuning Auto Tuning searches for TV stations from VHF minimum to UHF maximum and memorizes every tuned program position Notes If the VCR is turned on with the antenna not connected all channels are skipped When Auto Tuning is canceled halfway Auto Tuning is not executed even if the VCR is turned off and then...

Страница 13: ... reconnect it 4 Turn off the VCR and then turn it on Press VCR TV to select the VCR mode Auto Tuning commences If Auto Tuning stops halfway by turning the VCR off playback or a power failure 1 Disconnect the mains lead and then reconnect it 2 Turn off the VCR and then turn it on Auto Tuning commences To Change the RF Output Channel In some rare cases after tuning the TV to your VCR interference ma...

Страница 14: ...cedure on the next page Preparations Confirm that the TV is on and the VCR viewing channel is selected Turn on the VCR and select any program position except AV input Press VCR TV to select the VCR mode Operations 1 Press MENU 2 Select CHANNEL SET by pressing 3 or 4 and then press OK 3 Select ANTENNA SYSTEM by pressing 3 or 4 and then press OK 4 Select the desired system by pressing 3 or 4 and the...

Страница 15: ...ed program positions to skip during the selection of the program positions 8 Press MENU three times Channel Plan TV mode CHANNEL DESIGNATIONS VHF UHF CHANNEL RECEIVED OF THE AIR 2 13 14 69 CHANNEL SELECTION INDICATION ON VCR 2 13 14 69 CATV mode CHANNEL DESIGNATIONS BROADCAST VHF CATV LOW BAND CATV MID SUPER BANDS CATV HYPER BAND ULTRA BAND SPECIAL CATV CHANNEL CHANNEL RECEIVED FROM CABLE 2 13 A 5...

Страница 16: ...channel is selected Turn on the VCR Press VCR TV to select the VCR mode To Select the Desired Language Select one of the four languages displayed English Spanish Portuguese and French 1 Press MENU 2 Select LANGUAGE by pressing 3 or 4 and then press OK 3 Select the desired language by pressing 3 or 4 4 Press MENU twice ENGLISH SELECT END OK MENU OSD MENU LANGUAGE CLOCK SET CHANNEL SET OPTION SELECT...

Страница 17: ...START MENU SELECT µ D S T YES NO D S T YES NO Y 2005 CLOCK SET M 10 D 16 H M 20 15 START MENU SELECT s r D S T YES NO Y 2005 H M 0 00 CLOCK SET M 10 D 16 START MENU SELECT s r D S T YES NO M 10 Y 2005 D 1 H M 0 00 CLOCK SET START MENU SELECT s r D S T YES NO M 1 Y 2005 D 1 H M 0 00 CLOCK SET START MENU SELECT s r 5 Press MENU The clock starts Note The clock operates for at least 5 years on its bac...

Страница 18: ... Press OSD DISPLAY 1 Program position 2 Tape running display Stop Eject Rewind Review Index Search 6 JET SEARCH backward Fast forward Cue Index Search 5 JET SEARCH forward Playback 1 Recording Recording pause M Repeat playback R 1 3 Present time Tape counter Remaining tape time Index search Information Display Present time 17 24 Tape counter j2 35 47 Remaining tape time REMAIN 2 34 Index search S ...

Страница 19: ...160 T180 BLUE BACK ON OFF JET NAVIGATOR ON OFF DELETE NAVIDATA NO YES JET SEARCH x27 x35 OPTION END MENU SELECT s r OSD ON OFF TAPE SELECT T120 T160 T180 BLUE BACK ON OFF JET NAVIGATOR ON OFF DELETE NAVIDATA NO YES JET SEARCH x27 x35 OPTION END MENU SELECT s r OSD ON OFF TAPE SELECT T120 T160 T180 BLUE BACK ON OFF JET NAVIGATOR ON OFF DELETE NAVIDATA NO YES JET SEARCH x27 x35 OPTION END MENU SELEC...

Страница 20: ...o view the picture recorded in the EP mode at approx 27 or 35 times speed 5 Press MENU twice to make the on screen display disappear See page 22 for details on the Jet Search function OSD ON OFF TAPE SELECT T120 T160 T180 BLUE BACK ON OFF JET NAVIGATOR ON OFF DELETE NAVIDATA NO YES JET SEARCH x27 x35 OPTION END MENU SELECT s r OSD ON OFF TAPE SELECT T120 T160 T180 BLUE BACK ON OFF JET NAVIGATOR ON...

Страница 21: ...by pressing PLAY 3 Search forward by tapping FF To change back to normal playback press PLAY 4 Search backward by tapping REW To change back to normal playback press PLAY 5 View a still picture by pressing PAUSE SLOW To continue normal playback press PLAY or PAUSE SLOW 6 View a slow motion picture Keep PAUSE SLOW pressed for 2 seconds or more To continue normal playback press PLAY 7 Stop viewing t...

Страница 22: ...to cancel the Jet Search Other Playback Functions To Stop Playback Automatically Playback Off Timer Function Whenever you are playing back and wish to stop the tape automatically simply set the playback duration by pressing PLAY on the VCR repeatedly The duration indicated on the VCR display changes by pressing PLAY as follows Counter display normal playback mode 30 min 60 min 120 min 180 min 240 ...

Страница 23: ...ges the indication in the following order STANDARD Initial Setting DYNAMIC SOFT CARTOON STANDARD Initial Setting To Eject the Video Cassette Using the Remote Controller Keep pressing STOP for at least 3 seconds Notes Jet Search cue review or slow playback will be automatically released after 10 minutes and still playback after 5 minutes In the EP mode only When playing back a tape which was record...

Страница 24: ... 5 6 9 Í Í D MENU 1 2 3 4 5 4 2 3 Manual Recording Operations 1 Insert a video cassette tape with an intact erasure prevention tab If it has already been inserted press POWER Í I VCR Í to turn the VCR on 2 Press VCR TV to select the VCR mode 3 Press the I and J buttons to select the TV station If you press and hold down these buttons the number of program position changes fast 4 Press REC REC OTR ...

Страница 25: ... TAPE SELECT from the on screen display and select the corresponding video cassette tape length See page 19 REC OSD ON OFF TAPE SELECT T120 T160 T180 BLUE BACK ON OFF JET NAVIGATOR ON OFF DELETE NAVIDATA NO YES JET SEARCH x27 x35 OPTION END MENU SELECT s r REMAIN T120 For T30 60 90 and 120 tapes T160 For T140 and 160 tapes T180 For T180 tape 2 Press OSD DISPLAY The display changes as follows each ...

Страница 26: ...80 min 240 min Counter display normal recording mode Preparation Insert a video cassette with an intact erasure prevention tab Operations 1 Ready the video source which is to be recorded and start recording 2 Press REC OTR on the VCR main unit repeatedly to select the desired recording duration The VCR will automatically switch off when OTR is completed To turn the VCR on again press POWER Í I VCR...

Страница 27: ...ations Insert a video cassette tape with an intact erasure prevention tab Confirm that the TV is on and the VCR viewing channel is selected Turn on the VCR Check that the clock is set to the correct time If it has not been set refer to page 17 Press VCR TV to select the VCR mode Example Program position channel 2 Date 27 October Starting time 20 02 Ending time 21 30 Present date 16 October END MEN...

Страница 28: ...ly you can set the category on the Navigator list See page 31 for details This function is activated when JET NAVIGATOR is set to ON See page 19 When JET NAVIGATOR is set to OFF proceed to the step 8 7 Press MENU to make the previous display appear 8 To activate timer recording press TIMER When JET NAVIGATOR is set to ON the PROGRAM IS COMPLETED REMAINING PROGRAM 49 message appears See page 19 Whe...

Страница 29: ... tape CH DATE ON OFF A 2 2 0 0 2 21 30 27TH CATEGORY 1 CH DATE ON OFF 1 2 2 27TH 20 02 21 30 SP 125 SU SA 10 30 11 00 A 14 SU 15 00 16 00 SP 5 19WE 22 15 23 30 EP AV 28FR 20 02 21 30 SP 4 30SU 19 10 19 55 EP END MENU SELECT 1 1 2 3 4 5 6 7 8 CH DATE ON OFF 1 2 2 27TH 20 02 21 30 SP 125 SU SA 10 30 11 00 A 14 SU 15 00 16 00 SP 5 19WE 22 15 23 30 EP AV 28FR 20 02 21 30 SP 4 30SU 19 10 19 55 EP END M...

Страница 30: ...r each page When more than 15 programs have been recorded for one cassette the program data are deleted from the first one When pressing NAVI during playback playback stops and the Jet Navigator list appears 2 Press NAVI several times to select the program that you want to locate and play back After more than 3 seconds the VCR starts the search for the beginning of the selected program and playbac...

Страница 31: ...a is already stored in memory and you attempt to store timer recording data for another program the message REMAINING PROGRAM 0 DELETE JET NAVIGATOR DATA appears If you attempt to make a new recording this same message also appears after you insert the cassette and the Jet Navigator data is checked As each timer recording or manual recording is finished the program data is deleted starting from th...

Страница 32: ... in the EP mode To Demonstrate the Jet Navigator Function Keep NAVI pressed for more than 5 seconds without inserting a cassette tape When Recording Over the Same Location on a Tape The originally recorded program is deleted from the list Program contents starting near the start and end of the newly recorded program within 10 minutes before the start and after the end of the newly recorded program...

Страница 33: ...activated Note The index search function can only work correctly if the index signals are spaced at least 3 minutes apart in the SP mode and 5 minutes apart in the EP mode Searching while checking the video cassette contents Intro Jet Scan The approximate beginnings of each recorded program are played in succession at the high speed so that the program to be viewed can be located easily Preparatio...

Страница 34: ...the end of previous one Preparations Connect a movie camera or another VCR to this VCR as shown Insert a recorded cassette tape with an intact erasure prevention tab Select the audio source required by pressing INPUT SELECT to set AV input Operations 1 Search for the end of the previous recording by pressing PLAY 2 Press PAUSE SLOW 3 Press REC to switch the VCR from the pause mode to the recording...

Страница 35: ...djustment Use the I and J buttons to minimize any vertical jitter during still picture playback Other Automatic Functions Automatic Playback When a video cassette without an erasure prevention tab is inserted the VCR starts playback automatically VCR off Playback When the VCR is off an inserted video cassette can be played back by pressing PLAY Automatic Rewinding When the tape reaches its end dur...

Страница 36: ...e timer standby mode Press TIMER TIMER REC to release the VCR from the timer standby mode Self diagnostic Indications This VCR has a self diagnosis and display function If the VCR detects trouble during installation or during use the following indications automatically appear in the VCR display Indications are in the form of a single English letter plus two numbers such as H01 INDICATION H F CAUSE...

Страница 37: ...m Timer recording cannot be performed The clock or calendar has been incorrectly set Check the clock and calendar Set them to the present time Note that this is a 24 hour clock See page 17 The recording starting or ending time setting is incorrect Set the recording starting and ending time correctly The VCR has not been set for timer recording Press TIMER TIMER REC after programming for timer reco...

Страница 38: ...ingers or Other Objects Inside Do not attempt to disassemble the VCR Touching internal parts of this VCR is dangerous and may cause it serious damage There are no user serviceable parts inside Avoid Water Keep the VCR away from flower vases tubs sinks etc If liquids are spilled into the VCR serious damage could occur If you spill any liquid into the VCR consult qualified service personnel Lightnin...

Страница 39: ...hich prevents damage due to power surges caused by induced lightning This function may not be effective for surges by direct lightning CVC Crystal View Control Indicator The crystal view control function ensures that you always obtain the optimum picture quality so that you get the best picture automatically While the VCR is turned on the CVC indication is always displayed to show that the Crystal...

Страница 40: ...ft recording Input Level VIDEO IN PHONO 1 0 Vp p 75 ohm Output Level VIDEO OUT PHONO 1 0 Vp p 75 ohm RF modulated VHF channel US3 or 4 75 ohm terminated AUDIO Input Level AUDIO IN PHONO j10 dBV 47 kohm Output Level AUDIO OUT PHONO j8 dBV 1 kohm Audio Track 1 track normal mono only Video Horizontal Resolution Color more than 200 lines Signal to Noise Ratio Video more than 40 dB SP Audio more than 4...

Страница 41: ...41 ...

Страница 42: ...68 323 436 3500 Government Marketing Department 52 West Gude Drive Rockville MD 20850 301 738 3840 Broadcast PARTS INFORMATION ORDERING 9 00 a m 5 00 p m EST 800 334 4881 24 Hr Fax 800 334 4880 Emergency after hour parts orders 800 334 4881 TECHNICAL SUPPORT Emergency 24 Hour Service 800 222 0741 5770 Ambler Drive Mississauga Ontario L4W 2T3 905 624 5010 Panasonic de Mexico S A de C V Panasonic Ca...

Отзывы: