62 - ENGLISH
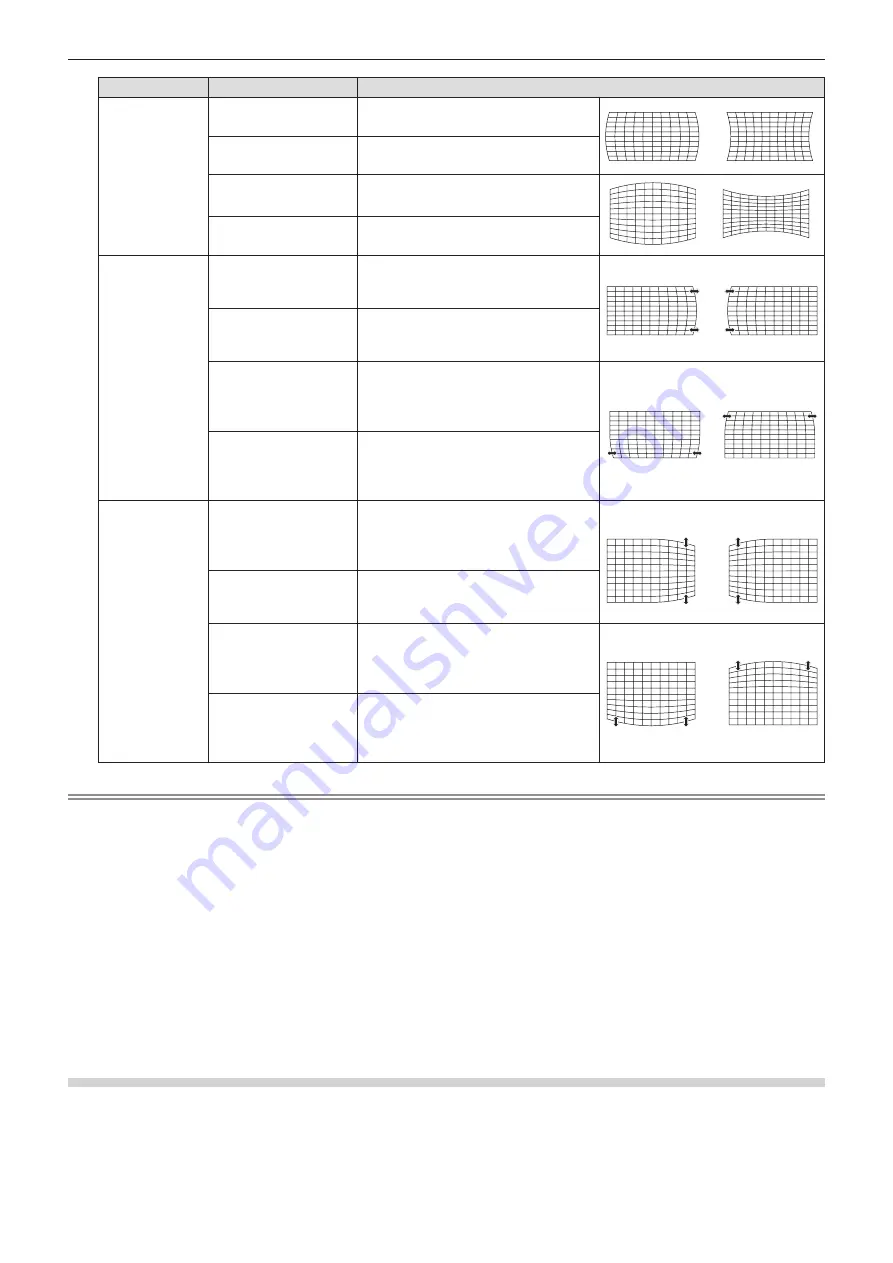
Items
Operation
Adjustment
[Curved
correction X/Y
Gain]
Press the
w
button.
Extend the vertical lines to left and
right.
Press the
q
button.
Dent the vertical lines to left and right.
Press the
a
button.
Extend the horizontal lines to top and
bottom.
Press the
s
button.
Dent the horizontal lines to top and
bottom.
[Curved
correction X
Offset]
Press the
w
button.
Used to correct the right side vertical
lines. Extend the top and bottom while
keeping the center part as it is.
Press the
q
button.
Used to correct the left side vertical
lines. Extend the top and bottom while
keeping the center part as it is.
Press the
a
button.
Used to correct the both sides of the
vertical lines. Extend the lower corners
while keeping the center part and the
upper part as they are.
Press the
s
button.
Used to correct the both sides of the
vertical lines. Extend the top corners
while keeping the center part and the
lower part as they are.
[Curved
correction Y
Offset]
Press the
w
button.
Used to correct the right side
horizontal lines. Extend the top and
bottom while keeping the center part
as it is.
Press the
q
button.
Used to correct the left side horizontal
lines. Extend the top and bottom while
keeping the center part as it is.
Press the
a
button.
Used to correct the both sides of the
horizontal lines. Extend the lower
corners while keeping the center part
and the upper part as they are.
Press the
s
button.
Used to correct the both sides of the
horizontal lines. Extend the top corners
while keeping the center part and the
lower part as they are.
Note
f
Either [H/V Keystone] or [Corner correction] setting value is valid. If the other item is adjusted after [H/V Keystone] or [Corner
correction] was adjusted, the previous setting value will be reset.
f
The [Curved Correction X Offset] and the [Curved Correction Y Offset] cannot be adjusted independently. After adjusting the
[Curved Correction X/Y Gain] at the beginning, please adjust the [Curved Correction X Offset] and the [Curved Correction Y
Offset].
f
Press the <KEYSTONE> button on the control panel or on the remote control when the [H/V Keystone], [Corner correction]
or [Curved correction] individual adjustment screen is displaying, the individual adjustment screen will switch as follows.
- [H/V Keystone]
[Corner correction] (Upper left)
[Corner correction] (Upper right)
[Corner correction] (Lower right)
[Corner correction] (Lower left)
[Curved correction X/Y Gain]
[Curved correction X Offset]
[Curved correction Y
Offset]
[H/V Keystone]
...
f
Correcting up to ±15° for the tilt in the vertical direction and ±15° for the tilt in the horizontal direction are available for
adjustments with [Keystone]. However, the image quality will degrade and it will get harder to focus with more correction.
Install the projector so that the correction will be as small as possible.
f
Screen size will also change when [H/V Keystone] is used to perform various adjustments.
f
Aspect ratio of the image size may shift depending on the correction.
Resetting the keystone correction
To return to the factory default state by releasing the state of the keystone correction.
1) Press
as
to select [Keystone].
2) Press the <ENTER> button.
f
The [Keystone] screen is displayed.
Chapter 4 Settings - [Expand] menu


