background image


PAN1780 Bluetooth Module 


5 Getting Started 


Module Integration Guide Rev. 1.1 


Page 21 of 44 


Getting Started  

5.1  Default Jumper Configuration 

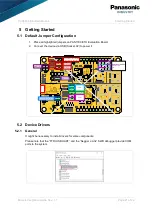
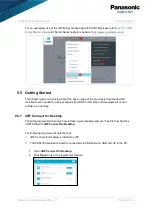
  Place all highlighted jumpers on PAN1780 ETU Evaluation Board.  

1.

  Connect the device via USB (Socket X2) to power it. 

2.


5.2  Device Drivers 

5.2.1  General 

It might be necessary to install drivers for some components.  

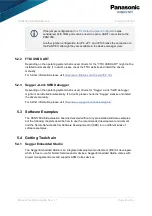
Please note that the “FTDI USB UART” and the “Segger J-Link” SWD debugger provide COM 
ports to the system. 


3.3V to pin

Do not place

with external 3.3V supply

5V from USB

5V from pin

Module VCC

Switch Module UART:

Breakout pins

FTDI

SWD

Module Reset

UART

Module VCC5V Breakout

NFC Antenna

Содержание PAN1780

Страница 1: ...Wireless Connectivity PAN1780 Bluetooth Low Energy Module Module Integration Guide Rev 1 1 ...

Страница 2: ... C 2 UART 4 PWM 8 ADC 1 NFC A 32 kHz IN OUT nRESET USB 2 0 full speed device interface Built in temperature sensor Bluetooth LE 2 Mbps high speed PHY LE long range coded PHY LE advertising extensions advertising on 40 channels total Channel selection algorithm 2 LE secure connections Over the air update of application software Qualified Bluetooth mesh profile stack Characteristics Typical sensitiv...

Страница 3: ...onic disclaims liability for damages caused by The use of the Engineering Sample other than for evaluation purposes particularly the installation or integration in another product to be sold by the customer Deviation or lapse in function of the Engineering Sample Improper use of the Engineering Sample Panasonic Industrial Devices Europe GmbH disclaims any liability for consequential and incidental...

Страница 4: ...or any and all claims or representations of these third party providers Panasonic makes no warranty whatsoever neither express nor implied with respect to the goods the referenced contents or any and all claims or representations of the third party providers To the maximum extent allowable by Law Panasonic assumes no liability whatsoever including without limitation indirect consequential special ...

Страница 5: ...ings 16 4 6 NFC Antenna Placement 18 4 7 PCB Layout 18 5 Getting Started 21 5 1 Default Jumper Configuration 21 5 2 Device Drivers 21 5 3 Software Examples 22 5 4 Getting Toolchain 22 5 5 Getting Started 29 6 Regulatory and Certification Information 34 6 1 General Certification Information 34 6 2 Federal Communications Commission FCC for US 34 6 3 Innovation Science and Economic Development ISED f...

Страница 6: ...engineers Please read this guide carefully to assure the compliance of your product to regulatory The product is referred to as the PAN1780 or the module within this document 1 2 Revision History Revision Date Modifications Remarks 1 0 2020 03 12 First preliminary version 1 1 2020 04 27 Updated chapter General Certification Information added SoftDevice S113 Updated chapter Innovation Science and E...

Страница 7: ... Example Click Save Menu Menu item Path Indicates a path e g to access a dialog Example In the menu select File Setup page This font File names messages user input Indicates file names or messages and information displayed on the screen or to be selected or entered by the user Examples pan1760 c contains the actual module initialization The message Failed to save your data is displayed Enter the v...

Страница 8: ...h sensitivity of the nRF52840 in combination with the LE coded PHY makes the module very attractive in applications where a long range is required In addition the ultra low current consumption of the PAN1780 makes the module an ideal choice for battery powered devices With the Cortex M4F processor 256 kB RAM and the build in 1 MB flash memory the PAN1780 can easily be used in standalone mode there...

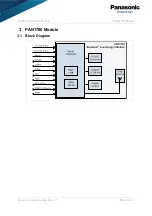
Страница 9: ... PAN1780 Bluetooth Module 3 PAN1780 Module Module Integration Guide Rev 1 1 Page 9 of 44 3 PAN1780 Module 3 1 Block Diagram ...

Страница 10: ...The outer dimensions have a tolerance of 0 3 mm Top View G1 G2 G3 G4 G5 G6 G7 G8 G9 G10 F1 F2 F3 F4 F5 F6 F7 F8 F9 F10 E1 E2 E3 E4 E5 E6 E7 E8 E9 E10 1 10 D1 D2 D3 D4 D5 D6 D7 D8 D9 D10 C1 C2 C3 C4 C5 C6 C7 C8 C9 C10 B1 B2 B3 B4 B5 B6 B7 B8 B9 B10 1 00 1 10 A2 A3 A4 A5 A6 A7 A8 A9 2 20 A10 A12 1 40 A13 G12 G13 0 60 15 60 8 70 1 05 1 05 A1 ...

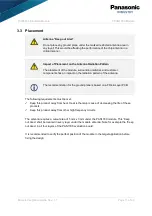
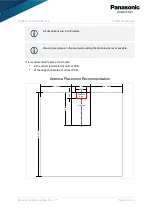
Страница 11: ...ation pattern of the antenna The recommendation for the ground plane is based on a FR4 4 Layer PCB The following requirements must be met Keep this product away from heat Heat is the major cause of decreasing the life of these products Keep this product away from other high frequency circuits The antenna requires a cutout area of 5 mm x 3 mm under the PAN1780 module This Keep out Area shall be loc...

Страница 12: ...e in millimeters Use a ground plane in the area surrounding the module wherever possible It is recommended to place the module In the center horizontal of mother PCB At the edge horizontal of mother PCB Antenna Placement Recommendation Min 15 00 5 00 3 00 Keep out Area Min 15 00 8 70 Min 40 00 15 60 Top View ...

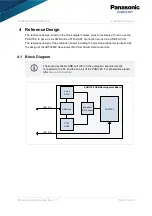
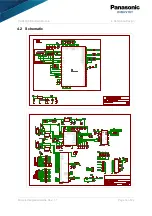
Страница 13: ...t one USB Port X2 The reference design of the evaluation board including the provided peripherals is inspired by the design of the nRF52840 Development Kit from Nordic Semiconductors 4 1 Block Diagram The second available USB port X5 on the evaluation board is directly connected to the D and the D pins of the PAN1780 For schematics please refer to 4 2 Schematic PAN1780 USB Development Board PAN178...

Страница 14: ... PAN1780 Bluetooth Module 4 Reference Design Module Integration Guide Rev 1 1 Page 14 of 44 4 2 Schematic ...

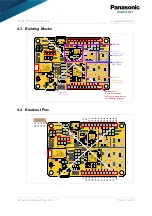
Страница 15: ...n be connected externally to sensor boards or for debugging reasons US BHUB FTDI US Bto UARTconversion User Buttons SW1 SW4 User LEDs LED1 LED4 JTAGS WD Programming and debugging Reset Button 3 3V P0 17 P0 19 P0 20 1 8V P0 21 P0 22 P0 05 P0 07 P0 08 P0 06 GND 5V P0 29 P0 30 P0 31 P0 28 P1 12 P1 15 P1 14 P1 13 P1 02 P1 01 GND P0 02 P0 26 P0 27 P0 03 ...

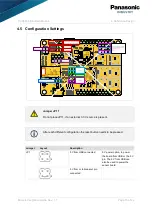
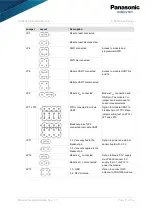
Страница 16: ...not place JP11 if an external 3 3 V source is present After each different configuration the reset button needs to be pressed Jumper Layout Description JP1 5 V from USB connected 5 V power option to power the board from USB or the 5 V pin The 5 V from USB can also be used to power the sensor board 5 V from or to breakout pin connected ...

Страница 17: ... VCC jumper can be removed for current measurements JP7 JP10 FTDI connected to module UART Option for module UART to breakout pin or FTDI Place jumpers either just on JP7 or JP7 and JP10 Breakout pins of JP2 connected to module UART JP11 3 3 V are supplied to the breakout pin Option to power an external sensor board with 3 3 V 3 3 V are not supplied to the breakout pin JP12 Module VCC connected Op...

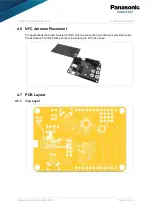
Страница 18: ...ntegration Guide Rev 1 1 Page 18 of 44 4 6 NFC Antenna Placement For applications that need an external NFC antenna connection an antenna is provided inside the Evaluation Tool Kit Please connect the antenna to JP13 as shown 4 7 PCB Layout 4 7 1 Top Layer ...

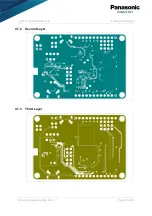
Страница 19: ... PAN1780 Bluetooth Module 4 Reference Design Module Integration Guide Rev 1 1 Page 19 of 44 4 7 2 Second Layer 4 7 3 Third Layer ...

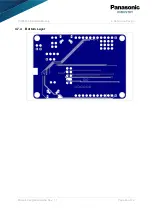
Страница 20: ... PAN1780 Bluetooth Module 4 Reference Design Module Integration Guide Rev 1 1 Page 20 of 44 4 7 4 Bottom Layer ...

Страница 21: ... the device via USB Socket X2 to power it 2 5 2 Device Drivers 5 2 1 General It might be necessary to install drivers for some components Please note that the FTDI USB UART and the Segger J Link SWD debugger provide COM ports to the system 3 3Vto pin Do not place with external 3 3Vsupply 5Vfrom USB 5Vfrom pin Module VCC Switch Module UART Breakout pins FTDI S WD Module Reset UART Module VCC5VBreak...

Страница 22: ... J Link SWD Debugger Depending on the operating system that is used drivers for Segger J Link SWD debugger might not be installed automatically If in doubt please check the Segger website and install the drivers manually For further information please visit https www segger com downloads jlink 5 3 Software Examples The PAN1780 USB evaluation board is delivered without any preinstalled software exa...

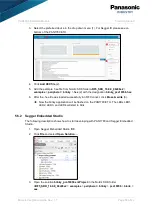
Страница 23: ...ect Embedded Studio 2 2 Select a preferred version and operating system and download it 3 Install Segger Embedded Studio IDE from the downloaded file 4 After opening Segger Embedded Studio for the first time it will show a manage li cense window Click Activate Your Free License because Segger Embedded Studio will be used with 5 a Nordic Semiconductor device ...

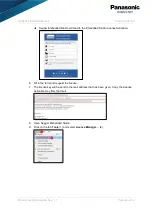
Страница 24: ...d Studio will lead to the Embedded Studio License Activation Fill in the form and request the license 6 The license key will be send to the mail address that has been given Copy the License 7 Activation Key from that mail Open Segger Embedded Studio 8 Click on the tab Tools 1 and select Licence Manager 2 9 ...

Страница 25: ...eceives this non commercial license to be used solely with Nordic Semiconductors devices A detailed guide how to use Segger Embedded Studio is available on YouTube Search for SEGGER Embedded Studio Getting started Other IDEs and tools that can be used with Nordic s nRF5 SDK are Keil IAR and GCC For detailed information please refer to Nordic Semiconductors infocenter infocenter nordicsemi com ...

Страница 26: ...4 2 Nordic nRF Connect Visit the website https www nordicsemi com 1 Search for nRF Connect for Desktop Software and tools 1 Development 2 tools 2 nRF Connect for Desktop 3 The download page will be shown Click on the tab Downloads 1 and click Download file 2 3 Install nRF Connect for Desktop 4 ...

Страница 27: ...Visit the website https www nordicsemi com 1 Search for nRF5 SDK Software and tools 1 Bluetooth software 2 nRF5 2 SDK 3 The download page will be shown Click on the area Download latest version nRF5 SDK 3 Extract the zipped SDK to a working directory 4 The extracted folder gives an overview about the nRF5 SDK ...

Страница 28: ...ttps www nordicsemi com For detailed information about the SDK please visit Nordic Semiconductors infocenter https infocenter nordicsemi com 5 4 4 Mobile Apps Nordic Semiconductors provides different mobile apps for Android devices in Google Play Store and iOS devices in Apple App Store The following overview shows briefly the purpose of these apps recommended for using with PAN1780 ETU App Descri...

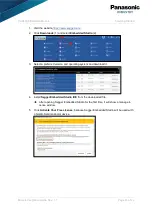
Страница 29: ... of the previously downloaded and installed tools needed for using examples from SDK in first step and development of own software in next step 5 5 1 nRF Connect for Desktop The following description shows how to flash a precompiled example hex file from Nordics nRF5 SDK with nRF Connect for Desktop The following requirements must be met nRF Connect for Desktop is installed on PC The PAN1780 evalu...

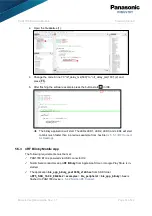
Страница 30: ...blinky_pca10056 hex After the hex file was loaded successfully in nRF Connect click Erase write 3 6 Now the blinky application will be flashed on the PAN1780 ETU The LEDs LED1 LED2 LED3 and LED4 will start to blink 5 5 2 Segger Embedded Studio The following description shows how to start developing with PAN1780 and Segger Embedded Studio Open Segger Embedded Studio IDE 1 Click File and select Open...

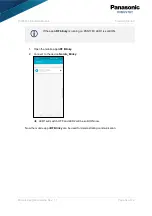
Страница 31: ...D1 LED2 LED3 and LED4 will start to blink much faster than in previous example from hex file 5 5 1 nRF Connect for Desktop 5 5 3 nRF Blinky Mobile App The following requirements must be met PAN1780 ETU is powered via USB connector X2 Nordic Semiconductors app nRF Blinky from Apple App Store or Google Play Store is in stalled The application ble_app_blinky_pca10056_s140 hex from SDK folder nRF5_SDK...

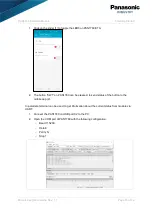
Страница 32: ...1 1 Page 32 of 44 If the app nRF blinky is running on PAN1780 LED1 is solid ON Open the mobile app nRF Blinky 1 Connect to the device Nordic_Blinky 2 LED1 will switch OFF and LED2 will be solid ON now Now the mobile app nRF Blinky can be used for demonstrating communication ...

Страница 33: ... ETU 1 The button SW1 on PAN1780 can be pressed to send status of the button to the 2 mobile app 2 In parallel a terminal can be used to get information about the current status from module via UART Connect the PAN1780 on USB port X2 to the PC 1 Open the COM port of PAN1780 with the following configuration 2 Baud 115200 Data 8 Parity N Stop 1 ...

Страница 34: ...ement has to be printed in the OEM end product user information The device meets the requirements for modular transmitter approval as detailed in FCC public Notice DA00 1407 The transmitter operation is subject to the following two conditions 1 This device may not cause harmful interference and 2 This device must accept any interference received including interference that may cause undesired oper...

Страница 35: ... is connected Consult the dealer or an experienced radio TV technician for help 6 2 3 Label Requirements The following labelling requirements have to be implemented on the OEM end product The OEM must ensure that FCC labelling requirements are met This includes a clearly visible label on the outside of the OEM enclosure specifying the appropriate Panasonic FCC identifier for this product as well a...

Страница 36: ...ment in manuals for products operating with the approved antennas to alert users on FCC RF Exposure compliance Any notification to the end user of installation or removal instructions about the integrated radio module is not allowed The radiated output power of the PAN1780 with a mounted ceramic antenna FCC ID T7V1780 is below the FCC radio frequency exposure limits Nevertheless the PAN1780 shall ...

Страница 37: ...ximum gain of 1 0 dBi Antennas not included in this list or having a gain greater than 1 0 dBi are strictly prohibited for use with this device The required antenna impedance is 50 ohms The antenna used for this transmitter must not be co located or operating in conjunction with any other antenna or transmitter without the need of re assessment of conformity by ISED Due to the model size the IC id...

Страница 38: ...s le tableau Approved Antenna List présentant un gain maximum de 1 0 dBi Des antennes autres que celles listées ici ou présentant un gain supérieur à 1 0 dBi ne doivent en aucune circonstance être utilisées en combinaison avec ce produit L impédance des antennes compatibles est 50 Ohm L antenne utilisée avec ce produit ne doit ni être située à proximité d une autre antenne ou d un autre émetteur n...

Страница 39: ... Approved Antenna List est conforme aux CNR Gen d Industrie Canada applicables aux appareils radio exempts de licence L exploitation est autorisée aux deux conditions suivantes 1 L appareil ne doit pas produire de brouillage et 2 L utilisateur de l appareil doit accepter tout brouillage radioélectrique subi même si le brouillage est susceptible d en compromettre le fonctionnement 6 3 2 Labeling Re...

Страница 40: ...que les obligations d étiquetage IC du produit final sont remplies Ces obligations incluent une étiquette clairement visible à l extérieur de l emballage externe comportant l identifiant IC du module Panasonic inclus ainsi que la notification ci dessus L identifiant IC est IC 216Q 1780 Cet identifiant est valide pour module PAN1780 Dans tous les cas les produits finaux doivent indiquer sur leur em...

Страница 41: ...sessment If a Notified Body has been contracted for the end product conformity assessment it should be noted that this EU Type Examination Certificate should be used for conformance assessment As a result of the OEM end product conformity assessment procedure described in 2014 53 EU Directive and other applicable EU directives the end customer equipment should be labelled as follows The requiremen...

Страница 42: ...tooth SIG If the PAN1780 is used on more than one OEM product costs can be saved by applying for a family EPL For the end product EPL the following IDs can be used in order to avoid re testing Bluetooth 5 Declaration ID QDID End product D050150 148922 Bluetooth Marks According to the Bluetooth SIG the PAN1780 fulfills the criteria to label your product as a Bluetooth device For further information...

Страница 43: ...evice or system or to affect its safety or effectiveness Panasonic customers using or selling these products for use in such applications do so at their own risk and agree to fully indemnify Panasonic Industrial Devices Europe GmbH for any damages resulting 7 2 Restricted End Use This Panasonic Industrial Devices Europe GmbH product is not designed for any restricted activity that supports the dev...

Страница 44: ...rth America visit the Panasonic website Sales Support to find assistance near you at https na industrial panasonic com distributors Please visit the Panasonic Wireless Technical Forum to submit a question at https forum na industrial panasonic com 8 2 Product Information Please refer to the Panasonic Wireless Connectivity website for further information on our products and related documents For co...

Отзывы: