background image

55

Special 

Features

Special 

Features

Transferring Your Images

Transferring Your Images

Before you begin

• Set POWER to OFF before inserting a

recorded Memory Card.
(See pages 32, 33.)

• Turn your PC on.

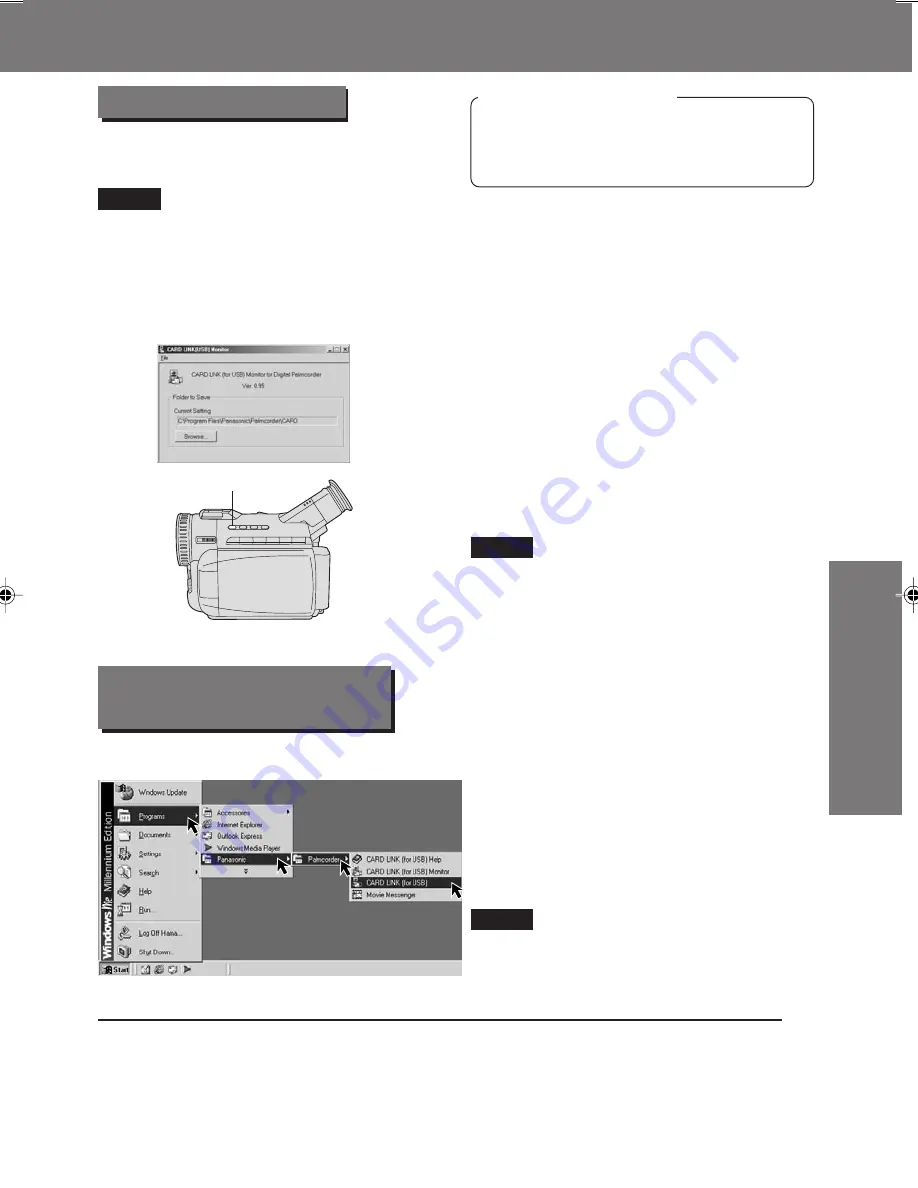
Running the CARD LINK
(for USB)

You can transfer images between the
Memory Card and your PC.

1

Repeat steps 1 and 2 above.

2

Click on Start, “Programs,”

“Panasonic,” “Palmcorder,” then
“CARD LINK (for USB).”

3

“CARD LINK (for USB)” is opened.

Refer to Help for information about
application operations and Error
messages.

Note

One Touch Transfer

Note

1

Set Palmcorder POWER to CAMERA
or slide M-CARD Lock Switch to
unlock and set to M-CARD.
(See pages 9, 10.)

2

Connect the Palmcorder to your PC
(Windows) 
using the USB Cable
(supplied). (See page 54.)
• “CONNECT WITH PC” is displayed

on the LCD monitor.

3

Press TRANSFER.
• CARD LINK (for USB) application is

run automatically and images stored
on the memory card are transferred to
your PC and saved. (If an image to
be transferred already exists, that
image will be skipped over and not
transferred.)

• Before using this feature, make sure the

CARD LINK (for USB) monitor icon is
displayed.

• Double clicking the CARD LINK Monitor

icon displays a dialog box in which the
save location for the collective transfer
can be changed.

The images stored on the Memory Card
can easily be transferred to the PC by
pressing the TRANSFER Button.

3

TRANSFER Button

• JPEG image format (only image data that

can be played back on Palmcorder) can
be transferred from the PC to the
Palmcorder.

Note

While CARD LINK is running, do not perform the following operations...

The PC system may become unstable.
• Change the screen area or color pallet in the Display Properties window.
• Turn the Palmcorder power switch ON or OFF while connecting the Palmcorder to your

PC using the USB Cable.

• Connect/disconnect the USB Cable.
• Insert/remove a Memory Card.

201_401.53-57.p65

01/01/18, 17:08

55

Содержание Palmcorder PV-DV201

Страница 1: ... Spanish Quick Use Guide is included Guía para rápida consulta en español está incluida R LSQT0364A Models No PV DV201 PV DV401 Digital Video Camcorder Operating Instructions Mini For assistance please call 1 800 211 PANA 7262 or send e mail to consumerproducts panasonic com R PV DV401 shown 0 3 6 4 A ...

Страница 2: ... with Part 15 of the FCC Rules Operation is subject to the following two conditions 1 This device may not cause harmful interference and 2 this device must accept any interference received including interference that may cause undesired operation Note This equipment has been tested and found to comply with Part 15 of the FCC Rules These limits are designed to provide reasonable protection against ...

Страница 3: ...ng instructions should be retained for future reference 3 Heed Warnings All warnings on the unit and in the operating instructions should be adhered to 4 Follow Instructions All operating and maintenance instructions should be followed 5 Cleaning Unplug this video unit from the wall outlet before cleaning Do not use liquid or aerosol cleaners Use a dry cloth for cleaning 6 Attachments Do not use a...

Страница 4: ... electric shock or other hazards 21 Safety Check Upon completion of any service or repairs to this video unit ask the service technician to perform safety checks to determine that the video unit is in safe operating order USE LOCATION TO AVOID SHOCK HAZARD Your Palmcorder and power supply should not be exposed to rain or moisture Do not connect the power supply or operate your Palmcorder if it get...

Страница 5: ...ictures 42 MAGICVU 0LUX PV DV401 only 42 Program AE 43 Other Digital Functions 44 Picture in Picture PinP 45 Strobe Multi Mode 46 Focus 47 Backlight 47 Audio Video Fade In Out 48 High Speed Shutter 48 Audio Dubbing using the External or Built in Microphone 49 Memory Stop Editing 50 Copying your Tapes to S VHS or VHS Cassette 51 Copying from Digital Equipment dubbing 52 Transferring Your Images 53 ...

Страница 6: ...s 98 Me CARD LINK for USB for Windows 98 Me PHOTOVU LINK Movie Messenger for Windows 98 Me ArcSoft Software for Windows 98 Me LSFT0247 Microsoft and Windows are registered trademarks of Microsoft in the United States and other countries Intel Pentium is a registered trademark i LINK and are trademarks PHOTOVU LINK Movie Messenger is a registered trademark IBM is a registered trademark of IBM Compa...

Страница 7: ...he Palmcorder is connected to a power source the cassette can be inserted and ejected without turning the Palmcorder on To remove the cassette Slide TAPE EJECT to open the Cassette Compartment Cover and pull the cassette tape straight out Hint to locate recording position when inserting cassette When you insert a partially recorded cassette use the Edit Search Function see page 24 to visually conf...

Страница 8: ...from one end of the strap 3 Thread the strap with no buckle through the Light Holder so that it faces outward Then reinsert the buckle 1 2 2 1 3 Adjust the Length 1 Insert the Light into the Light Holder for Storage 2 To remove the Light press LIGHT RELEASE and slide Light out of the holder LIGHT RELEASE Button Light Holder Attach the Light Optional Adjust the length of the Hand Strap to the size ...

Страница 9: ...3 Insert a cassette record tab up window side facing out Make sure the record tab is closed See page 6 Protection Film Note Remove the Protection Film before use 1 2 4 3 Before you begin Charge the Battery See page 11 VCR OFF CAMERA M CARD CameraRecording When the LCD monitor is fully open the Viewfinder automatically turns OFF 180 90 VCR OFF CAMERA M CARD 1 Set POWER Switch to CAMERA LCD Monitor ...

Страница 10: ...Press REW Button to rewind the tape 4 Press PLAY Button to start playback 5 Press STOP Button to stop playback M CARD Lock Switch Before you begin Charge the Battery See page 11 Memory Card MultiMediaCard or SD Memory Card See page 64 Be sure to insert the Memory Card before using the Card PhotoShot See page 32 Below is a list of memory cards which can be used in this Palmcorder Memory Card MultiM...

Страница 11: ...Charge the Battery within an ambient temperature range of 10 C and 30 C If charging is done in extreme low or high temperatures Battery charge time increases CHARGE Lamp flashes when The Battery is being charged but charging is taking longer than normal Charging is not possible Remove the Battery once wait a short time then re attach it for charging Note 1 Slide the Viewfinder backward to its full...

Страница 12: ... 104 F 40 C The Battery may be warm after charging or just after use This is normal Do not use an insufficiently charged or worn out Battery If charging is done in extreme low or high temperatures Battery charge time increases Safety precautions Do not get the Battery near or dispose of in fire Do not directly connect short circuit the positive and negative terminals Never attempt to disassemble o...

Страница 13: ...y hour and minutes To make corrections Press JOG KEY repeatedly to move back to an item and correct A built in Battery maintains clock operation If the Palmcorder is not connected to a power source for a few months the built in battery may discharge and CLOCK BATTERY indication appears See page 21 EXAMPLE When DATE TIME setting is completed press MENU three times to start the clock and exit 2001 Y...

Страница 14: ...E MOSAIC SLIM TRAIL STRETCH GAIN UP WIPE MIX PinP 2 ADJUST CAMERA ADJUST menu is displayed To select PROG AE W BALANCE or H S S High Speed Shutter 3 REC MODE CAMERA REC MODE menu is displayed To select REC SPEED AUDIO REC INDEX SHUTTER SELF REC or WIND CUT 4 SET UP CAMERA SET UP menu is displayed To select REMOTE BEEP or MAGICVU PV DV401only 5 DISPLAY SETTING DISPLAY SETTING menu is displayed To s...

Страница 15: ... 32 kHz mode 16 bit The sound is recorded in the 16 bit 48 kHz high quality mode INDEX See page 30 DAY An index signal is recorded when recording is restarted after the date has changed since the last recording 2 HOUR An index signal is recorded when recording is restarted after a lapse of more than 2 hours SHUTTER See page 41 When set to ON still pictures taken in the PhotoShot mode are recorded ...

Страница 16: ...ns See page 21 MAGICVU PV DV401 only See page 42 To select one of the 3 MAGICVU modes slide MAGICVU 0LUX Switch to ON DISPLAY See page 19 To select the desired type of display and counter indication displayed on the LCD Monitor or in the viewfinder C RESET See page 19 Setting to ON resets the counter to zero DATE TIME See page 20 The date and time can be set and displayed on the screen CLOCK SET S...

Страница 17: ...earch function PHOTO To search for Photo shot pictures SCENE To search for scenes marked with Index signal AUDIO See page 50 To select the desired audio playback mode after performing audio dubbing in the 12 bit mode SP mode only ST1 The original sound alone is played back ST2 The dubbed sound alone is played back MIX The original sound and the dubbed sound are played back together REMOTE See page...

Страница 18: ...ee page 19 Setting to ON resets the counter to zero DATE TIME See page 19 The date and time can be set and displayed on the screen CLOCK SET See page 13 When set to ON the date and time can be set on the screen LCD EVF SETTING See page 23 Setting to ON displays the menu for adjusting the LCD brightness color level and the EVF brightness M CARD Menu Screen 9 10 11 12 13 8 9 10 11 12 13 8 MENU OSD M...

Страница 19: ...pears when SEPIA or MONO is selected in VCR menu Tape Speed Indication See page 15 Indicates the tape speed SP or LP AY DVM30EA AY DVM60EA Memory Counter M 0 00 00 The Palmcorder will stop whenever it reaches the point where the counter was previously set to M 0 00 00 during audio dub fast forward or rewind Time Code 0h00m00s00f The Palmcorder calculates and displays exactly where you are on any t...

Страница 20: ...cations REC Recording PHOTO PhotoShot recording PAUSE Paused during recording PLAY Playback R Repeat Playback CHK Recording Check FF Fast forward REW Rewind FF Search REW Search BLANK Blank Search SEARCH Index Search Digital EIS Indications See page 39 Zoom Magnification Level See page 40 Manual Focus Indication See page 47 White Balance Indication See page 42 PROGRAM AE Indication See page 43 Bac...

Страница 21: ...B is attempted on a pre recorded LP tape CANNOT REC LP MODE will appear for 5 seconds If excessive moisture condenses in the unit WARNING will flash DEW DETECTED will appear and the Palmcorder will automatically turn OFF in 15 seconds In this case wait until the indicator no longer flashes when your Palmcorder is turned ON again When a battery recharge is necessary WARNING will flash LOW BATTERY w...

Страница 22: ... bright objects or bright lights a vertical bar may appear in the picture This is a normal characteristic of the CCD pick up device Try to avoid this whenever possible WARNING Do not leave the Palmcorder with the EVF aimed directly at the sun as this may cause damage to the internal parts of the EVF Do not lift or carry the Palmcorder by the EVF or the LCD Monitor SimpleRecording Before you begin ...

Страница 23: ...80 degrees so it faces the same direction as the lens to record yourself CAMERA mode The picture in the LCD monitor will appear reversed Set SELF REC to MIRROR see page 15 in the Camera mode menu screen to see the picture as it is actually being recorded Using the LCD Monitor 1LCD OPEN Button Self Recording Note 180 90 90 180 Before you begin Connect the Palmcorder to a power source See pages 11 1...

Страница 24: ... muted in reverse visual search Make sure the SP LP tape speed setting is the same as the recording to eliminate distortion during edit search 2 3REC PAUSE Button 1POWER Switch Edit Search You can visually search for scenes in CAMERA mode to maintain proper continuity when taping Note Camera Recording Camera Recording 1Press EDIT SEARCH briefly in the REC PAUSE mode The CHK indication appears Afte...

Страница 25: ...tions Rec Pause See page 22 Tele Zoom See page 22 Wide Zoom See page 22 Date Time See page 20 Reset See page 50 PhotoShot See page 41 Display On TV See page 31 Counter Time Code See page 19 Audio Dubbing See page 49 Record See page 52 Menu See page 14 Play See page 27 FF Search See page 28 REW Search See page 28 Pause Select See pages 14 28 Stop Set See pages 14 27 Slow Frame Advance Forward See p...

Страница 26: ...CR mode menu screen then press JOG KEY to display the CAMERA SET UP or VCR PLAY MODE menu screen 4Rotate JOG KEY to select REMOTE and then press JOG KEY to select VCR 2 See pages 16 17 Leave the other Palmcorder set to VCR1 5Set the Remote Control Optional page 64 to VCR 1 or VCR 2 to correspond with the Palmcorder you wish to control See above left When the Palmcorder and remote are not set to th...

Страница 27: ...order will go into Repeat Playback mode when the tape reaches its end The letter R will appear in the EVF and LCD monitor To exit the Repeat Playback mode turn the Palmcorder OFF 2REWIND SEARCH Button VOLUME KEY 4STOP Button 3PLAY Button Built in Speaker 1LCD OPEN Button Playback using the LCD Monitor You can also use the LCD monitor to playback your recording R Note 180 90 90 You can place the Pa...

Страница 28: ...re may become bluish for an instant or mosaic This is normal during this mode STILL Picture Note Note Note SLOW F ADV Button Fast Forward Rewind Check Press PAUSE during playback Press PLAY or PAUSE to release To protect the tape and video heads your Palmcorder s operating modes will revert as follows STILL STOP after 3 minutes Optional Remote Control Only See page 64 Forward Slow Press SLOW F ADV...

Страница 29: ...rch Palmcorder only During Still mode rotate JOG KEY to advance or reverse the picture one frame at a time Variable Speed Search 1 Press PLAY to start playback 2 Press PLAY again 3 Rotate JOG KEY to adjust the playback speed Rotate JOG KEY downward for forward playback Rotate JOG KEY upward for reverse playback To return to normal playback Press PLAY Playback will continue at normal speed The Vari...

Страница 30: ...menu to SCENE See page 17 Ex if you press the button three times S3 will appear If the interval between scenes is less than 1 minute index search may not operate properly Response time from pressing the button and change in the scene number is quite slow Do not press INDEX SEARCH rapidly and continuously During Reverse Index Search mode playback will not begin when a tape rewinds all the way to th...

Страница 31: ...ecting Please connect the A V Cable securely CATV System Installer This reminder is provided to call the CATV system installer s attention to Article 820 40 of the NEC in USA and to the Canadian Electrical code in Canada that provides guidelines for proper grounding and in particular specifies that the cable ground shall be connected to the grounding system of the building as close to the point of...

Страница 32: ...on the subject After capturing an image the number may not decrease or it may decrease by two This is normal While PROCESSING is displayed DO NOT turn off the Palmcorder or unplug the AC Adaptor supplied because this will cause irreversible damage to the memory Before you begin Connect the Palmcorder to a power source See pages 11 12 Set POWER to OFF before inserting a Memory Card See page 10 M CA...

Страница 33: ... images from a cassette tape to a Memory Card 3PLAY Button Before you begin Connect the Palmcorder to a power source See pages 11 12 Set POWER to OFF before inserting a Memory Card See page 10 2POWER Switch MENU Button JOG KEY 4PHOTOSHOT Button M CARD Lock Switch Playback Still Images 1 Slide the M CARD Lock Switch to unlock then set POWER to M CARD The POWER lamp lights red Be sure POWER is fully...

Страница 34: ...ge MULTI Multi Image screen or NEXT next image Press M STOP to return to the Multi Playback screen DISPLAY Select OFF to remove all displays from the screen DCF Design rule for Camera File system Select OFF to cancel DCF No on the screen Note If the file number is changed the Palmcorder cannot read the file data This product is compliant with DCF Design rule for Camera File System Images saved on ...

Страница 35: ...rting a recorded Memory Card See pages 32 33 1 Slide the M CARD Lock Switch to unlock then set POWER to M CARD The POWER lamp lights red Be sure POWER is fully turned to M CARD position PLAY PUSH PLAY KEY is displayed for 10 seconds 2 Press M PLAY to display the Multi playback screen PLEASE WAIT appears on screen 3 Press M DEL to display the DELETE menu then rotate and press JOG KEY to select PAGE...

Страница 36: ...M STOP to return to the Card PhotoShot REC Mode screen See page 32 You can delete all images from the Memory Card easily with this operation Warning Once deleted images cannot be restored 2M DEL Button M STOP Button While deleting image DO NOT turn off the Palmcorder or unplug the AC Adaptor supplied because this will cause irreversible damage to the memory resulting in reduced image storage capac...

Страница 37: ...USH STOP PUSH SET JOG JOG KEY KEY KEY SELECT CANCEL ROTATE 1 3 6 4 PAGE You can easily format your Memory Card using this operation Warning Formatting permanently removes all image data 1 2 3 4 6 FORMAT CARD ARE YOU SURE YES NO PUSH STOP E X I T SET JOG JOG KEY KEY SELECT ROTATE While deleting image DO NOT turn off the Palmcorder or unplug the AC Adaptor supplied because this will cause irreversib...

Страница 38: ...a mode screen After Photo Title is performed Digital Function turns off There are 12 pre installed files 5Press REC PAUSE to start recording with Photo Title WIPE or MIX screen is displayed at beginning of the recording Then the Photo Title setting will be cleared automatically You can record PhotoShot images from a Memory Card to a cassette to be used as a WIPE or MIX effect When Photo Title is s...

Страница 39: ...used in both the Recording and Playback VCR modes CAMERA mode VCR mode Other Digital Functions are turned off automatically when the EIS and Digital Zoom are selected A Set POWER to VCR The POWER lamp lights red Be sure POWER is fully turned to VCR position B Press PLAY to start playback C Press EIS to stabilize the picture D Press EIS again to cancel Be sure that D E I S is turned off when not ne...

Страница 40: ...o select D ZOOM1 or D ZOOM2 once D ZOOM1 from 20X to 40X twice D ZOOM2 from 20X to 300X three times Turn off D ZOOM 3Press REC PAUSE to start recording and press POWER ZOOM to zoom in or zoom out The magnification level is always displayed in the EVF or the LCD monitor when DISPLAY is set to ON See pages 16 18 4Press D ZOOM to turn off Digital Zoom so that no indication appears VCR mode Other Digi...

Страница 41: ...SCENE Press MENU twice to exit EPress INDEX SEARCH fast forward or rewind on the remote control Optional page 64 to advance or rewind the tape to playback a PhotoShot scene To view the next PhotoShot INDEX SEARCH must be pressed again DigitalPhotoShot Use this feature to record a seven second approx still image from the current camera picture Audio is also recorded for on the spot narration Or you...

Страница 42: ...ecording Still Pictures Auto White Balance automatically maintains optimum color balance in most lighting conditions However when using Digital Functions etc you may get better results using the manual adjustment 1While in RECORD mode press STILL and hold for 2 seconds to capture a still picture The captured still picture will be recorded together with sound 2Press STILL once again to release the ...

Страница 43: ...ar whitish It is not possible to select the SPORTS mode or PORTRAIT mode together with the GAIN UP in the Digital function camera menu No display SPORTS PORTRAIT LOW LIGHT SPOT LIGHT SURF SNOW Program AE 3 4JOG KEY 2MENU Button The Auto Exposure feature can be used to make quality recordings in a variety of scene situations Note 1 Set POWER to CAMERA The POWER lamp lights red Be sure POWER is full...

Страница 44: ...nded vertically TRAIL The subject being recorded creates a trail when in motion STRETCH The picture is expanded horizontally GAIN UP Not available during playback Picture sensitivity is increased Only Manual Focus is available WIPE Successive scenes are separated in a way which simulates the drawing of a curtain MIX The current scene is mixed in with the following scene during scene changes PinP P...

Страница 45: ...u screen 3 Rotate JOG KEY repeatedly to select D FUNCTION then press JOG KEY to display the CAMERA FUNCTION menu screen 4 Press JOG KEY to select PinP Press MENU twice to exit this menu 5 Aim at the scene you wish to place as PinP then press CAMERA STILL to freeze the image 6 Press CAMERA STILL again to place the frozen image as PinP 7 Press REC PAUSE to record a scene with PinP image Press PHOTOS...

Страница 46: ...ress PLAY to start playback Press MULTI at the point you want to start capturing A succession of 9 screens will be captured and playback will stop Press MULTI to return to the normal STILL screen Press PLAY to start playback Press STOP to stop playback Strobe Speeds Strobe Speeds FAST NORM SLOW 9 screen capture time Every 0 3 seconds Every 0 6 seconds Every 1 0 seconds A Multi Image Playback scree...

Страница 47: ... is fully turned to CAMERA position 2Press M FOCUS DIAL so that MF Manual Focus appears in the EVF or the LCD monitor 3Press and hold POWER ZOOM T side Telephoto until the lens is at maximum zoom in 4Turn M FOCUS DIAL until the picture is in focus It may be necessary to back away from the subject to focus the image properly 5Press POWER ZOOM to W or T as desired The subject will remain in focus ov...

Страница 48: ... page 6 Starting the first scene with fade in is very effective 1 In REC PAUSE mode hold down FADE until the picture fades out 2 Press REC PAUSE to start recording 3 Release FADE and the picture will gradually fade in Fade Out Use to create a soft ending or together with fade in for a soft transition from one scene to the next ADuring recording hold down FADE until the picture fades out BPress REC...

Страница 49: ... Then press PAUSE where you want dubbing to begin 3 Press A DUB on this unit for 3 seconds or on the remote control optional page 64 to put the Palmcorder in the Audio Dub mode A DUB flashes in the EVF or the LCD monitor 2PLAY Button 2PAUSE Button 3A DUB Button 3A DUB Button Optional Before you begin Connect the external Microphone if used PV DV401 only Turn on the Palmcorder Insert a pre recorded...

Страница 50: ...nly page 64 Optional 16 bit dubbed sound completely erases the original 16 bit recorded sound If you dubbed using 12 bit AUDIO recording and then selected AUDIO MIX in the menu for playback the sound will be stereo regardless of the AUDIO OUT setting If you recorded in LP mode you cannot use the A DUB feature Note You can set an automatic Dubbing stop point DRESET Button AMENU Button APress MENU t...

Страница 51: ...o S VHS or VHS Cassette Monitor with your TV 1 Insert a pre recorded tape into the source playing Palmcorder and a blank tape with record tab in place into the target VCR Recorder 2 Press PLAY on the Palmcorder When the tape reaches the point you want to start dubbing press PAUSE 3 Place the VCR into REC PAUSE mode See VCR manual 4 Simultaneously press PAUSE on both units to begin copying 5 Press ...

Страница 52: ... on the target recording Palmcorder or on the remote control optional page 64 Press PAUSE to pause the tape at the starting point of the dub 5 Simultaneously press PAUSE on both units to begin dubbing 6 Press STOP on the recording unit and then press STOP on the playing unit to end dubbing When two Palmcorders are used for dubbing it is recommended that the remote control VCR1 or VCR2 setting be u...

Страница 53: ...uture on our website at www panasonic com video Software Installation Windows 98 Me 1 Turn on the PC Personal Computer and start up Windows 98 Me 2 Insert the supplied Software CD ROM into the CD ROM drive 3 Select and click the icon you want to install 4 Follow the instructions as they appear on your PC screen Palmcorder USB Device Driver Click PHOTOVU LINK Movie Messenger Click CARD LINK for USB...

Страница 54: ...left click on Exit to close CARD LINK for USB Monitor If the Locked File Detected dialog box appears while unistalling the CARD LINK for USB close CARD LINK for USB Monitor as described above then click on Retry Note Notes on PHOTOVU LINK Movie Messenger and CARD LINK operation For PHOTOVU LINK Movie Messenger do not connect the i LINK and USB terminals to the Palmcorder at the same time Make sure...

Страница 55: ...on is run automatically and images stored on the memory card are transferred to your PC and saved If an image to be transferred already exists that image will be skipped over and not transferred Before using this feature make sure the CARD LINK for USB monitor icon is displayed Double clicking the CARD LINK Monitor icon displays a dialog box in which the save location for the collective transfer c...

Страница 56: ...ring the image to your PC the displayed picture appears abnormal restart the PC application and turn Palmcorder POWER off and then back on Using PC Image Data CARD LINK for USB You can use JPEG or Bitmap files from your computer for Photo Title see page 38 by transferring them to the Palmcorder via PC connection 1 Click on File then Click on Open At your PC please select andopen the data jpg or bm...

Страница 57: ... the USB Cable supplied or DV interface Cable i LINK CStart up the PHOTOVU LINK Movie Messenger While PHOTOVU LINK Movie Messenger is running do not perform the following operations The PC system may become unstable Change the screen area or color pallet in the Display Properties window Turn the Palmcorder power switch ON or OFF while connecting the Palmcorder to your PC using the USB Cable or DV ...

Страница 58: ...till images are saved to the PC and you can playback the saved images on the Image Browser See page 59 By connecting the Palmcorder and PC with the USB Cable you can transfer Motion images and Still images saved on the DV Tape directly to your PC To capture Motion images 3Click on MOVIE CAPTURE at the start point you wish to capture a Motion image 4Click MOVIE CAPTURE or STOP to end capture Now Se...

Страница 59: ...mage Browser screen To view Still images 3Click on Pictures to display the Still image list 4Double Click on the desired image to open it If the image cannot be opened please refer to the software Help menu 3Pictures 3Movies To view Motion images 3Click on Movies The first part of each Motion image will be displayed as a list 4Double click on the desired Motion image to display the playback screen...

Страница 60: ... and so on 1Repeat steps 1 4 on page 57 to run the PHOTOVU LINK Movie Messenger See Note below 2Click IMAGE BROWSER to display the Image Browser screen 3Select E mail Settings from Settings 4Select the e mail software you are using then click OK If the e mail software does not support MAPI clicking on E mail of Movie Messenger will not automatically run the e mail software Please run the e mail so...

Страница 61: ... Motion image to be attached then click on Compress Follow the menu to perform the compression settings 5Clicking on Compress will compress the selected image Successfully Done is displayed on the PC screen Click Play to open the Movie Messenger Player screen You can confirm the compressed Motion image by clicking on Play 6Clicking on E Mail will automatically attach the compressed Motion image to...

Страница 62: ...r operating system PHOTOVU LINK Movie Messenger i LINK connection may not work with some DV Interface boards In this case use the software included with the board 1394 i LINK interface must conform to OHCI Open Host Controller Interface Specification PC Connection with DV Interface Cable i LINK For more detailed information regarding editing software products from these companies please visit thei...

Страница 63: ...en for confirmation Note To capture Still images 3Click on STILL CAPTURE at the point you wish to capture an image Repeat step 3 to continue capturing images Captured Still images are saved to the PC and you can playback the saved images on the Image Browser By connecting the Palmcorder and PC with the DV Interface Cable i LINK you can transfer Motion images and still images saved on the DV Tape d...

Страница 64: ...N SDCAPU 1B BN SDABPU 1B Description AC Adaptor with AC Cable and DC Cable 800mAH 1 h 30 min Battery Pack 1600mAH 3 h Battery Pack 2800mAH 5 h Battery Pack 5300mAH 9 h Battery Pack DV Interface Cable i LINK 4 pin to 4 pin Color Enhancement Light IR Remote Control Carrying Case 64 MB SD Memory Card 32 MB SD Memory Card 16 MB SD Memory Card SD USB Reader Writer compatible with MultiMediaCard SD PCMC...

Страница 65: ...o be erased when the Card is formatted SD Memory Card The SD Memory Card optional which is the same size as the MultiMediaCard is an external memory card with an even bigger memory capacity It has a write protect switch to prevent the data writing and card formatting and it comes with a copyright protection function that complies with the SDMI Secure Digital Music Initiative standard Music play is...

Страница 66: ...Y ORDER OFFICE 20421 84th Avenue South Kent WA 98032 Ship To Mr Mrs Ms First Last StreetAddress City State Zip Phone Day Night 4 Shipping information UPS delivery requires complete street address Please photocopy this form when placing an order 3 Method of payment check one Check of Money Order enclosed NO C O D SHIPMENTS VISA Credit Card MasterCard Expiration Date Discover Customer Signature Make...

Страница 67: ... lamp Off white Tungsten lamp for photography Halogen lamp Iodine lamp Tungsten lamp Acetylene lamp Kerosene lamp Candlelight KELVIN COLOR TEMPERATURE Fair weather blue sky Slightly cloudy sky Cloudy or rainy sky Sunlight in clear weather at midday Averagesunlightinclearweather Sunlight 2 hours after sunrise and before sunset Sunlight 40 min after sunrise and before sunset Sunlight 30 min after su...

Страница 68: ...ectronic Viewfinder PV DV201 0 44 inch 12 7 mm Liquid Crystal Electronic Viewfinder PV DV401 LCD Monitor 2 5 inch 63 5 mm Liquid Crystal Display PV DV201 3 0 inch 76 2mm Liquid Crystal Display PV DV401 Minimum Illumination Required 5 lx F1 1 6 0 5 footcandles 0 lx MAGICVU 0LUX ON PV DV401 only Image Storage supplied 320 x 240 pixels NORMAL mode 8 MB MultiMediaCard 640 x 480 pixels FINE mode Approx...

Страница 69: ...ice CloggedVideoHead When you go from function to function PLAY FF REW etc please note that the unit will not accept a new function operation until the previous operation is complete The POWER Button and all function buttons PLAY FF REW etc are only operational after the tape has been completely loaded When the following accessories are attached and the zoom is set to maximum wide angle the four c...

Страница 70: ...ptom Make sure the Power Source is connected pp 11 12 Make sure the POWER switch is set to VCR or CAMERA pp 22 27 Check the Dew Indicator p 21 Make sure the Battery is fully charged p 11 Make sure all necessary cables are connected correctly and firmly p 12 Make sure the Lens Cap is removed p 22 Make sure the Power Source is connected pp 11 12 Insert the cassette record tab up window side facing o...

Страница 71: ... 7847 Attn Camcorder Repair RequestforServiceNotice Please photocopy this form when making a request for service notice In the unlikely event this product needs service Please include your proof of purchase Failure to due so will delay your repair To further speed your repair please provide an explanation of what is wrong with the unit and any symptom it is exhibiting Please write the displayed Se...

Страница 72: ...rnal Microphone Jack PV DV401 only See page 49 Built in Light Mount See page 7 Hand Strap See page 8 Cassette Compartment Cover See page 7 Front View Side View D ZOOM Button See page 40 EIS Button See page 39 TRANSFER Button See page 55 PHONE Jack See page 27 DV Input Output i LINK Connector See pages 52 62 A V Output Connector See pages 31 51 S VIDEO Output Connector See pages 31 51 TAPE EJECT Sw...

Страница 73: ...POWER Switch CAMERA VCR OFF M CARD See pages 9 10 Rear View REC PAUSE Button See pages 9 22 Battery Release Button See pages 11 12 POWER Lamp See page 22 LCD Liquid Crystal Display Monitor See pages 9 10 23 27 LCD OPEN Button See pages 9 10 23 27 Built in Speaker See page 27 Rear View USB Terminal See page 54 M CARD Door See page 10 CARD EJECT Switch See page 10 DC IN Terminal See page 12 Shoulder...

Страница 74: ...age 24 PAUSE Button See pages 28 29 49 50 51 52 CAMERA STILL Button See pages 45 REC Button See page 52 M DEL Button See pages 35 36 37 CAUTION VCR DC Output Connector See page 12 CHARGE Lamp See page 11 POWER Lamp See pages 11 12 AC Power Cord See pages 11 12 AC Adaptor This unit will operate on 110 120 220 240 V AC An AC plug adaptor may be required for voltages other than 120V AC Please contact...

Страница 75: ...3 14 50 VIDEO REC Button See pages 25 52 POWER ZOOM Switch See pages 22 25 SPKR VOL See pages 25 27 REC PAUSE Button See pages 22 25 PHOTOSHOT Button See pages 25 41 DATE TIME Button See pages 20 25 DISPLAY ON TV Button See pages 25 31 FAST FORWARD SEARCH Button See pages 25 28 REVERSE INDEX SEARCH Button See pages 25 30 41 REVERSE SLOW F ADV Button See pages 25 28 29 STOP Button See pages 25 27 S...

Страница 76: ...use neglect mishandling misapplication alteration modification faultyinstallation set upadjustments improperantenna inadequate signal pickup maladjustment of consumer controls improper operation power line surge improper voltage supply lightning damage commercial use such as hotel office restaurant or other business or rental use of the product or service by anyone other than a PASC Factory Servic...

Страница 77: ...0 MINNESOTA 7850 12th Avenue South Airport Business Center Bloomington MN 55425 OHIO 2236 Waycross Road Civic Center Plaza Forest Park OH 45240 PENNSYLVANIA 2221 Cabot Blvd West Suite B Langhorne PA 19047 TEXAS 13615 Welch Road Suite 101 Farmers Branch TX 75244 WASHINGTON 20425 84th Avenue South Kent WA 98032 HAWAII 99 859 Iwaiwa Street Aiea Hawaii 96701 Phone 808 488 1996 Fax 808 486 4369 Central...

Страница 78: ...l compartimento del cassette 3 Introduzca un cassette con la parte de la ventana hacia arriba Asegúrese de que la lengüeta de grabación esté cerrada Página 6 Film de protección Nota Retire la película protectora antes de utilizarlo 1 2 4 3 Antes de comenzar Cargue la battería Página 11 VCR OFF CAMERA M CARD Grabación con la cámara Cuando el monitor LCD se enchuentra totalmente abjerto el visor se ...

Страница 79: ... cinta 4Presione el botón de reproducción PLAY para reproducir la cinta 5 Presione el botón de parada STOP para detener la reproducción Botón para interrumpir el cambio al M CARD Para ver la reproducción en el LCD pantalla de visualización de cristal líquido Cuando el monitor LCD se enchuentra totalmente abierto el visor se DESACTIVA automáticamente Antes de comenzar Cargue la battería Pàgina 11 T...

Страница 80: ... Strap 8 High Speed Shutter 48 J Jog Search 29 L Lens Cap 6 8 22 Limited Warranty 76 M Macro Focus 47 MAGICVU 0LUX Switch 42 Manual Focus 47 Memory Counter 19 MENU OSD 14 15 16 17 18 Memory Card 6 10 64 M CARD Door 10 P PC Cable 6 54 PC Connection 54 62 Picture in Picture PinP 45 PLAY Indicator 20 Playback 27 28 29 30 31 Power Supply 11 12 Program AE 43 R REC Indicator 20 Recording Still Pictures ...

Отзывы: