2-28
SUB COLOR
00
Control Function
Value to be
adjusted
SUB COLOR
SUB TINT
SUB BRIGHT
SUB SHARPNESS
R CUT -OFF
G CUT -OFF
B CUT -OFF
G DRIVE
B DRIVE
SUB CONTRAST
H CENTER
V SIZE
C0 – FF, 00 – 3F
E0 – FF, 00 – 1F
C0 – FF, 00 – 3F
E0 – FF, 00 – 1F
00 – 7F
00 – FF
00 – FF
00 – 7F
00 – 7F
00 – 0F
00 – 0F
00 – 7F
Control functions
Range
Default
00
00
F0
00
1E
3C
3C
40
40
06
08
40
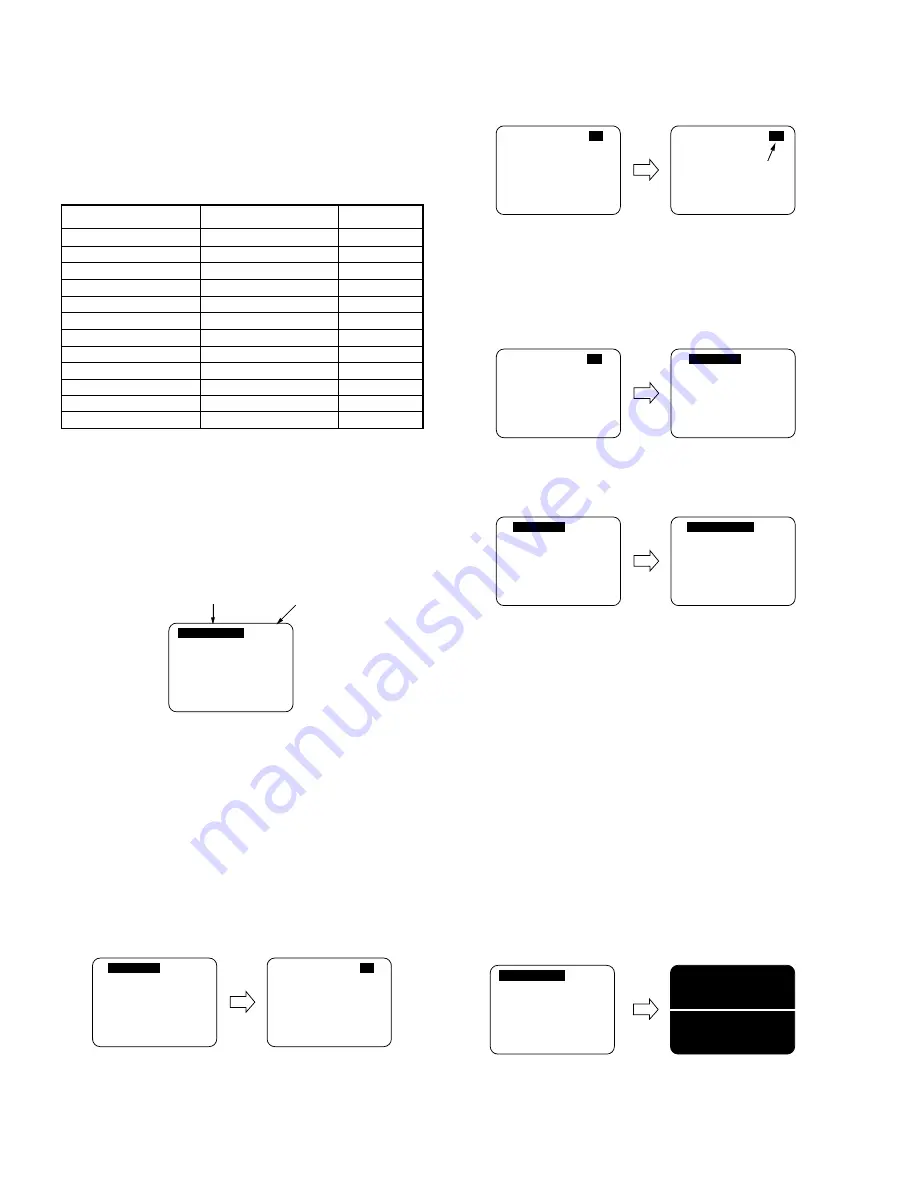
3. Press CH UP/DOWN key on the remote control to adjust
the value of the selected control.
Fig. E5-4
Note:
You can select a desired channel by using the numbered
keys on the remote control in EVR adjustment mode.
4. Press VOL UP/DOWN key on the remote control so that the
shaded area moves to the control function.
Fig. E5-5
5. Press CH UP/DOWN key on the remote control to select a
control function for the next adjustment if necessary.
Fig. E5-6
How to release from EVR Adjustment Mode:
Press and hold STOP, FF, and VOL DOWN button on the unit
together over 5 seconds again or press the POWER button
OFF.
The adjusted value will be written to Memory IC(IC6004).
HOW TO ENTER SERVICE MODE
1. Enter EVR adjustment mode.
2. Press DISPLAY key on the remote control for collapse
scan.
Note:
Before pressing DISPLAY key on the remote control for
collapse scan, select the desired control function and move
the shaded area to the value for adjustments you will
proceed.
Fig. E5-7
How to release from Service Mode:
Press DISPLAY key again on the remote control.
EVR (Electronic Variable Register)
Adjustment with the remote control
This unit has electronic technology using I
2
C Bus concept.
The following control functions are adjusted by using "On
Screen Displays" and the remote control instead of adjusting
mechanical controls (VR).
Fig. E5-1 Control Functions
HOW TO ENTER EVR ADJUSTMENT MODE
Press and hold STOP, FF, and VOL DOWN button on the
unit together over 5 seconds with no cassette inserted.
The adjustment overlay will appear.
Fig. E5-2
How to adjust:
1. Press CH UP/DOWN key on the remote control to select
control function to be adjusted.
Important Note:
Make a note of the original value of the controls before
modifying in case the wrong control is adjusted.
2. Press VOL UP/DOWN key on the remote control so that the
shaded area moves to the value.
Fig. E5-3
SUB TINT
00
SUB TINT
00
SUB TINT
SUB TINT
07
Adjust
00
SUB TINT
07
SUB TINT
07
SUB TINT
07
SUB COLOR
00
SUB COLOR
00
Содержание Omnivision PV-M2768
Страница 56: ......
Страница 57: ......
Страница 58: ......
Страница 59: ......
Страница 60: ......
Страница 61: ......
Страница 62: ......
Страница 63: ......
Страница 64: ......
Страница 65: ......
Страница 66: ......
Страница 67: ......
Страница 68: ......
Страница 69: ......
Страница 70: ......
Страница 71: ......
Страница 72: ......
Страница 73: ......
Страница 74: ......
Страница 75: ......
Страница 76: ......
Страница 77: ......
Страница 78: ......
Страница 79: ......
Страница 80: ......
Страница 81: ......
Страница 82: ......
Страница 83: ......
Страница 84: ......
Страница 85: ......
Страница 86: ......
Страница 87: ......
Страница 88: ......
Страница 89: ......
Страница 90: ......
Страница 91: ......
Страница 92: ......
Страница 93: ......
Страница 94: ......
Страница 95: ......
Страница 96: ......
Страница 97: ......
Страница 98: ......
Страница 99: ......
Страница 100: ......
Страница 101: ......
Страница 102: ......
Страница 103: ......
Страница 104: ......
Страница 105: ......
Страница 106: ......
Страница 107: ......
Страница 108: ......
Страница 109: ......
Страница 110: ......
Страница 111: ......
Страница 112: ......
Страница 113: ......
Страница 114: ......
Страница 115: ......
Страница 116: ......
Страница 117: ......
Страница 118: ......
Страница 119: ......
Страница 120: ......
Страница 121: ......
Страница 122: ......
Страница 123: ......
Страница 124: ......
Страница 125: ......
Страница 126: ......
Страница 127: ......
Страница 128: ......
Страница 151: ...Printed in Japan ...


