


- 5 -
EXT LINK
EXT LINK TV ASPECT TV/TEXT
TRACKING/V-LOCK
TRACKING/V-LOCK
VOLUME
INPUT SELECT
INPUT SELECT
INDEX
PROG PLAY
PROG PLAY AUDIO
REC
PDC
SP/LP/EP
PROG./CHECK
PROG./CHECK
TIMER
OFF TIMER OSD/DISPLAY RESET/CANCEL
RESET/CANCEL
CH
CH
I-TIMER
ENTER
VIDEO Plus+
Auto Setup
1
- - - - - - - - - - - - - - - - - - - - - - - - - - - - - - - - - - - - - - - - - - - - - - - - - - - - - - - - - - - - - - -- - - - - - - - - - - - - - - - - - - - - - - - - - - - - - - - - - - - - - - - - - - - - - - - - - - -
2
- - - - - - - - - - - - - - - - - - - - - - - - - - - - - - - - - - - - - - - - - - - - - - - - - - - - - - - - - - - - - - -- - - - - - - - - - - - - - - - - - - - - - - - - - - - - - - - - - - - - - - - - - - - - - - - - - - -
3
- - - - - - - - - - - - - - - - - - - - - - - - - - - - - - - - - - - - - - - - - - - - - - - - - - - - - - - - - - - - - - -- - - - - - - - - - - - - - - - - - - - - - - - - - - - - - - - - - - - - - - - - - - - - - - - - - - -
4
- - - - - - - - - - - - - - - - - - - - - - - - - - - - - - - - - - - - - - - - - - - - - - - - - - - - - - - - - - - - - - -- - - - - - - - - - - - - - - - - - - - - - - - - - - - - - - - - - - - - - - - - - - - - - - - - - - -
5
- - - - - - - - - - - - - - - - - - - - - - - - - - - - - - - - - - - - - - - - - - - - - - - - - - - - - - - - - - - - - - -- - - - - - - - - - - - - - - - - - - - - - - - - - - - - - - - - - - - - - - - - - - - - - - - - - - -
6
- - - - - - - - - - - - - - - - - - - - - - - - - - - - - - - - - - - - - - - - - - - - - - - - - - - - - - - - - - - - - - -- - - - - - - - - - - - - - - - - - - - - - - - - - - - - - - - - - - - - - - - - - - - - - - - - - - -
7
- - - - - - - - - - - - - - - - - - - - - - - - - - - - - - - - - - - - - - - - - - - - - - - - - - - - - - - - - - - - - - -- - - - - - - - - - - - - - - - - - - - - - - - - - - - - - - - - - - - - - - - - - - - - - - - - - - -
8
- - - - - - - - - - - - - - - - - - - - - - - - - - - - - - - - - - - - - - - - - - - - - - - - - - - - - - - - - - - - - - -- - - - - - - - - - - - - - - - - - - - - - - - - - - - - - - - - - - - - - - - - - - - - - - - - - - -
9
- - - - - - - - - - - - - - - - - - - - - - - - - - - - - - - - - - - - - - - - - - - - - - - - - - - - - - - - - - - - - - -- - - - - - - - - - - - - - - - - - - - - - - - - - - - - - - - - - - - - - - - - - - - - - - - - - - -
10
START
3,10
5,8
5
6,7
1
4
4,7
4
1
FINISH
BBC1
VCR Display
On-Screen Display
VCR
TV
EXIT
EXIT
1
2
3
7
8
0
9
4
5
6
Owner ID
PIN number : 846
Name
:
:
:
*
**************
***********
***********
House No
Postcode
:
: store
:
select
exit
ENTER
EXIT
You now have the opportunity
to enter your details and
help the police crack crime
see instruction book.
ENTER
ENTER
Auto-Setup
Tuning
: Ch 21
To set the Owner ID now, press the
buttons or
buttons (
) to enter a four-digit
PIN number.
If you make a mistake, press the
button ( ),
then enter the correct digit. Make sure that you will
remember the PIN number (make a note of it).
Numeric
Cursor
Cursor
Press the
button and the
button ( ).
The cursor moves to [Name].
ENTER
Cursor
Press the
button ( ).
Cursor
Press the
buttons (
) to select a letter and
then press the
button ( ) to move to the next
letter.
Repeat these steps until you have entered your name.
Cursor
Cursor
Press the
button to finish setting your name.
ENTER
Enter the [House No] and [Postcode] in the same way.
When you are happy with the information you have
entered, press the
button to leave the Owner ID
screen. You will now see the TV picture.
Your VCR is now ready to use.
EXIT
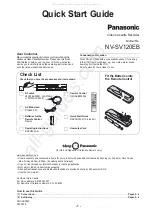
Set the
switch to
. Turn on the TV, then
press the
button to switch on the VCR.
The VCR will now start Auto Setup.
The first digit of the VCR display will begin to flash.
After a while, it will stop flashing and the RF output
channel number will be displayed.
, you will see the screen on the right during Auto
Setup.
VCR/TV
VCR
Standby/ON
!
!
If you have connected the VCR to the TV with a Scart
cable
You can skip step
below.
2
Select an unused channel pre-set on your TV and tune
it to the RF output channel number shown on the VCR
display (or until you can clearly see the Auto Setup
screen shown on the right). Store the new video
playback channel (refer to the instructions for your TV).
If you can see interference on the picture, you may
need to change the RF output channel. Follow the
instructions on page 6 to do this.
!
Press the
button. The Owner ID screen will appear.
You can complete the Owner ID now or skip this step
and do it later. To do it later, press the
button
again. Your VCR is now ready to use.
EXIT
EXIT
Auto-Setup
VCR Ch : 24
EXIT
!
!
!
If Auto Setup has previously been completed, this
. In this case you can run
Auto Setup again. See page 43
.
indication will not appear
of Operating Instructions
In some cases, where the VCR has been connected to your TV using the RF cable only (no Scart)
the RF output channel may interfere with the TV stations transmitted in your area.
Please refer to
for removing the interference
.
If you want to cancel Auto Setup before it has finished, press the
button. You can restart Auto
Setup later, see page 43 of Operating Instructions.
This may prevent
you from seeing the On-Screen Display clearly.
page 6
before restarting Auto Setup (page 43 of Operating Instructions)
EXIT
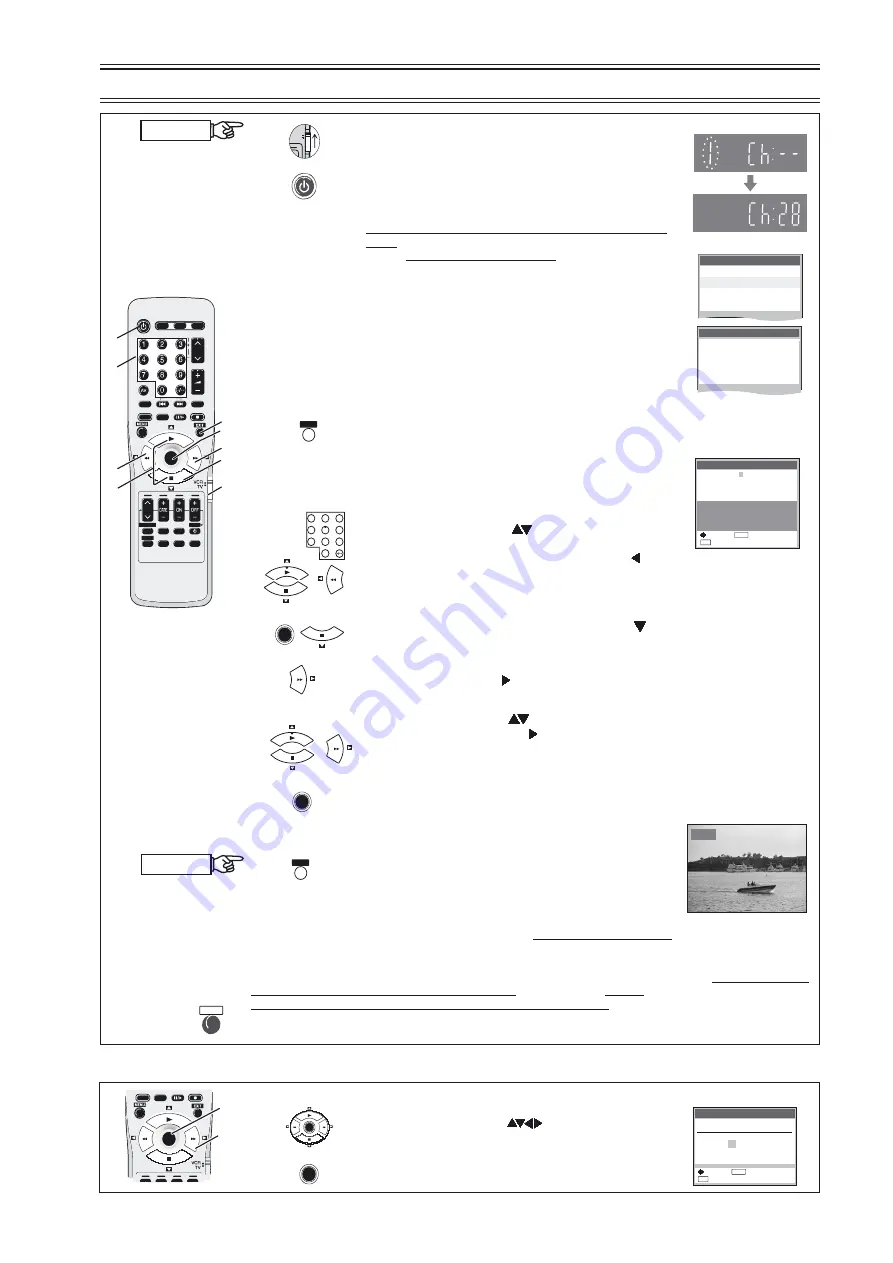
Note:
If the clock setting menu appears after Auto Setup has finished
(Auto clock set was not possible due to a weak signal)
PROG PLAY
PROG PLAY AUDIO
REC
ENTER
On-Screen Display
1
2
2
1
Datum / Zeit
:
:
:
:
wählen
zurück
abbrechen
speichern
ENTER
MENU
EXIT
Clock set
Time
: 12 : 00 : 00
:
:
:
select
store
exit
ENTER
EXIT
Date
: 11.
6. 03
MANUAL
ENTER
ENTER
Press the
buttons (
) to set the correct time
and date.
Cursor
Press the
button to finish this setting.
ENTER
All manuals and user guides at all-guides.com