Panasonic NV-HS830 Series Скачать руководство пользователя страница 17

17

Search Functions

Programme List Search

• Each timer recording programming on the tape must be at 

least 15 minutes long. (25 minutes in the EP mode)

1)

Press the [LIBRARY/SEARCH] 

(4)

 to display the Programme 

List menu.

2)

Press the [Cursor] 

(38)


34

 to 

select the programme that you want to locate and play 
back.

3)

Press the [LIBRARY/SEARCH] 

(4)

 to start the search for 

the beginning of the selected programme.
• After the desired recorded programme has been found, 

playback starts automatically.

• If, after playback has started, you want to search for the 

beginning of the same or another programme, press the 
[LIBRARY/SEARCH] 

(4)

. Playback stops, and the 

Programme List menu appears.

To Cancel the Programme List Search

Press the [EXIT] 

(27)

.

Notes:

• If you take out the cassette after a timer recording has finished, 

pressing the [LIBRARY/SEARCH] 

(4)

 activates the Intro-Jet Scan.

• If you programme linked timer recordings, Programme List Search 

function does not work.

VISS=VHS Index Search System

• Each programme recorded on the tape must be at least 5 

minutes long.

Press the [INDEX] 

(31)

 to start the index search. If you want 

to search for the 2nd recorded programme in forward 
direction, press the [INDEX] 

L


(31)

 twice. 

• The VCR fast-forwards or rewinds the tape and searches 

for the specified index signal. When it has been found, 
playback starts automatically.

To Cancel the Index Search or to Stop Playback

Press the [Stop] 

(9)

.

Intro-Jet Scan

• Each programme recorded on the tape must be at least 

15 minutes long. (25 minutes in the EP mode)

1)

Press the [LIBRARY/SEARCH] 

(4)

 to start the Intro-Jet 

Scan.
• After rewinding the tape to the beginning, the VCR 

plays it back at high speed for approximately 10 
seconds. It then fast-forwards the tape to the next tape 
position marked by an index signal (beginning of a 
programme), and every time an index signal is found, 
the VCR switches over to high-speed playback (Cue) 
for about 10 seconds.

2)

When you have found the programme that you want to 
view, press the [Play] 

(26)

 to start normal playback.

To Cancel the Intro-Jet Scan or to Stop Playback

Press the [Stop] 

(9)

.

Note:

• If you press the [LIBRARY/SEARCH] 

(4)

 after a timer recording 

has finished, but before ejecting that cassette, the Programme List 
Search will be activated.

Editing

Album Function

The album function lets you collect desired scenes (both 
moving and still pictures) and create the equivalent of a 
photo album, but on video cassette.


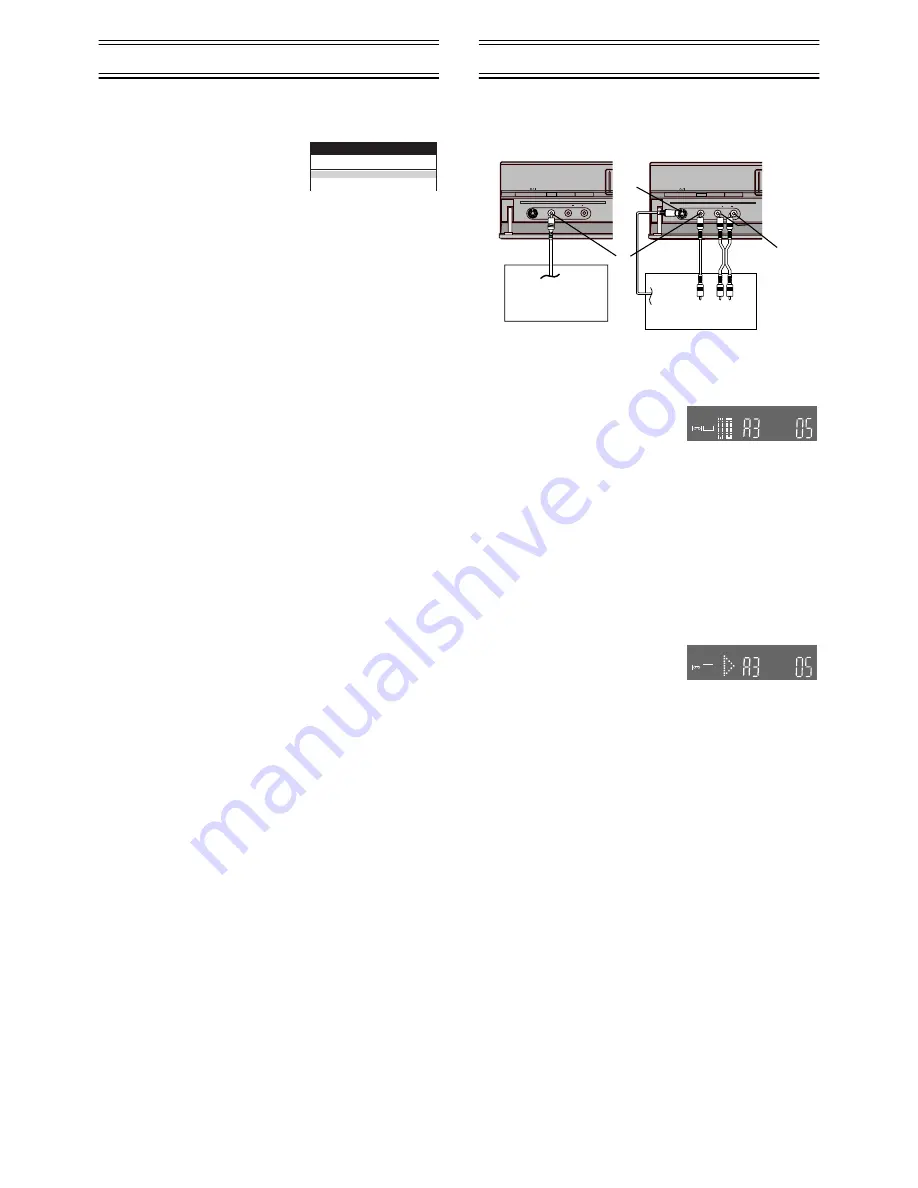
• Connect a digital still camera, a video movie camera or 

another external source to the Video Input socket/S-Video 
Input socket and Audio Input sockets on the front panel of 
this VCR.

1)

Press the [STILL ALBUM] 

(6)


on the remote control to put the 
VCR in the recording pause 
mode.
• The VCR automatically selects the AV Input (external 

input) [A3] and then switches over to the recording 
pause mode. The figure for the preset recording time 
(seconds) appears on the VCR display. The initial 
setting is [05] (5 seconds).

2)

Press the [INDEX] 

L


(31)

 or [INDEX] 

K


(31)

 to 

change the recording time. You can set any time 
between [3] and [20] seconds.

3)

Start playback on the source unit to search for the point 
from which you want to copy onto this VCR.

4)

When that point is reached, 
press the [STILL ALBUM] 

(6)


on the remote control again to 
start recording.
The VCR records the picture (and sound) for 5 seconds 
and then automatically switches over to the recording 
pause mode.

5)

When you have recorded all desired scenes, press the 
[Stop] 

(9)

 to finish recording.

Hints:

• If you connect a digital still camera, use a camera equipped with 

the video output socket. Use the cable supplied with the still 
camera to connect it. For details, also read the operating 
instructions of the equipment to be connected.

• If you leave the VCR in the recording pause mode for more than

5 minutes, the VCR automatically switches over to the stop mode 
to protect the video heads. In this case, press the
[STILL ALBUM] 

(6)

 again to put the VCR in the recording pause 

mode again.

• If you want to add background music or narration to the scenes 

recorded with the album function, perform Audio Dubbing as 
explained on page 18. (For NV-HS880 Series)

• Depending on the output system of the digital still camera, the 

pictures may not be recorded correctly.

• If you dub still pictures from a conventional analogue video movie 

camera or VCR, some picture distortion may occur in the recorded 
picture.

Programme List

Pos
Name

Date

Start

1.

ZDF

27/10

17:46

2.

ARD

28/10

15:00

Panasonic VCR

AV3 IN

L MONO AUDIO

VIDEO

4

S-VIDEO

R

INTELLIGENT TIMER

3D DNR

AV3 IN

L MONO AUDIO

VIDEO

4

S-VIDEO

R

INTELLIGENT TIMER

3D DNR

Digital still camera

Video movie camera


(45)


(46)


(44)

REC

REC

REC

REC

Содержание NV-HS830 Series

Страница 1: ...ng 18 Setting the VCR s Clock 20 Various Settings 20 Other Function 22 Before Requesting Service 23 Index 25 Specifications 26 Model No NV HS880 Series NV HS830 Series VQT9606 Contents Page Video Cassette Recorder Operating Instructions Bedienungsanleitung Please read through all these operating instructions especially the safety information before connecting or operating the video cassette record...

Страница 2: ... VCR Connecting or handling the equipment with wet hands Using a cell phone near the VCR because doing so may cause noise to adversely affect the picture and sound Do Wipe the VCR with a clean and dry cloth Install the VCR in a horizontal position Keep the VCR TV and other equipment switched off until you have finished all connections Condensation may form in the following cases The VCR is brought...

Страница 3: ...IO IN socket AV3 47 A DUB For NV HS880 Series 48 EXT LINK 49 CVC CVC Super indicator 50 VCR display 51 REC OTR 52 Pause Still 53 VIDEO OUT socket 54 S VIDEO OUT socket 55 AC Input socket 56 AV1 21 pin Scart socket 57 AV2 21 pin Scart socket 58 NORMAL S VIDEO OUT SORTIE 59 AUDIO OUT socket 60 RF IN socket 61 RF OUT socket VCR 1 2 1 2 3 7 8 0 9 4 5 6 INPUT SELECT Í DIRECTTV REC TV ASPECT AV LINK TV ...

Страница 4: ...en format between the wide screen and other formats VOLUME 32 To adjust the volume of the TV TV TEXT 34 To switch between normal TV mode and teletext mode Teletext 37 If your TV is equipped for Teletext reception you can use these buttons to change the teletext information displayed on the screen and select desired information For details refer to your TV s operating instructions Setting the Remot...

Страница 5: ... a registered trademark of Panasonic 2 DATA LOGIC is a registered trademark of Metz 3 Easy Link is a registered trademark of Philips 4 Megalogic is a registered trademark of Grundig 5 SMARTLINK is a registered trademark of Sony For details refer to your TV s operating instructions or consult your dealer Unlike in most commercially sold 21 pin Scart cables in fully wired 21 pin Scart cables all 21 ...

Страница 6: ...tion If you select Schweiz Suisse or Svizzera on the Country setting menu the other setting menu appears automatically to let you set Power save to ON In this setting the VCR s power consumption is minimised when it is off Standby mode To turn the VCR on keep the VCR ON OFF 1 pressed on the VCR main unit not with the remote control Preset Download To Set Up this VCR with a TV Already in Use 1 Swit...

Страница 7: ...EXIT 27 When the clock setting menu appears after Auto Setup has finished 1 Press the Cursor 38 3421 to set the correct time and date 2 Press the OK 24 to conclude the setting To confirm that the TV stations have been tuned correctly by the Auto Setup function See page 18 When no station has been set confirm all connections of the VCR again and restart the Auto Setup See page 19 When the station n...

Страница 8: ...nel 3 Press the OK 24 to conclude the setting To cancel the Auto Setup before it has finished Press the EXIT 27 When the clock setting menu appears after Auto Setup has finished 1 Press the Cursor 38 3421 to set the correct time and date 2 Press the OK 24 to conclude the setting To confirm that the TV stations have been tuned correctly by the Auto Setup function See page 18 When no station has bee...

Страница 9: ... not appear in repeat playback mode To Cancel the Repeat Playback Mode Press the Stop 9 To Rewind the Tape a Little to View the Same Scene Again Replay Function Press the REPLAY 5 Rewind the tape a little from its present position and play it back again During review playback when you press this button the VCR briefly switches over to cue playback and play it back again When the VCR is in the stop...

Страница 10: ...it repeatedly changes the indication in the following order For certain cassettes the remaining tape time may not be displayed correctly Clock Counter Remaining Tape Time Clock To Select the Recording Duration and Perform Timer Recording OTR One Touch Recording 1 Press the REC OTR 51 to start recording 2 Press the REC OTR 51 on the VCR repeatedly to select the desired recording duration Every time...

Страница 11: ...on a VHS VCR without S VHS quasi playback function noisy playback picture will appear If you want to make a recording in the VHS format in order to play it back on a VHS VCR set the S VHS to OFF so that the S VHS indicator goes out See page 21 Note When receiving SECAM signals or when you set Video system on the Manual tuning menu or TV system on the Other settings menu to MESECAM see pages 19 and...

Страница 12: ...rt socket If your satellite receiver has a VCR socket connect the cable to it 3 21 pin Scart cable not supplied Set AV2 to EXT EXT LINK 1 or EXT LINK 2 For details see page 21 If the satellite receiver is not equipped with a 21 pin scart socket 1 Satellite receiver not supplied 2 Aerial Input socket 3 Aerial Output socket 4 Aerial not supplied 5 Aerial lead not supplied 6 RF coaxial cable not supp...

Страница 13: ... refers to the device used to decode scrambled broadcasts Pay TV 1 Decoder not supplied 2 21 pin Scart socket 3 21 pin Scart cable not supplied 1 Connect a 21 pin Scart cable not supplied to the AV2 21 pin Scart socket on the VCR and to the 21 pin Scart socket on the decoder 2 Connect the decoder s mains lead to an AC mains socket 3 Set AV2 to DECODER For details see page 21 AV Link Function If th...

Страница 14: ...recording of a TV programme with the SHOWVIEW number 721114 1 Press the SV V ShowView 30 to display the menu for entering the SHOWVIEW number on the TV 2 Press the Numeric 2 to enter the SHOWVIEW number If you have entered a wrong digit press the Cursor 38 2 and then enter the correct digit 3 Press the OK 24 to display the programmed content 4 Press the SP LP EP 21 to set the desired tape speed Re...

Страница 15: ...start and stop with the actual broadcasting start and stop of the TV programme Press the Cursor 38 3421 to make the ON indication appear ON must be displayed under VPS PDC on the TV screen The TV station must broadcast VPS PDC signals The programme starting time must be set correctly to the starting time listed in the newspaper magazine To Check Change or Cancel Timer Recording Programmings 1 Pres...

Страница 16: ...flashing check the timer recording details again See page 15 Protecting programmes 1 Press the I TIMER 15 to display the menu 2 Press the Cursor 38 43 to select the programme details that you want to protect then press the Cursor 38 1 to lock it A lock symbol appears to the left of the programme Locked programmes cannot be deleted Releasing the protection 1 Press the I TIMER 15 to display the menu...

Страница 17: ...arch will be activated Editing Album Function The album function lets you collect desired scenes both moving and still pictures and create the equivalent of a photo album but on video cassette Connect a digital still camera a video movie camera or another external source to the Video Input socket S Video Input socket and Audio Input sockets on the front panel of this VCR 1 Press the STILL ALBUM 6 ...

Страница 18: ...and then press the AUDIO 17 during playback to select the mixed sound Manual Tuning This VCR has 99 programme positions that can be preset to receive TV stations If available TV stations are not received due to extraordinary transmission circumstances or if you want to change the name of a TV station or change a TV station you can set it up manually 1 Press the MENU 7 to display the Main menu on t...

Страница 19: ...e DATE 11 r green To move a TV station to another programme position Move Press the ON 10 r yellow and then use the Cursor 38 34 to select the new programme position to which you want to assign the TV station 6 Press the OK 24 to conclude the setting 7 Press the EXIT 27 to exit the On Screen Display Note If downloading of the setup data has been performed only the instruction indication Delete app...

Страница 20: ... set correctly Various Settings 1 Press the MENU 7 to display the Main menu on the TV screen 2 Press the Cursor 38 34 to select Other settings Press the OK 24 to display Other settings menu 3 Press the Cursor 38 3421 to select the desired field then desired position Tape length To set the Tape length of the cassette being used to ensure correct indication of the remaining tape time Set Tape length...

Страница 21: ...c sharpness adjustment of the playback picture SHARP To make the playback picture sharper SOFT To make the playback picture softer Audio playback To set the Audio mode to be used during playback For NV HS880 Series Set Audio mode as follows NORMAL Normally set to this position MIX Use this setting when playing back a cassette tape on which audio dubbing has been performed The Hi Fi sound track wit...

Страница 22: ...s however the playback picture may roll up or down If your TV has a V HOLD control or equivalent adjustment function use it to try to stop the picture movement Crystal View Control Super CVC Super The crystal view control function ensures that you always obtain the optimum picture quality so that you get the best picture automatically While the VCR is turned on the CVC indication is always display...

Страница 23: ...nd tapes it may not be possible to adjust the tracking If you play back a cassette that was recorded on another unit of VCR the picture quality may be inferior in the normal playback slow playback and still playback and it may need to manual adjust the tracking by above method Also on some TVs the picture may scroll up and down in the special playback functions However these are not malfunctions B...

Страница 24: ...ot Possible or Does Not Work Properly When recording is attempted the 1 indication flashes A video cassette with a broken out erasure prevention tab is used Use a cassette with an intact tab or if you want to erase the previously recorded contents on the cassette cover the tab hole with two layers of adhesive tape The playback picture of a recorded programme is distorted or no picture can be seen ...

Страница 25: ...8 19 Menu 4 MESECAM 19 21 Mono 19 N NICAM 22 NTSC playback 22 O OSD 20 22 OTR 10 P PAL 19 21 Playback 9 Playback off timer 9 Pos 15 18 Power save 20 Programme list search 17 Q Q Link 5 R Recording 10 Remaining tape time 10 Remote control mode 21 Repeat Playback 9 Replay 9 Reset 3 Review 9 Rewind 9 RF 5 7 8 S Satellite receiver 12 Scart cable 5 7 Shipping condition 19 SHOWVIEW 14 Slow playback 9 SP...

Страница 26: ...bcarrier phase shift recording Input Level AV1 AV2 AV3 1 0 Vp p 75 ohm terminated Output Level AV1 AV2 1 0 Vp p 75 ohm terminated VIDEO OUT PHONO 1 0 Vp p 75 ohm terminated S VIDEO OUT PHONO 1 0 Vp p 75 ohm terminated RF Modulated UHF channel 21 69 75 ohm AUDIO Input Level AV1 AV2 AV3 j6 dBV more than 10 kohm Output Level AV1 AV2 j6 dBV less than 1 kohm AUDIO OUT PHONO j6 dBV less than 1 kohm Vide...

Отзывы: