background image

Before Use

-6-

(2)

LCD Monitor 

-13-

,

-44-

(3)

Colour Night View Button 
[COLOUR NIGHT VIEW] 

-22-

(4)

Soft Skin Button [SOFT SKIN] 

-22-

(5)

Tele Macro Button [TELE MACRO] 

-20-

(6)

Multi Button [MULTI] 

-27-

Picture-in-Picture Button [P-IN-P] 

-27-

(7)

Recording Check Button [

S

-17-

Recording Button [REC] 

(Available only 

with 

NV-GS33

-35-

(8)

Backlight Button [BACK LIGHT] 

-21-

(9)

Pause Button [

;

-30-

Still Button [STILL] 

-18-

(10)

Fast Forward/Cue Button [

5

-29-

(11)

Play Button [

1

-29-

Enter Button [ENTER] 

-14-

(12)

Stop Button [

-29-

Fade Button [FADE] 

-21-

(13)

Rewind/Review Button [

6

-29-

(14)

Menu Button [MENU] 

-14-

(15)

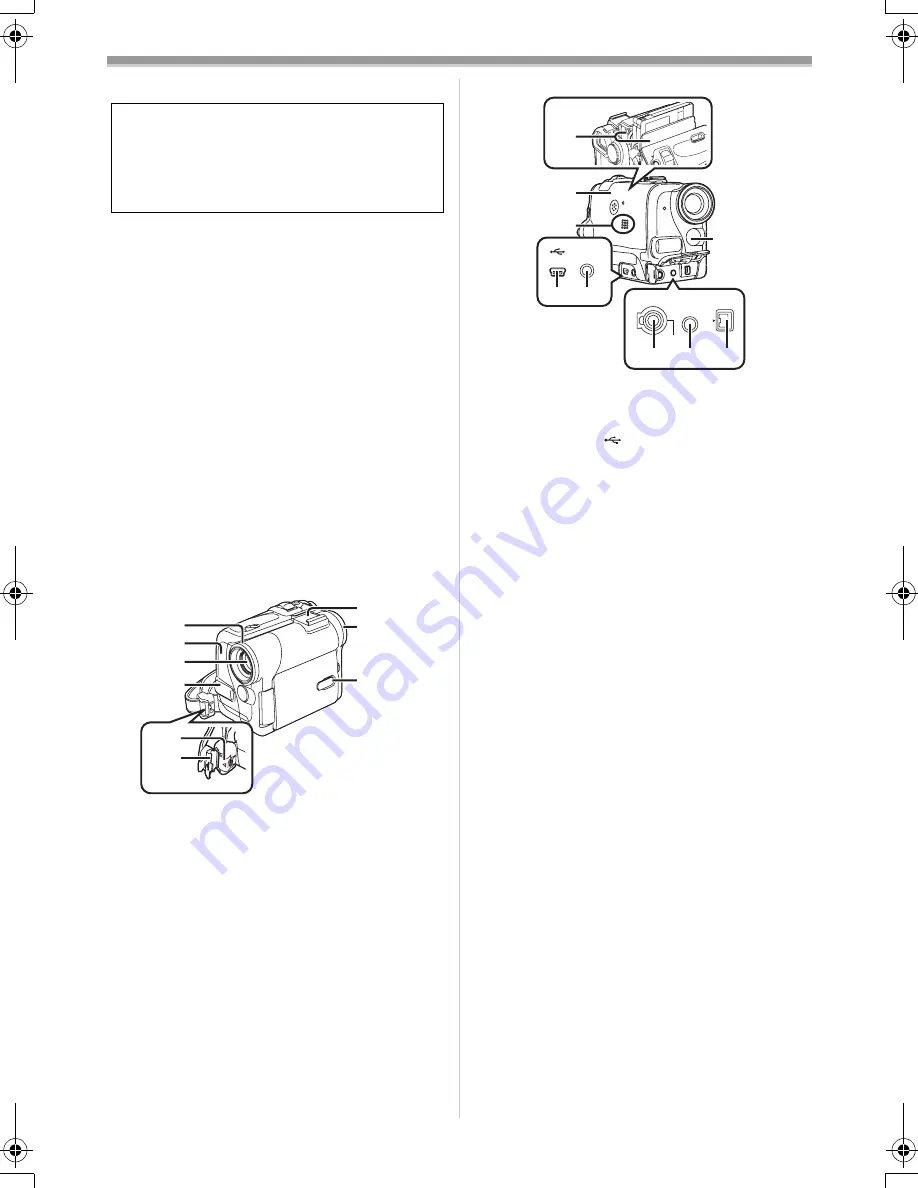
Lens Hood 

-44-

(16)

Recording Lamp 

-17-

(17)

Lens

(18)

Microphone (built-in, stereo) 

-20-

,

-22-

(19)

Lock Button 

-11-

(20)

Lock Cover 

-11-

(21)

Accessory Shoe

Accessories, such as a stereo microphone 

(VW-VMS2E; optional), are attached here.

(22)

Eyecup

(23)

Power LCD Button [POWER LCD] 

-13-

Power LCD Lamp 

-13-

Due to limitations in LCD production 
technology, there may be some tiny bright or 
dark spots on the LCD Monitor screen. 
However, this is not a malfunction and does 
not affect the recorded picture.

(15)
(16)
(17)
(18)

(19)
(20)

(21)
(22)

(23)

(24)

Cassette Holder

(25)

Cassette Compartment Cover 

-12-

(26)

Speaker 

-29-

(27)

USB Socket [

-35-

(28)

S-Video Output Socket [S-VIDEO OUT] 

-33-

(29)

White Balance Sensor 

-24-

Remote Control Sensor 

-9-

(30)

Socket for Free Style Remote Controller 
with Mic [REMOTE] 

-18-

Microphone Socket [MIC]

When connecting an external microphone 

or audio equipment to this socket, the 
built-in microphone does not operate.

When connecting the Free Style Remote 

Controller with Mic to this socket and the 
[TALK] Button is pressed, the built-in 
microphone does not operate. 

-18-

When connecting the pin plug of the Free 

Style Remote Controller with Mic to this 
socket, plug it in as far as it goes.

A compatible plug-in powered microphone 

can be used.

The microphone may make noises 

depending on the type of it. In this case, we 
recommend using the battery for the Movie 
Camera.

(31)

Audio-Video Output Socket [A/V OUT] 

-32-

Headphone Socket [PHONES]

Connecting an AV Cable to this socket 

activates the Movie Camera’s built-in 
speaker, but connecting a headphone, etc. 
deactivates it.

When connecting the pin plug of the AV 

Cable to this socket, plug it in as far as it 
goes.

When using headphones, set [AV JACK] of 

the [INITIAL] sub-menu to [OUT/PHONES]. 
If you set [AV JACK] to [OUT], you may 
hear noises on the right.

S-VIDEO

  OUT

A/V OUT 

PHONES

REMOTE/MIC

DV

(PLUG IN POWER)

(24)

(25)

(26)

(27)


(28)

(29)

(30)


(31)


(32)

33B-ENG.book  6 ページ  2004年2月4日 水曜日 午前11時55分

Содержание NV-GS22

Страница 1: ...Operating Instructions Digital Video Camera Model No NV GS22EB NV GS33EB Before use please read these instructions completely VQT0H66 1 R ...

Страница 2: ...able fuse cover you must ensure that it is refitted when the fuse is replaced If you lose the fuse cover the plug must not be used until a replacement cover is obtained A replacement fuse cover can be purchased from your local Panasonic Dealer IF THE FITTED MOULDED PLUG IS UNSUITABLE FOR THE SOCKET OUTLET IN YOUR HOME THEN THE FUSE SHOULD BE REMOVED AND THE PLUG CUT OFF AND DISPOSED OF SAFELY THER...

Страница 3: ...r example 00 Use only the recommended accessories ª WARNING Do not remove the cover or back there are no user serviceable parts inside Refer servicing to qualified service personnel ª Carefully observe copyright laws Recording of pre recorded tapes or discs or other published or broadcast material for purposes other than your own private use may infringe copyright laws Even for the purpose of priv...

Страница 4: ...mpensation Function 21 Night View Functions 22 Soft Skin Function 22 Wind Noise Reduction Function 22 Cinema Function 22 Recording in Special Situations 23 Recording in Natural Colours 23 Adjusting White Balance Manually 24 Manual Shutter Speed Adjustment 25 Manual Iris Adjustment 25 Manual Focus Adjustment 25 Digital Effect Functions 26 Playback Mode Playing Back a Tape 29 Finding a Scene You Wan...

Страница 5: ...ns Lead 9 2 Battery Pack 9 RJA0053 3X 1 3 7 6 8 VFC3506 N2QAGC000018 4 5 2 K2GJ2DZ00017 K2KC4CB00009 N2QCBD000030 K2KC4CB00008 VGQ7304 VGQ7697 9 VFA0425 VSK0651 10 VFC3778 CGA DU07 3 Remote Controller and Button Type Battery 7 4 Free Style Remote Controller with Mic 8 5 Lens Cap and Lens Cap Cord 11 6 AV Cable 32 7 S Video Cable 33 8 Shoulder Strap 11 9 USB Connection Kit USB Cable and CD ROM 10 C...

Страница 6: ...over 12 26 Speaker 29 27 USB Socket 35 28 S Video Output Socket S VIDEO OUT 33 29 White Balance Sensor 24 Remote Control Sensor 9 30 Socket for Free Style Remote Controller with Mic REMOTE 18 Microphone Socket MIC When connecting an external microphone or audio equipment to this socket the built in microphone does not operate When connecting the Free Style Remote Controller with Mic to this socket...

Страница 7: ...ontroller that is supplied with the Movie Camera most of the Movie Camera functions can be operated from a distance 50 Date Time Button DATE TIME 37 51 Indication Output Button OSD 33 52 Display Button DISPLAY 36 53 Reset Button RESET 46 54 Recording Button REC Available only with NV GS33 35 55 Audio Dubbing Button A DUB 34 56 Cursor Buttons for Variable Speed Search Function π 30 Direction Button...

Страница 8: ...the Free Style Remote Controller with Mic is connected to REMOTE Socket and the TALK Button is pressed the narration microphone is activated and the built in ZOOM INDEX INDEX SELECT STORE STOP K L OSD DISPLAY V REW STILL ADV OFF ON P B DIGITAL DATE TIME RESET TITLE T W s VOL r REC MULTI P IN P PHOTO SHOT START STOP A DUB PLAY PAUSE FF W STILL ADV ENTER 6 1 5 E D VAR SEARCH MENU P B ZOOM 65 66 71 7...

Страница 9: ...Y CONNECTIONS OBSERVED DO NOT ATTEMPT TO RE CHARGE THE OLD BATTERY OR RE USE IT FOR ANY OTHER PURPOSE IT SHOULD BE DISPOSED OF IN WASTE PRODUCTS DESTINED FOR BURIAL RATHER THAN INCINERATION 15 15 15 15 29 If the Remote Controller Mode of the Movie Camera and that of the Remote Controller do not match REMOTE Indication is displayed Setup on the Movie Camera Set REMOTE on the INITIAL Sub Menu to the...

Страница 10: ...ding time with repeated recording and stopping actions 1h10min indicates 1 hour and 10 minutes Battery CGA DU07 is supplied The times shown in the table are approximate times The numbers indicate the recording time when the Viewfinder is used The numbers in parentheses indicate the recording time when the LCD Monitor is used In actual use the available recording time may be shorter The times shown...

Страница 11: ...s securely locked Attaching the Lens Cap To protect the Lens surface attach the Lens Cap 1 Pass one end of the Lens Cap Cord through the attached eye on the Lens Cap Then pass the other end through the loop made by itself and pull tight 2 Pass the end of the Lens Cap Cord through the hole in the Grip Belt Attachment and the Lens Cap through the Lens Cap Cord The removed Lens Cap can be hooked onto...

Страница 12: ...recording To enable recording close the accidental erasure 1 OPEN EJECT 37 PUSH 1 prevention slider by sliding it to the REC arrow direction For other notes concerning this item see 37 Turning on the Movie Camera ª How to Turn on the Power 1 Set the OFF ON Switch 42 to ON while pressing the button 1 The POWER Lamp 43 lights up ª How to Turn off the Power 1 Set the OFF ON Switch 42 to OFF while pre...

Страница 13: ... the LCD Monitor Push the LCD Monitor until it is securely locked ª Adjusting Brightness and Colour Level When LCD EVF SET on the LCD EVF Sub Menu is set to YES the following items are displayed LCD Brightness LCD BRIGHTNESS Adjusts the brightness of the image on the LCD screen LCD Colour Level LCD COLOUR LEVEL Adjusts the colour saturation of the image on the LCD screen Brightness of the Viewfind...

Страница 14: ...l be retained even when the Movie Camera is turned off However if the Battery or AC Adaptor is disconnected before turning off the Movie Camera the selected setup may not be retained The setups of EFFECT2 26 are not retained Menu operation flow is shown in this text by MENU STILL ENTER FADE i s 14 39 List of Menus The figures of the Menus are for explanation purposes only and they are different fr...

Страница 15: ...UND Beep Sound 37 CLOCK SET Date and Time Setting 16 INITIAL SET Initial Setting Mode 37 ª TAPE PLAYBACK MENU Tape Playback Mode 1 PLAYBACK SELECT NEXT MENU EXIT DIGITAL RECORDING DISPLAY LCD EVF INITIAL 12bit AUDIO AUDIO OUT SEARCH TAPE PLAYBACK MENU PLAYBACK Playback Functions Sub Menu SEARCH Index Search Mode 31 12bit AUDIO Audio Selector 34 AUDIO OUT Audio Output Mode 40 2 DIGITAL Playback Dig...

Страница 16: ...s WARNING THE LITHIUM BATTERY IN THIS EQUIPMENT MUST ONLY BE REPLACED BY QUALIFIED PERSONNEL WHEN NECESSARY CONTACT YOUR LOCAL PANASONIC SUPPLIER CLOCK SET SELECT SETUP MENU EXIT 1YEAR 2004 MONTH 10 DAY 8 HOUR 14 MIN 30 LP Mode A desired recording speed can be selected with REC SPEED on the RECORDING Sub Menu If LP Mode is selected the recording time becomes 1 5 times longer than that of SP Mode A...

Страница 17: ...atically To resume recording from this condition turn off then turn on the power again ª Recording Lamp The Recording Lamp 16 lights up during recording and alerts those being recorded that recording is in progress The Recording Lamp does not light up if the REC LAMP on the INITIAL Sub Menu is set to OFF Recording on a Tape 1 Set the OFF ON Switch 42 to ON AUTO MANUAL FOCUS 44 16 The POWER Lamp 43...

Страница 18: ...TO SHOT 35 If you set SHTR EFFECT on the CAMERA Sub Menu to ON you can add an image and a sound like releasing the shutter ª Progressive Photoshot When the æ Indication is displayed Progressive Photoshot Function works You can record still pictures as frame still pictures with higher quality by this function The progressive function may not be activated depending on the function you use 37 ª Conti...

Страница 19: ...Keep the QUICK START Button pressed for approximately 2 seconds and make sure the Quick Start Recording Lamp is not lit For other notes concerning this item see 38 START QUICK 40 40 ON O F F 42 Self timer Recording When you set the self timer the still pictures are automatically taken after 10 seconds on the Tape 1 Set TAPE RECORDING MENU CAMERA SELF TIMER ON The Indication appears 2 Press the PHO...

Страница 20: ... ON The Z MIC Indication is displayed For other notes concerning this item see 38 Digital Zoom Function This function is useful when you want to record close up shots of subjects located beyond a normal zoom range of 1k to 10k magnification TELE MACRO 5 T MACRO T MACRO T MACRO PHOTO SHOT 35 41 Z MIC Z MIC With the Digital Zoom Function you can select a magnification from 20k up to 500k 1 Set TAPE ...

Страница 21: ...lly PHOTO SHOT 35 41 STILL ENTER FADE i s 12 41 Fade Out Fade Out causes images and sounds to disappear gradually leaving a black screen at the end of a scene 1 Keep pressing the FADE Button 12 while recording The image fades out gradually 2 When the image is completely gone press the Recording Start Stop Button 41 to stop recording 3 Release the FADE Button 12 The still picture cannot fade in or ...

Страница 22: ...ing this item see 38 Soft Skin Function This enables you to record skin colours in a softer tone In order to get the best result avoid COLOUR NIGHT VIEW C NIGHT VIEW 3 0LUX NIGHT VIEW C NIGHT VIEW background colours similar to the skin colour of the subject Otherwise this may result in a softer background lacking in detail 1 Press the SOFT SKIN Button 4 The Indication appears To obtain the best ef...

Страница 23: ...kground 3 4 Low Light Mode For recording a dark scene brighter 4 Ω Spotlight Mode For recording a subject under a spotlight in a party theatre etc 5 º Surf Snow Mode For recording in a glaring surrounding such as ski slopes beaches etc To Cancel the Programme AE Function Set the PROG AE on the CAMERA Sub menu to OFF Or set the AUTO MANUAL FOCUS Switch to AUTO For other notes concerning this item s...

Страница 24: ...2 4 AUTO MANUAL FOCUS 44 STILL ENTER FADE i s 11 4 Press the 5 Button 10 or 6 Button 13 until the 1 Indication is displayed 5 Keep pressing ENTER Button 11 until the 1 Indication stops flashing To Resume Automatic Adjustment Press the 5 Button 10 or 6 Button 13 until the AWB Indication is displayed Or set the AUTO MANUAL FOCUS Switch to AUTO ª About White Balance Sensor The White Balance Sensor 29...

Страница 25: ... You can use this function when the screen is too bright or too dark AUTO MANUAL FOCUS 44 STILL ENTER FADE i s MNL 1 1000 11 1 Set the AUTO MANUAL FOCUS Switch 44 to MANUAL The MNL Indication appears 2 Press the ENTER Button 11 until the Iris Indication appears 3 Press the 5 Button 10 or 6 Button 13 to adjust the iris Range of Iris Adjustment CLOSE Closed F16 F2 0 OP Opened i0dB OPi18dB When a val...

Страница 26: ...saic Mode MOSAIC It produces a mosaic like image 8 Mirror Mode MIRROR The right half of an image becomes a mirror image of the left half 9 Stretch Mode STRETCH The Picture is expanded horizontally 10 Slim Mode SLIM The picture is expanded vertically Digital Effects 2 EFFECT2 11 Negative Mode NEGA The colours of the recorded image are inverted as seen in a negative 12 Sepia Mode SEPIA It records a ...

Страница 27: ...e deleted one by one they cannot be displayed again For other notes concerning this item see 40 ª Picture in Picture Mode You can display a sub screen still picture inside the screen MENU STILL ENTER FADE i s 14 MULTI P IN P 6 1 Set TAPE RECORDING MENU DIGITAL EFFECT1 P IN P 2 Aim the Movie Camera at the scene you want to capture and press the P IN P Button 6 to insert a small still picture A smal...

Страница 28: ...rt Stop Button 41 to pause the recording The last scene is stored in memory The WIPE or MIX Indication changes to B or C 4 Press the Recording Start Stop Button 41 to restart the recording The last image of the previous scene gradually changes to the new scene For other notes concerning this item see 40 41 ...

Страница 29: ...ER FADE i s 12 W T Lever towards T to increase the volume or push the W T Lever towards W to decrease the volume The VOLUME Indication goes off after the adjustment is finished To adjust the volume with the Remote Controller press the T or W Button to display the VOLUME Indication Press the T Button to increase the volume or press the W Button to decrease the volume The VOLUME Indication goes off ...

Страница 30: ...vie Camera is left in the Slow Playback Mode for more than 12 minutes the Movie Camera switches to the Stop Mode to protect the video heads from excessive wear and tear Still Playback Still Advance Playback This Movie Camera is capable of still picture playback and frame advance playback 1 Press the 1 Button 72 2 Press the Button 69 The playback image stops in the Still Playback Mode 3 Press the E...

Страница 31: ...the 9 Button or Button 58 on the Remote Controller When the corresponding button is pressed once the S 1 Indication appears and searching for the subsequent scene marked INDEX MENU STILL ENTER FADE i s 14 INDEX INDEX SELECT STOP K L V REW STILL ADV W s V PLAY PAUSE FF W STILL ADV 6 1 5 E D P B ZOOM 58 58 with an index signal starts Each time the button is pressed after the start of Scene Index Sea...

Страница 32: ...SE FF W STILL ADV 6 1 5 E D P B ZOOM 72 SELECT STORE OFF ON P B DIGITAL ENTER VAR SEARCH MENU 59 61 INDEX INDEX S C STOP K L V REW STILL ADV W s V PLAY PAUSE FF W STILL ADV 6 1 5 E D P B ZOOM 72 2 Press the SELECT Button 59 on the Remote Controller and select WIPE or MIX 3 Press the STORE Button 60 at the moment you want to save as a still picture The B or C Indication appears and the image is sav...

Страница 33: ...n as far as it goes To Make the Indications Appear on the TV Screen Press the OSD Button 51 on the Remote Controller If your TV is not equipped with AV Input Sockets the 21 pin Adaptor purchase separately is necessary Consult your dealer For other notes concerning this item see 40 ZOOM OSD DISPLAY DATE TIME RESET TITLE PHOTO SHOT START STOP 51 ...

Страница 34: ...YBACK Sub Menu to ST2 and you can check the pre recorded sound Use headphones to listen to the pre recorded sound while dubbing the audio For other notes concerning this item see 40 INDEX INDEX SELECT STOP K L V REW STILL ADV T W s VOL r REC MULTI P IN P A DUB PLAY PAUSE FF W STILL ADV 6 1 5 E D P B ZOOM 55 69 Copying on an S VHS or a VHS Cassette Dubbing After connecting the Movie Camera and the ...

Страница 35: ... you can send video from the Movie Camera to other parties via the network Do not connect the USB Cable until the USB driver or Web Camera driver is installed 1 Install the supplied USB driver or Web Camera driver 2 Set the Mode Dial to Tape Recording Mode or Tape Playback Mode when using with DV STUDIO 3 When using as a Web Camera Set CAMERA USB FUNCTION WEB CAMERA When using with DV STUDIO 1 DV ...

Страница 36: ... Programme AE 23 º Surf Snow Mode Programme AE 23 REC Recording 17 PAUSE Recording Pause 17 Self Timer Recording 19 When connecting the Free Style Remote Controller with Mic to REMOTE Socket and the TALK Button is pressed this indication appears 18 Playback 29 Still Playback 30 Fast forward Cue Playback 29 Rewind Review Playback 29 Slow Motion Playback 30 Still Advance Playback 30 Index Search 30 ...

Страница 37: ...0 The built in battery is low 16 NEED HEAD CLEANING The video heads are dirty 42 2END TAPE END The tape came to the end during recording REMOTE CHECK REMOTE MODE Wrong Remote Controller Mode has been selected 9 UNPLAYABLE TAPE OTHER FORMAT You are attempting to play back a tape section that has been recorded with a different TV system UNABLE TO A DUB LP RECORDED Because the original recording was ...

Страница 38: ... sound will be emitted along with the Recording Lamp flashing in the Self timer Standby Mode By operating the OFF ON Switch Recording Start Stop Button or Mode Dial the Self timer Standby Mode is cancelled ª Zoom In Out Functions When you are zooming on a faraway subject a sharper focus is achieved if the recording subject is 1 2 metres or further from the Movie Camera ª Tele Macro Function The Te...

Страница 39: ...mme AE mode Sports Mode During normal playback the image movement may not look smooth Because the colour and brightness of the playback image may change avoid recording under fluorescent light mercury light or sodium light If you record a subject illuminated with strong light or a highly reflective subject vertical lines of light may appear If the light is insufficient the 5 Indication flashes Spo...

Страница 40: ...L Left channel sound main sound R Right channel sound sub sound If you dub a tape recorded at the 12bit selected as the AUDIO REC on the RECORDING Sub Menu playback sound becomes stereo sound regardless of the AUDIO OUT setting if 12bit AUDIO is set to MIX ª Index Search Functions Index Search may not be possible at the beginning of the tape Scene Index Search may not function properly if the inte...

Страница 41: ...ave radiation generated by a microprocessor may adversely affect the Movie Camera causing the disturbance of images and sounds If the Movie Camera is affected by magnetically charged equipment and does not function properly turn off the Movie Camera power and detach the Battery or AC Adaptor and then connect the Battery or AC Adaptor again Thereafter turn on the Movie Camera power Do not use your ...

Страница 42: ...tomatically turns off Leave it for about 2 to 3 hours 3 Turn the Movie Camera on again set it to the Tape Recording Playback Mode and then check if the condensation indication disappears Especially in cold districts dews may be frozen In this case it may take more time before the condensation indication disappears Watch for Condensation even before the Condensation Indication is displayed The cond...

Страница 43: ...y damage the Movie Camera or AC Adaptor ª Cautions for Storage Before storing the Movie Camera take the Cassette out and detach the Battery Store all the components in a dry place with a relatively stable temperature Recommended Temperature 15 to 25oC Recommended Humidity 40 to 60 Movie Camera Wrap it with a soft cloth to prevent dust from getting into the Camera Do not leave the Movie Camera in p...

Страница 44: ...pixels with a mere 0 01 of the pixels inactive or always lit However this is not a malfunction and does not affect the recorded picture Be sure to keep the Lens Hood attached to the Movie Camera so as to shut out unnecessary light Before Requesting Repair Problems and Solutions Power 1 The Movie Camera power cannot be turned on Is the power source connected correctly 9 2 The Movie Camera power is ...

Страница 45: ...operating instructions of your TV and select the channel that matches the input sockets used for the connection Depending on your TV nothing may be shown even if you correctly connect the movie camera with your TV In this case set AV JACK on the INITIAL Sub Menu to OUT 4 Playback picture is not clear Are the heads of the Movie Camera dirty If the heads are dirty playback image cannot be clear 42 5...

Страница 46: ... information that comes through the lens decreases considerably the Movie Camera cannot focus correctly 4 Recording a subject that is surrounded by objects with glossy surfaces or by highly reflective objects Because the Movie Camera focuses on the objects with glossy surfaces or on highly reflective objects the recording subject may become blurry 5 Recording a fast moving subject Because the focu...

Страница 47: ...Y C DISPLAY MEMORY 2 Reset the Tape Counter to zero at the position where you want to stop editing 3 Play back the still picture where you want to start audio dubbing 4 Start audio dubbing 34 Audio dubbing automatically stops at the position where the counter was set to zero ...

Страница 48: ...ht View Mode Video Output Level 1 0 Vp p 75 ohm S Video Output Level Y Output 1 0 Vp p 75 ohm C Output 0 3 Vp p 75 ohm Audio Output Level Line 316 mV 600 ohm Mic Input Mic sensitivity 50 dB 0 dB 1 V Pa 1 kHz Stereo mini jack USB USB 2 0 compliant max 12 Mbps Power Source DC 7 9 7 2 V Power Consumption Recording 2 1 W When using Viewfinder 2 6 W When using LCD Monitor Digital Interface NV GS22 DV O...

Страница 49: ...Mode 26 ª N Negative Mode 26 ª P Photoshot 18 Picture in Picture Mode 27 Playback Digital Effects 32 Playback with Zoom Lever 30 Playback Zoom 31 Portrait Mode 23 Programme AE 23 ª Q Quick Start 19 ª R Recording Check 17 Recording Pause Mode 17 Recording Speed 16 Remaining Tape Time 36 Remote Controller 7 Repeat Playback 40 Review Playback 29 ª S Self Recording 18 Self timer Recording 19 Sepia Mod...

Страница 50: ... 50 ...

Страница 51: ... 51 ...

Страница 52: ...B VQT0H66 1 F0104Sn1024 4000 B C Matsushita Electric Industrial Co Ltd Web site http www panasonic co jp global ...

Отзывы: