background image

10

Care and Cleaning of Your Microwave Oven

After cooking, the oven should be cleaned with a soft cloth moistened with soapy water. If the oven is 

not cleaned occasionally to eliminate grease, it can accumulate and cause the oven to “Smoke” during 

use.

BEFORE CLEANING:

Unplug oven at wall outlet. If outlet is inacces-
sible, leave oven door open while cleaning.

AFTER CLEANING:

Be sure to place the Roller Ring and the 
Glass Tray in the proper position and press 

Stop/Reset

 Button to clear the Display.

Label:

Do not remove, wipe with 
a damp cloth.

Glass Tray:

Remove and wash in warm soapy 
water or in a dishwasher.

Outside oven surfaces:

Clean with a damp cloth. 
To prevent damage to the 
operating parts inside the oven, 
water should not be allowed to 
seep into ventilation openings.

Control Panel:

* Covered with a 

removable protective 

fi

 lm to prevent 

scratches during 
shipping. Small 
bubbles may appear 
under this 

fi

 lm. 

(Hint 

- To remove film, 
apply masking or 
clear tape to an 
exposed corner and 
pull gently.)

* If the Control Panel 

becomes wet, clean 
it with a soft, dry 
cloth. Do not use 
harsh detergents or 
abrasives.

Inside of the oven:

Wipe with a damp cloth 
after using, mild detergent 
may be used if needed. The 
use of harsh detergents or 
abrasives.

Roller Ring and oven cavity 

fl

 oor:

Clean the bottom surface of the oven 
with mild detergent water or window 
cleaner, and dry. Roller Ring may be 
washed in mild soapy water or dish-
washer. These areas should be kept 
clean to avoid excessive noise.

Do not remove waveguide cover:
It is important to keep cover clean 
in the same manner as the inside 
of the oven.

Oven Door:

Wipe with a soft, dry 
cloth when steam 
accumulates inside or 
around the outside of 
the oven door. During 
cooking, especially 
under high humidity 
conditions, steam 
is given off from the 
food. (Some steam will 
condense on cooler 
surfaces, such as the 
oven door. This is 
normal.) Inside surface 
is covered with a heat 
and vapor barrier 

fi

 lm. 

Do not remove.

IT IS IMPORTANT TO KEEP THE OVEN CLEAN AND DRY. 
FOOD RESIDUE AND CONDENSATION MAY CAUSE RUSTING 
OR ARCING AND DAMAGE TO THE OVEN. AFTER USE, WIPE 
DRY ALL SURFACES-INCLUDING VENT OPENINGS, OVEN 
SEAMS, AND UNDER GLASS TRAY.

F0003BP40CP_En_150324.indd   10

F0003BP40CP_En_150324.indd   10

2015/5/4   8:56:34

2015/5/4   8:56:34

Содержание NN-SD965S

Страница 1: ...VE THIS MANUAL FOR FUTURE USE Inverser le manuel pour lire les instructions en fran ais Panasonic Canada Inc 5770 Ambler Drive Mississauga Ontario L4W 2T3 Tel 905 624 5010 www panasonic com F0003BP40C...

Страница 2: ...More Less Feature 18 Inverter Turbo Defrost Feature 19 Defrosting Tips Techniques 19 20 Sensor Reheat Feature 21 Sensor Cook Feature 21 Sensor Cook Chart 22 23 Microwave Recipes 24 Timer Feature Kitch...

Страница 3: ...what the potential hazard is tell you how to reduce the chance of injury and tell you what can happen if the instructions are not followed PRECAUTIONS TO AVOID POSSIBLE EXPOSURE TO EXCESSIVE MICROWAVE...

Страница 4: ...r a swimming pool or similar locations 8 Use this appliance only for its intended use as described in this manual DO NOT use corrosive chemicals vapors or non food products in this appliance This type...

Страница 5: ...vity when not in use 18 Superheated Liquids Liquids such as water coffee or tea are able to be overheated beyond the boiling point without showing evidence or signs of boiling Visible bubbling is not...

Страница 6: ...lways be used when removing items from the oven Heat is transferred from the HOT food to the cooking container and from the container to the Glass Tray The Glass Tray can also be very HOT after removi...

Страница 7: ...use For proper operation the oven must have sufficient air flow Allow 7 6 cm 3 inches of space on both sides of the oven and 5 cm 2 inches of space on top of the oven a DO NOT block air vents If they...

Страница 8: ...sion cord should be at least as great as the electrical rating of the appliance The extension cord must be a grounding type 3 wire cord The longer cord should be arranged so that it will not drape ove...

Страница 9: ...re of the hot oil and can shatter or melt 4 FOODS WITH NONPOROUS SKINS DO NOT COOK REHEAT WHOLE EGGS WITH OR WITHOUT THE SHELL Steam buildup in whole eggs may cause them to explode and possibly damage...

Страница 10: ...esigned for microwave cooking only Always follow instructions provided by the manufacturer DO NOT preheat browning dish for longer than 6 minutes If an oven cooking bag is used for microwave cooking p...

Страница 11: ...e to warm rolls and sandwiches only if labeled safe for microwave use Recycled Paper Towels Napkins No Recycled paper products may contain impurities which may cause sparks or create a fire hazard Par...

Страница 12: ...lean it with a soft dry cloth Do not use harsh detergents or abrasives Inside of the oven Wipe with a damp cloth after using mild detergent may be used if needed The use of harsh detergents or abrasiv...

Страница 13: ...Vapor Barrier Film do not remove 10 Waveguide Cover do not remove 11 Door Release Button 12 Warning Label 13 Function Label 14 Time Weight and Sensor Menu Dial 15 Power Supply Cord 16 Power Supply Pl...

Страница 14: ...tton page 18 Keep Warm Button page 17 More Less Button page 18 Start Button After cooking program setting one tap allows oven to begin functioning If door is opened or Stop Reset Button is pressed onc...

Страница 15: ...Reset button must be pressed 3 times within 10 seconds 1 Display Window Plug into a properly grounded electrical outlet WELCOME TO PANASONIC REFER TO OPERATING INSTRUCTIONS BEFORE USE scrolls across...

Страница 16: ...hoice of English French or Spanish display BEEP CHOICE The oven has both Beep On and Beep Off mode Plug into a properly grounded electrical outlet LB KG CHOICE LANGUAGE CHOICE BEEP CHOICE Press Start...

Страница 17: ...ed again press Stop Reset to exit MENU ACTION ON OFF can be selected when colon or clock appears in the display window MENU ACTION SCREEN helps you to program your oven by prompting the next step to b...

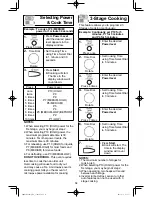
Страница 18: ...der unit Overcooking will cause food to dry out and may cause a fire A microwave oven s cooking power tells you the amount of microwave power available for cooking 3 Stage Cooking This feature allows...

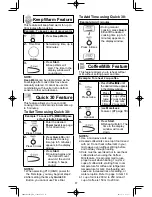
Страница 19: ...d Time using Quick 30 Example Add 3 minutes Press 6 times During manual cooking press Quick 30 until the desired cooking time up to 5 minutes appears in the display window Coffee Milk Feature This fea...

Страница 20: ...RKS When popping multiple bags one right after the other the cooking time may vary slightly This does not affect the popcorn results For Popcorn By using the MORE LESS Button the programs can be adjus...

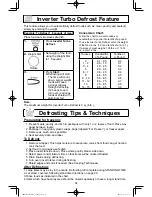
Страница 21: ...ight Note The maximum weight for Inverter Turbo Defrost is 3 kg 6 lb Defrosting Tips Techniques Preparation for freezing 1 Freeze meats poultry and fish in packages with only 1 or 2 layers of food Pla...

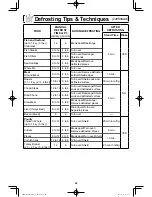
Страница 22: ...min in refrig Chops Steak 12 to 16 6 to 8 Turn over Rearrange Shield ends and defrosted surface 5 min Ribs T bone 12 to 16 6 to 8 Turn over Rearrange Shield ends and defrosted surface Stew Meat 8 to 1...

Страница 23: ...s programming Example To cook Frozen Entr es 1 Press Sensor Cook Reheat 2 Sensor Menu Dial Rotate Select the desired sensor menu using the Sensor Menu Select Dial 3 Optional see More Less Feature page...

Страница 24: ...eps stir Let stand 14 minutes before serving 6 Soup 250 500 ml 1 2 cups Pour soup into a microwave safe serving bowl Cover with vented plastic wrap Stir after cooking 7 Frozen Entr es 220 800 g 8 28 o...

Страница 25: ...oz Place 2 oz pasta and 3 cups hot tap water in a microwave safe 2 qt casserole salt and oil if desired covered with lid or vented plastic wrap For 4 oz pasta use 4 cups water for 6 oz pasta use 6 cu...

Страница 26: ...tard salt and pepper and gradually add the milk Cook for 3 4 minutes at P10 until sauce thickens stirring once Add the cheddar cheese stirring thoroughly Pour and stir the sauce into the macaroni in a...

Страница 27: ...ad instructions To Set Delay Start Example To delay the start of cooking for 5 minutes and cook at P6 power for 3 minutes 1 Press Timer Clock once 2 Time Dial Rotate Set delay time using Time Select D...

Страница 28: ...y melted NOTE Chocolate holds its shape even when softened To toast Coconut 125 ml cup P10 HIGH 1 Place in a microwave safe dish Stir every 30 seconds To soften Cream Cheese 225 g 8 oz P3 MED LOW 1 2...

Страница 29: ...heat liquids in microwave oven without stirring before heating Cup of liquid To warm Beverage 1 cup 250 ml 8 oz 2 cups 500 ml 16 oz P7 MED HIGH 1 2 2 3 To roast Nuts 375 ml 1 cups P10 HIGH 3 4 Spread...

Страница 30: ...pieces cook more quickly than thick pieces Starting Temperature Foods that are at room temperature take less time to cook than if they are chilled refrigerated or frozen Cooking Techniques Piercing Fo...

Страница 31: ...ies or pork chops Rearrange pieces from the edge to the center and pieces from the center to the edge of the dish Turning It is not possible to stir some foods to distrib ute the heat evenly At times...

Страница 32: ...securely Start Button was not pressed after programming Press Start Button The program is not correct Program again according to the Operating Instructions Stop Reset Button has been pressed accidenta...

Страница 33: ...hich result from accidents misuse abuse neglect mishandling misapplication alteration faulty installation set up adjustments misadjustment of consumer controls improper maintenance power line surge li...

Страница 34: ...ress once Press once Time Dial To cook using Quick 30 page 17 To Set Time Press once Set time up to 5 min Press to select Power Level To Add Time During manual cooking Press to add time up to 5 min To...

Страница 35: ...To Use Delay Start page 25 Input up to 2 stage cook ing programs Press once Set time Press once Time Dial Specifications NN SD965S NN SD765S NN SD755S Power Source 120 V 60 Hz Power Consumption 12 3 A...

Страница 36: ...5S NN SD755S Model Number NN TK932S NN TK732S Outside Dimensions W x H 760 mm x 472 mm 30 x 18 9 16 760 mm x 419 mm 30 x 16 Cabinet Opening W x H x D 724 mm x 442 mm x 533 mm 28 1 2 x 17 3 8 x 21 724...

Отзывы: