background image

15

8.2.

REPLACEMENT PARTS LIST

Notes:Important safety notice

• Components identified by   mark have special characteristics important for safety.
• " When replacing any of these components use only manufacturer's specified parts."

MODEL No.MK-ZG1500BTN

Safety

Ref. No.

Part No.

Part Name & Description

Pcs/Set

Remarks

ZG1500BTN

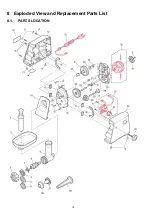
<PARTS LIST>

1

AME04-107-K0

Food pusher

1

2

AME03-131

Hopper

1

3

AME02-121

Grinder cap

1

4

AME33-121

Cutting plate A

1

Fine 3mm

5

AMM10C-180

Cutting plate C

1

Medium 5mm

6

AME05-121

Cutting plate F

1

Coarse 7mm

7

AMM12C-180

Cutting blade

1

8

AMA19-121

Feed screw

1

9

AME01-121

Grinder cap

1

10

AMY03Y131

Caution label

1

11

AMB29-131-K0

PET sheet

2

12

AMB19-131-K0

Motor housing (Right)

1

13

AJB05-108-H

Foot

4

14

AMY10Y131

Rating plate

1

15

AMP96Y131

Power cord

1

220V-240V C-3P

16

AMB90-131

Housing cover

1

17

AMM37A-180

Gear case cushion

4

18

AMM38A-491

Motor support rubber

2

19

AMB89-110

Gear case cover

1

20

AMM05B-180

Bearing B

1

21

AMH99-110

Gear C

1

22

AMM18B-180

Adjustment washer B

1

23

AMM04B-180

Bearing A

1

24

AMH02-110

Gear B

1

25

AMH61-110

Gear shaft A

2

26

AMH97-110

Gear A

1

27

AMM36B-180

Adjustment washer C

1

28

AMH53-110

Adjustment washer D

1

29

AMB26-110

Gear case

1

30

TXM131Y

A.C. Motor

1

AC 220V-240V

31

AMM31-110-K0

Fan

1

32

AMN98Y131-S0

Switch

1

AC 220V-240V

33

AMN99-131-S0

Rotary knob

1

34

AMB91Y131-K0

Motor housing (Left)

1

35

AMB85-131-K3

Locking knob

1

36

AMM24C-270W

Kubbe attachment B

1

37

AMM96C-270W

Kubbe attachment A

1

38

AME96A107

Sausage attachment

1

AMP09-131

Cable tie

2

<SMALL STANDARDIZED METAL PARTS>

A

XTN4+20BFJ

Screw

4

B

XNG8BFJ

Screw

1

C

XWG5F14FJ

Screw

3

D

XYN5+C10FJ

Screw

3

E

SPN-9

Screw

1

F

XTT4+16BFJ

Screw

2

G

XTN4+20BFJ

Screw

4

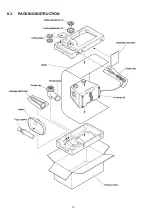
<PACKING SPECIFICATIONS>

AMZ01Y131

Outer carton

1

AMZ50Y131

Operating instructions

1

AMZ03-131

Bottom plate

1

AMZ02-131

Top plate

1

XZB15X70A015

Polybag for cord

1

AMZ04-131

Protect sheet

2

Содержание MK-ZG1500BTN

Страница 1: ... United Arab Emirates Sultanate of Oman State of Qatar Republic of Leb anon PGF TABLE OF CONTENTS PAGE PAGE 1 Safety Precautions 2 2 Specifications 3 3 Location of Controls and Components 4 4 Operating Instructions 5 5 Troubleshooting Guide 10 6 Disassembly and Assembly Instructions 11 7 Wiring Connection Diagram 13 8 Exploded View and Replacement Parts List 14 ...

Страница 2: ...2 1 Safety Precautions ...

Страница 3: ...inder gets stuck do not force meat into it You may feel the feed screw vibrating during use It is not a trouble Do not over tighten the locking knob Keep in mind that some parts of the grinder cannot be washed in a dishwasher This meat grinder is for home use only ...

Страница 4: ...4 3 Location of Controls and Components ...

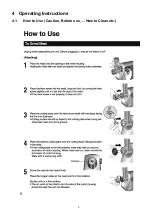
Страница 5: ...5 4 Operating Instructions 4 1 How to Use Caution Before use How to Clean etc ...

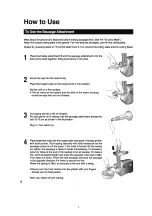
Страница 6: ...6 ...

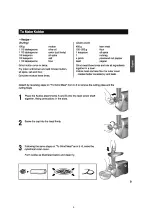
Страница 7: ...7 ...

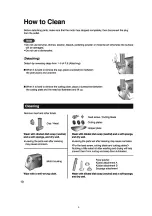
Страница 8: ...8 ...

Страница 9: ...9 ...

Страница 10: ...t the breaker Causes Remedy Power cord broken Replace the power cord Lead wire terminal in poor contact Repair or replace the lead wire terminal Switch in poor contact Replace the switch Carbon brush worn out Replace the carbon brush A C motor coil broken Replace the A C motor Causes Remedy Gears worn out Replace the gears Gears damaged Replace the gears Feed screw worn out Replace the feed screw ...

Страница 11: ... left side down 3 Remove the four pan head tapping screws and detach motor housing right from motor housing left 4 Detach housing cover from the motor housing left 6 2 Disconnecting the power cord and switch 1 Lift the A C motor with gear case and cover and disconnect the lead wire terminal 2 Pull and disconnect the power cord terminal out of the switch 3 Disconnect the lead wire terminal from the...

Страница 12: ...arts come out together attached by grease on the gears Remember their positions and assembling steps Be also careful not to lose them 5 Take out the bearing A gear shaft and washers out of the gear case 6 Remove the three gear case lock screws and detach the gear case from the motor To reassemble the gear case take the reverse steps Be very careful to put all the parts gears washers bearings A and...

Страница 13: ...13 7 Wiring Connection Diagram 7 1 Schematic diagram 7 2 Basic Wiring diagram ...

Страница 14: ...14 8 Exploded View and Replacement Parts List 8 1 PARTS LOCATION ...

Страница 15: ...se cushion 4 18 AMM38A 491 Motor support rubber 2 19 AMB89 110 Gear case cover 1 20 AMM05B 180 Bearing B 1 21 AMH99 110 Gear C 1 22 AMM18B 180 Adjustment washer B 1 23 AMM04B 180 Bearing A 1 24 AMH02 110 Gear B 1 25 AMH61 110 Gear shaft A 2 26 AMH97 110 Gear A 1 27 AMM36B 180 Adjustment washer C 1 28 AMH53 110 Adjustment washer D 1 29 AMB26 110 Gear case 1 30 TXM131Y A C Motor 1 AC 220V 240V 31 AM...

Страница 16: ...16 8 3 PACKING INSTRUCTION ...

Отзывы: