background image

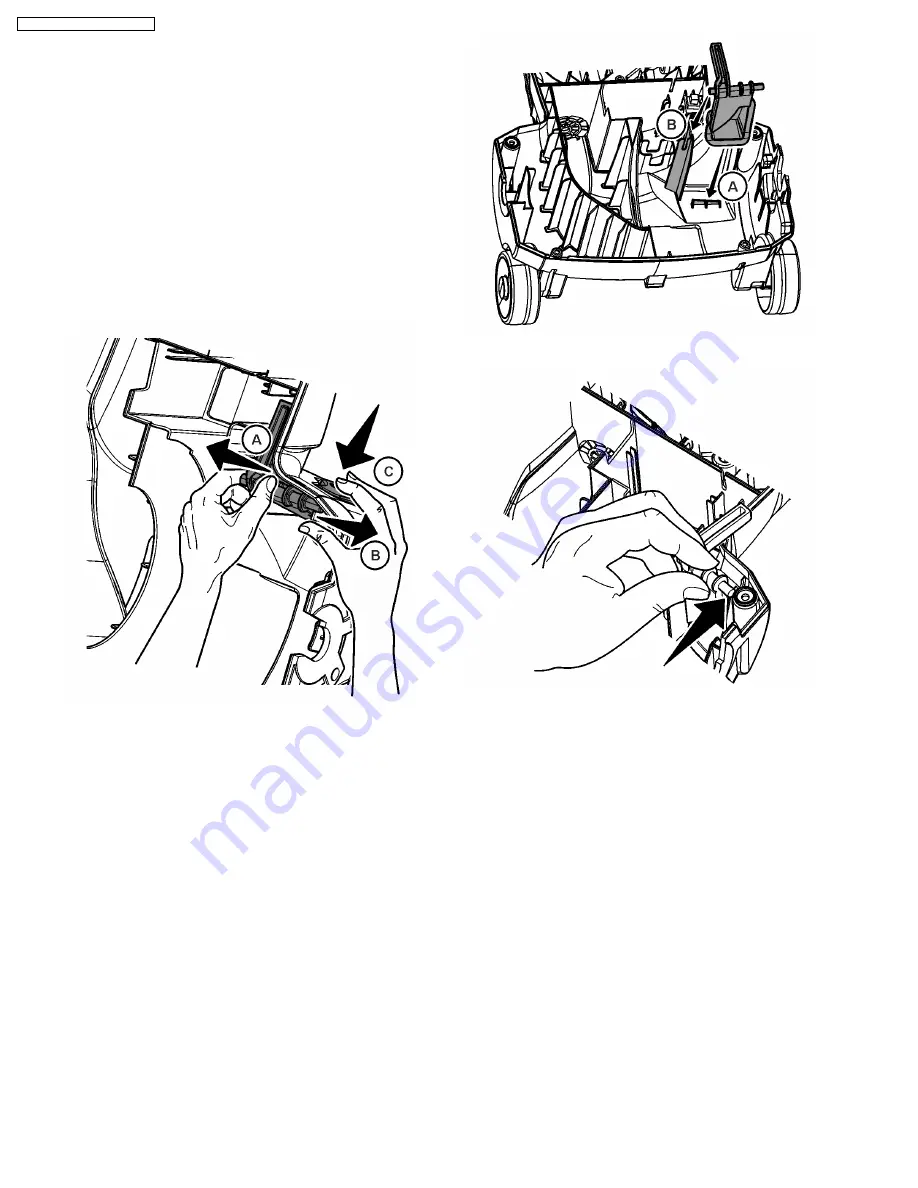
3.7. On/Off Switch

3.7.1. Removal

 1. Remove lower plate (See Lower Plate - Removal).
 2. Remove agitator and belt (See Agitator - Removal).
 3. Remove motor cover (See Motor - Removal).
 4. Remove nozzle (See Motor - Removal).
 5. Remove motor assembly (See Motor - Removal).
 6. Lift power distribution board out of dust container.
 7. To remove button use the following steps simultaneously:

(A) Slide button inward
(B) Press rib outward
(C) Slightly depress on/off button

 8. Remove spring.
 9. Lift switch out of dust container.
 10. Disconnect leads.

3.7.2. Installation

 1. Connect leads to switch.
 2. Place switch in slot with terminals towards the inside of dust

container.

 3. Reinstall spring.
 4. Reinstall button by:

(A) Placing bottom of button behind retaining ribs.
(B) Locate hinge tab in slot.

 5. Press button into place.

 6. Reinstall power distribution board in slots.
 7. Reinstall motor (See Motor - Installation).
 8. Reinstall nozzle (See Motor - Installation).
 9. Reinstall agitator and belt (See Agitator - Installation).
 10. Reinstall lower plate (See Lower Plate - Installation).

18

MC-UG323-00 / MC-UG327-00 /

Содержание MC-UG323-00

Страница 1: ...d copying and distribution is a violation of law MC UG323 00 MC UG327 00 Product Color Dynamic Blue MC UG323 00 Deep Burgandy MC UG327 00 Destination North America Vacuum Cleaner Specifications are subject to change without notice for further improvement Order Number MAC1206005CE ...

Страница 2: ... UG37 00 5 2 EXPLODED VIEW AND PARTS LIST 6 2 1 Upper Body 6 2 2 Lower Body 7 2 3 Nozzle Housing 9 2 4 Handle Assembly 10 2 5 Packing Materials 11 3 SERVICE PROCEDURES 12 3 1 Upper Body 12 3 2 Lower Plate 13 3 3 Agitator 14 3 4 Motor 15 3 5 Cord Reel MC UG327 00 17 3 6 Power Cord MC UG323 00 17 3 7 On Off Switch 18 CONTENTS Page Page 2 MC UG323 00 MC UG327 00 ...

Страница 3: ...1 WIRING SCHEMATICS 1 1 Wiring Diagram MC UG323 00 1 2 Wiring Diagram MC UG327 00 3 MC UG323 00 MC UG327 00 ...

Страница 4: ...nching of any wire during reassembly After servicing any electrical component or electrical enclosure the unit should be reassembled and checked for dielectric breakdown or current leakage Use part number AC79FCWZZ000 FIBERGLASS CLOTH TAPE whenever original tape is removed 4 MC UG323 00 MC UG327 00 ...

Страница 5: ...nching of any wire during reassembly After servicing any electrical component or electrical enclosure the unit should be reassembled and checked for dielectric breakdown or current leakage Use part number AC79FCWZZ000 FIBERGLASS CLOTH TAPE whenever original tape is removed 5 MC UG323 00 MC UG327 00 ...

Страница 6: ...AC02HDTGZM0L COVER LID 1 8 AC69KJMZV07 PROTECTOR 1 9 AC70KDKEZG00 PROTECTOR SPRING 1 10 AC68KAJDZV07 PROTECTOR CASE 1 11 AXTN4 16BFY SCREW 5 12 AC74EDTGZ000 SEAL MOTOR CASE 1 13 AC66KBDNZ000 DUST COMPARTMENT PACKING 1 14 AC43NDSAZR03 CORD REWIND BUTTON 1 MC UG327 00 15 AC60KDTGZCUT DUST COVER 1 MC UG323 00 15 AC60KDVJZRU3 DUST COVER 1 MC UG327 00 16 AC15KDTGZMUL FASTENER 1 17 AC16KDTGZ000 DUST BAG...

Страница 7: ...2 2 Lower Body 2 2 1 Exploded View 7 MC UG323 00 MC UG327 00 ...

Страница 8: ...AC85GDRZZ000 LEAD WIRE BLACK 1 14 AC85GDSAZ000 LEAD WIRE BLACK 1 15 AC01CDSAZV07 WHEEL UNIT 2 MC UG323 00 15 AC99CDRZZV07 WHEEL UNIT 2 MC UG327 00 16 AC02CDRZZV07 WHEEL SUPPORTER 2 17 AC73BZAZ000 HANDLE SCREW 1 18 AC62ECWZZ000 CORD STOPPER 1 MC UG323 00 19 AC97EDRZZ000 POWER CORD 1 MC UG323 00 19 AC99NDMTZV07 CORD REEL ASSEMBLY 1 MC UG327 00 20 AC78NZAZ000 PLASTIC HOLDER 1 MC UG323 00 21 AC85WDRZZ...

Страница 9: ...ITURE GUARD 1 3 AC58ACRYZ000 SPRING NOZZLE 1 4 AC84RDRZZ000 AGITATOR ASSEMBLY 1 5 AC28SDRZZ000 BELT 1 6 AC91ADRZZV07 LOWER PLATE 1 7 AC99QCYBZV06 WHEEL UNIT 2 8 AC16CNXZ00 ROLLER SHAFT 2 9 AC43SAFVZ000 BELT COVER 1 10 AMC57A V00 PEDAL SPRING 1 11 AXTN4 16BFY SCREW 7 12 AMC43A 2V0 FRAME ASSEMBLY COMPLETE 1 MC UG323 00 12 AC92BAMAZ000 BELT SHIFTER ASSY 1 MC UG327 00 13 AC42AAFY1V07 FOOT PEDAL COVER ...

Страница 10: ...AC64BDSAZV07 HANDLE 1 MC UG323 00 2 AC64BDRZZV07 HANDLE 1 MC UG327 00 3 AC50BDRZZC0T HANDLE GRIP 1 MC UG323 00 3 AC50BDRZZR03 HANDLE GRIP 1 MC UG327 00 4 AC53PDTGZV07 HOSE HOOK HOSE HANGER 1 5 AXTN4 16BFY SCREW 3 6 AC73BAMAZ000 HANDLE SCREW 1 7 AC53EZAZV07 CORD HOOK 1 MC UG323 00 8 AC32RDRZZV07 ATTACHMENT HOLDER 1 MC UG327 00 9 AC80SCRZZV0N TURBINE UNIT 1 MC UG327 00 10 MC UG323 00 MC UG327 00 ...

Страница 11: ...00 Carton Box 1 MC UG323 00 1 AC61ZDVKZU00 Carton Box 1 MC UG327 00 2 AC01ZDTGZ000 Operating Instructions 1 MC UG323 00 2 AC01ZDVKZ000 Operating Instructions 1 MC UG327 00 3 AC94ZDTGZ000 Packing Assembly 1 MC UG323 00 includes items 1 2 and A H 3 AC94ZDVKZ000 Packing Assembly 1 MC UG327 00 includes items 1 2 and A G 11 MC UG323 00 MC UG327 00 ...

Страница 12: ...emoval 1 Remove one 1 screw from back of vacuum cleaner 2 Remove dust cover 3 Remove dust bag 4 Remove two 2 screws 5 Separate upper body and lower body 6 Remove fastener guide 3 SERVICE PROCEDURES 12 MC UG323 00 MC UG327 00 ...

Страница 13: ...lug vacuum cleaner 2 Lay vacuum cleaner with bottom facing upwards and nozzle flat 3 Remove nozzle hose from body by 1 pressing in locking tab and 2 sliding up and out of retaining slot 4 Remove four 4 screws from the nozzle cover 5 Place the vacuum cleaner in the upright position standing on the handle This will minimize wheel interference when removing the lower plate 6 Remove the lower plate by...

Страница 14: ...move lower plate See Lower Plate Removal 2 Lay vacuum cleaner with bottom facing upwards and nozzle flat 3 Remove agitator carefully lifting out 3 3 2 Installation 1 Loop new belt around motor shaft and agitator belt groove 2 MC UG327 ONLY Belt must be looped around motor shaft not carpet bare floor selector shaft See illustration for correct belt routing NOTE Shifter must be in carpet position wh...

Страница 15: ...tor Removal 5 Remove two 2 screws from rear of vacuum cleaner 6 Remove three screws from front of vacuum cleaner 7 Press inwards on the sides of the dust container in area shown to release tabs on the motor cover 8 Lift off motor cover 9 Remove nozzle by 1 raising non belt side and 2 sliding nozzle off the motor shaft 10 Lift out motor assembly plastic holder MC UG323 and noise suppressor 11 Disco...

Страница 16: ...pinching of the noise suppressor by installing with overlap beneath motor and tuck excess material 7 Reinstall nozzle and nozzle spring 8 Reinstall motor cover Make sure no wires are pinched and the tabs snap into place 9 Reinstall three 3 screws in the front of the vacuum cleaner 10 Turn vacuum cleaner over and reinstall two 2 screws into back of vacuum cleaner 11 Reinstall agitator See Agitator ...

Страница 17: ... wire which were cut during removal 6 Reconnect cord reel leads refer to wiring diagram 7 Route all wiring in accordance with wire management drawing 8 Reinstall motor cover See Motor Installation Make sure no wires are pinched 3 6 Power Cord MC UG323 00 3 6 1 Removal 1 Remove motor cover See Cord Reel Removal 2 Cut black and white power cord leads at cord jacket 3 Remove two 2 screws and cord sto...

Страница 18: ...on off button 8 Remove spring 9 Lift switch out of dust container 10 Disconnect leads 3 7 2 Installation 1 Connect leads to switch 2 Place switch in slot with terminals towards the inside of dust container 3 Reinstall spring 4 Reinstall button by A Placing bottom of button behind retaining ribs B Locate hinge tab in slot 5 Press button into place 6 Reinstall power distribution board in slots 7 Rei...

Отзывы: