background image

6

TV

OK

1

3

2

4

6

5

7

9

8
0

CH

VOL


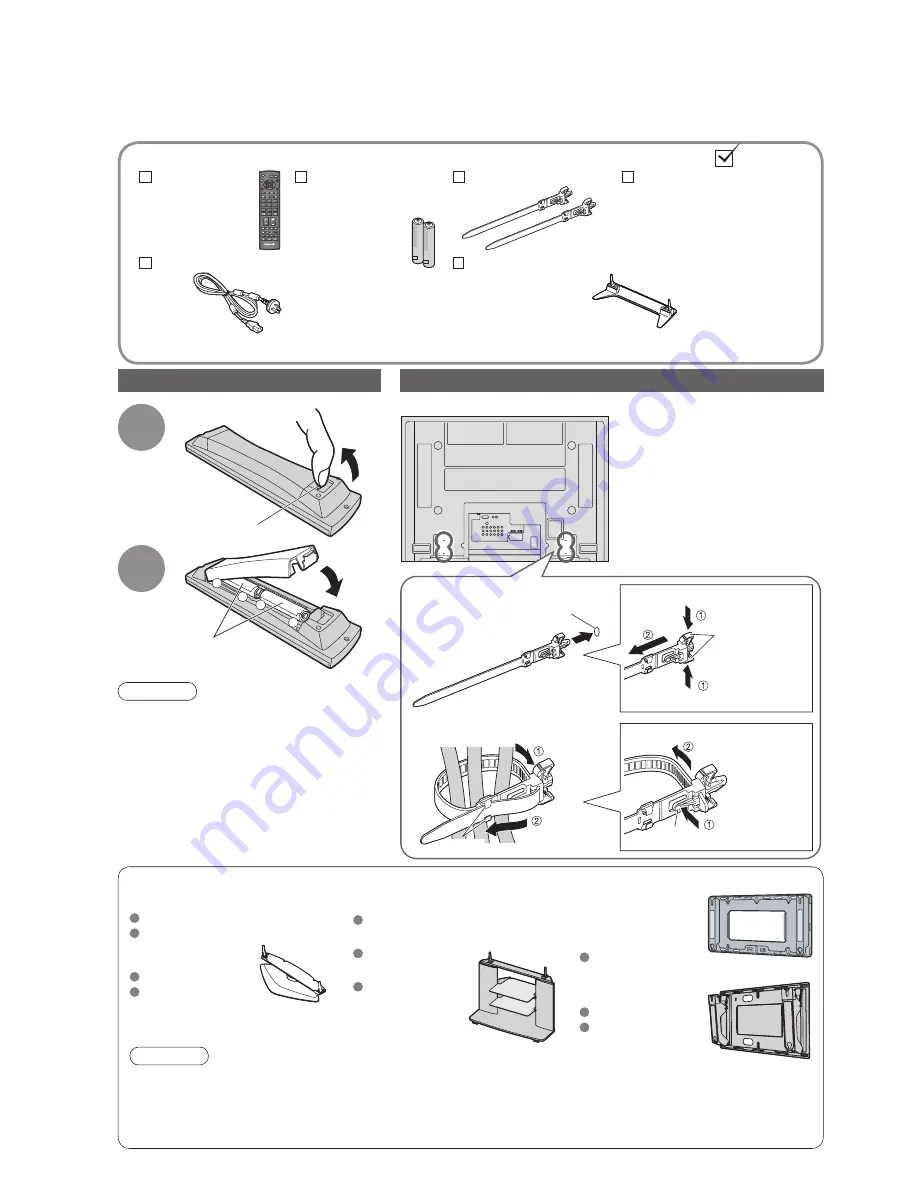
Accessories / Options


Remote 

Control 

Transmitter

• 

EUR7651140

Standard accessories

Check that you have the accessories and items shown


Batteries for the 

Remote Control 

Transmitter 

(2)

• 

R6 (AA)


Operating Instructions


Clamper 

(2)

Installing remote’s batteries

Caution

• 

Incorrect installation may cause battery 

leakage and corrosion, resulting in 

damage to the remote control.

Do not mix old and new batteries.

Do not mix different battery types (such 

as alkaline and manganese batteries).

Do not use rechargeable (Ni-Cd) 

batteries.

• 

Do not burn or breakup batteries.

1

Pull 

open

Hook

2

Note the correct 

polarity (+ or -)

Close

Using the clamper

• 

Do not bundle the RF cable 

and mains lead together (could 

cause distorted image).

• 

Fix cables with clampers as 

necessary.

• 

When using the optional 

accessory, follow the option’s 

assembly manual to fix cables.

Rear of the TV

snaps

To remove from the TV:

To loosen:

 Keep pushing 

both side snaps

 Set the tip  

in the hooks

Insert the clamper

in a hole

hole

1. Attach the clamper

2. Bundle the cables

 Keep pushing 

the knob

knob

hooks

Caution

• 

In order to maintain the unit’s performance and safety, be absolutely sure to ask your dealer or a licenced 

contractor to secure the wall-hanging brackets.

• 

Carefully read the instructions accompanying the plasma TV stand or pedestal, and be absolutely sure to take 

steps to prevent the TV from tipping over.

• 

Handle the TV carefully during installation since subjecting it to impact or other forces may cause product damage.

Optional accessories

Pedestal

Plasma TV stand

Wall-hanging 

bracket 

(vertical)

TY-WK42PV3W

(angle)

TY-WK42PR2W

TY-WK42PR3W

TY-S37PX70WK

(TH-37PV70AZ)

TY-S42PX70WK

( TH-42PV70AZ)

TY-ST42D1-WK

TY-ST42D2-WK

( TH-37PV70AZ,  

TH-42PV70AZ)

TY-S50PX70WK

( TH-50PV70AZ)

TY-ST50D1-WK

TY-ST50D2-WK

( TH-50PV70AZ)

Read the manual of the 

pedestal for installation.


Pedestal (ST-42H2-WK / ST-50H2-WK)

• 

TBLX0024 

(TH-37PV70AZ)

• 

TBLX0023 

(TH-42PV70AZ)

• 

TBLX0025 

(TH-50PV70AZ)


Mains Lead

Содержание MBS0407S0

Страница 1: ...omer s Record The model number and serial number of this product may be found on its rear panel You should note this serial number in the space provided below and retain this book plus your purchase receipt as a permanent record of your purchase to aid in identification in the event of theft or loss and for Warranty Service purposes Model Number Serial Number ...

Страница 2: ... REC POWER VCR DVD TEXT CH VOL F P INDEX HOLD Operating Instructions Plasma Television English Please read these instructions before operating your set and retain them for future reference The images shown in this manual are for illustrative purposes only TQBC2160 TH 37PV70AZ TH 42PV70AZ TH 50PV70AZ Model No ...

Страница 3: ...2 Turn your own living room into a movie theatre Experience an amazing level of multi ...

Страница 4: ...unctions 18 picture sound quality etc Editing and Setting Channels 22 Control Channel Audience 24 Restore Settings 25 Input Labels 26 Displaying PC Screen on TV 27 VIERA Link HDAVI ControlTM 28 External Equipment 30 Basic Features Watching TV 12 Watching Videos and DVDs 14 Viewing Teletext 16 Enjoy your TV Technical Information 32 FAQs 36 Licence 38 WARRANTY 38 Specifications 39 FAQs etc Accessorie...

Страница 5: ...nected to prevent electrical shock Do not touch the mains plug with a wet hand This may cause electrical shock Do not use any mains lead other than that provided with this TV This may cause fire or electrical shock Do not damage the mains lead A damaged lead may cause fire or electrical shock Do not move the TV with the lead plugged in the socket outlet Do not place a heavy object on the lead or pla...

Страница 6: ...side the TV could lead to product failure Use care not to subject surfaces to bug repellent solvent thinner or other volatile substances this may deteriorate the surface by peeling the paint Do not allow the cabinet to make contact with a rubber or PVC substance for a long time When TV will not be used for a long time remove the mains plug This TV will still consume some power even in the Off mode...

Страница 7: ...r of the TV snaps To remove from the TV To loosen Keep pushing both side snaps Set the tip in the hooks Insert the clamper in a hole hole 1 Attach the clamper 2 Bundle the cables Keep pushing the knob knob hooks Caution In order to maintain the unit s performance and safety be absolutely sure to ask your dealer or a licenced contractor to secure the wall hanging brackets Carefully read the instruc...

Страница 8: ...eo Bilingual Sound Selection p 34 Programme channel change buttons 0 9 and Teletext page buttons p 12 and p 16 When in Standby mode switches TV On Option menu Sets the preferred settings of viewing and sound options easily p 13 Main Menu Press to access VIERA Link Picture Sound Setup menus and Language p 10 and p 18 Viewing a favourite teletext channel p 17 Surround p 20 Changes the input mode TV ...

Страница 9: ...ns plug at the socket outlet first Example 1 Connecting aerial Example 2 Connecting DVD Recorder VCR RF cable RF cable TV only TV DVD Recorder or VCR AC 220 240 V 50 60 Hz AC 220 240 V 50 60 Hz Note Do not put the Coaxial cable close to the mains lead to avoid noise Do not place the Coaxial cable under the TV To obtain optimum quality picture and sound an Aerial the correct cable 75 Ω coaxial and ...

Страница 10: ... Tuning Basic Connection Plug the TV into mains socket and switch On Takes a few seconds to be displayed 1 Auto Tuning Search and store TV channels automatically These steps are not necessary if the setup has been completed by your local dealer Auto Tuning is now complete and your TV is ready for viewing You can now use the remote control to turn On the TV or turn the TV to standby mode Power LED ...

Страница 11: ...N SURROUND TV RETURN EXIT MENU OK Main Menu Select Access EXIT RETURN VIERA Link Language Picture Setup Sound Chinese Store EXIT Select RETURN Language English Français MENU Language Setting You can change language for on screen displays 1 Display the menu 2 Select Language 3 Select the language change store select access ...

Страница 12: ...Instructions box Open the main menu Return to the previous menu Move the cursor select the menu Move the cursor adjust levels select from a range of options Access the menu store settings after adjustments have been made or options have been set Many features available on this TV can be accessed via the On Screen Display menu How to use remote control Language Setting Using the On Screen Displays ...

Страница 13: ...EXIT CH VOL RECALL STTL Bad Signal Encrypted AD TXT Stereo 45 1 BBS CH05 5 5MHz PAL Corontation Street POWER CH 1 3 2 4 6 5 7 9 8 0 To select the two or three digit programme number e g 39 Watching TV Select a channel up 2 Information banner Turn power on Mains power On Off switch should be On down or 1 9 in a short time 3 Volume ...

Страница 14: ...tio p 33 Enjoy viewing the picture at its optimum size and aspect Aspect Selection list To change the mode To change the mode using the ASPECT button only ASPECT Press repeatedly until you reach the desired mode Display Aspect Selection list ASPECT During the list is displayed select the mode Store Display information banner STTL Bad Signal Encrypted AD TXT Stereo 1 BBS 45 CH05 5 5MHz PAL Corontat...

Страница 15: ...e input mode connected to the equipment Note If the external equipment has an aspect adjustment function set to 16 9 For details see the manual of the equipment or ask your local dealer To return to TV Display the Input select menu Displays the selected mode You can also select the input using the AV button on the remote control or the front panel of the TV Press the button repeatedly until the de...

Страница 16: ...e Pause Restart DVD Press and hold to play at slow speed PROGRAMME Programme Up Down Select programme REC Record Start recording Panasonic equipment connected to the TV can be directly operated with the remote control Note Confirm correct operation after the code changed DVD means DVD player DVD recorders and Recorder home theatre Some operations may not be possible on some equipment models Setting...

Страница 17: ... FASTEXT mode In FASTEXT mode four differently coloured subjects are situated at the bottom of the screen To access more information about one of these subjects press the appropriately coloured button This facility enables fast access to information on the subjects shown What is List mode In List mode four differently coloured page numbers are situated at the bottom of the screen Each of these num...

Страница 18: ...es depending on the broadcasters up to 79 pages It may take some time for searching during which time you can watch TV Enter the 4 digit number example P6 Appears at upper left corner of the screen To view specific sub page MENU B View sub page Only when teletext is more than one page Watch TV while waiting for update P108 MENU Y Y Appears when updating is completed You cannot change the channel Te...

Страница 19: ...e Standard Sharpness Tuning Menu Access MENU CH 18 How to Use Menu Functions Display the menu 3 2 4 Various menus allow you to make settings for the picture sound and other functions Displays the functions that can be set varies according to the input signal Note To initialize all settings Shipping Condition p 25 To return to TV at any time EXIT To return to the previous screen RETURN Select the m...

Страница 20: ...c Bass Treble Balance Headphone Volume Surround Off Volume Correction HDMI1 Input Auto Sound Menu Reset to Default Set 12 12 11 p 20 1 2 AV Colour System Auto Colour Matrix SD Child Lock Access Tuning Menu Access Setup Menu Off Timer Off Teletext FASTEXT Teletext Language English Shipping Condition Access Power Save Off 2 2 Banner Display Timeout 3 seconds VIERA Link Settings System Information Ac...

Страница 21: ...PEG NR Automatically reduces noise for watching DTV DVD and VCD Off Weak Mid Strong 3D COMB Automatically makes still pictures and slow pictures look more vivid Off On For PAL or NTSC signal reception only Not valid on S Video components PC and HDMI Reset to Default Press the OK button to reset the present Picture Menu to the default settings Sound Menu Basic sound mode Music News Cinema Set for e...

Страница 22: ...XT List p 16 Teletext Language Selects teletext language English CIS E Europe Persian Shipping Condition Resets all settings for example when moving house p 25 Power Save Reduces brightness of picture to economise on power consumption Off On Side Panel Increases the brightness of the side panel Off Low Mid High The recommended setting is High to prevent panel image retention Input Labels Labels or...

Страница 23: ...ne Tuning Use to make small adjustments to the tuning of an individual channel affected by weather conditions etc Manual Tuning Set channel manually after Auto Tuning If a VCR is connected with only the RF cable select programme position 0 store search Search and store Select the channel CH Position Direct Example When Channel Selection is on Position and Auto Tuning is performed the TV memorises ...

Страница 24: ...f the broadcaster displayed when selecting channels Cursor Select the channel to edit Edit To delete R After confirming press R To add G After confirming press G To move Y Select new position Y Edit the programme position settings select Maximum five characters Programme Edit Change programme Store EXIT Select option Return Delete Add Move 1 CH33 2 CH21 3 CH21 4 CH60 5 CH21 Prog Chan Name 1 2 3 X Y Z...

Страница 25: ...el audience Page up Page down Change 1 of 2 Child Lock PIN Entry EXIT Return Please enter new PIN PIN Child Lock Service List Change PIN Access Select Exit Return Access Wed 12 05 04 10 46 Return Child Lock Service List Select EXIT Unlock Lock All Unlock All BBC Service Name 1 THREE 7 E4 14 CBBC 70 Nwk 72 BBCi 80 Radio 85 Cymru 90 Lock 1 3 2 4 6 5 7 9 8 0 To change the PIN number Select Change PIN...

Страница 26: ...eck the message and initialise Follow the on screen instructions Auto Tuning will automatically start p 9 To re tune TV channels only e g after moving house Auto Tuning p 23 3 2 4 Select Setup Select Shipping Condition Display the menu Set To return to TV EXIT Restore Settings Shipping Condition Restore Settings Resets the TV to its original condition i e no channels tuned in All settings channels...

Страница 27: ...tup Select Input Labels Display the menu Select a input terminal and set To return to TV EXIT For easier identification and selection of the input mode you can label each input terminals or skip terminal that is not connected to any equipment To select the input mode p 14 1 The labels you set will be displayed in Input Selection menu p 14 or banner If Skip is selected you cannot select the mode Use...

Страница 28: ... if noise occurs Sync Chooses another synchronous signal if the image is distorted H V On G H V by the horizontal and vertical signals from your PC On G by the green signal from your PC if available PROGRAMME ASPECT RETURN EXIT MENU OPTION DIRECTTV REC VCR 1 3 2 4 6 5 7 9 8 0 REC VCR DVD TEXT F P INDEX HOLD TV INPUT OK Select Access EXIT RETURN Input Selection AV1 AV2 AV3 AV4 PC HDMI1 HDMI2 TV 27 ...

Страница 29: ...g Panasonic s HDAVI Control and VIERA Link VIERA Link HDAVI Control based on the control functions provided by HDMI which is an industry standard known as HDMI CEC Consumer Electronics Control is a unique function that we have developed and added As such its operation with other manufacturers equipment that supports HDMI CEC cannot be guaranteed Refer to individual manuals for compatibility inform...

Страница 30: ...activated the TV is automatically turned on Only when TV is in Standby mode Power off Link Set to Set When TV is set to Standby mode the connected Panasonic equipment is also automatically set to Standby This function will work even if the TV enters standby mode automatically by Off Timer function or auto power standby function The TV remains on even if the VIERA Link compatible equipment is turne...

Страница 31: ...ONO MONO MONO Y L R Y PR CR PB CB PR CR PB CB L R AUDIO VIDEO AV2 IN AV3 IN S VIDEO AV4 IN VIDEO L MONO R AUDIO AV IN 1 2 30 These diagrams show our recommendations for how to connect the TV to your various equipment For other connections consult the instructions for each piece of equipment the table below and the specifications p 39 VIDEO or S VIDEO AUDIO Recommended Connection Headphones Camcord...

Страница 32: ...ly wired HDMI compliant cable Read the manuals of the equipment too or VIERA Link p 28 Speaker system Computer S VIDEO 4 pin terminal Chrominance in Chrominance earth Luminance in Luminance earth Hot Plug Detect DDC CEC Ground SCL CEC TMDS Clock Shield TMDS Data0 TMDS Data0 TMDS Data1 Shield TMDS Data2 TMDS Data2 5V Power SDA Reserved in cable but N C on device TMDS Clock TMDS Clock TMDS Data0 Shi...

Страница 33: ...69 21 62 63 69 62 63 69 62 63 62 C13 70 73 74 75 76 77 78 79 S 1 S 2 S 3 S 1 S 2 S 3 S 1 S 2 S 3 S 1 S 1 S 2 S 3 80 81 89 Z1 Z9 S1 S2 S10 S1 S2 S10 S1 S2 S10 S1 S2 S10 S1 S2 S10 90 91 92 93 94 95 96 97 98 99 Z10 Z11 Z12 Z13 Z14 Z15 Z16 Z17 Z18 Z19 S11 S12 S13 S14 S15 S16 S17 S18 S19 S20 S11 S12 S13 S14 S15 S16 S17 S18 S19 S20 S11 S12 S13 S14 S15 S16 S17 S18 S19 S20 S11 S12 S13 S14 S15 S16 S17 S18 ...

Страница 34: ... at its maximum with slight enlargement 4 3 Displays the image at the standard 4 3 without distortion Zoom1 Displays a 16 9 letterbox or 4 3 image without distortion Zoom2 Displays a 16 9 letterbox anamorphic image full screen without distortion Just Displays a 4 3 image full screen Stretching is only noticeable at the left and right edges 4 3 Full Displays a 4 3 image enlarged horizontally to fit ...

Страница 35: ...terface allows you to enjoy high definition digital images and high quality sound by connecting the TV and the equipment HDMI compatible equipment 1 with an HDMI or DVI output terminal such as a set top box or a DVD player can be connected to the HDMI terminal using an HDMI compliant fully wired cable About connections see External Equipment p 30 Note HDMI is the world s first complete digital consu...

Страница 36: ...ntosh13 640 480 35 00 66 67 Macintosh16 832 624 49 73 74 55 Macintosh21 1 152 870 68 68 75 06 Mark Applicable input signal COMPONENT Y PB CB PR CR HDMI PC D sub 15P Pin No Signal Name Pin No Signal Name Pin No Signal Name R GND Ground NC not connected G GND Ground NC not connected B GND Ground HD NC not connected NC not connected VD GND Ground GND Ground NC not connected 1 6 7 8 3 9 4 5 10 15 14 1...

Страница 37: ...outlet Is the TV turned On Check Picture Menu p 20 and volume An error message appears Follow the message s instructions If the problem persists contact the authorized Service Centre Permanently lit spots on screen Due to production process involved in this technology this may result in some pixels which are permanently lit or unlit This is not a malfunction Contrast is reduced Contrast is lowered...

Страница 38: ... from the equipment p 35 Use an equipment compliant with EIA CEA 861 861B Sound is unusual Set the sound setting of the connected equipment to 2ch L PCM Check the HDMI1 Input setting in the Sound Menu p 20 If digital sound connection has a problem select analogue sound connection p 34 Sound level is low or sound is distorted Sound signal reception may be deteriorated Check Sound system p 23 No sou...

Страница 39: ...ed with or related to such installation de installation re installation or transit Panasonic Authorised Service Centres are located in major metropolitan areas and most regional centres of Australia however coverage will vary dependant on product For advice on exact Authorised Service Centre locations for your product please telephone our Customer Care Centre on 132600 or visit our website and use...

Страница 40: ...5 Ω C 0 286 V p p 75 Ω Others HDMI1 2 Input TYPE A Connectors PC Input HIGH DENSITY D SUB 15PIN R G B 0 7 V p p 75 Ω HD VD TTL Level 2 0 5 0 V p p high impedance Audio Input RCA PIN Type 2 0 5 V rms Monitor Output AUDIO L R RCA PIN Type 2 0 5 V rms high impedance VIDEO RCA PIN Type 1 1 0 V p p 75 Ω Dimensions W H D 917 mm 690 mm 320 mm With Pedestal 917 mm 645 mm 94 mm TV only 1 020 mm 750 mm 320 ...

Отзывы: