background image

Application (Record)

Using the [Rec] menu

SQW0215

- 142 -


Mosaic effect may appear depending on subject and recording conditions.


Cannot be set in the following cases:

 •Scene Modes ([High Sens.], [3D Photo Mode]) 

 •When [Quality] is set to [ 

 ]

 •For the setting procedures of the menu. 

(→61)

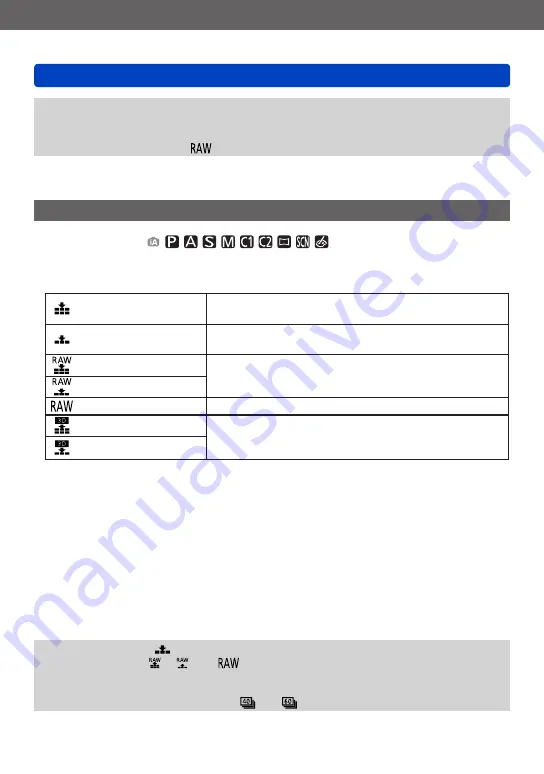
[Quality]


Recording mode: 

Set the picture quality.


Settings

[Fine]

Gives priority to picture quality and saves pictures in 

JPEG file format.

[Standard]

Saves pictures in JPEG file format using standard 

picture quality.

[RAW+Fine]

Saves pictures in JPEG file format in addition to the 

RAW file format.

*

1

[RAW+Standard]
[RAW]

Saves pictures in the RAW file format.

*

2

[3D+Fine]

Simultaneously saves 3D still picture data (MPO) and 

pictures in JPEG file format. (Only when [3D Photo 

Mode] Scene Mode is set.)

[3D+Standard]

*

1

  If you delete a RAW file from the camera, the corresponding JPEG file is also deleted.

*

2

  You cannot set the picture size. (The pictures are saved using the maximum recordable pixels for 

each image aspect ratio.)


About RAW file

In RAW file format the data is saved without any picture processing by the camera.

You can use Ichikawa Soft Laboratory’s “SILKYPIX Developer Studio SE” to save RAW 

file format pictures in file formats (JPEG, TIFF, etc.) that can be displayed on a PC, 

etc., and to perform advanced editing such as correcting the white balance of pictures 

recorded previously. Note, however, that the volume of picture data in a RAW file is 

larger.

Download “SILKYPIX Developer Studio SE” from website and install it on your 

computer to use. For details on how to download the software, etc., refer to 

(→271)

.


[Quality] is fixed to [   ] ([Standard]) in [High Sens.] Scene Mode.


You cannot set to [   ], [   ], or [ 

 ] in the following cases:

 •[Panorama Shot] Mode

 •Scene Modes ([Handheld Night Shot], [HDR])

 •When the [Burst] setting is set to [   ] or [   ]

Содержание Lumix DMC-TZ70GN

Страница 1: ...0215 M0115KZ0 Operating Instructions for advanced features Digital Camera Model No DMC TZ70 DMC ZS50 Please read these instructions carefully before using this product and save this manual for future...

Страница 2: ...uick menu 34 Taking pictures with automatic settings Intelligent Auto Mode 35 Using flash 35 Automatic Scene Detection 36 Defocusing the background 37 Motion Deblur 38 iHandheld Night Shot 39 iHDR 40...

Страница 3: ...hing the display of recording information etc 77 Taking pictures with the composition determined Composition Guide 78 Using the level gauge 80 Using Zoom 81 Zoom types and use 82 Step Zoom 84 Taking p...

Страница 4: ...ing panorama pictures Panorama Shot Mode 120 Taking pictures according to the scene Scene Mode 124 Portrait 125 Soft Skin 125 Scenery 125 Sports 126 Night Portrait 126 Night Scenery 126 Handheld Night...

Страница 5: ...display etc 159 Viewing the group picture 160 Different playback methods Playback Mode 163 2D 3D Settings 163 Selecting pictures to play back Filtering Play 164 Narrowing down by selecting picture ty...

Страница 6: ...d back 208 Adding location information to pictures in the camera 211 Operating the camera to send pictures to a smartphone or tablet 213 Displaying still pictures on a TV 218 Wireless printing 219 Sen...

Страница 7: ...tional 267 Storing recorded still pictures and motion pictures on your PC 268 About supplied software 269 Installing supplied software 270 Downloading SILKYPIX Developer Studio SE 271 Copying still pi...

Страница 8: ...ome into contact with the camera Avoid using the camera under the following conditions which present a risk that sand water or foreign material may enter the camera through the lens or openings around...

Страница 9: ...t contain works with copyright for purposes other than personal use is prohibited under copyright law Recording of certain material may be restricted even for the purpose of personal use Also refer to...

Страница 10: ...ccessories refer to Basic Operating Instructions Battery Pack is indicated as battery pack or battery in the text SD Memory Card SDHC Memory Card and SDXC Memory Card are indicated as card in the text...

Страница 11: ...rding mode 9 Shutter button 10 Zoom lever 81 Use the lever to zoom in and enlarge a distant subject 11 Motion picture button 49 Record motion pictures 12 Camera ON OFF button Use this to turn the came...

Страница 12: ...button 14 Fn2 button 14 134 Use this to switch display between viewfinder and LCD monitor LVF button Use this button to operate a registered function Fn2 button 20 Monitor 66 67 279 21 Charging lamp R...

Страница 13: ...4 and erase pictures 59 You can also use this button to return to the previous screen while a menu is displayed 61 30 DISP button 77 159 Use this to change display 31 Fn1 button 134 Use this to use re...

Страница 14: ...is switched as shown below Automatic switching between viewfinder and monitor Viewfinder display Monitor display Automatic switching between viewfinder and monitor For automatic switching between the...

Страница 15: ...the eye sensor HIGH LOW LVF Monitor Switch Use this setting to switch the display between the viewfinder and monitor LVF MON AUTO Automatic switching between viewfinder and monitor LVF Viewfinder disp...

Страница 16: ...ations while recording button Exposure Compensation 101 button Flash 86 Drive Mode button Burst 103 Auto Bracket 102 Self timer 106 button Macro recording 94 96 Manual Focus 97 Control dial Turn the d...

Страница 17: ...et the requirements of appropriate safety standards There is a possibility that these battery packs may lead to fire or explosion Please be advised that we are not liable for any accident or failure o...

Страница 18: ...insert the battery in the correct orientation To remove battery Move the lever in the card battery compartment in the direction of the arrow Always use genuine Panasonic batteries If you use other ba...

Страница 19: ...ght position Insert the USB connection cable so that its mark will face the mark side of the camera Always check the direction of the pins and hold the plug straight to insert or remove it If the cabl...

Страница 20: ...g lamp Red On Charging in progress Off Charging stops After charging stops disconnect the camera from the electrical outlet or your computer Flashing Charging error For instructions on correcting the...

Страница 21: ...le supplied are dedicated accessories of this camera Do not use them for other devices If there is any trouble related to the electrical outlet i e power failure charging may not complete properly Dis...

Страница 22: ...e used repeatedly Recording still pictures When using LCD monitor Number of recordable pictures Approx 300 pictures By CIPA standard Recording time Approx 150 min Recording conditions by CIPA standard...

Страница 23: ...ntinuous recording is displayed on the screen You can continuously record a motion picture in MP4 for up to 29 minutes 59 seconds or approx 4 GB Since recording in MP4 with FHD 25p creates larger file...

Страница 24: ...a to malfunction and may damage the card or recorded data Make sure that the camera is turned off Slide the release lever to the OPEN position and open the card battery door OPEN LOCK Release lever In...

Страница 25: ...B 64 GB SD speed class refers to a specification for sustained write speeds Confirm the SD speed by checking the card label or other card related materials Example Latest information http panasonic jp...

Страница 26: ...and type of card Estimated remaining pictures or recording time capacity switch with Remaining Disp 69 Displayed when no card is inserted pictures will be saved to built in memory Recording picture c...

Страница 27: ...50m00s HD 25p 1h35m00s 6h27m00s 13h04m00s VGA 25p 2m00s 3h29m00s 14h12m00s 28h46m00s The time displayed in the table is the total time Remaining time for continuous recording is displayed on the scree...

Страница 28: ...reen is not displayed proceed to step Press MENU SET while the message is displayed Press to select the language and press MENU SET The Please set the clock message appears Press MENU SET Press to sel...

Страница 29: ...e date on the pictures with Date Stamp or Text Stamp If the clock is set the correct date can be printed even if the date is not displayed on the screen of the camera Changing time settings Select Clo...

Страница 30: ...settings 45 Aperture Priority Mode Determine aperture then record pictures 107 Shutter Priority Mode Determine shutter speed then record pictures 108 Manual Exposure Mode Determine aperture and shutte...

Страница 31: ...picture button again to end recording Holding the camera Do not block the flash or the lamp Do not look at it from close range Flash AF Assist Lamp Hand strap Microphones To avoid camera shake hold i...

Страница 32: ...y back pictures Press the Playback button Press or turn the control dial to select the picture to be displayed Viewing motion pictures Select a picture with the motion picture icon and press 5 Press t...

Страница 33: ...mode Control ring 1 Control dial Intelligent Auto Mode Step Zoom 84 Program AE Mode Programme Shift 46 Aperture Priority Mode Aperture adjustment 107 Shutter Priority Mode Shutter speed adjustment 10...

Страница 34: ...recording you can easily call some of the menu items and set them Press Q MENU button Press to select menu items The menu items and setting items that are displayed differ depending on the recording m...

Страница 35: ...ode Take a picture Press halfway press lightly to focus Press fully press the button all the way to record Focus display When focus is aligned illuminated When focus is not aligned flashing AF area Us...

Страница 36: ...the self timer 3 When iHandheld Night Shot is ON 4 i Low Light will be selected for nightscapes and other dark scenes Depending on recording conditions different scene types may be determined for the...

Страница 37: ...d defocusing easily as with in Aperture Priority mode Press Turn the control ring or control dial to adjust background defocusing Defocus background condition Defocus the background Focus the backgrou...

Страница 38: ...g mode is changed the background defocusing setting returns to AUTO Motion Deblur Motion Deblur automatically sets the optimum shutter speed in accordance with the movements of the subject to minimise...

Страница 39: ...hout using a tripod by combining a burst of pictures It is preset to ON with this unit Settings Press MENU SET Press to select Rec menu and press MENU SET Press to select iHandheld Night Shot and pres...

Страница 40: ...NU SET This function is automatically activated only when is displayed on the screen In the case that a single picture is going to be composed from a burst a message indicating that multiple pictures...

Страница 41: ...o cancel AF Tracking Press Align the AF Tracking frame with the subject and press the shutter button halfway to lock To cancel AF Lock Press MENU SET AF Tracking frame AF Lock successful Yellow AF Loc...

Страница 42: ...n easily adjust the brightness and colouring in addition to the background defocusing without compromising the user friendly operation of the Intelligent Auto Mode Switching to Intelligent Auto Plus M...

Страница 43: ...background Focus the background Colouring Warm colours Cool colours You can also make adjustments with To return to automatic adjustment Press Q MENU button Press MENU SET When you record motion pict...

Страница 44: ...up menu Beep Level and Shutter Vol only The settings for the following functions are fixed Setup menu Fn Button Set Composition Guide Fn1 LVF Monitor Switch Fn2 Auto Power Off 5MIN Auto Review 2SEC Re...

Страница 45: ...mode dial to Program AE Mode Take a picture Press halfway press lightly to focus Press fully press the button all the way to record If a warning is displayed about jitter use Stabilizer a tripod or Se...

Страница 46: ...utton halfway The shutter speed and aperture value are displayed in yellow on the screen While the numeric values are being displayed in yellow approximately 10 seconds turn the control ring or contro...

Страница 47: ...ot be activated Programme Shift cannot be used in the following cases When recording motion pictures When Sensitivity is set to Example of Programme Shift 2 0 2 8 4 0 5 6 8 0 11 1 2 3 4 5 6 7 8 9 10 1...

Страница 48: ...ng difficult Fast moving or extremely bright objects or objects with no colour contrast Taking pictures through glass or near objects emitting light In the dark or with significant jitter When too clo...

Страница 49: ...ing recording time approx Do not block the microphones when recording motion pictures Immediately release the motion picture button after pressing it You can record motion pictures fitting each record...

Страница 50: ...rded motion pictures can be saved and played back using this unit or PHOTOfunSTUDIO This means the highest quality for this unit MP4 This is a simpler video format best used when extensive editing is...

Страница 51: ...memory cards recording may end while in progress The recording range may become narrower in motion pictures compared to still pictures Also if the aspect ratio is different for still pictures and mot...

Страница 52: ...n pictures the setting is changed to Approx 2 pictures sec If is selected while recording motion pictures the setting is changed to Approx 5 pictures sec Even at the or setting the focus is fixed at t...

Страница 53: ...r Total pictures With location information 174 208 211 Folder File number Ending Playback Press the Playback button or the Motion picture button again or press the shutter button halfway It may not be...

Страница 54: ...oom lever toward the T side the magnification increases through four levels 2x 4x 8x and 16x The picture quality displayed becomes successively lower To reduce zoom Move the zoom lever toward W side M...

Страница 55: ...splay methods in the following order 1 picture screen full screen 12 picture screen 30 picture screen Calendar screen Move the lever to the T side to return When you select a picture using the cursor...

Страница 56: ...icture screen The cursor will appear on the first picture taken on the selected date You can also select the date with the control dial Only months when pictures were taken are shown on the calendar s...

Страница 57: ...ion pictures while paused 58 1 The fast forward or rewind speed increases if you press again You can also perform these operations with the control dial Fast rewind 2 steps 2 Single frame rewind while...

Страница 58: ...es and press MENU SET to save the picture Still pictures are saved with Aspect Ratio setting of 16 9 and Picture Size at 2M In the following cases saved pictures become 4 3 0 3M MP4 motion pictures wi...

Страница 59: ...ted Deleted pictures cannot be recovered However pictures will not be deleted in the following cases Protected pictures Card switch is in LOCK position Pictures that are not based on the DCF standard...

Страница 60: ...U SET Items can also be selected by turning the control dial Delete Multi Use to select picture and press DISP button Picture selected To cancel Press DISP button again To execute Press MENU SET Pictu...

Страница 61: ...select AF Mode and press MENU SET Pages The pages can also be selected with the zoom lever Menu items Menu description Operation guide Press or turn the control dial to select a setting and press MENU...

Страница 62: ...nnection and Wi Fi functions Playback Mode You can choose the playback method to see Slide Show or to narrow down the pictures for display etc Playback You can specify picture protection resizing prin...

Страница 63: ...ing procedures of the menu 61 In Intelligent Auto Mode only Clock Set World Time Airplane Mode Beep Composition Guide and Language are set Clock Set Set time date and display format 29 World Time Set...

Страница 64: ...hutter Tone Settings Beep sounds when operating the control ring Beep sounds are audible when turning the control ring Regardless of the Beep Level setting no beep sounds are audible in the following...

Страница 65: ...om the Rec menu Setup menu or other menus to the function buttons for faster operation 134 Zoom Lever Set Switches the zoom lever operation setting 84 Settings Zoom The zoom operates in the normal way...

Страница 66: ...ayed pictures will appear slightly grainy For example use when you want to record a fast moving subject The Live View Mode setting will have no effect on the pictures being recorded The display speed...

Страница 67: ...30 seconds when recording Press any button to make the screen brighter again Because the picture shown on the LCD monitor screen emphasises brightness some subjects may look different than their actua...

Страница 68: ...or during Exposure Compensation When the flash fires The histogram displayed during recording is only a reference The histogram displayed during recording and that displayed during playback may be di...

Страница 69: ...ns Resume Zoom Resume Remember the zoom position when turning the camera off Settings ON OFF MF Resume This unit remembers the focusing position for Manual Focus under the following circumstances When...

Страница 70: ...k During Slide Shows When using Time Lapse Shot When supplying power with the AC adaptor during playback when connected to supplied AC adaptor When connected to computer printer Settings fixed to 5MIN...

Страница 71: ...the automatic playback screen displayed until MENU SET is pressed OFF For Intelligent Auto Mode the setting is fixed to 2SEC Cannot be used in the following cases When using Time Lapse Shot When reco...

Страница 72: ...s Reset Rec settings Reset setup settings Information registered in Face Recog is reset if recording settings are reset Resetting the setup parameters will also reset the following The World Time home...

Страница 73: ...patible printer PC Select when connecting to a computer TV Connection Change the settings to be used when the camera is connected to a TV or other device Video Out Settings NTSC Video output is set to...

Страница 74: ...erformed via the camera s own buttons For the setting procedures of the menu 61 Rotate Disp Automatically rotate portrait still pictures Settings Rotate pictures on a TV and the LCD monitor viewfinder...

Страница 75: ...card built in memory carefully before formatting When formatting the built in memory remove the cards Only inserted card will be formatted if present built in memory will be formatted if no card is in...

Страница 76: ...ers Use to select and press MENU SET Move the zoom lever toward T side Turn the control dial to the right Editing text Use to select and press MENU SET Then move the cursor to the text to edit You can...

Страница 77: ...a simple display for example when determining the composition Press DISP button to change display With information 1 With information simple display 2 Without information 2 With information simple di...

Страница 78: ...rom the centre This composition creates a more interesting photo by offsetting the flower from the centre This composition creates a more interesting photo by offsetting the person from the centre Dia...

Страница 79: ...g use to flip To turn off guideline display select No Guide When other functions are registered to the Fn1 button Select Composition Guide from the Setup menu and press MENU SET Use to select the guid...

Страница 80: ...at it matches the white line Tilting up or down In this case it is facing upward Tilting left or right In this case the right side has dropped When the camera is tilted very little or not at all the l...

Страница 81: ...Zoom ratio Focus range The illustration is an example of when using Extra optical zoom i Zoom and Digital Zoom Using the control ring control dial for zoom operation You can perform zoom operation by...

Страница 82: ...is is not a malfunction Zoom types and use The zoom ratio changes when the picture size is changed Optical Zoom Zooming in up to 30x is possible if pictures without have been selected by Picture Size...

Страница 83: ...cases Macro Zoom When the Burst setting is set to or When the Quality setting is set to or Scene Modes Handheld Night Shot HDR High Sens 3D Photo Mode Creative Control Mode Impressive Art Toy Effect...

Страница 84: ...setting assigned to the control ring control dial is Step Zoom Step Zoom will also be available for use in other modes 135 Turn the control ring or control dial In Program AE Mode the control ring is...

Страница 85: ...is based on the Aspect Ratio setting of 4 3 The focal length will change in the following cases When iHandheld Night Shot is set to ON When Burst is set to When Handheld Night Shot is set in Scene Mo...

Страница 86: ...luorescent Slow Sync Red Eye 2 Automatically judges when to use flash reduces red eye slow shutter speed to take brighter pictures Taking pictures of subjects against a nightscape tripod recommended F...

Страница 87: ...be negligible Flash settings may be changed when changing recording mode Scene Mode flash settings are restored to default when Scene Mode is changed Edges of picture may become slightly dark if using...

Страница 88: ...Wide Approx 0 6 m 6 4 m 2 0 feet 21 feet 2 Max Tele Approx 2 0 m 3 3 m 6 6 feet 11 feet 2 2 When ISO Limit Set is AUTO Shutter speeds for each flash mode Setting Shutter speed seconds 1 60 3 1 2000 1...

Страница 89: ...Press button Use to select AF and press MENU SET Switching AF Mode Select AF Mode from the Rec menu For the setting procedures of the menu 61 Use to select Auto Focus mode items and press MENU SET Fa...

Страница 90: ...aces that are the same distance away as faces within the yellow AF area are also focused Cannot set to Face Detection in the following cases Scene Modes Night Scenery Handheld Night Shot Food Starry S...

Страница 91: ...atically kept in focus If AF Lock fails a red frame flashes To release AF Tracking Press MENU SET Focus range same as macro recording Under certain recording conditions such as when the subject is sma...

Страница 92: ...during motion picture recording Cannot set to 23 area focusing in the following cases Scene Modes Starry Sky High Speed Video Miniature Effect in Creative Control Mode Determined position for focus 1...

Страница 93: ...on of the AF area Press To change the size of the AF area Turn the control dial To restore the AF area to its initial state position and size Press DISP button Press MENU SET Press the function button...

Страница 94: ...to enlarge the subject setting to AF Macro enables you to take pictures at an even closer distance than the normal focus range up to 3 cm 0 098 feet for max Wide Press button Use to select AF Macro an...

Страница 95: ...1 6 feet 3 cm 0 098 feet 3 cm 0 098 feet Max T 200 cm 6 6 feet 200 cm 6 6 feet Focus range is displayed when operating the zoom etc Focus range It may take some time until distant subjects come into f...

Страница 96: ...ith the zoom lever The zoom position is fixed at the Wide end Focus range is 3 cm 0 098 feet Return Enlarge display Magnification 1x to 3x In Macro Zoom higher magnification results in lower picture q...

Страница 97: ...F and press MENU SET Turn the control ring to adjust focus Focus range indication Focus range If Peaking is set to ON colour is added to the portions of the image that are in focus 99 After zoom opera...

Страница 98: ...on an enlarged display of the MF area the position to be focused on appears Shortly after you stop operating Manual Focus the display switches to normal To change the position of the MF area Press MEN...

Страница 99: ...ng does not affect the focus range Display Color Sets the highlighting colour used for Peaking Settings The available colour settings differ depending on the setting of Detect Level Changing the Detec...

Страница 100: ...focus and or exposure To cancel AF AE Lock Press the function button Move the camera to compose the still picture you want to take and press the shutter button fully When AE is set press the shutter b...

Страница 101: ...sure to the direction After exposure adjustment the adjustment value for example is displayed in the bottom left corner of the screen You can also press to make adjustments Depending on the brightness...

Страница 102: ...posure Compensation set Take a picture Press the shutter button fully to record a burst of 3 pictures while exposure is changed automatically The first still picture is recorded without compensation t...

Страница 103: ...frame rate becomes faster and the number of pictures that can be recorded in a series is restricted to about 10 100 Approx 3 pictures sec The subject is brought into focus as far as this is allowed by...

Страница 104: ...ith recording conditions The burst of still pictures can be recorded even in low light conditions as the flash is used Flash Burst The focus exposure and flash level are all fixed to the settings for...

Страница 105: ...sh Burst Settings will be stored even if the camera is turned off The burst function cannot be used in the following cases Scene Modes Handheld Night Shot HDR Starry Sky High Speed Video 3D Photo Mode...

Страница 106: ...fter the preset time Self timer indicator Flashes for set duration To cancel while in operation Press MENU SET To cancel self timer In step select or When using zoom the camera could tilt when the len...

Страница 107: ...the aperture value is increased the range of depth in focus expands and the picture shows up clearly from the position of the camera to the background When the aperture value is reduced the range of d...

Страница 108: ...s not possible in the range indicated in red Aperture value Automatic adjustment When you increase the shutter speed you can reduce jitter when recording a subject When you decrease the shutter speed...

Страница 109: ...t mode dial to Turn the control ring to select the aperture value and turn the control dial to select the shutter speed Manual exposure assist 110 About the exposure meter Set shutter speed Proper exp...

Страница 110: ...s For the appropriate exposure either use a faster shutter speed or increase aperture value Shows darker pictures For the appropriate exposure either use a slower shutter speed or reduce aperture valu...

Страница 111: ...ects on the screen Set mode dial to Use to select an effect and then press MENU SET If you press the DISP button an explanation of the effect appears Changing the selected picture effects Creative Con...

Страница 112: ...efocusing condition setting conditions of a selected effect etc Press Press to select an item to adjust Adjusts the brightness Adjusts background defocusing Adjusts the setting conditions of the selec...

Страница 113: ...ll Vividness Subdued colouring Gaudy colouring Retro This effect gives a faded image Items that can be set 112 Brightness Underexposure darker Overexposure brighter Degree of background defocusing Def...

Страница 114: ...ing Pinkish colouring Light bluish colouring Low Key This effect adds a dark and relaxing feel to the overall image and enhances bright parts Items that can be set 112 Brightness Underexposure darker...

Страница 115: ...as well Contrast Low contrast High contrast Impressive Art This effect gives your photo a dramatic contrast look Items that can be set 112 Brightness Underexposure darker Overexposure brighter Degree...

Страница 116: ...righter Degree of background defocusing Defocuses the background The background is in focus as well Colouring Greenish colouring Bluish colouring Yellowish colouring Reddish colouring Toy Effect This...

Страница 117: ...a slight delay compared to normal recording No audio is recorded for motion pictures When a motion picture is recorded the finished recording will be approximately 1 8th of the actual recorded time pe...

Страница 118: ...ture size setting the screen will become dark for a certain period of time after the picture is taken However this occurs due to signal processing and is not a defect Star Filter This effect transform...

Страница 119: ...at can be set 112 Brightness Underexposure darker Overexposure brighter Degree of background defocusing Defocuses the background The background is in focus as well Amount of colour retained Leaves a s...

Страница 120: ...horizontal guide line is displayed If you take pictures up down or down up a vertical guide line is displayed Changing the recording direction 122 Changing picture effects Turn control ring or control...

Страница 121: ...direction and progress status approximate 1 sec 2 sec 3 sec 4 sec Pan the camera so that you make a complete circuit in approx 8 seconds Pan the camera at a constant speed You may not be able to take...

Страница 122: ...ss MENU SET Use to select the picture effect and press MENU SET Tips Pan the camera in the recording direction as steadily as possible If the camera shakes too much it may not be able to take pictures...

Страница 123: ...ctures may not be created or pictures may not be recorded properly when taking pictures of the following subjects or when taking pictures in the following recording conditions Subjects that have a con...

Страница 124: ...lected Scene Mode Scene Mode menu Press MENU SET Use to select Scene Mode menu and press MENU SET Use to select the scene and press MENU SET Control ring control dial Turn the control ring or control...

Страница 125: ...t conditions Tips The more the zoom is drawn towards T side and a distant background is selected the greater the effect will be Soft Skin Smoothes skin colours in bright outdoor daylight conditions po...

Страница 126: ...scapes with close to actual brightness Tips Use flash Subject should not move Tripod self timer recommended Shutter speed may slow down up to 4 seconds After recording the shutter may stay closed up t...

Страница 127: ...idual pictures used to create the HDR picture are not saved You can minimise the loss of gradations in bright areas and dark areas when for example the contrast between the background and the subject...

Страница 128: ...he birthday and name Age Set birthday with and press MENU SET Name See Entering Text 76 Use to select Exit and press MENU SET Tips Make sure Age and Name are ON before taking a picture Age display for...

Страница 129: ...ded Do not move the camera until the countdown is finished After taking the picture the countdown is displayed again while the signal is processed Stabilizer does not work Glass Through The camera pri...

Страница 130: ...Motion picture recording can also be started or finished by pressing the shutter button During playback the movements of a subject that cannot be seen by the naked eye can be made recognisable by pla...

Страница 131: ...tdoors or in other bright locations Press the shutter button halfway to fix the focus and the exposure press the shutter button fully and then pan the camera Hold the camera so that the subject is sli...

Страница 132: ...the setting procedures of the menu 61 Select Cust Set Mem from the Setup menu Use to select custom set for registration and press MENU SET A confirmation screen is displayed Select Yes and press MENU...

Страница 133: ...s are displayed Press MENU SET to enter the settings The camera switches to the recording mode and settings of the selected custom set When changing the menu settings Even if the menu settings are cha...

Страница 134: ...Button Set from Setup menu and press MENU SET 61 Use to select the button to which you want to register a function and press MENU SET Use to select the function to register and press MENU SET LVF Moni...

Страница 135: ...fault setting select Default Control 33 If you do not use the control ring select Not Set When the settings assigned to both the control ring and control dial have been changed Programme Shift cannot...

Страница 136: ...rrectly recognises even registered people depending on their expression or the environment Even if Face Recognition information is changed Face Recognition information for previously recorded pictures...

Страница 137: ...recording select No Faces of subjects other than people e g pets cannot be registered When DISP button is pressed an explanation is displayed Press to select the item for editing and press MENU SET Na...

Страница 138: ...and outdoors or with different expressions or angles Register additional pictures at the place you are recording If a registered person is no longer recognised re register that person Editing or delet...

Страница 139: ...g Text 76 The travel date is calculated from the set departure date and the date set in the camera s clock When destination is set in World Time days elapsed are calculated based on local destination...

Страница 140: ...time Current time at selected destination When Destination has been selected When Home has been selected To set daylight savings Press in step Press again to release the setting When daylight savings...

Страница 141: ...ber of pixels of still pictures Number of pictures which can be recorded depends on this setting and on Quality Settings Aspect Ratio 4 3 3 2 16 9 1 1 Picture Size 12M 4000 3000 10 5M 4000 2672 9M 400...

Страница 142: ...a RAW file from the camera the corresponding JPEG file is also deleted 2 You cannot set the picture size The pictures are saved using the maximum recordable pixels for each image aspect ratio About R...

Страница 143: ...ubject blur High Low AUTO is automatically set in a range up to 1600 based on subject brightness is automatically set in a range up to 1600 based on subject movement and brightness The Sensitivity is...

Страница 144: ...or the setting procedures of the menu 61 ISO Limit Set Recording mode You can set the upper limit of ISO Sensitivity when Sensitivity is set to AUTO or Settings AUTO 200 400 800 1600 3200 6400 This fu...

Страница 145: ...te Balance is set the colouring is adjusted in accordance with the light source However if the scene is too bright or too dark or if other extreme conditions apply the pictures may appear reddish or b...

Страница 146: ...plied when using flash Setting White Balance manually Take a picture of a white object under the target light source to adjust colours Select and press MENU SET Point the camera towards a white object...

Страница 147: ...consumption Settings ON OFF Focus alignment may take time if zoom is suddenly changed from max W to max T or if suddenly moving closer to subject Press shutter button halfway if focus is difficult to...

Страница 148: ...entre Spot Centre and close surrounding area Great difference between brightness of subject and background e g person in spotlight on stage backlighting i Exposure Recording mode Automatically adjusts...

Страница 149: ...es but increase risk of jitter so we recommend using a tripod and the self timer As still pictures may become dark when using faster values such as 1 250 we recommend that still pictures are taken in...

Страница 150: ...pending on the operating conditions and remaining battery power Press to select the item and press MENU SET Start Time Now Starts the recording by fully pressing the shutter button Start Time Set Set...

Страница 151: ...he recording interval is set to a value of less than 1 minute to take pictures of nightscapes etc and the previous recording has not finished yet the later recording may be skipped When Alert is set t...

Страница 152: ...subject conditions Do not block the lamp with your fingers or look at it from close range The setting is fixed to OFF in the following Scene Modes Scenery Night Scenery Handheld Night Shot Sunset Glas...

Страница 153: ...hoto Mode The 5 axis Hybrid Image Stabiliser function automatically functions while recording motion pictures This decreases the jitter of the image when recording motion pictures while zooming or wal...

Страница 154: ...t request date printing in store or make date printing on printer for still pictures with date stamps Date printing may be overlapped Date stamps on still pictures cannot be erased The setting is fixe...

Страница 155: ...pictures on a computer and other such devices For details about recording formats for recording motion pictures and the compatibility of recorded motion pictures 50 Rec Quality Recording mode Sets th...

Страница 156: ...the bit rate volume of data for definite period of time is changed automatically depending on the subject to record Therefore the recording time is shortened when a subject with fast movement is recor...

Страница 157: ...el Shot Recording mode Level Shot function automatically detects the camera s tilt while recording motion pictures and horizontally corrects the recording motion picture so it will not be tilted Setti...

Страница 158: ...When the Zoom Mic is set to ON Zoom Mic Recording mode This function links sound recording with the zoom operation During telephoto recording you can clearly pick up sounds from the subject while supp...

Страница 159: ...on to change display Has picture information recording date and time etc Has recording information Flash Sensitivity etc No display You can only turn the display on or off in the following cases Durin...

Страница 160: ...an delete or edit pictures in group units For example if you delete one of pictures in a group all pictures in that group will be deleted Playing back group pictures consecutively Select a picture wit...

Страница 161: ...again to return to the normal playback screen You can use the same operations for pictures stored in a group as in normal still picture playback Multi Playback Playback Zoom deletion of pictures etc...

Страница 162: ...pictures in a picture group can be displayed at the same time during Favorite playback with Slide Show or Filtering Play The following operation cannot be performed while a representative picture is...

Страница 163: ...ing HDMI output 266 Slide Show Automatically plays back recorded pictures one after another 168 Filtering Play Plays back the pictures after narrowing them down according to various conditions 164 Cal...

Страница 164: ...ctures set as Favorite 167 About operations during Filtering Play During Filtering Play the operation when is pressed in the 1 picture Playback screen is different Select the operation you want to per...

Страница 165: ...eed motion pictures 3D Play Plays back 3D still pictures recorded using 3D Photo Mode Scene Mode Narrowing down by selecting pictures recorded at a destination Play back pictures with Travel Date 139...

Страница 166: ...with Portrait Soft Skin Night Portrait Baby from Scene Mode Scenery etc Only display pictures recorded with Panorama Mode and Scenery Sunset Glass Through from Scene Mode Night Scenery etc Only displa...

Страница 167: ...ctures were taken are shown on the calendar screen If the clock was not set pictures will be displayed as 1st January 2015 Pictures taken with destination settings made in World Time are displayed in...

Страница 168: ...sor button to select Filtering then press MENU SET For details on how to narrow down 164 The filtering will not be cancelled even after the Slide Show finishes If you select All the filtering will be...

Страница 169: ...e operation guide is turned off To display the guide again press the DISP button Control dial Previous Next When URBAN has been selected the picture may appear in black and white as a screen effect Wh...

Страница 170: ...e and press MENU SET If there is more than one picture recorded on the same date the first picture taken on that date will be selected You can display the calendar between January 2000 to December 209...

Страница 171: ...nal condition before retouching Operation from the Playback menu Select Retouch in the Playback menu and then press MENU SET Use to select Auto Retouch and press MENU SET Use to select picture and pre...

Страница 172: ...ive This effect emphasises the colour to make a pop art picture Retro This effect gives a faded image Old Days This effect adds a bright soft and nostalgic feel to the overall image High Key This effe...

Страница 173: ...or to move the focusing area frame Turn the control dial to select the size of the focusing area frame Press MENU SET One Point Color Select the colour to be retained with and press MENU SET Operation...

Страница 174: ...send location information latitude and longitude obtained with your smartphone tablet to this unit and write the location information to the pictures Location information cannot be written to still pi...

Страница 175: ...onfirmation screen is displayed If you select Yes the operation is executed Location information may not be written if there is not enough free space on your card If the card is locked you cannot writ...

Страница 176: ...h the same text Use to select a still picture and press DISP button Title Edit setting Title Edit already set To cancel Press DISP button again To execute Press MENU SET Enter characters See Entering...

Страница 177: ...GLE Use to select a still picture and press MENU SET MULTI up to 100 pictures Use to select a still picture and press DISP button Text Stamp setting Text Stamp already set To cancel Press DISP button...

Страница 178: ...gistered in Title Edit Items set to OFF are not stamped Do not request date printing in store or make date printing on printer for still pictures with date stamps Date printing may be overlapped Canno...

Страница 179: ...at where you want to split a motion picture to pause it Press A confirmation screen is displayed It is executed when Yes is selected The original motion picture that was split does not remain There wi...

Страница 180: ...ps 25 pictures are played back in 1 second Use to select Start and press MENU SET Confirmation screen is displayed It is executed when Yes is selected Exit the menu after it is executed When you selec...

Страница 181: ...web pages etc Still pictures recorded at the smallest recording pixel level cannot be further reduced SINGLE Use to select SINGLE and press MENU SET Use to select a still picture and press MENU SET U...

Страница 182: ...before after resizing Resize setting To cancel Press DISP button again To execute Press MENU SET Confirmation screen is displayed If you select Yes the operation is executed Picture quality is reduce...

Страница 183: ...firmation screen is displayed If you select Yes the operation is executed You can also enlarge the still picture with the control dial Original Face Recognition information will not be copied when sti...

Страница 184: ...tures except your favourites Up to 999 pictures can be set as favourites Use to select SINGLE or MULTI and press MENU SET Use to select picture and press MENU SET SINGLE Favourite picture setting MULT...

Страница 185: ...No to print Date print setting release Press DISP button To clear all Select CANCEL in step and select Yes and then press MENU SET Date print setting cannot be made for still pictures that have been t...

Страница 186: ...nd press MENU SET Use to select picture and press MENU SET SINGLE Picture protected MULTI Picture protected To cancel Press MENU SET again To clear all Select CANCEL in step and select Yes and then pr...

Страница 187: ...a person and press MENU SET If DELETE go to step People whose Face Recognition information has not been registered cannot be selected Use to select the person to replace for another and press MENU SET...

Страница 188: ...ress MENU SET To cancel Press MENU SET Copying pictures may take several minutes Do not turn off the camera or perform other operations during copying If identical names folder file numbers are presen...

Страница 189: ...areas with magnetic fields static electricity or interference Do not use the camera in areas with magnetic fields static electricity or interference such as near microwave ovens Radio waves may not re...

Страница 190: ...ion enables the following operation When connected using Remote Shooting View a guide explaining how to terminate the Wi Fi connection is displayed Terminate the Connection Terminates the Wi Fi connec...

Страница 191: ...ding on the details of your contract Pictures may not be completely sent depending on radio wave conditions If the connection is terminated while sending pictures pictures with missing sections may be...

Страница 192: ...splaying still pictures on a TV 218 Wireless printing 219 Sending pictures to AV equipment 220 Still pictures and motion pictures can be sent to AV equipment in the home home AV equipment Sending pict...

Страница 193: ...l it The icon will be added to the menu Connect the iOS device to the network Select App StoreSM Enter Panasonic Image App or LUMIX to search for the app Select Panasonic Image App and install it The...

Страница 194: ...ission and steal transmitted data To set Wi Fi Password to ON refer to 196 Preparation Install Image App in advance 193 Press Wi Fi button SSID Wi Fi connection lamp Lit blue The information SSID requ...

Страница 195: ...for the connection to be established The connection method differs depending on the smartphone used Using an iOS device Turn on the Wi Fi function in the setting menu of the smartphone Select the SSI...

Страница 196: ...etting a password When Wi Fi Password is set to ON 259 you can strengthen security by using manual input or a QR code for password authentication When Wi Fi Password is set to ON operate the smartphon...

Страница 197: ...rn on the Wi Fi function in the setting menu of the smartphone Select the SSID displayed on the screen of this unit Return to the home screen and start Image App 193 When connecting with SSID and pass...

Страница 198: ...may not be able to read the QR code successfully depending on its quality If you cannot use the QR code connect the smartphone to this unit using SSID and a password When connecting with SSID and pass...

Страница 199: ...h Via Network On the camera Select Via Network and press MENU SET Connect the camera to a wireless access point by following the connection method 250 On your smartphone Set Wi Fi function to ON Selec...

Страница 200: ...rd and play back pictures on the camera as normal On the camera Press Q MENU button A confirmation screen is displayed Select Yes and press MENU SET On your smartphone Close Image App Using an iOS dev...

Страница 201: ...Wi Fi connection Compatible models This function can be used with NFC compatible devices with Android 2 3 3 or above Not available in certain models See the operating instructions of your NFC compati...

Страница 202: ...on your smartphone If you connect during playback of one picture it will be transferred to the smartphone 205 Hold the smartphone close to this area within 5 mm 0 20 inch Use to select Yes and press M...

Страница 203: ...ding motion pictures During motion picture playback during slide shows during panorama picture playback and during continuous playback of group pictures including pauses in each case When using Time L...

Страница 204: ...let Connect to a smartphone 194 Select from Image App The images captured by the camera are displayed on the smartphone Press and hold the picture and drag it to save it on the smartphone The picture...

Страница 205: ...display simply by holding the smartphone close to the camera Pictures can be transferred as soon as they are recorded so you can easily transfer them to your friends and family s smartphones Image App...

Страница 206: ...nsferring the picture to Hold the smartphone close to the on this unit It may take some time to complete the connection If you are transferring multiple pictures repeat steps and Multiple pictures can...

Страница 207: ...m Image App The images captured by the camera are displayed on the smartphone Press and hold the picture and drag it to send it to the social networking service etc Switch the location of the pictures...

Страница 208: ...at is different from the information acquired during recording may be written Take care regarding the following matters Set Home of World Time of the camera to your home area Once a smartphone starts...

Страница 209: ...es 53 Hold the smartphone close to the on this unit The location information is written to the picture being played back Writing the location information may take several minutes is displayed for pict...

Страница 210: ...ctures Pictures recorded in the built in memory Pictures recorded using cameras other than this unit Location information may not be written if there is not enough free space on your card You cannot w...

Страница 211: ...ring recording may be written Take care regarding the following matters Set Home of World Time of the camera to your home area Once a smartphone starts recording the location information do not change...

Страница 212: ...eady have location information Motion pictures recorded in AVCHD format Protected pictures Pictures recorded in the built in memory Pictures recorded using cameras other than this unit Location inform...

Страница 213: ...s Send Images Stored in the Camera Some images may not be played back or sent depending on the device See the operating instructions of the destination device for more information about picture playba...

Страница 214: ...cture each time one is recorded Send Images While Recording Select New Connection in the Wi Fi menu and press MENU SET 61 Use cursor button to select Send Images While Recording and press MENU SET Use...

Страница 215: ...ct On the camera Connect the camera to a smartphone 253 On your smartphone Start Image App 193 When connecting with Manual Connection in Direct 195 Select the device you wish to connect to When the co...

Страница 216: ...selected pictures Send Images Stored in the Camera Select New Connection in the Wi Fi menu and press MENU SET 61 Use cursor button to select Send Images Stored in the Camera and press MENU SET Use cur...

Страница 217: ...art Image App 193 When connecting with Manual Connection in Direct 195 Select the device you wish to connect to When the connection is established the confirmation screen for the transmission setting...

Страница 218: ...device you wish to connect to When the connection is established the screen is displayed Take or play back still pictures on this unit To change the setting or disconnect press Wi Fi button 190 When...

Страница 219: ...t with the DPS over IP standards Contact the printer manufacturers for details on PictBridge wireless LAN compatible printers Select New Connection in the Wi Fi menu and press MENU SET 61 Use cursor b...

Страница 220: ...e one is recorded Send Images While Recording Sending selected pictures Send Images Stored in the Camera Some images may not be played back or sent depending on the device See the operating instructio...

Страница 221: ...o select AV device and then press MENU SET Select Via Network or Direct to connect 249 Select the device you wish to connect to When the connection is established the confirmation screen for the trans...

Страница 222: ...wish to connect to When the connection is established the confirmation screen for the transmission setting is displayed Check the setting and press MENU SET To change the send setting press the DISP b...

Страница 223: ...es of up to 4 GB Files larger than 4 GB cannot be sent Some images may not be played back or sent depending on the device See the operating instructions of the destination device for more information...

Страница 224: ...r automatically select Auto create To specify a folder create a new folder or set a password to the folder select Create manually For details refer to the operating instructions of PHOTOfunSTUDIO PDF...

Страница 225: ...he PC you want to connect to If the PC you want to connect to is not displayed select Manual Input then enter the computer name for Mac enter the NetBIOS name Select the folder you want to send to Whe...

Страница 226: ...ter the computer name for Mac enter the NetBIOS name Select the folder you want to send to When the connection is established the confirmation screen for the transmission setting is displayed Check th...

Страница 227: ...ders If the screen for a user account and password entry appears enter the one you set on your PC If the computer name for Mac the NetBIOS name contains spaces etc the name may not be properly recogni...

Страница 228: ...nsferred still pictures and motion pictures on a PC or a smartphone You can make a setting so that pictures in the camera can be sent to a WEB service or cloud synchronisation service automatically wh...

Страница 229: ...service to which you will send the pictures For more details about picture sending methods 257 Preparation You need to register to LUMIX CLUB 237 to send a picture to a WEB service When sending images...

Страница 230: ...such as a title the time and date when the images were taken and the location where the image was taken Check this information before uploading images to WEB services Panasonic assumes no responsibil...

Страница 231: ...anasonic net eng c lumix_faqs Preparation Make sure that you have created an account on the WEB service you want to use and have the login information available Connect to the LUMIX CLUB site using a...

Страница 232: ...lect Web service and then press MENU SET Select Via Network and connect 250 Select a WEB service you want to connect When the connection is established the confirmation screen for the transmission set...

Страница 233: ...connect When the connection is established the confirmation screen for the transmission setting is displayed Check the setting and press MENU SET To change the send setting press the DISP button 258 S...

Страница 234: ...the part of the manual that applies to your objective Sending a picture each time one is recorded Send Images While Recording 235 Sending selected pictures Send Images Stored in the Camera 236 About...

Страница 235: ...nc Service and then press MENU SET Check the message and press MENU SET Select Via Network and connect 250 Check the send setting When the connection is established the confirmation screen for the tra...

Страница 236: ...eck the send setting When the connection is established the confirmation screen for the transmission setting is displayed Check the setting and press MENU SET To change the send setting press the DISP...

Страница 237: ...may be suspended due to regular maintenance or unexpected problems and service contents may be changed or added to without prior notice to the users The service may be stopped in whole or in part wit...

Страница 238: ...fication If you turn the zoom lever counterclockwise after enlarging the page the page returns to its original size no magnification You can use to move the position of the area to be enlarged Press Q...

Страница 239: ...the Wi Fi menu and press MENU SET 61 Use cursor button to select LUMIX CLUB and press MENU SET Select Set Add Account Select Set Login ID The login ID and password are displayed The password is displa...

Страница 240: ...login ID by following the on screen instructions This operation is not available for Wi Fi Direct connection When this unit and the smartphone tablet have acquired different login IDs When you want t...

Страница 241: ...e message is displayed Select Next Select Yes in the login ID delete confirmation screen The message is displayed Select Next Select Yes on the confirmation screen for deleting the LUMIX CLUB account...

Страница 242: ...Recording PC AV device Web services Cloud Folder Charging Start transferring Example Auto Transfer USB connection cable supplied Pictures that can be sent with Smart Transfer JPEG RAW MP4 AVCHD 3D Des...

Страница 243: ...th other people Panasonic assumes no responsibility for any damages caused by uploaded images Panasonic assumes no responsibility for any damages caused by the use of Smart Transfer Electromagnetic wa...

Страница 244: ...ed For details regarding preparation before transfer read To create a folder that receives images 224 Use cursor button to select a PC you want to connect and then press MENU SET Use cursor button to...

Страница 245: ...daptor supplied into the electrical outlet When using a PC Connect the camera to a computer using the USB connection cable supplied Smart Transfer starts automatically according to the Charge Priority...

Страница 246: ...camera using the USB connection cable supplied and plug the AC adaptor supplied into the electrical outlet Switch to playback mode Select Wi Fi Setup in the Wi Fi menu and press MENU SET 61 Use curso...

Страница 247: ...ing to a wireless access point and set For details 250 Size Change the size of the picture to be transferred Original Change Change M or S can be selected for picture size The aspect ratio of the pict...

Страница 248: ...ress MENU SET Use cursor button to select an item and press MENU SET Item Description ON Give priority to charging Pictures are transferred after charging OFF Give priority to picture transfers When r...

Страница 249: ...do not ordinarily use or in a similar situation it is convenient to make a direct connection If you are connecting with the same settings as used previously you can quickly start using the Wi Fi funct...

Страница 250: ...point that is compatible with Wi Fi Protected Setup with a WPS mark Press the wireless access point WPS button until it switches to WPS Mode Refer to the wireless access point instruction manual for d...

Страница 251: ...confirm SSID network authentication type encryption type encryption key of the wireless access point you are using Use cursor button to select the wireless access point you are connecting to and pres...

Страница 252: ...e encryption type The type of settings that can be changed may vary depending on the details of network authentication settings Network authentication type Encryption types that can be set WPA2 PSK WP...

Страница 253: ...method Description Wi Fi Direct Set the device to Wi Fi Direct mode Select Wi Fi Direct Select the device to connect to Read the operating instructions of your device for details WPS Connection WPS P...

Страница 254: ...register items in the History to Favourite You can easily connect with the same settings as used previously by connecting from History or Favourite Select History Connection or Favorite Connection in...

Страница 255: ...Select History Connection from the Wi Fi menu 61 Select the item you wish to register and press Enter a registration name For details on how to enter characters refer to Entering Text 76 Up to 30 char...

Страница 256: ...e number of settings that can be saved in the history is limited We recommend that you register and save frequently used Wi Fi connection settings to Favourite 255 When selecting History or Favourite...

Страница 257: ...while files are being sent If you turn off the camera before you have completed sending or if you close the Wi Fi connection or in similar situations unsent files will not be resent You may not be ab...

Страница 258: ...images before sending them ON Delete the location information then send OFF Keep the location information and send This operation only deletes the location information from the images that are set to...

Страница 259: ...nnect to the same workgroup as the destination computer when sending pictures to the computer The default is set to WORKGROUP Change Workgroup Name Enter the workgroup of the connecting computer Close...

Страница 260: ...selected Exit the menu after it is executed For details on how to enter characters refer to Entering Text 76 Make a copy of password If you forget the password you can reset it with Reset Wi Fi Settin...

Страница 261: ...n the plug could become deformed and cause faulty operation Also do not insert into the wrong socket Doing so may cause damage to this unit HDMI micro cable To HDMI video audio input socket To connect...

Страница 262: ...ay be momentarily distorted immediately after commencing playback or pausing on certain televisions Audio output is stereo To connect with an AV cable optional Always use a genuine Panasonic AV cable...

Страница 263: ...our product manual to verify compatibility with VIERA Link HDMI This camera supports VIERA Link HDMI Version 5 This is the Panasonic standard that also supports previous Panasonic VIERA Link devices U...

Страница 264: ...le referring to what is displayed on the TV screen When operating refer to the VIERA Link operating panel Other related operations Turning the unit OFF The camera can also be turned off when the telev...

Страница 265: ...le TV by use of an HDMI micro cable to display the playback screen 261 Display still pictures recorded in 3D When the VIERA Link setting on the camera is set to ON and the camera is connected to a VIE...

Страница 266: ...to display the image in 3D or not When a 3D image is played back on a TV that is not 3D capable 2 pictures may appear side by side on the screen On the screen of this camera 3D still pictures will be...

Страница 267: ...ity will be reduced from high definition to standard definition Audio will be monaural Connect camera to recorder AV cable optional To recorder s input socket Check the plug direction and insert it st...

Страница 268: ...owing support website http panasonic net avc sdcard information SDXC html Computer specifications You can connect the camera to a computer that can detect a mass storage device device that stores a la...

Страница 269: ...es or write to DVD Operating environment Supported OS Windows 8 1 32 bit 64 bit Windows 8 32 bit 64 bit Windows 7 32 bit 64 bit and SP1 Windows Vista 32 bit SP2 CPU Windows 8 1 Pentium III 1 GHz or hi...

Страница 270: ...URL http loilo tv product 20 Installing supplied software The software compatible with your PC will be installed Preparation Check your PC s specifications and operating environment for each software...

Страница 271: ...oper Studio SE from the following site and install it on your computer to use This software is not provided on the supplied CD ROM http www isl co jp SILKYPIX english p Operating environment Supported...

Страница 272: ...e built in memory remove any memory cards Install PHOTOfunSTUDIO on your computer before starting the copying procedure 270 Turn on the camera and computer Check the plug direction and insert it strai...

Страница 273: ...otion pictures in AVCHD 1 JPG Still pictures RW2 Still pictures recorded in RAW file MP4 MP4 Motion Pictures High Speed Video MPO 3D still pictures 2 New folders are created in the following cases Whe...

Страница 274: ...e connected to your computer even if USB Mode 73 is set to PictBridge PTP Only picture output can be performed If you cannot connect to your PC in PTP mode set USB Mode to PC and reconnect It may not...

Страница 275: ...a picture and press MENU SET Use to select Print start and press MENU SET Print settings 278 To cancel print Press MENU SET Check the plug direction and insert it straight in If the cable is inserted...

Страница 276: ...ication a warning beep sounds Cancel printing and disconnect USB connection cable supplied Still pictures recorded in a RAW file cannot be printed The still pictures recorded in JPEG file format at th...

Страница 277: ...with date and text Printing date without Text Stamp Printing in store Only recording date can be printed Request date printing in store Making Print Set 185 settings on the camera in advance allows se...

Страница 278: ...setting and press MENU SET When setting Print with Date to ON check the date printing settings on the printer printer settings may be prioritised To print a picture on which text or a date has been s...

Страница 279: ...1 Picture Size 141 Quality 142 Flash Mode 86 Stabiliser 45 153 Motion Deblur 38 Jitter alert 45 White Balance 145 Creative control adjustment display 112 Peaking 99 Remaining battery 22 Focus 48 Zoom...

Страница 280: ...erture value 45 107 109 Minimum shutter speed 149 1 60 Shutter speed 45 108 109 ISO Sensitivity 143 ISO Limit Set 144 XXhXXmXXs RXXhXXmXXs h m and s indicate hour minute and second 290 Number of recor...

Страница 281: ...rs List of LCD monitor Viewfinder displays SQW0215 281 Destination settings 139 Travel elapsed days 139 Name 128 137 Age in years months 128 137 Current date time 140 World time 140 Focus range 95 Zoo...

Страница 282: ...d picture 171 172 Aspect Ratio 141 Picture Size 141 Quality 142 Remaining battery 22 50i Rec Format 155 Rec Quality 155 30s Motion picture recording time 57 Burst 160 Histogram 68 Retouch 171 Motion p...

Страница 283: ...7 109 1 60 Shutter speed 45 108 109 Folder File number 53 273 Picture number Total pictures 53 25s Elapsed playback time 1 57 Recording date time World time 140 Name 2 128 137 Age in years months 2 12...

Страница 284: ...he camera on again Consult the dealer or your nearest Service Centre if display still remains Some pictures cannot be copied Copy could not be completed Pictures cannot be copied in following cases Pi...

Страница 285: ...d has dropped If this happens we recommend backing up the data on the memory card and formatting it 75 A folder cannot be created Folder numbers in use have reached 999 Save needed data on a computer...

Страница 286: ...ocessing time Try again after a while Depending on the wireless access point connection may be automatically disconnected after specific time has passed Reconnect the connection again Upload to the Cl...

Страница 287: ...selected together WEB services designed only for pictures and WEB services designed only for motion pictures cannot be selected at the same time Deselect one of the services Cannot get IP address Plea...

Страница 288: ...or low temperature Reconnect the USB connection cable supplied and retry charging in a place where ambient temperature is 10 C to 30 C 50 F to 86 F temperature conditions also apply to the battery its...

Страница 289: ...ect Focus range varies according to recording mode Subject outside of focus range 95 Caused by jitter or subject movement 45 Recorded pictures are blurred The stabiliser function ineffective Shutter s...

Страница 290: ...otect the camera With some cards access display may appear briefly after recording and recording may end midway Use a card of SD Speed Class 4 or higher If recording stops even when using a card of th...

Страница 291: ...correct flicker caused by lighting such as fluorescent lights LED lights etc and is not a malfunction The screen is too bright too dark Monitor Luminance is activated 67 Use Monitor Display Viewfinder...

Страница 292: ...e round spots like soap bubbles appear on the recorded picture If you take a picture with the flash in a dark place or indoors white round spots may appear on the picture caused by the flash reflectin...

Страница 293: ...s point is not displayed Or it cannot be connected Check if the wireless access point to connect is in operating state The camera may not display or connect to a wireless access point depending on the...

Страница 294: ...atch that of your PC 259 Pictures cannot be transmitted to the computer If a firewall is enabled by the OS or security software this unit may be unable to connect to the computer Images cannot be tran...

Страница 295: ...et on the Wi Fi Setup menu will be reset Transmission of the image fails midway Is the size of the image too large Transmit after dividing the motion picture with Video Divide 179 Reduce the image siz...

Страница 296: ...m the camera VIERA Link HDMI is not working Is the HDMI micro cable connected correctly 261 Check that the HDMI micro cable is fully inserted Is the camera s VIERA Link setting set to ON 74 The input...

Страница 297: ...he camera off before disconnecting the USB connection cable Cannot print when connecting to printer Printer not compatible with PictBridge Set USB Mode to PictBridge PTP 73 The edges of pictures are c...

Страница 298: ...ay also change but this is due to aperture settings being made Does not affect recording Clock is incorrect Camera has been left for a long period Reset the clock 29 A long time was taken to set the c...

Страница 299: ...supplied Then reinsert the battery or reconnect AC adaptor and turn this unit on Do not use this unit near radio transmitters or high voltage lines If you record near radio transmitters or high voltag...

Страница 300: ...t information and does not completely delete the data from within the memory card When disposing of or transferring your memory cards we recommend physically destroying them or using commercially avai...

Страница 301: ...rom AM radio may cause radio interference Do not use a damaged or dented battery especially connectors e g by dropping can cause faults Do not peel off or scratch the covering on the battery Using a b...

Страница 302: ...in Baby Mode or in the Face Recog function keep in mind that the camera and recorded pictures will contain personal information Disclaimer Data containing personal information can be altered or lost d...

Страница 303: ...e double D symbol are trademarks of Dolby Laboratories Pentium is a trademark of Intel Corporation in the U S and or other countries Windows and Windows Vista are either registered trademarks or trade...

Страница 304: ...aFont from DynaComware Corporation DynaFont is a registered trademark of DynaComware Taiwan Inc Other names company names and product names mentioned in these instructions are trademarks or registered...

Страница 305: ...d party and licensed to Panasonic Corporation and or 3 open source software The software categorised as 3 is distributed in the hope that it will be useful but WITHOUT ANY WARRANTY without even the im...

Отзывы: