background image

64   

VQT1P98

VQT1P98

   65

Applications

(Record)

11

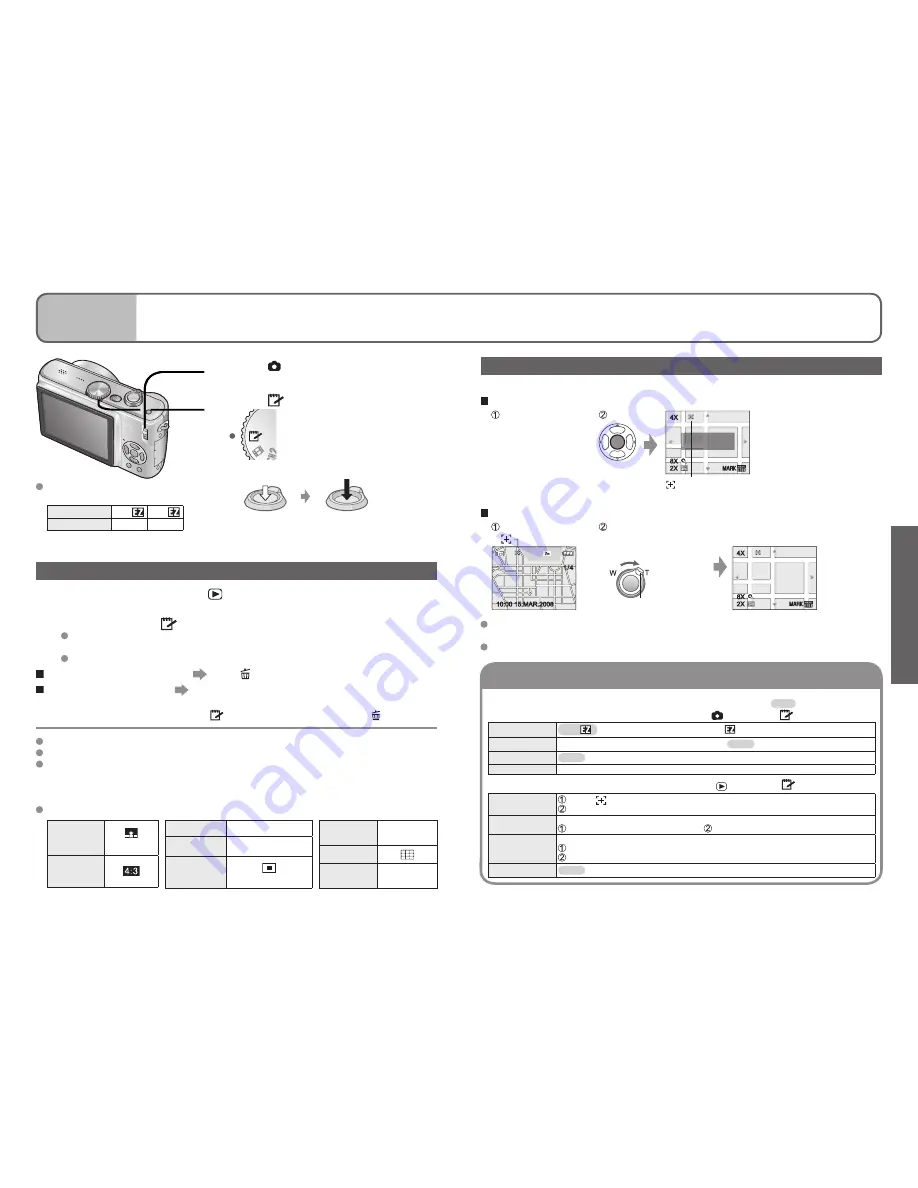
Taking/viewing clipboard 

pictures 

(CLIPBOARD)

Useful for taking pictures of timetables and maps instead of taking memos.
Regardless of presence of card, pictures will always be saved to clipboard folder of 
built-in memory, so that they can be distinguished from normal pictures and viewed 
immediately. 

Beware of copyrights, etc. (P.2)

CLIPBOARD menu

1

Set to   

2

Set to 


(clipboard)

3

Take a clipboard picture

Press halfway

(align focus)

Press fully

(take picture)

Viewing clipboard pictures 

1

Set REC/PLAY switch to

2

Set mode dial to

 (CLIPBOARD mode)


 Can be viewed with same operations as with still pictures taken in other modes 

(P.35). (30-picture and calendar displays cannot be used.)

 Copy clipboard pictures onto memory cards in order to print (next page).

 To delete clipboard pictures 

Press   (delete) in step

 2


above. (P.36)

 If internal memory is full 

   Non-clipboard pictures can be deleted from the internal memory by removing card from camera, 

setting mode dial to a setting other than 

 (CLIPBOARD mode), and pressing

(delete).

 Playback mode functions cannot be used.
 ‘STABILIZER’ setting made in REC menu will be reflected in clipboard mode.
 Functions  unavailable:

  INTELLIGENT ISO, METERING MODE, I.EXPOSURE, MIN. SHTR SPEED

BURST, DIGITAL ZOOM, AUTO BRACKET, WB ADJUST, CONTINUOUS AF, COLOR 
MODE, AUTO LCD OFF, HISTOGRAM

 The settings for the following functions are fixed.

 Represents built-in memory used 

entirely for clipboard pictures (approx.)

Picture size

2 M 

1 M 

Pictures

97

146

QUALITY


(Standard)

ASPECT 

RATIO


SENSITIVITY

AUTO

WHITE 

BALANCE

AWB

AF MODE


(1-area-focusing)

AF ASSIST 

LAMP

ON

GUIDE LINE

POWER 

SAVE

5MIN.

Zoom mark

Useful for enlarging and saving parts of maps, etc.

 To register zoom enlarged size and position 

  Enlarge with 

zoom lever and 
select position 
with 

▲▼◄►

 Press

 Zoom mark 

Displayed on registered pictures 

•  To change zoom and position: 

Repeat the left

•  To finish zoom mark setting: 

Restore zoom to original 

(normal) ratio

Laker St

Chalky A

ve

Greener Pl

Northwood St

Hudson Rd

Crossford St

G

reener Pl

Crossford St

THE ZOOM MARK HAS
BEEN SET

4X

4X

2X

8X
2X

8X

MARK

MARK

 To view registered ratio and position:

Laker St

Chalky A

ve

Stringer St

August St

Greener Pl

Christen Pl

Edgar

 Rd

Tr

acer
y R

d

Par

k Rd

Arb

our 

Grov

e

Northwood St

Southwood St

Southwood St

Jillian St

Gilbert St

Guillemot St

Guillemot St

Hudson Rd

Hudson Rd

Crockery St

Crossford St

City Park

Beak A

ve

10:00 15.MAR.2008

10:00 15.MAR.2008

our 

G

Arb

o

1/4

1/4

 Display picture with

  Turn to T side

(No need to manually 
enlarge or move)

Zoom lever

Laker St

Chalky A

ve

Greener Pl

Northwood St

Hudson Rd

Crossford St

4X

4X

2X

8X
2X

8X

MARK

MARK

Immediately displayed at 
recorded size and position

•  To cancel 

zoom mark 

 ‘CANCEL 

MARK’ 

(below)

 When a picture with a zoom mark is deleted, both original picture and picture with zoom 

mark will be deleted.

  Picture can be deleted even while zoomed in.

A special menu is used in CLIPBOARD mode. (Default setting:           )

REC ON CLIPBOARD menu

 (REC/PLAY switch:    Mode dial: 

)

PICTURE SIZE

2 M 

   (Priority to picture quality) / 1 M 

 (Priority to the number of pictures)

AUDIO REC.

Record sound (5 seconds) simultaneously.   OFF   /ON 

LCD MODE

  OFF   / AUTO POWER LCD / POWER LCD / HIGH ANGLE (P.22)

CLOCK SET

(P.19)

PLAY ON CLIPBOARD menu

 (REC/PLAY switch:    Mode dial: 

)

CANCEL MARK

 Select 

 marked clipboard picture with 

◄►

.

 Cancel with ‘MENU/SET’.

AUDIO DUB.

Add sound to previously-taken clipboard picture.

 Select clipboard picture with 

◄►

.   Record/stop with ‘MENU/SET’. (P.79)

COPY

Copy single pictures from clipboard to card. (Zoom mark will not be copied.)

 Select clipboard picture with 

◄►

 and press ‘MENU/SET’

 Select ‘YES’ with 

▲▼

 and press ‘MENU/SET’.

LCD MODE

  OFF   / POWER LCD (P.22)

Содержание Lumix DMC-TZ11

Страница 1: ...8 Before use please read these instructions completely This manual is based on the DMC TZ15 model Product illustrations and screens may vary GN Operating Instructions Digital Camera Model No DMC TZ15 DMC TZ11 ...

Страница 2: ...se may infringe copyright laws Even for the purpose of private use recording of certain material may be restricted THE SOCKET OUTLET SHALL BE INSTALLED NEAR THE EQUIPMENT AND SHALL BE EASILY ACCESSIBLE CAUTION Danger of explosion if battery is incorrectly replaced Replace only with the same or equivalent type recommended by the manufacturer Dispose of used batteries according to the manufacturer s...

Страница 3: ... want to view 1 9 100 0001 100 0001 1 9 10 00 15 MAR 2008 10 00 15 MAR 2008 Note Example screens displayed in this manual are for DMC TZ15 model DMC TZ11 About the battery charger CAUTION DO NOT INSTALL OR PLACE THIS UNIT IN A BOOKCASE BUILT IN CABINET OR IN ANOTHER CONFINED SPACE ENSURE THE UNIT IS WELL VENTILATED TO PREVENT RISK OF ELECTRIC SHOCK OR FIRE HAZARD DUE TO OVERHEATING ENSURE THAT CUR...

Страница 4: ...eens AV cable supplied Component cable optional Enjoy videos in HD on TV with component terminals 1080i by using a component cable With your printer 3 Connect directly to easily print pictures at home Use a PictBridge compatible printer USB connection cable supplied At digital photo centre Give card to shop assistant to print pictures Using your PC 3 Send by e mail save to hard disk Print out pict...

Страница 5: ...pictures with zoom 32 Enlarging further DIGITAL ZOOM 34 Applications Record 5 Viewing your pictures Play 35 Deleting pictures 36 To delete multiple or all pictures 36 4 5 1 2 3 4 5 6 Changing recording information display 37 Taking pictures with flash 38 Taking close up pictures 40 Taking close up pictures without standing close to subject TELE MACRO function 40 Positioning camera and subject with...

Страница 6: ...65 Quick setting 66 1 2 3 4 Applications View Viewing as list Multi playback Calendar playback 67 Viewing motion pictures pictures with audio Creating still pictures from motion pictures 68 Different playback methods 69 NORMAL PLAY 69 DUAL DISPLAY DMC TZ15 Only 69 SLIDE SHOW 70 CATEGORY PLAY 71 FAVORITE PLAY 71 Using PLAYBACK menu 72 CALENDAR 72 TITLE EDIT 72 Text input method 72 TEXT STAMP 73 RES...

Страница 7: ...numbers are as of January 2008 Battery Pack CGA S007E referred to in this manual as battery Battery Charger DE A46A referred to in this manual as charger Battery Carrying Case VYQ3680 AC Cable K2CJ2DA00008 Strap VFC4297 USB Connection Cable K1HA08CD0019 AV Cable K2HA08CD0020 CD ROM Please dispose of all packaging appropriately Cards are optional You can record or play back pictures on the built in...

Страница 8: ...t compensation P 29 Flash P 38 MENU SET menu display set finish P 20 COMPONENT OUT socket P 87 AV OUT DIGITAL socket P 81 83 86 DC IN socket P 81 83 Always use a genuine Panasonic AC adaptor DMW AC5G optional Release lever P 17 Up down left right INTELLIGENT AUTO mode Take pictures with automatic settings P 28 NORMAL PICTURE mode Take pictures with customized settings P 30 SCENE mode Take pictures...

Страница 9: ...oduct Do not remove card or battery while power is ON or while status indicator is on Camera may cease operating correctly or card recorded contents may be damaged The reading writing speed of a MultiMediaCard is slower than an SD memory card When a MultiMediaCard is used the performance of certain features may be slightly slower than advertised Keep the Memory Card out of reach of children to pre...

Страница 10: ...emory Remaining battery only when using battery flashes red Status indicator flashes when LCD monitor is off Recharge or replace battery P 16 When in operation Card or Built in memory are Illuminated red This means that an operation is in progress such as the recording reading or deleting of pictures Do not turn off the power or remove the battery card or AC adaptor optional this may cause damage ...

Страница 11: ... dial setting REC menu REC PLAY switch REC EXIT MENU SELECT ASPECT RATIO PICTURE SIZE SENSITIVITY AUTO OFF INTELLIGENT ISO QUALITY Changing photography preferences P 55 63 Make settings such as white balance sensitivity aspect ratio and picture size Screen example DMC TZ15 PLAYBACK MODE menu REC PLAY switch PLAYBACK MODE SLIDE SHOW NORMAL PLAY FAVORITE PLAY CATEGORY PLAY DUAL PLAY SET SELECT Viewi...

Страница 12: ...mode or menu screen display or when connected to computer printer POWER LCD will be deactivated if no operations are performed for 30 seconds while recording Brightness can be restored by pressing any button Brightness colour of screen in LCD MODE has no effect on pictures recorded BEEP Change or mute the beep shutter sounds BEEP LEVEL Mute Low High BEEP TONE Change beep tone SHUTTER VOL Mute Low ...

Страница 13: ...MULTI ASPECT 1 scene modes AUTO BRACKET BURST mode or pictures with audio auto review performed regardless of setting 1DMC TZ15 only Motion pictures cannot be automatically reviewed ZOOM RESUME Remember the zoom ratio when turning power off OFF ON Cannot be set when using SELF PORTRAIT scene mode NO RESET Reset image file numbers OFF ON The folder number is updated and the file number starts from ...

Страница 14: ...fficiently charged battery P 16 or AC adaptor DMW AC5G optional Only inserted card will be formatted if present internal memory will be formatted if no card is inserted Always format cards with this camera All picture data including protected pictures will be deleted Do not turn off power or perform other operations during formatting Consult retailer if format cannot be successfully completed Form...

Страница 15: ...cognises i PORTRAIT Follows face to take clear bright pictures Recognises i SCENERY Takes sharp pictures of near and far landscapes Recognises i MACRO Reads distance to take sharp pictures of close subjects Recognises i NIGHT PORTRAIT Takes bright natural pictures of people and night scenery Only with Recognises i NIGHT SCENERY Uses slow shutter speed to achieve natural colouring Only with Recogni...

Страница 16: ...r objects emitting light In dark or with significant jitter When too close to object or when taking pictures of both distant and close objects together in the same picture We recommend using the face detection function when taking pictures of people P 59 2 Return to desired composition Press fully F3 3 1 30 F3 3 1 30 AF area Focus range P 41 Outside of range focus may not be aligned even if displa...

Страница 17: ...if power is turned off E ZOOM Optical zoom and extra optical zoom EZ Automatically switches to optical zoom when using maximum picture size P 55 and to extra optical zoom for further zooming otherwise EZ is short for extra optical zoom Optical zoom Extra optical zoom p Zoom bar displayed Max enlargement 10x Max enlargement 11 3x 16 9x DMC TZ11 12 8x 15 9x Varies according to picture size Maximum z...

Страница 18: ...set to OFF 1 DMC TZ15 only 1 Set to 2 Scroll through pictures Previous Next File number Picture number Total pictures Hold down to quickly scroll forwards backwards Only file numbers change while held down picture is displayed when released Scroll speed increases the longer you press If file number is not displayed press display button After the final picture display returns to the first picture S...

Страница 19: ...and recording information display on off with GUIDE LINE setting P 23 When is in use recording information and guide lines cannot be displayed simultaneously Example OK Dark Bright Applications Record 1 Changing recording information display 3 Select type of deletion SET SET SELECT SELECT CANCEL CANCEL DELETE SINGLE NO YES DELETE DELETE DELETE MULTI DELETE ALL To use DELETE ALL go to step 6 4 Sele...

Страница 20: ... setting SCENE MODE 2 1 ー ー ー ー 3 ー ー ー ー ー ー ー ー ー ー ー ー ー ー ー ー 3 ー ー ー ー ー ー ー ー ー ー ー ー ー ー ー ー 3 ー ー ー ー ー ー ー ー ー ー ー ー ー 1 Set to AUTO AUTO RED EYE reduction or SLOW SYNC RED EYE reduction according to subject and brightness 2 DMC TZ15 only 3 DMC TZ11 Cannot be used with MOTION PICTURE mode and scene modes or Focus range according to ISO sensitivity and zoom Focus range Max W Max T SENSITIV...

Страница 21: ...is close to camera due to margin for focus alignment being severely reduced Resolution may be reduced around the edges of the picture When using INTELLIGENT AUTO mode macro recording can be activated by just pointing the camera at subject display Mode dial set to 1 1 1 When using MACRO Zoom ratio Focus range 1 x max W 4 7 x 5 cm 5 cm to 2 m 2 m to Ranges between 5 cm 2 m according to zoom ratio 10...

Страница 22: ...self timer Corrects exposure when adequate exposure cannot be obtained if difference between brightness of object and background etc Depending on the brightness this may not be possible in some cases e g AUTO BRACKET with 1EV First picture 0EV Standard Second picture 1EV Darker Third picture 1EV Brighter Minus direction Plus direction Over exposed Optimum exposure Under exposed EXPOSURE AUTO BRACK...

Страница 23: ...scene The scene mode flash setting is reset to the default setting when the scene mode is changed Guidelines displayed in gray in NIGHT PORTRAIT NIGHT SCENERY STARRY SKY and FIREWORKS scene modes MENU SET DISPLAY 1 Set to 2 Set to SCN1 or SCN2 3 Select scene Press MENU SET if scene menu is not displayed SCENE MENU DISPLAY SCENE MODE 1 PORTRAIT 2 1 SET SELECT Zoom lever can also be used to switch t...

Страница 24: ... Record 7 Taking pictures according to the scene SCENE MODE Continued How to select a scene P 44 Using flash in scene modes P 39 NIGHT PORTRAIT Take pictures of people and nightscapes with close to actual brightness Interference may be noticeable with dark scenes Shutter may remain closed for 1 second after taking picture Main fixed setting CONTINUOUS AF OFF AF MODE default setting is face detecti...

Страница 25: ...ng flash in scene modes P 39 Scene Uses Tips Notes HIGH SENS Prevents blurring of subject in dark indoor conditions Pictures may appear slightly grainy due to high sensitivity Main fixed settings QUALITY Standard SENSITIVITY ISO1600 6400 Extra optical zoom and digital zoom cannot be used Tips Select the aspect ratio and the picture size with and press MENU SET HIGH SENS PICTURE SIZE 2 5M 2M 3M 4 3...

Страница 26: ...ing to the scene SCENE MODE Continued How to select a scene P 44 Using flash in scene modes P 39 Scene Uses Tips Notes AERIAL PHOTO Take pictures of the view from aircraft windows Main fixed settings FLASH FORCED FLASH OFF AF ASSIST LAMP OFF Turn the camera off when taking off or landing When using the camera follow all instructions from the cabin crew Tips Angle the camera towards areas of contra...

Страница 27: ...ecting with component cable optional DMC TZ15 only P 87 fps frames per second 30fps for smooth picture movement 10fps for longer motion pictures Estimated recording time P 100 To viewing motion pictures P 68 Applications Record 8 Taking motion pictures MOTION PICTURE TRAVEL DATE Record travel date and destination Record information as to what day and where pictures were taken by setting departure ...

Страница 28: ...d 9 Useful features for travel Continued Default setting Quick setting P 66 is useful to easily call up frequently used menus PICTURE SIZE Set size of picture Number of pictures which can be recorded depends on this setting and on QUALITY see below P 100 Set up Mode dial Press MENU SET Select PICTURE SIZE P 20 Settings ASPECT RATIO P 56 Picture size 9 M 1 3456 2592 7 M 2 3072 2304 5 M 2560 1920 3 ...

Страница 29: ...nued REC PLAY switch Shutter speed and ISO sensitivity are displayed in the screen for a few seconds after recording If interference becomes noticeable we recommend reducing the setting or selecting NATURAL in the COLOR MODE Blurring may occur depending on brightness and size position and speed of movement of the subject e g if subject is too small is on edge of picture or starts moving as soon as...

Страница 30: ...ards a white object e g paper and press MENU SET Press MENU SET twice Making this setting will reset white balance fine adjustment MENU SET WHITE SET SET CANCEL Only takes image of white objects within frame step Applications Record 10 Using REC menu Continued REC PLAY switch METERING MODE You can change the position for measuring brightness when correcting exposure Set up Mode dial Press MENU SET...

Страница 31: ...o subject Press shutter button halfway if focus is difficult to align When using or AF MODE focus will be aligned quickly when shutter button is pressed halfway BURST Enables a rapid succession of photographs to be taken Succession of photographs taken while shutter button is held down Set up Mode dial Press MENU SET Select BURST P 20 Settings BURST setting Speed No of pictures 1 OFF No burst Burs...

Страница 32: ...ark locations Set up Mode dial Press MENU SET Select MIN SHTR SPEED P 20 Settings 1 200 1 125 1 60 1 30 1 15 1 8 1 4 1 2 1 Slower shutter speeds allow for brighter pictures but increase risk of jitter so we recommend using a tripod and the self timer As pictures may become dark when using faster values such as 1 200 we recommend that pictures are taken in bright locations flashes red when shutter ...

Страница 33: ...arged size and position Enlarge with zoom lever and select position with Press Zoom mark Displayed on registered pictures To change zoom and position Repeat the left To finish zoom mark setting Restore zoom to original normal ratio Laker St Chalky Ave Greener Pl Northwood St Hudson Rd Crossford St Greener Pl Crossford St THE ZOOM MARK HAS BEEN SET 4X 4X 2X 8X 2X 8X MARK MARK To view registered rat...

Страница 34: ... 15 MAR 2008 10 00 15 MAR 2008 To view pictures press 2 Set to multiple screen display Scrolls with each turn to W side 1 14 15 MAR 2008 Picture no Date recorded Total no Scroll bar Picture type FAVORITE MOTION PICTURE BABY PET TRAVEL DATE WORLD TIME TITLE EDIT TEXT STAMP 12 screens T W 1 50 15 MAR 2008 MENU CANCEL 30 screens SUN MON TUE WED THU FRI SAT 2008 3 16 23 9 2 30 5 6 7 1 8 15 22 29 17 24...

Страница 35: ...ect screen 2 Select picture Previous picture Next picture Reduce Expand Display zoom position for 1 sec Same picture cannot be displayed in DUAL DISPLAY Applications View 3 Different playback methods REC PLAY switch Set mode dial to any except 1Select and play picture Operations during motion picture playback Motion picture mode icon Motion picture recording time 5s 5s 1 9 100 0001 100 0001 1 9 10...

Страница 36: ...ack in slide show Music effects cannot be added CATEGORY PLAY Pictures can be classified automatically and viewed by category Automatic classification starts when CATEGORY PLAY is selected from the playback mode selection menu Set up Press MENU SET Select CATEGORY PLAY P 20 FAVORITE PLAY Manually play pictures set in FAVORITE P 77 displayed only when FAVORITE pictures present and setting set to ON...

Страница 37: ...le does not fit on screen To edit select SINGLE in step 1 select picture with and press MENU SET correct text and press EXIT Cannot be set in CATEGORY PLAY or FAVORITE PLAY playback mode P 71 Cannot be used with pictures taken on other devices protected pictures or motion pictures To print text use TEXT STAMP below or the supplied CD ROM PHOTOfunSTUDIO viewer TEXT STAMP Stamp recording date or tex...

Страница 38: ...e RESIZE RESIZE SELECT SELECT CANCEL CANCEL SET SET 1 5 100 0001 100 0001 1 5 Current size Size after change 4 Select YES NO YES SELECT SELECT CANCEL CANCEL SET SET RESIZE RESIZE SAVE NEW PICTURES Press when finish setting to return to the menu screen Picture quality is reduced after resizing Cannot be set in CATEGORY PLAY or FAVORITE PLAY playback mode P 71 Cannot be used with motion pictures pic...

Страница 39: ...t ASPECT CONV P 20 3 Select horizontal position and convert Move portrait pictures using ADJUST ADJUST CANCEL CANCEL SET SET Changes to outlined size 4 Select YES and set Press when finish setting to return to the menu screen ROTATE DISP and ROTATE cannot be used with motion pictures ROTATE cannot be used with protected pictures P 79 Some pictures taken facing up or facing down may not be rotated ...

Страница 40: ...e used In such cases delete all of the DPOF information and then set it again with this camera Date printing settings cannot be made for pictures with a TEXT STAMP applied These settings will also be cancelled if a TEXT STAMP is applied later PROTECT Set protection to disable picture deletion Prevents deletion of important pictures Set up Press MENU SET PLAYBACK menu Select PROTECT P 20 1 Select S...

Страница 41: ...tures will not be deleted after copying to delete pictures P 36 Cannot be set in CATEGORY PLAY or FAVORITE PLAY playback mode P 71 Connect the camera to your computer to save play print and e mail your pictures Set up Connect the camera to the AC adaptor DMW AC5G optional Alternatively use a sufficiently charged battery Card Insert card and set mode dial to any except Built in memory Remove card T...

Страница 42: ...ctBridge PTP remove the need to make the setting each time the camera is connected to the printer You can connect directly to a PictBridge compatible printer for printing Set up Connect the camera to the AC adaptor DMW AC5G optional Alternatively use a sufficiently charged battery Card Insert card Built in memory Remove card Copy clipboard mode pictures to the card P 65 Adjust settings on your pri...

Страница 43: ...78 settings on the camera in advance allows settings for numbers of copies and date printing to be designated before giving the card to the store When printing pictures of 16 9 aspect ratio check in advance that the store can accept this size Using computer Print settings for recording date and text information can be made using the supplied CD ROM PHOTOfunSTUDIO viewer Using printer Recording dat...

Страница 44: ...s Do not use any other AV cables except the supplied one You can view pictures on TVs in other countries regions which use the NTSC or PAL system when you set VIDEO OUT in SETUP menu LCD MODE setting is not reflected on TV Pictures can only be displyed on TV by using mode Some televisions may cut off the edges of pictures or not display them full screen Pictures rotated to portrait may be blurred ...

Страница 45: ...ng state 8 Histogram P 37 9 Travel date P 53 10 Aperture value P 30 Shutter speed P 30 ISO sensitivity P 57 Intelligent ISO P 56 11 Current date time Focus range P 41 Zoom P 32 12 Burst mode P 61 Auto bracket P 43 Intelligent exposure P 61 High angle mode P 22 Auto power LCD P 22 Power LCD P 22 Exposure compensation P 43 Backlight Compensation P 29 13 Spot metering target P 59 14 Spot AF area P 60...

Страница 46: ...Y Displayed when formatting built in memory via computer etc Reformat directly using camera P 27 MEMORY CARD ERROR FORMAT THIS CARD Card cannot be recognised on this camera Save all necessary data to computer or other device and FORMAT P 27 MEMORY CARD ERROR PLEASE CHECK THE CARD Access to card has failed Insert card again MEMORY CARD ERROR MEMORY CARD PARAMETER ERROR Card is not of SD standard On...

Страница 47: ...ter button halfway to release Recording Cannot record pictures REC PLAY switch is not set to record Built in memory card is full Free space by deleting unwanted pictures P 36 Recording capacity is low Battery needs recharging Use a fully charged battery not sold pre charged P 16 If you leave the camera on the battery will be exhausted Turn the camera off frequently by using POWER SAVE or AUTO LCD ...

Страница 48: ...uorescent lighting Monitor is too bright too dark Adjust MONITOR setting P 22 Camera set to LCD MODE P 22 Black blue red green dots or interference appears Monitor looks distorted when touched This is not a fault and will not be recorded on the actual pictures so there is no need to worry LCD monitor continued Date age is not displayed Current date TRAVEL DATE P 53 and ages in BABY and PET P 48 sc...

Страница 49: ...inter not compatible with PictBridge Set USB MODE to PictBridge PTP P 25 Edges cut off pictures when printing Release any trimming or edgeless printing settings on printer before printing Consult printer operating manual Pictures taken on ASPECT RATIO If printing in shop check if 16 9 sizes can be printed Others Menu not displayed in desired language Change LANGUAGE setting P 27 Camera rattles if ...

Страница 50: ... bags Store together with a drying agent silica gel if leaving in drawer etc Store batteries in cool 15 C 25 C places with low humidity 40 60 and no major temperature changes Charge battery once per year and use completely before storing again Memory cards To prevent damage to cards and data Avoid high temperatures direct sunlight electromagnetic waves and static electricity Do not bend drop or ex...

Страница 51: ...0 1870 3660 2210 4300 2500 4910 3550 6820 5450 10230 2020 3960 2610 5110 2950 5710 4160 7920 7220 13640 16 GB 3550 6950 3980 7840 4490 8820 6410 12350 9880 19000 15440 29070 70590 98840 3770 7370 4450 8660 5040 9880 7160 13720 10980 20590 4080 7970 5250 10290 5950 11490 8370 15940 14530 27450 PICTURE MODE 30fpsVGA 10fpsVGA 30fpsQVGA 10fpsQVGA 16 9H30fps 1 16 9H15fps 1 16 9L30fps 16 9L10fps Built i...

Страница 52: ...re compensation 1 3 EV Step 2 EV to 2 EV Metering mode Multiple Centre weighted Spot LCD monitor DMC TZ15 3 0 low temperature polycrystalline TFT LCD Approx 460 800 dots field of view ratio about 100 DMC TZ11 2 5 amorphous silicon TFT LCD Approx 230 400 dots field of view ratio about 100 Flash Flash range ISO AUTO Approx 60 cm to 5 3 m Wide AUTO AUTO Red eye reduction Forced flash ON Forced flash ...

Страница 53: ...QuickTime and the QuickTime logo are trademarks or registered trademarks of Apple Inc used under license therefrom A VQT1P98 M0208KZ0 Matsushita Electric Industrial Co Ltd Web Site http panasonic net A ...

Отзывы: