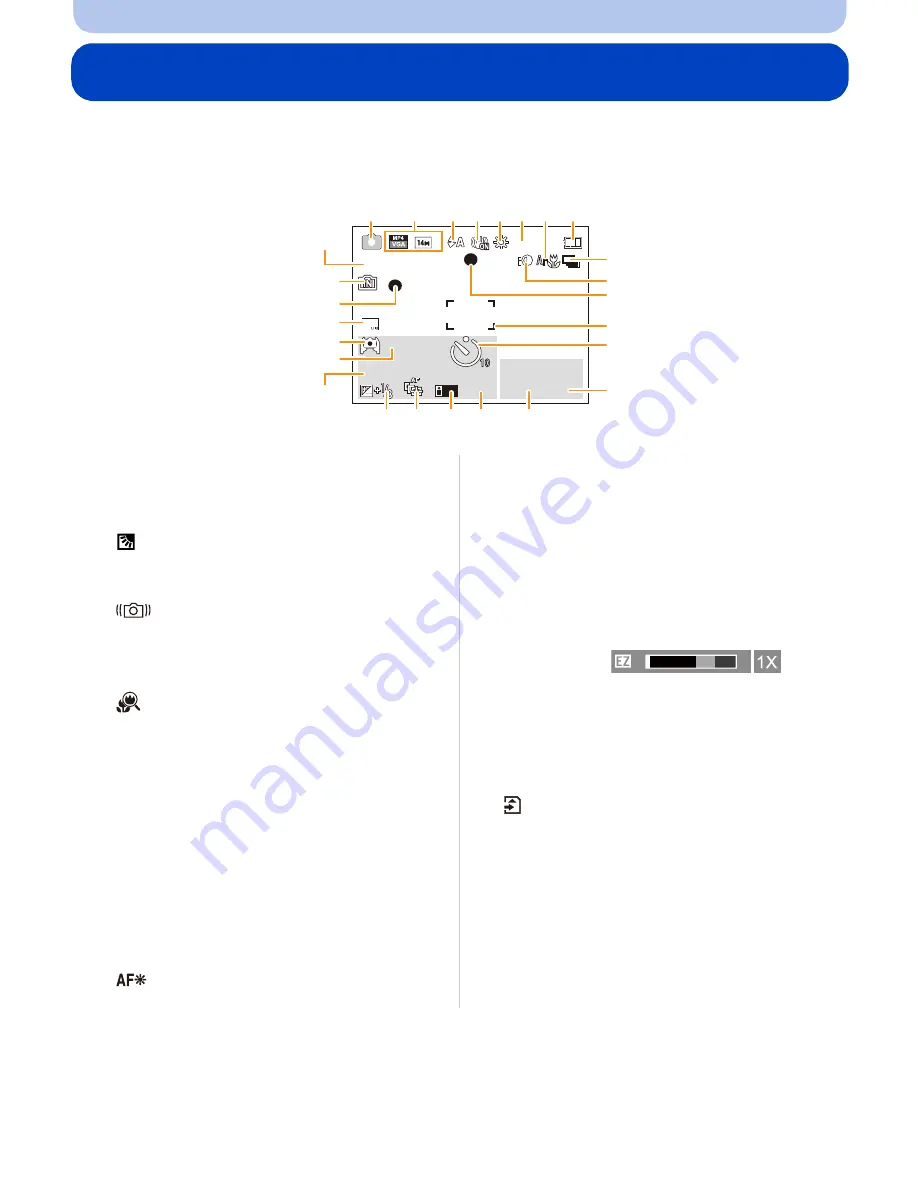
Panasonic Lumix DMC-SZ5 Скачать руководство пользователя страница 152

- 152 -

Others

Screen Display

In recording

1

Recording Mode

2

Recording Quality 

(P85)

Picture Size 

(P72)

: Backlight Compensation 

(P28)

3

Flash Mode 

(P55)

4

Optical Image Stabilizer 

(P83)

: Jitter alert 

(P25)

5

White Balance 

(P74)

6

Color Mode 

(P82)

7

AF Macro Mode 

(P59)

: Macro Zoom Mode 

(P59)

8

Battery indication 

(P14)

9

Burst 

(P80)

10 Intelligent Exposure 

(P79)

11

Focus 

(P31)

12 AF area 

(P31)

13 Self-timer Mode 

(P60)

14 AF tracking operation 

(P78)

15 Shutter speed 

(P30)

16 Aperture value 

(P30)

17 ISO sensitivity 

(P73)

18 AF Tracking 

(P78)

: AF assist lamp 

(P82)

19 Exposure compensation 

(P61)

20 Number of days that have passed since 

the departure date 

(P44)

Location 

(P44)

Name 

(P69)

Age 

(P69)

Current date and time

: World Time 

(P43)

Zoom 

(P52)

21 Elapsed recording time

¢


(P33)

:

22 LCD Mode 

(P46)

23 Date Stamp 

(P84)

24 Recording state 

(P33)

25 Built-in memory 

(P19)

: Card 

(P19)

 (displayed only during 

recording)

26 Number of recordable pictures 

(P22)

Available recording time

¢


(P22

33)

:

¢

“m” is an abbreviation for minute and “s” for 
second.

ISO

3s

3s

3s

1/60

1/60

1/60

B&W

B&W

B&W

F3.1

F3.1

F3.1

9

9

12

9

13

10

11

14

16

17

15

19

18

25
24

26

23

21

22

20

1

3

8

4

2

5 6 7

T

W

8m30s

R8m30s

Содержание Lumix DMC-SZ5

Страница 1: ...anced features Digital Camera Model No DMC SZ5 VQT4K04 F0712TC0 Before connecting operating or adjusting this product please read the instructions completely Register online at www panasonic com regis...

Страница 2: ...mera carefully 25 Preventing jitter camera shake 25 Basic Selecting the Recording Mode 26 Taking pictures using the automatic function Intelligent Auto Mode 27 Changing the settings 29 Taking pictures...

Страница 3: ...like dioramas Miniature Effect Mode 62 Taking pictures that match the scene being recorded Scene Mode 63 Portrait 64 Soft Skin 64 Scenery 64 Panorama Shot 65 Sports 68 Night Portrait 68 Night Scenery...

Страница 4: ...can do with the Wi FiR function 105 Wi Fi function 107 Setting up the connection with Wi Fi Wizard 108 Smartphone operations 109 Preparation before sending images 113 To send images 117 To display pic...

Страница 5: ...load tool LUMIX Image Uploader 143 Saving still pictures and motion pictures on a Recorder 144 Copy by inserting the SD card into the recorder 144 Printing the Pictures 146 Selecting a single picture...

Страница 6: ...buttons etc Be particularly careful since it may not just cause malfunctions but it may also become irreparable Places with a lot of sand or dust Places where water can come into contact with this uni...

Страница 7: ...ted as battery pack or battery in the text SD Memory Card SDHC Memory Card and SDXC Memory Card are indicated as card in the text The card is optional You can record or play back pictures on the built...

Страница 8: ...button P39 9 MODE button P26 86 10 Wi Fi button P134 11 Charging lamp P13 Wi Fi connection lamp P106 12 Playback button P36 13 Cursor buttons A 3 Exposure compensation P61 B 4 Macro Mode P59 AF Track...

Страница 9: ...the speaker with your finger Doing so may make sound difficult to hear 19 Microphone 20 Power button P23 21 Shutter button P27 30 22 Motion picture button P33 23 Tripod mount A tripod with a screw len...

Страница 10: ...ed About batteries that you can use with this unit Camera conditions Charge Turned off Turned on It has been found that counterfeit battery packs which look very similar to the genuine product are mad...

Страница 11: ...attery orientation insert all the way until you hear a locking sound and then check that it is locked by lever A Pull the lever A in the direction of the arrow to remove the battery 3 1 Close the card...

Страница 12: ...N socket C of the DC coupler D Align the marks and insert Ensure that only the AC adaptor and DC coupler for this camera are used Using any other equipment may cause damage Note Always use a genuine P...

Страница 13: ...cable supplied optional and insert the AC adaptor supplied into the power outlet Use the AC adaptor supplied indoors Charging Check that this unit is turned off A To power outlet B AC adaptor supplie...

Страница 14: ...USB hub About the charging lamp Charging time When using the AC adaptor supplied The indicated charging time is for when the battery has been discharged completely The charging time may vary dependin...

Страница 15: ...er charging The camera also becomes warm during use This is not a malfunction The battery can be recharged even when it still has some power left but it is not recommended that the battery charge be f...

Страница 16: ...decreases For example if you were to take one picture every two minutes then the number of pictures would be reduced to approximately one quarter of the number of pictures given above based upon one p...

Страница 17: ...ating times will shorten and the number of recordable pictures is reduced In low temperature environments such as on ski slopes When using LCD Mode When operations such as flash and zoom are used repe...

Страница 18: ...ut the direction in which you insert it To remove the card push the card until it clicks then pull the card out upright A Do not touch the connection terminals of the card 3 1 Close the card battery d...

Страница 19: ...ns can be performed using this unit When a card has not been inserted Pictures can be recorded on the built in memory and played back When a card has been inserted Pictures can be recorded on the card...

Страница 20: ...s English only Card Remarks SD Memory Card 8 MB to 2 GB Use a card with SD Speed Class with Class 4 or higher when recording motion pictures SDHC Memory Card can be used with SDHC Memory Card or SDXC...

Страница 21: ...n again Write Protect switch A provided When this switch is set to the LOCK position no further data writing deletion or formatting is possible The ability to write delete and format data is restored...

Страница 22: ...ntinuously is displayed on the screen The maximum available continuous recording time is displayed on the screen Approximate number of recordable pictures and available recording time Switch the displ...

Страница 23: ...Press 2 1 to select the items year month day hour minute display sequence or time display format and press 3 4 to set A Time at the home area B Time at the travel destination You can cancel without se...

Страница 24: ...he battery Leave the charged battery in the unit for 24 hours to charge the built in battery Note If the clock is not set the correct date cannot be printed when you order a photo studio to print the...

Страница 25: ...d Only when Rotate Disp P49 is set When the camera is held vertically and tilted up and down to record pictures the Direction Detection function may not work correctly Motion pictures taken with the c...

Страница 26: ...ng Mode 3 Press MENU SET Intelligent Auto Mode P27 The subjects are recorded using settings automatically selected by the camera Normal Picture Mode P30 The subjects are recorded using your own settin...

Страница 27: ...oval Stabilizer Continuous AF 1 Press MODE 2 Press 3 4 2 1 to select Intelligent Auto and then press MENU SET 3 Press the shutter button halfway to focus The focus indication 1 green lights when the s...

Страница 28: ...he same subject Subject conditions When the face is bright or dark the size of the subject the color of the subject the distance to the subject the contrast of the subject when the subject is moving R...

Страница 29: ...When is selected or is set depending on the type of subject and brightness When is set Red Eye Removal is enabled Shutter speed will be slower during or Changing the settings Menu Item Rec Picture Si...

Страница 30: ...arious settings in the Rec menu 1 Press MODE 2 Press 3 4 2 1 to select Normal Picture and then press MENU SET 3 Aim the AF area at the point you want to focus on 4 Press the shutter button halfway to...

Страница 31: ...is displayed in red when it is not focused after pressing the shutter button halfway The focus range may change gradually depending on the zoom position e g Range of focus during the Intelligent Auto...

Страница 32: ...le moving the camera as you compose the picture You can repeatedly retry the actions in step 1 before pressing the shutter button fully Subject and recording conditions which are difficult to focus in...

Страница 33: ...rding motion pictures This unit can record motion pictures in MP4 format MP4 This is a simpler video format best used when extensive editing is needed or when uploading videos to the internet About th...

Страница 34: ...ion picture button those settings will be cleared so the shooting range will change dramatically If you operate the zoom etc while recording motion pictures the sound of the operation may be recorded...

Страница 35: ...tion picture image taking still pictures by fully pressing the shutter button is recommended Picture size and number of recordable pictures are displayed by pressing the shutter button halfway Recordi...

Страница 36: ...Image File Format Files that do not comply with the DCF standard cannot be played back Pictures recorded with another camera may not be able to play back on this unit The lens barrel retracts about 15...

Страница 37: ...ess 3 4 2 1 to select a picture and then press MENU SET Displaying Multiple Screens Multi Playback Using the Playback Zoom Rotate the zoom lever towards Z T 1k 2k 4k 8k 16k When you rotate the zoom le...

Страница 38: ...same as 3 4 2 1 The fast forward rewind speed increases if you press 1 2 again Note When using a high capacity card it is possible that fast rewinding may be slower than usual To play back the motion...

Страница 39: ...memory or the card that are being played back will be deleted Pictures that are not in the DCF standard or those that are protected cannot be deleted To delete a single picture Select the picture to...

Страница 40: ...l Confirmation screen is displayed Pictures are deleted by selecting Yes It is possible to delete all pictures except the ones set as favorite when All Delete Except Favorite is selected with the Dele...

Страница 41: ...P72 to 84 Recording Mode only The menu lets you set the Coloring Sensitivity or Number of pixels etc of pictures you are recording Motion Picture P85 Recording Mode only This menu lets you set the set...

Страница 42: ...d using Quick Menu are determined by the mode or a display style the camera is in 3 Press 3 4 to select the menu item and then press MENU SET A Menu screen page It will switch to the next page when yo...

Страница 43: ...reen set by the time difference from the home area U Clock Set Setting Date Time World Time Set the time in your home area and travel destination You can display the local times at the travel destinat...

Страница 44: ...hen taking motion pictures Travel Date cannot be set in the Intelligent Auto Mode Setting of other Recording Mode will be reflected Travel Date Departure date and return date of the travel as well as...

Страница 45: ...cannot be adjusted r Beep This allows you to set the beep and shutter sound r Beep Level Shutter Vol t u s Low High OFF Low High OFF Beep Tone Shutter Tone u Volume Adjust the volume of the speaker to...

Страница 46: ...o make the LCD monitor bright again When LCD Mode is set the usage time is reduced LCD Mode These menu settings make it easier to see the LCD monitor when you are in bright places or when you are hold...

Страница 47: ...eview is activated regardless of its setting in the following cases When using Burst The Auto Review function is fixed to 2 SEC in the following cases Intelligent Auto Mode Photo Frame Scene Mode Auto...

Страница 48: ...rld Time setting The folder number and the clock setting are not changed Always reset the camera when disposing or selling it to prevent personal information saved within the camera from being misused...

Страница 49: ...ake longer to format the built in memory than the card If the built in memory or the card cannot be formatted consult Panasonic If you set a different language by mistake select from the menu icons to...

Страница 50: ...izer Demo cannot be displayed Stabilizer Demo is an approximation Auto Demo is not output to the television Demo Mode Displays the amount of jitter the camera has detected Stabilizer Demo The camera s...

Страница 51: ...eline This is used as a reference of composition such as balance while taking a picture In Panorama Shot or Photo Frame in Scene Mode the guideline is not displayed In Recording Mode B Normal display...

Страница 52: ...recordable pixels are set This function allows you to take a picture with additional enlargement without deteriorating the image quality Using the Optical Zoom Using the Extended Optical Zoom EZ Usin...

Страница 53: ...y bar Example 0 5 m 1 6 ft Feature Optical Zoom Extended Optical Zoom EZ Maximum magnification 10k 21 1k 1 Picture quality No deterioration No deterioration Conditions None Picture Size with P72 is se...

Страница 54: ...he Self timer P60 for taking pictures For details about using the zoom while recording motion pictures refer to P34 The Extended Optical Zoom cannot be used in the following cases Macro Zoom Mode High...

Страница 55: ...before the actual recording to reduce the red eye phenomenon eyes of the subject appearing red in the picture and then activated again for the actual recording Use this when you take pictures of peopl...

Страница 56: ...activated twice The subject should not move until the second flash is activated Interval until the second flash depends on the brightness of the subject Red Eye Removal P83 on the Rec menu is set to...

Страница 57: ...ial setting is displayed The flash setting may change if the Recording Mode is changed Set the flash setting again if necessary The flash setting is memorized even if the camera is turned off However...

Страница 58: ...flash will not provide the appropriate level of exposure and may result in a picture that is too white or dark When the Flash is being charged the Flash icon blinks red and you cannot take a picture e...

Страница 59: ...o focus on it again Macro Mode gives priority to a subject close to the camera Therefore if the distance between the camera and the subject is far it takes longer to focus on it When you take pictures...

Страница 60: ...n the subject We recommend using a tripod when recording with the Self timer The self timer cannot be set when recording motion pictures Item Description of settings 10sec Picture is taken 10 seconds...

Страница 61: ...h the aperture value or the shutter speed The set exposure value is memorized even if the camera is turned off The compensation range of the exposure will be limited depending on the brightness of the...

Страница 62: ...ODE 2 Press 3 4 2 1 to select Miniature Effect and then press MENU SET Note Display of the recording screen will be delayed more than usual and the screen will look as if frames are dropping No sound...

Страница 63: ...and hue to obtain the desired picture 1 Press MODE 2 Press 3 4 2 1 to select Scene Mode and then press MENU SET 3 Press 3 4 2 1 to select the Scene Mode and then press MENU SET Note To change the Scen...

Страница 64: ...the daytime this mode enables the texture of their skin to appear even softer than with Portrait It is effective when taking pictures of people from the chest up Technique for Soft Skin Mode To make...

Страница 65: ...ine will be displayed 3 Press the shutter button halfway to focus 4 Press the shutter button fully and record a picture while moving the camera in a small circle in the direction selected in Step 1 Pa...

Страница 66: ...tures The maximum number of pixels is shown below A panorama picture may not be able to be created or the pictures may not be combined properly when recording the following subjects or under the recor...

Страница 67: ...for pictures that were recorded using Panorama Shot Also if 3 is pressed during playback the screen will automatically scroll in the same direction during recording You can perform frame by frame for...

Страница 68: ...down for up to 8 seconds The shutter may remain closed max about 8 sec after taking the picture because of signal processing This is not a malfunction Noise may become visible when you take pictures i...

Страница 69: ...thday or name is set Age or Name is automatically set to ON If ON is selected when the birthday or name has not been registered the setting screen appears automatically 4 Press 4 to select Exit and th...

Страница 70: ...e of 3M 4 3 2 5M 3 2 2M 16 9 or 2 5M 1 1 This mode is ideal for taking pictures of scenery and other landscapes through clear glass such as in vehicles or buildings Note The camera may focus on the gl...

Страница 71: ...to switch text between A capitals a lower case 1 numbers and special characters To enter the same character again rotate the zoom lever towards Z T to move the cursor The following operations can be p...

Страница 72: ...In specific modes Extended Optical Zoom cannot be used and the picture size for is not displayed For details regarding modes in which Extended Optical Zoom cannot be used refer to P54 Pictures may app...

Страница 73: ...shutter button is pressed halfway It is continuously changing to match the movement of the subject until the shutter button is pressed fully Note For the focus range of flash when is set refer to P58...

Страница 74: ...setting is memorized even if the camera is turned off However the White Balance setting for a Scene Mode returns to AWB when the Scene Mode is changed White Balance is fixed to AWB in following cases...

Страница 75: ...Blue sky 3 Cloudy sky Rain 4 Shade 5 Sunlight 6 White fluorescent light 7 Incandescent light bulb 8 Sunrise and sunset 9 Candlelight KlKelvin Color Temperature Set the White Balance value Use to matc...

Страница 76: ...ode Settings Description of settings Face Detection The camera automatically detects the person s face max 15 areas The focus and exposure can then be adjusted to fit that face no matter what portion...

Страница 77: ...following cases the face detection function may fail to work making it impossible to detect faces AF Mode is switched to while motion pictures are taken When the face is not facing the camera When th...

Страница 78: ...king is canceled when 4 is pressed again Note Dynamic tracking function may not work in the following cases When the subject is too small When the recording location is too dark or bright When the sub...

Страница 79: ...ing on the conditions Applicable modes Pictures with sharp profile and resolution can be taken by using the Intelligent Resolution Technology Note Refer to P52 for information about the Intelligent Zo...

Страница 80: ...places if the ISO sensitivity is high etc Hi Speed Burst Burst speed approx 10 pictures second Number of recordable pictures max 100 pictures This can be set only during Normal Picture Mode The pictur...

Страница 81: ...cture data The setting is fixed to OFF in the following cases Panorama Shot Photo Frame Scene Mode Number of recordable pictures will be fixed to 3 pictures when the self timer is used except for The...

Страница 82: ...itions Settings ON OFF Note The effective distance of the assist lamp is a maximum of approximately 1 5 m 4 9 feet When you do not want to use the AF Assist Lamp A e g when taking pictures of animals...

Страница 83: ...e camera automatically compensates the jitter enabling jitter free images to be taken Settings ON OFF Note Stabilizer is fixed to OFF in the following case Panorama Shot Scene Mode Stabilizer will be...

Страница 84: ...the date information The setting is fixed to OFF in the following cases When recording motion pictures Panorama Shot Scene Mode When using Burst Text Stamp Resize and Cropping cannot be set for pictu...

Страница 85: ...an abbreviation of Variable Bit Rate and the bit rate volume of data for definite period of time is changed automatically depending on the subject to record Therefore the recording time is shortened w...

Страница 86: ...playback You can play back the recorded pictures in various methods 1 Press 2 Press MODE 3 Press 3 4 2 1 to select item and then press MENU SET Following items can be selected Normal Play P36 Slide S...

Страница 87: ...res you have taken 2 Press 3 to select Start and then press MENU SET 3 Press 4 to finish the slide show Normal Playback resumes after the slide show finishes Operations performed during slide show The...

Страница 88: ...played back with the recommended effects in each category Some Effect will not operate when playing back pictures displayed vertically Setup Duration or Repeat can be set Duration can be set only when...

Страница 89: ...pictures into each of the categories You can then play back the pictures in each category Press 3 4 2 1 to select the category and then press MENU SET to set Only the category for which pictures have...

Страница 90: ...set in the camera the recording date is set as January 1st 2012 If you take pictures after setting the travel destination in World Time the pictures are displayed by the dates at the travel destinatio...

Страница 91: ...2 1 to select a picture and then press 3 2 Press MENU SET Confirmation screen is displayed It is executed when Yes is selected Note Depending on the picture noise may be emphasized by Auto Retouch Ef...

Страница 92: ...formation on pictures then press MENU SET Confirmation screen is displayed It is executed when Yes is selected The location information is recorded onto pictures Pictures with location information are...

Страница 93: ...e Upload Set 1 Select Upload Set on the Playback menu P41 2 Press 3 4 to select SINGLE or MULTI and then press MENU SET Upload Set 3 Select the picture and then press MENU SET to set The setting is ca...

Страница 94: ...ing the camera to a PC P140 For details refer to P143 Canceling all the Upload Set settings 1 Select Upload Set on the Playback menu 2 Press 3 4 to select CANCEL and then press MENU SET Confirmation s...

Страница 95: ...select Set and then press MENU SET 5 Press 3 4 to select text stamp items and then press MENU SET Text Stamp 3 Select the picture and then press MENU SET to set is displayed on pictures already with...

Страница 96: ...being used some characters may be cut at printing Check before printing When text is stamped onto the 0 3M pictures it is difficult to read it Text and dates cannot be stamped on the pictures in the f...

Страница 97: ...ures by using Calendar or Category Selection in the Filtering Play Motion pictures with a short recording time cannot be divided Video Divide 1 Select Video Divide on the Playback menu P41 2 Press 2 1...

Страница 98: ...tures Pictures taken in Panorama Shot in Scene Mode Pictures with date or text stamped Resize 3 Select the picture and size SINGLE setting 1 Press 2 1 to select the picture and then press MENU SET 2 P...

Страница 99: ...ed Zoom lever T Enlargement Zoom lever W Reduction 3 4 2 1 Move 4 Press MENU SET Confirmation screen is displayed It is executed when Yes is selected Exit the menu after it is executed Note The pictur...

Страница 100: ...then press MENU SET Canceling all the Favorite settings 1 Select Favorite on the Playback menu 2 Press 3 4 to select CANCEL and then press MENU SET Confirmation screen is displayed It is executed when...

Страница 101: ...Select Print Set on the Playback menu P41 2 Press 3 4 to select SINGLE or MULTI and then press MENU SET 4 Press 3 4 to set the number of prints and then press MENU SET to set When MULTI has been selec...

Страница 102: ...he operating instructions for the printer The date cannot be printed on pictures with date or text stamped Note The number of prints can be set from 0 to 999 Depending on the printer the date print se...

Страница 103: ...ected Exit the menu after it is executed Note The protect setting may not be effective on other equipment Even if you protect pictures in the built in memory or a card they will be deleted if the buil...

Страница 104: ...number file number as the picture to be copied in the copy destination when is selected a new folder is created and the picture is copied If a picture exists with the same name folder number file num...

Страница 105: ...artphone Moreover you can send images in the camera to other devices or WEB services In addition to the above location information acquired on the smartphone can be written to images taken on the came...

Страница 106: ...106 Wi Fi About the Wi Fi connection lamp A Wi Fi connection lamp Lit blue The Wi Fi connection is on standby Blinking blue Sending receiving data through the Wi Fi connection...

Страница 107: ...s near microwave ovens Radio waves may not reach the camera Using the camera near devices such as microwave ovens or cordless telephones that use the 2 4 GHz radio wave band may cause a decrease in pe...

Страница 108: ...13 for details When Cloud Sync Service is selected LUMIX CLUB registration is required Refer to LUMIX CLUB on P129 Remote Control P109 Connect to the smartphone In Wi Fi Wizard you can directly connec...

Страница 109: ...glish only When downloading the app on a mobile network high packet communication fees may be incurred depending on the details of your contract 1 Select Remote Control in the Wi Fi menu P41 You can a...

Страница 110: ...ctly connect to the smartphone by using this unit as a wireless access point Connect to access point Connect this unit to a smartphone via a wireless access point Connection method Description of sett...

Страница 111: ...era on a smartphone Uploading photos on SNS Social Networking Service You can upload images in the camera or a smartphone on SNS Setting the menu items You can set the camera s menu items on a smartph...

Страница 112: ...the smartphone P109 6 Select Send location data on the smartphone The smartphone sends the acquired location information to the card in this unit When the transfer of location information to the card...

Страница 113: ...folder may fail if the account includes non alphanumeric characters When using PHOTOfunSTUDIO 1 Install PHOTOfunSTUDIO to the PC For details on hardware requirements and installation read Basic Owner...

Страница 114: ...es to External in AV device Panasonic AV device compatible with LUMIX CLUB that relatives or friends in distant locations own Register destination device in External AV device P133 Smart Transfer When...

Страница 115: ...days after the transfer When the download of images from a Cloud Folder to all specified devices is complete images may be deleted from the Cloud Folder even within 30 days after the transfer Using WE...

Страница 116: ...y not be completely sent depending on radio wave conditions If the connection is terminated while sending pictures pictures with missing sections may be sent Some images taken with a different camera...

Страница 117: ...is displayed Select Yes 2 Press 3 4 to select SINGLE or MULTI and press MENU SET 3 Select the image When SINGLE is selected 1 Press 2 1 to select the image 2 Press MENU SET When MULTI is selected 1 Pr...

Страница 118: ...tion information from images before sending them ON Delete the location information then send OFF Keep the location information and send This operation only deletes the location information from the i...

Страница 119: ...ange Access Point and press MENU SET When set to Cloud Sync Service Select Yes on the screen that asks you to confirm the connection destination When set to WEB service Press DISP on the destination s...

Страница 120: ...ctures stored in this unit on TV Press 2 1 to play back the previous next picture Press to quit Wireless TV Playback To change the connection destination 1 Press DISP on the destination confirmation s...

Страница 121: ...t a single picture Refer to Selecting a single picture and printing it on P148 for details To print multiple pictures Refer to Selecting multiple pictures and printing them on P148 for details To chan...

Страница 122: ...upplied optional Smart Transfer starts automatically according to the Charge Priority P124 setting Smart Transfer is not available when the memory card is locked Depending on the specifications of the...

Страница 123: ...ze Resizes the image to send Original Resize You can select the picture size from M or S in Resize The aspect ratio does not change Delete Location Data Select whether to delete the location informati...

Страница 124: ...ET When you select New Access Point a new access point will be registered to this unit To switch the priority setting between charging and image transfers 1 Select Smart Transfer in the Wi Fi menu P41...

Страница 125: ...Add and press MENU SET 4 Press 3 4 to select the connection method and press MENU SET Wi Fi Wizard Access Point Connection method Description of settings WPS Push Button Save push button type wireles...

Страница 126: ...point has been saved Refer to the wireless access point instruction manual for details 1 Press 3 4 to select the wireless access point you are connecting to and press MENU SET Touching DISP will sear...

Страница 127: ...r information on network authentication see the manual of the wireless access point 4 Press 3 4 to select the encryption type and press MENU SET The type of settings that can be changed may vary depen...

Страница 128: ...hanging settings Delete a saved wireless access point 1 Select Wi Fi Setup in the Wi Fi menu P41 2 Press 3 4 to select Access Point and press MENU SET 3 Press 3 4 to select Delete and press MENU SET 4...

Страница 129: ...1 1 Select Wi Fi Setup in the Wi Fi menu P41 2 Press 3 4 to select LUMIX CLUB and press MENU SET 3 Press 3 4 to select Add Change Account and press MENU SET 4 Press 3 4 to select New account and press...

Страница 130: ...oom area can be moved by 3 4 2 1 Press to cancel the process without acquiring a login ID 6 Enter a password and press MENU SET Enter any combination of 8 to 16 characters and numbers for the password...

Страница 131: ...sword differs from the one you created on your smartphone or PC you will not be able to upload images Close the menu after changing settings To set the same login ID for the camera and the smartphone...

Страница 132: ...e message is displayed Press MENU SET 5 Select Yes on the confirmation screen for deleting the LUMIX CLUB account If you want to continue using the service selecting No will only delete the login ID E...

Страница 133: ...ormation on AV device that has already been saved can be changed or deleted 1 Select Wi Fi Setup in the Wi Fi menu P41 2 Press 3 4 to select External AV device and press MENU SET 3 Press 3 4 to select...

Страница 134: ...g functions does not work in the Recording Mode Send Image Wireless TV Playback Wireless Print Wi Fi Button Show Wi Fi Menu Wireless TV Playback P120 Remote Control P109 Wireless Print P121 Send Image...

Страница 135: ...ord For details on how to enter characters refer to Entering Text section on P71 5 Enter the password entered in step 4 again and press MENU SET Close the menu after changing settings Cancel the Wi Fi...

Страница 136: ...UMIX CLUB login ID is separate to Reset Wi Fi Settings in the Setup Menu and cannot be deleted Instead delete it with Delete account in LUMIX CLUB P132 The technical compliance standard authentication...

Страница 137: ...AV cable DMW AVC1 optional 2 Turn the TV on and select external input 3 Turn the camera on and then press Note Depending on the Picture Size black bands may be displayed on the top and bottom or the l...

Страница 138: ...y not be displayed on the full screen Motion pictures cannot be played back To play back motion pictures connect the camera to the TV with the AV cable optional In some cases panorama pictures cannot...

Страница 139: ...mages to be erased so do not choose to format If the card is not recognized please refer to the below support site http panasonic net avc sdcard information SDXC html PC that can be used The unit can...

Страница 140: ...nks and the alarm beeps Refer to Disconnecting the USB connection cable safely P142 before disconnecting the USB connection cable Otherwise data may be destroyed Before connecting or disconnecting the...

Страница 141: ...the same folder number has been inserted Such as when pictures were taken using another maker of camera When there is a picture with file number 999 inside the folder For Windows A drive Removable Di...

Страница 142: ...ot be displayed If the icon is not displayed check that Access is not displayed on the LCD monitor of the digital camera before removing the hardware Connection in the PTP Mode Select PictBridge PTP w...

Страница 143: ...ith the LUMIX CLUB P129 1 Start up the LUMIXUP EXE by double clicking it P141 An upload tool LUMIX Image Uploader may startup automatically if the PHOTOfunSTUDIO software on the CD ROM supplied is ins...

Страница 144: ...c See the operating instructions for the recorder about the details about copying and playing back Copy by inserting the SD card into the recorder For details on Panasonic devices compatible with the...

Страница 145: ...is unit with the recording equipment with an AV cable optional 2 Start the playback of this unit 3 Start the recording on the recording equipment When ending the recording copying stop the playback on...

Страница 146: ...re printing the pictures from the built in memory Check print quality and other settings on the printer before printing the pictures 1 Connect the printer and camera with the USB connection cable supp...

Страница 147: ...f this happens during printing stop printing at once If not printing disconnect the USB connection cable Do not disconnect the USB connection cable while Cable disconnect prohibit icon is displayed ma...

Страница 148: ...ress MENU SET Refer to P149 for the items which can be set before starting to print the pictures Disconnect the USB connection cable after printing Selecting multiple pictures and printing them Item D...

Страница 149: ...ot displayed If the printer does not support date printing the date cannot be printed on the picture Depending on the printer the date print settings of the printer may take precedence so check if thi...

Страница 150: ...tem Description of settings Settings on the printer are prioritized L 3 5qk5q 89 mmk127 mm 2L 5qk7q 127 mmk178 mm POSTCARD 100 mmk148 mm 16 9 101 6 mmk180 6 mm A4 210 mmk297 mm A3 297 mmk420 mm 10k15c...

Страница 151: ...paper set Page Layout to and then set Num of prints to 1 for each of the 4 pictures Note The camera is receiving an error message from the printer when the indication lights orange during printing Af...

Страница 152: ...e P30 17 ISO sensitivity P73 18 AF Tracking P78 AF assist lamp P82 19 Exposure compensation P61 20 Number of days that have passed since the departure date P44 Location P44 Name P69 Age P69 Current da...

Страница 153: ...mation P51 Name P69 Age P69 13 Auto Retouch P91 Motion picture playback P38 Play panorama P67 14 Number of days that have passed since the departure date P44 Recorded date and time World Time P43 15 P...

Страница 154: ...ffected by electromagnetic equipment and stops functioning properly turn this unit off and remove the battery or disconnect AC adaptor supplied optional Then reinsert the battery or reconnect AC adapt...

Страница 155: ...camera is cold when you turn it on the picture on the LCD monitor will be slightly darker than usual at first However the picture will return to normal brightness when the internal temperature of the...

Страница 156: ...aptor supplied and USB connection cable supplied optional so that you can charge the battery in the country that you are traveling in Dispose of unusable battery The battery has a limited life Do not...

Страница 157: ...rmation is kept in the camera and recorded in the image Disclaimer Information including personal information may be altered or vanish due to erroneous operation effect of static electricity accident...

Страница 158: ...abinet Recorded data may be damaged or lost if the camera breaks down due to inappropriate handling Panasonic will not be liable for any damage suffered due to loss of recorded data When you use a tri...

Страница 159: ...ied When a picture with the same name as the picture to be copied exists in the copy destination Only when copying from a card to the built in memory Files not based on the DCF standard Moreover pictu...

Страница 160: ...umbers that can be used Format the card after saving necessary data on a PC etc P49 Picture is displayed for 16 9 TV Picture is displayed for 4 3 TV Select TV Aspect in the Setup menu if you want to c...

Страница 161: ...access point to connect to in the smartphone Wi Fi settings to this camera There is no free storage space on the smartphone Login failed Please check Login ID and Password Login ID or password for the...

Страница 162: ...usted Charge the battery If you leave the camera on the battery will be exhausted Turn the camera off frequently by using the Auto Power Off P47 Insert the battery securely all the way in P11 Is a Wi...

Страница 163: ...0 of the Rec menu to OFF The focus range varies depending on the Recording Mode Set to the proper mode for the distance to the subject The subject is beyond the focus range of the camera P31 There is...

Страница 164: ...he distinctive color of the subject if there is a part that is different from the surrounding color P78 If the camera is moved too slowly the camera assumes that camera motion was stopped and ends the...

Страница 165: ...is unit on This is an operation to correct flicker caused by lighting such as fluorescent lights LED lights etc and is not a malfunction Is LCD Mode active P46 Perform LCD Display P45 This is not a ma...

Страница 166: ...rd The pictures on the built in memory appear when a card is not inserted The picture data on the card appears when a card is inserted Is this a folder or picture which was processed in the PC If it i...

Страница 167: ...that red part may be corrected to black by the Red Eye Removal function It is recommended to take a picture with the Flash Mode set to or or Red Eye Removal on the Rec menu set to OFF P83 Is it a pic...

Страница 168: ...compatible MP4 playback device is used the video or sound quality of the recorded motion pictures may be poor or they may not be able to be played The recorded data may also not be displayed properly...

Страница 169: ...be used simultaneously with this camera if it is not compatible Perform Manual Connection in the Access Point of the Wi Fi Setup menu Check if the wireless access point to connect is in operating stat...

Страница 170: ...be busy Try again after a while Is the size of the image too large Reduce the size of the still picture at Size in Send Image or Size in Smart Transfer then transmit P118 123 Transmit after dividing t...

Страница 171: ...check the status of the destination by WEB destination settings Execute the Reset Wi Fi Settings in the Setup menu P48 However all the information set with the Wi Fi Setup menu such as the wireless a...

Страница 172: ...connected to the PC correctly Is the camera recognized by the PC correctly Select PC when connecting P140 Turn this unit off and on Disconnect the USB connection cable Connect it again while the card...

Страница 173: ...cting P146 When using a printer with a Cropping or borderless printing function cancel this function before printing For details refer to the operating instructions for the printer When you order phot...

Страница 174: ...time the clock may be reset Please set the clock message will be displayed please reset the clock P23 It is possible that the subject may be warped slightly or the borders get colored depending on th...

Страница 175: ...taken will not be stored in the memory When this unit is turned on again and pictures are taken they may be stored under file numbers which should have been assigned to previous pictures This is the...

Страница 176: ...registered marks of the Wi Fi Alliance DLNA the DLNA Logo and DLNA CERTIFIED are trademarks service marks or certification marks of the Digital Living Network Alliance This product uses DynaFont from...

Страница 177: ...d or other materials provided with the distribution 3 All advertising materials mentioning features or use of this software must display the following acknowledgment This product includes software dev...

Страница 178: ...ry form must reproduce the above copyright notice this list of conditions and the following disclaimer in the documentation and or other materials provided with the distribution 3 All advertising mate...

Страница 179: ...bove copyright notice this list of conditions and the following disclaimer in the documentation and or other materials provided with the distribution 3 All advertising materials mentioning features or...

Страница 180: ...the distribution 3 Neither the name of the University nor the names of its contributors may be used to endorse or promote products derived from this software without specific prior written permission...

Страница 181: ...mission please contact licensing OpenSSL org 5 Products derived from this software may not be called OpenSSL nor may OpenSSL appear in their names without prior written permission of the OpenSSL Proje...

Страница 182: ...bove copyright notice this list of conditions and the following disclaimer in the documentation and or other materials provided with the distribution 3 All advertising materials mentioning features or...

Страница 183: ...the distribution 3 Neither the name of the University nor the names of its contributors may be used to endorse or promote products derived from this software without specific prior written permission...

Страница 184: ...ollowing acknowledgement This product includes software developed by the University of California Berkeley and its contributors 4 Neither the name of the University nor the names of its contributors m...

Страница 185: ...e distribution 3 Neither the name of the University nor the names of its contributors may be used to endorse or promote products derived from this software without specific prior written permission TH...

Отзывы: