background image

13

Preparation/Basic

 (ENG) SQT0790

Preparation

Check that the camera is turned off.

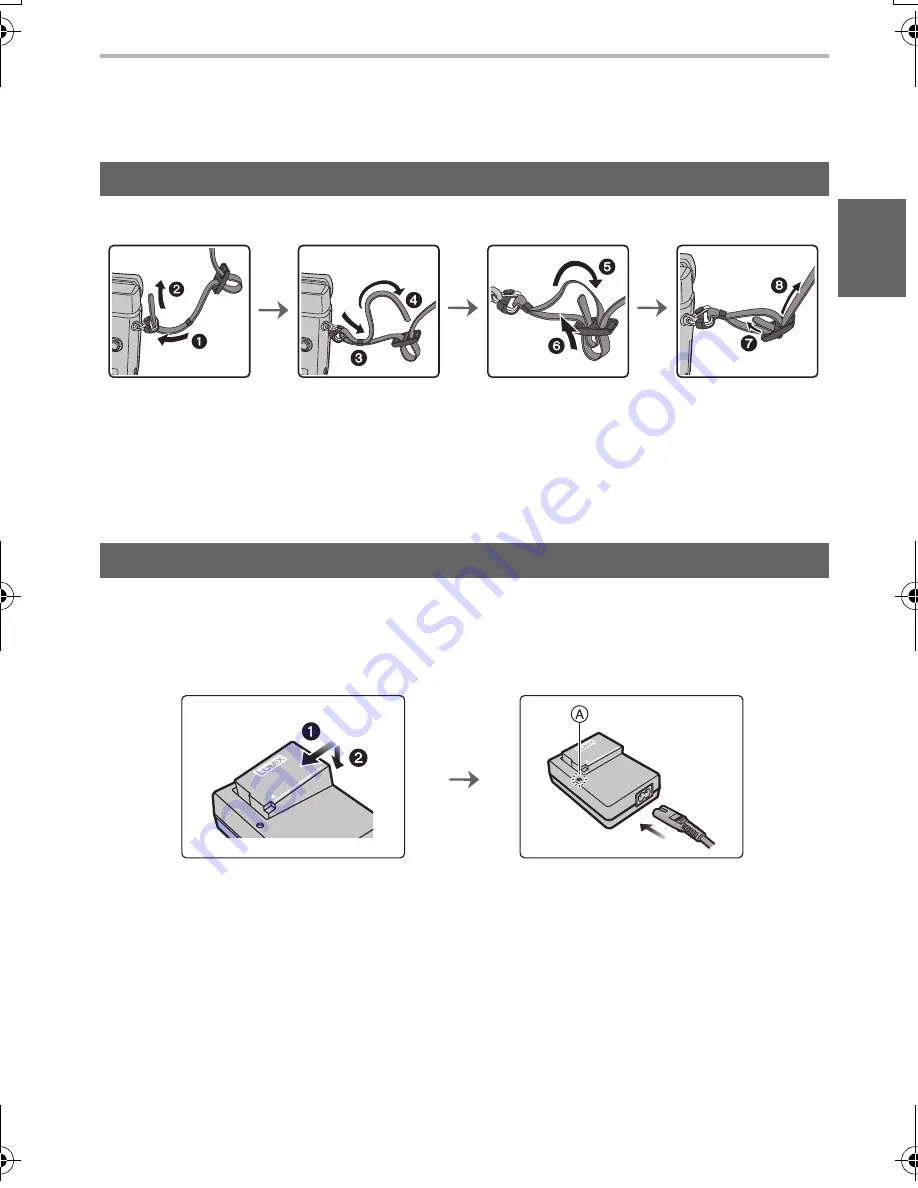
We recommend attaching the shoulder strap when using the camera to prevent it from dropping.

Perform steps 

1

 to 

8

 and then attach the other side of the shoulder strap.

Use the shoulder strap around your shoulder.

Do not wrap the strap around your neck.

It may result in injury or accident.

Do not leave the shoulder strap where an infant can reach it.

It may result in an accident by mistakenly wrapping around the neck.

The battery that can be used with this unit is DMW-BLC12E.

1

Attach the battery paying attention to the direction of the battery.

2

Connect the AC cable.

The [CHARGE] indicator 

A

 lights up and charging begins.

 About the [CHARGE] indicator

When the [CHARGE] indicator flashes

The battery temperature is too high or too low. It is recommended to charge the battery again 
in an ambient temperature of between 10

o

C and 30

o

C.

The terminals of the charger or the battery are dirty. In this case, wipe them with a dry cloth.

Attaching the Shoulder Strap

Charging the Battery

On:

Charging.

Off:

Charging has completed.
(Disconnect the charger from the electrical socket and detach the 
battery after charging is completed.)

DMC-GX8A&GX8H&GX8K_GCGH-SQT0790_eng.book  13 ページ  2015年7月8日 水曜日 午前9時11分

Содержание Lumix DMC-GX8A

Страница 1: ...DMC GX8K DMC GX8 Please read these instructions carefully before using this product and save this manual for future use More detailed instructions on the operation of this camera are contained in Ope...

Страница 2: ...private use may infringe copyright laws Even for the purpose of private use recording of certain material may be restricted Information for Your Safety Product identification marking For Thailand only...

Страница 3: ...ase contact your local authorities or dealer and ask for the correct method of disposal Warning Risk of fire explosion and burns Do not disassemble heat above 60 xC or incinerate CAUTION To reduce the...

Страница 4: ...may be disrupted by electromagnetic wave radiation Do not use this unit near cell phones because doing so may result in noise adversely affecting the pictures and or sound Recorded data may be damage...

Страница 5: ...tatic electricity The data on the card may be damaged or lost due to electromagnetic waves static electricity or breakdown of the camera or the card We recommend storing important data on a PC etc Do...

Страница 6: ...Setting menu items 23 Calling frequently used menus instantly Quick Menu 24 Assigning frequently used functions to the buttons function buttons 24 Recording Taking Pictures using the Automatic Functi...

Страница 7: ...phone tablet remote recording 46 Playing back images in the camera 46 Saving images stored in the camera 47 Sending images in the camera to an SNS 47 Adding location information to images stored in th...

Страница 8: ...the camera Under no circumstances should you touch or place any foreign objects within the camera or in close proximity of the camera s image sensor If sand dust or liquids such as water droplets adh...

Страница 9: ...based on the interchangeable lens H FS14140 Some digital camera kits may not be commercially available in some regions Consult the dealer or Panasonic if you lose the supplied accessories You can purc...

Страница 10: ...compensation dial P26 12 Mode dial P20 Rotate the mode dial to switch the Recording Mode 13 Hot shoe Hot shoe cover P12 Keep the Hot Shoe Cover out of reach of children to prevent swallowing 14 Stere...

Страница 11: ...tons P20 3 ISO sensitivity 1 White Balance 2 Auto Focus Mode 4 Drive mode P31 Single P31 Burst 4K Photo P32 Auto bracket Self timer 39 MENU SET button P23 40 NFC antenna P45 47 41 Fn button Fn4 P24 42...

Страница 12: ...arrow 2 while pressing it in the direction indicated by arrow 1 When the hot shoe is not in use make sure to attach the hot shoe cover Please be careful not to lose the hot shoe cover H FS14140 H HS1...

Страница 13: ...The battery that can be used with this unit is DMW BLC12E 1 Attach the battery paying attention to the direction of the battery 2 Connect the AC cable The CHARGE indicator A lights up and charging beg...

Страница 14: ...BLC12E If you use other batteries we cannot guarantee the quality of this product Being careful about the battery orientation insert all the way until you hear a locking sound and then check that it i...

Страница 15: ...t swallowing Format the card before recording a picture with this unit Since data cannot be recovered after formatting make sure to back up necessary data in advance Select the menu P23 Confirmation s...

Страница 16: ...ime when this camera is purchased the monitor is stowed in the camera body Bring out the monitor as shown below 1 Open the monitor Maximum 180o 2 It can be rotated 180o forward 3 Return the monitor to...

Страница 17: ...ess 3 4 to select the language and press MENU SET 4 Press MENU SET 5 Press 2 1 to select the items year month day hour minute and press 3 4 to set 6 Press MENU SET to set 7 When The clock setting has...

Страница 18: ...nal position completely when the camera is not in use When the viewfinder surface becomes dirty remove the Eyecup blow away the dust with a blower commercially available and wipe the surface lightly w...

Страница 19: ...and take the picture When the image is correctly focused the picture will be taken since the Focus Release Priority is set initially to FOCUS The focus range is different depending on the lens used Ev...

Страница 20: ...hue when in Intelligent Auto Mode Programme AE Mode Records at the aperture value and shutter speed set by the camera Aperture Priority AE Mode The shutter speed is automatically determined by the ape...

Страница 21: ...ms to be assigned temporarily to the front rear dials in Dial Operation Switch Setup in Dial Set in the Custom menu 1 Press Fn13 A A guide will be displayed showing the items temporarily assigned to t...

Страница 22: ...our eye or an object near it Touch screen of this unit is capacitive Touch the panel directly with your bare finger Touch To touch and release the touch screen When selecting features using the touch...

Страница 23: ...ting and press MENU SET Depending on the menu item its setting may not appear or it may be displayed in a different way Switching to other menus e g Switching to the Setup menu from Rec menu 1 Press 2...

Страница 24: ...Q MENU to exit the menu once the setting is complete Assigning frequently used functions to the buttons function buttons You can assign recording functions etc to specific buttons and icons 1 Select...

Страница 25: ...e the icon of the scene concerned is displayed in blue for 2 seconds after which its colour changes to the usual red Automatic scene detection Switching between Intelligent Auto Plus Mode and Intellig...

Страница 26: ...e blurriness setting screen will cancel the setting Recording Mode This mode enables you to change the brightness Exposure and colour tone to your preferred settings from the ones set by the camera Se...

Страница 27: ...P23 3 Press 3 4 to select P A S or M and then press MENU SET The operation for changing the aperture value or shutter speed is the same as the operation for setting the mode dial to or 4 Start record...

Страница 28: ...g the aspect ratio of pictures Rec Aspect Ratio 4 3 Aspect Ratio of a 4 3 TV 3 2 Aspect Ratio of a 35 mm film camera 16 9 Aspect Ratio of a high definition TV etc 1 1 Square aspect ratio Setting the n...

Страница 29: ...u can process RAW images in RAW Processing in the Playback menu P41 To process and edit RAW files on a PC use the software SILKYPIX Developer Studio by Ichikawa Soft Laboratory on the DVD supplied Set...

Страница 30: ...g You can check whether the point of focus is to the near side or to the far side MF Guide You can perform the following operations 5 Press the shutter button halfway The assist screen will close The...

Страница 31: ...e modes 1 Single When the shutter button is pressed only one picture is recorded 2 Burst Recordings are made in succession while the shutter button is pressed 3 4K PHOTO P32 When the shutter button is...

Страница 32: ...e optimised for 4K photo recording The recording method is set to 4K Burst by default 1 Record a 4K photo 2 Select and save pictures 3 The picture is complete 4K Burst 1 2 For capturing the best shot...

Страница 33: ...e saved in JPEG format The picture will be saved with recording information Exif information including its shutter speed aperture and ISO sensitivity information For details refer to the Operating Ins...

Страница 34: ...activated if the O I S switch of the lens is set to ON is set at the time of purchase 1 Select the menu P23 When taking pictures When recording motion pictures Panasonic lenses compatible with Dual I...

Страница 35: ...ixed direction OFF Stabilizer does not work When using a lens with an O I S switch set the switch to OFF E Stabilizat ion Video Jitter during motion picture recording is corrected along the vertical h...

Страница 36: ...ndicator red C will flash while recording motion pictures If no operation is performed part of the information on the screen will gradually become darker after approximately 10 seconds has passed and...

Страница 37: ...with a Rec Quality size of FHD HD or VGA Recording stops when the continuous recording time exceeds 29 minutes and 59 seconds or the file size exceeds 4 GB Since the file size becomes larger with FHD...

Страница 38: ...Set Rec Format in the Motion Picture menu to MP4 P37 2 Set Rec Quality in the Motion Picture menu to 4K 100M 25p or 4K 100M 24p P37 3 Start recording by pressing the motion picture button 4 Stop the r...

Страница 39: ...image to a web service For details refer to the Operating Instructions for advanced features PDF format Button operation Touch operation Description of operation Button operation Touch operation Desc...

Страница 40: ...1 In Playback Mode press 2 Press 3 4 to select Delete Multi or Delete All and then press MENU SET Delete All Confirmation screen is displayed Pictures are deleted by selecting Yes It is possible to de...

Страница 41: ...U SET and set The setting method differs according to the item 5 Press MENU SET This operation returns you to the screen in step 3 To set other items repeat steps 3 through 5 6 Select Begin Processing...

Страница 42: ...and press MENU SET If you select Reinstate Adjustments a confirmation screen will be displayed Selecting Yes will execute the operation and return you to the item selection screen 2 Press 3 4 to sele...

Страница 43: ...essing Wi Fi 1 Touch 2 Touch Controlling with a Smartphone Tablet The Image App is an application provided by Panasonic OS Controlling with a Smartphone Tablet P43 Recording with a smartphone P46 Play...

Страница 44: ...loading the app on a mobile network high packet communication fees may be incurred depending on the details of your contract Connecting to a smartphone tablet You can easily set up a direct connection...

Страница 45: ...App If a message appears stating that a camera search is in progress close the message 2 While is displayed on the screen of the smartphone touch the smartphone to of the camera 3 When the connection...

Страница 46: ...that of the actual recorded motion picture In addition depending on the smartphone or conditions of use the image quality may deteriorate or the sound may skip during motion picture or picture playbac...

Страница 47: ...ge App touch the smartphone to of the camera If a connection attempt by touching fails restart the Image App and then display the screen in step 2 again To transfer more than one image repeat steps 1...

Страница 48: ...one 4 and iPod touch 4th generation do not support Snap Movie of the Image App Adding location information to images stored in the camera from a smartphone tablet Start stop recording location informa...

Страница 49: ...ndows 8 1 you can display the menu by clicking a message that is displayed after inserting the DVD and then selecting and executing Launcher exe You can also display the menu by double clicking SFMXXX...

Страница 50: ...Photo Style Flash Mode Flash Extra Tele Conversion when recording motion pictures Recording format Recording quality P37 Snap Movie Picture size Aspect Ratio P28 Extra Tele Conversion when taking sti...

Страница 51: ...and time Travel destination setting 3 Exposure meter Focal distance display Step zoom AFS AFF AFC MF AFL LOW STAR 4 AF area Spot metering target Centre marker display Self timer 4 Mic level display S...

Страница 52: ...down 5 It is possible to switch the display between the number of recordable pictures and available recording time with the Remaining Disp setting in the Custom menu Touch tab Touch zoom Touch Shutter...

Страница 53: ...0 Fn ISO AUTO Wi Fi L 4 3 AFS AFS C1 EXPS EXPS ISO AUTO 0 0 WL 3 Single P31 Burst 4K Photo P32 Auto Bracket Self timer Focus Mode P30 AF Mode A Quality P29 Picture size Aspect Ratio P28 Wi Fi Wi Fi P4...

Страница 54: ...ttings iHandheld Night Shot Extended ISO Aspect Ratio iHDR Long Shtr NR Picture Size HDR Shading Comp Quality Multi Exp Diffraction Compensation AFS AFF Time Lapse Shot Ex Tele Conv Metering Mode Stop...

Страница 55: ...s Focus Release Priority Monitor Disp Style AF MF Monitor Info Disp MF Assist Rec Area Setup This menu lets you perform the clock settings select the operating beep tone settings and set other setting...

Страница 56: ...y Is Focus Release Priority in the Custom menu set to RELEASE Is Shutter AF in the Custom menu set to OFF Is the AF Lock applied incorrectly The shutter speed will become slower and the Image Stabilis...

Страница 57: ...etc the colours and screen brightness may change or horizontal striping may appear on the screen When the ambient temperature is high or recording with 4K Burst or 4K Burst S S of the 4K Photo functio...

Страница 58: ...re a picture which has been edited using a PC or a picture which was taken by another make of digital camera Did you remove the battery immediately after picture taking or did you take the picture usi...

Страница 59: ...wireless access point Remove the obstacles between this unit and the wireless access point Change the direction of this unit Change the location and orientation of the wireless access point Perform th...

Страница 60: ...n the battery indicator is flashing red Is the size of the image too large Reduce the image size at Size and then send Transmit after dividing the motion picture with Video Divide File format of the m...

Страница 61: ...to the operating instructions of the TV for details It is a sound of lens movement or aperture operation when this unit is turned on or off and it is not a malfunction The sound which is caused by the...

Страница 62: ...le lens H FS14140 is used 1 9 W When playing back with Monitor When the Interchangeable lens H HS12035 is used 1 9 W When playing back with Monitor When the Interchangeable lens H FS1442A is used Came...

Страница 63: ...600 3200 6400 12800 25600 1 3 EV step change possible Only available when Extended ISO is set Minimum Illumination Approx 9 lx when i Low light is used the shutter speed is 1 25th of a second When the...

Страница 64: ...uch screen Viewfinder OLED Live Viewfinder 4 3 Approx 2 360 000 dots field of view ratio about 100 Magnification approx 1 54k 0 77k 35 mm film camera equivalent with 50 mm lens at infinity j1 0 mj1 wi...

Страница 65: ...0i recording 1920k1080 FHD 25p 24 Mbps 50i recording 1920k1080 FHD 24p 24 Mbps 24p recording Sensor output is 25 frames sec MP4 3840k2160 4K 25p 100 Mbps 3840k2160 4K 24p 100 Mbps 1920k1080 FHD 50p 28...

Страница 66: ...rchangeable lens H FS14140 card and battery Approx 790 g with the Interchangeable lens H HS12035 card and battery Approx 597 g with the Interchangeable lens H FS1442A card and battery Operating temper...

Страница 67: ...urface coating None In focus distance 0 3 m to from the focus distance reference line focal length 14 mm to 21 mm 0 5 m to from the focus distance reference line focal length 22 mm to 140 mm Maximum i...

Страница 68: ...25 m to from the focus distance reference line 0 2 m to from the focus distance reference line focal length 14 mm to 20 mm 0 3 m to from the focus distance reference line focal length 21 mm to 42 mm M...

Страница 69: ...ailable in some countries NOTE Accessories and or model numbers may vary between countries Consult your local dealer For lens related optional accessories such as compatible lenses and filters refer t...

Страница 70: ...f the Operating Instructions you want to open The Operating Instructions for advanced features PDF format will open You can save the Operating Instructions for advanced features on the PC You will nee...

Страница 71: ...pus Imaging Corporation in Japan the United States the European Union and other countries SDXC Logo is a trademark of SD 3C LLC AVCHD AVCHD Progressive and the AVCHD Progressive logo are trademarks of...

Страница 72: ...stered trademark of DENSO WAVE INCORPORATED Other names of systems and products mentioned in these instructions are usually the registered trademarks or trademarks of the manufacturers who developed t...

Отзывы: