background image

21

(ENG) SQT0840

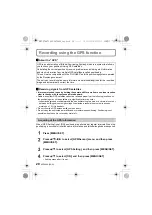
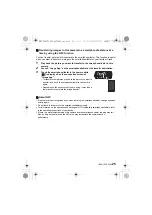
About the Icon indicating positioning status

Positioning is performed by this unit when radio waves from 3 or more GPS satellites 
are received.

The bar moves up the scale according to the number of GPS satellites from which signals are 
being received.
When the bar has filled the scale and positioning has been successful, the indicator goes 
blue.

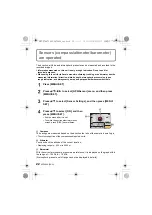
When the displayed location name information is different from the current location or 
when the positioning is not successful, move to a location where the radio waves from 
GPS satellites can be received better and perform the positioning update.

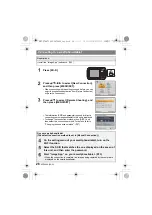
Press [MENU/SET].

Press 

3

/

4

/

2

/

1

 to select [GPS/Sensor] menu, and then press 

[MENU/SET].

Press 

3

/

4

 to select [Repositioning], and then press [MENU/

SET].

Positioning is started and the current location information is updated once the 
positioning is successful.

When used during overseas travel etc.

The GPS may not operate in China or close to the Chinese border in neighbouring countries. 
(As of March 2015)

The usage of GPS, etc., may be restricted depending on the country or the region. This 
camera has a GPS function, so check with the embassies or travel agencies etc. prior to your 
overseas travel regarding any restrictions on cameras with a built-in GPS function.

Update the GPS information

DMC-FT6&TS6GN-SQT0840_eng.book  21 ページ  2015年3月5日 木曜日 午後2時20分

Содержание lumix DMC-FT6

Страница 1: ...e detailed instructions on the operation of this camera are contained in Operating Instructions for advanced features PDF format in the supplied CD ROM GN Basic Operating Instructions Digital Camera Model No DMC FT6 SQT0840 F0315MG0 until 2015 03 27 DMC FT6 TS6GN SQT0840_eng book 1 ページ 2015年3月5日 木曜日 午後2時20分 ...
Страница 2: ...ringe copyright laws Even for the purpose of private use recording of certain material may be restricted Information for Your Safety Product identification marking WARNING To reduce the risk of fire electric shock or product damage Do not let water or other liquids drip or splash inside the unit Do not expose accessories battery pack battery charger AC adaptor SD memory card and etc to rain moistu...

Страница 3: ...outlet CAUTION Danger of explosion if battery is incorrectly replaced Replace only with the type recommended by the manufacturer When disposing of the batteries please contact your local authorities or dealer and ask for the correct method of disposal Warning Risk of fire explosion and burns Do not disassemble heat above 60 xC or incinerate CAUTION To reduce the risk of fire electric shock or prod...

Страница 4: ...may be distorted by strong magnetic fields created by speakers or large motors Electromagnetic wave radiation may adversely affect this unit disturbing the pictures and or sound If this unit is adversely affected by electromagnetic equipment and stops functioning properly turn this unit off and remove the battery or disconnect AC adaptor DMW AC5G optional Then reinsert the battery or reconnect AC ...

Страница 5: ... the GPS function 20 Sensors compass altimeter barometer are operated 22 Remote Shooting 23 Installing the smartphone tablet app Panasonic Image App 23 Connecting easily to a smartphone tablet NFC 24 Connecting to a smartphone tablet 26 Taking pictures via a smartphone tablet remote recording 28 Playing back pictures in the camera 28 Reading the Operating Instructions PDF format 29 Installing supp...

Страница 6: ...ally in 10 minutes to 2 hours with the side door open when the temperature of the camera gets close to the ambient temperature Contact Panasonic if the fogging does not disappear Conditions in which inner side of the lens may be fogged Condensation may occur and the inner side of the lens may be fogged when the camera is used in areas that undergo a significant change in temperature or in high hum...

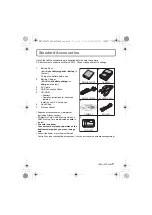
Страница 7: ...r advanced features Install on your PC before use 6 Hand Strap 7 Silicone Jacket Supplied accessories are not waterproof excluding Silicone Jacket SD Memory Card SDHC Memory Card and SDXC Memory Card are indicated as card in the text The card is optional You can record or play back pictures on the built in memory when you are not using a card Consult the dealer or your nearest Service Centre if yo...

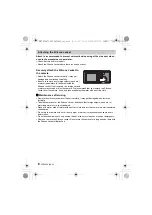
Страница 8: ...e and then wipe away the water with a soft dry cloth Maintenance after using Remove the silicone jacket from the unit carefully It may get damaged when removed forcefully Take the camera out of the Silicone Jacket and check that foreign objects sand etc or water sea water etc are not adhered Rinse with water wipe off water with a soft dry cloth and dry the camera in a well ventilated shaded area D...

Страница 9: ...6 5 Shock However the drop height was changed from 122 cm to 200 cm dropping onto 3 cm thick plyboard This drop test was passed Disregarding appearance change such as loss of paint or distortion of the part where drop impact is applied 3 According to the test conditions specified by Panasonic Waterproof Dustproof Performance This camera s waterproof dustproof rating complies with the IPX8 and IP6X...

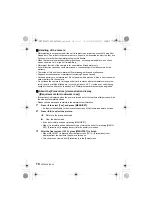
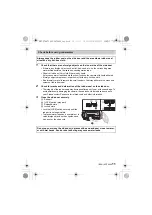
Страница 10: ...resorts or at high altitude etc or very high above 40 oC inside a car under strong sunlight close to a heater on the beach etc Waterproof performance may be degraded About the Precautions demonstration display Requirements for Underwater use Precautions is displayed when the power is turned on for the first time after purchase with the side door completely closed Please check beforehand to maintai...

Страница 11: ...f the rubber seals may decrease after about 1 year with use and age To avoid permanently damaging the camera the seals should be replaced once each year Please contact Panasonic for related costs and other information 3 Close the side door securely A Red part B LOCK switch grey part C Released state D Locked state Lock the LOCK switch securely until the red part is no longer visible To prevent wat...

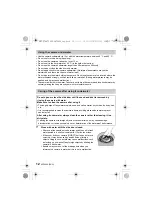
Страница 12: ...e unit in fresh water pooled in a shallow container for 10 minutes or less If the zoom button or camera ON OFF button do not move smoothly it may be caused by an adhesion of foreign objects Using in such a state may cause malfunctions such as locking up so wash off any foreign objects by shaking the camera in fresh water Bubbles may come out of the drainage hole when you immerse the camera in wate...

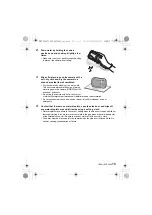
Страница 13: ...erproof performance will deteriorate due to deformation Do not use chemicals such as benzine thinner alcohol or cleanser soap or detergents 4 Confirm that there are no water droplets open the side door and wipe off any water droplets or sand left inside using a soft dry cloth Water droplets may adhere to the card or battery when the side door is opened without thoroughly drying Also water may accu...

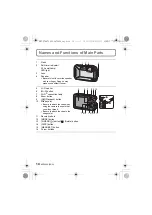
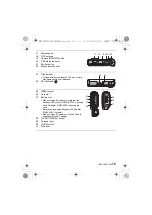
Страница 14: ...Wi Fi button 7 Wi Fi connection lamp 8 Zoom button 9 Playback button 10 Strap eyelet Be sure to attach the strap when using the camera to ensure that you will not drop it Be sure to attach the strap to the strap eyelet 11 Decorative hole 12 MODE button 13 Q MENU button Delete button 14 DISP button 15 MENU SET button 16 Cursor buttons 1 2 3 4 5 6 7 8 9 10 11 12 13 14 15 16 DMC FT6 TS6GN SQT0840_eng...

Страница 15: ...et 26 Card slot 27 Battery slot When using an AC adaptor ensure that the Panasonic DC coupler DMW DCC14 optional and AC adaptor DMW AC5G optional are used Always use a genuine Panasonic AC adaptor DMW AC5G optional When using an AC adaptor use the AC cable supplied with the AC adaptor 28 AV OUT DIGITAL socket 29 Release lever 30 LOCK switch 31 Side door 17 18 19 20 21 22 23 24 25 26 27 28 29 30 31...

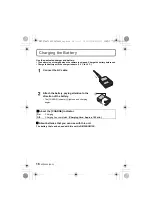
Страница 16: ...o 30 oC About batteries that you can use with this unit The battery that can be used with this unit is DMW BCM13E Connect the AC cable Attach the battery paying attention to the direction of the battery The CHARGE indicator A lights up and charging begins About the CHARGE indicator On Charging Off Charging has completed Charging time Approx 165 min DMC FT6 TS6GN SQT0840_eng book 16 ページ 2015年3月5日 木...

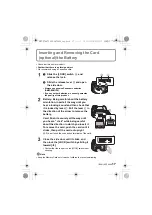
Страница 17: ...ntil you hear a locking sound and then check that it is locked by lever C Pull the lever C in the direction of the arrow to remove the battery Card Push it securely all the way until you hear a click while being careful about the direction in which you insert it To remove the card push the card until it clicks then pull the card out upright D Do not touch the connection terminals of the card Close...

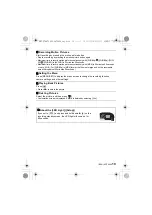
Страница 18: ... the aperture value and the shutter speed that are manually adjusted Record while checking the image effect This mode is optimal for taking pictures of sporting events etc This mode is optimal for taking pictures that show the snow as white as possible at a ski resort or a snow covered mountain This mode is optimal for taking pictures underwater and at the beach This is optimal for taking pictures...

Страница 19: ...format the file size is large and so the recordable time will drop below 29 minutes 59 seconds Setting the Menu Press MENU SET to display the menu screen to change the recording function camera settings and other settings Playing Back Pictures Press Press 2 1 to select the picture Deleting Pictures Select the picture and then press Confirmation screen is displayed Picture is deleted by selecting Y...

Страница 20: ...PS Setting is set ON positioning is performed at regular intervals When the positioning is successful location name information and latitude longitude are acquired Press MENU SET Press 3 4 2 1 to select GPS Sensor menu and then press MENU SET Press 3 4 to select GPS Setting and then press MENU SET Press 3 4 to select ON and then press MENU SET Exit the menu after it is set GPS is an abbreviation o...

Страница 21: ...er and perform the positioning update Press MENU SET Press 3 4 2 1 to select GPS Sensor menu and then press MENU SET Press 3 4 to select Repositioning and then press MENU SET Positioning is started and the current location information is updated once the positioning is successful When used during overseas travel etc The GPS may not operate in China or close to the Chinese border in neighbouring co...

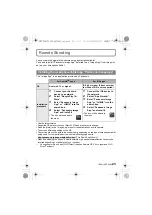
Страница 22: ... Sensor Settings and then press MENU SET Press 3 4 to select ON and then press MENU SET Exit the menu after it is set To switch the environment information screen press DISP several times A Compass 16 bearings are measured based on the direction the lens of the camera is pointing in The coloured portion of the compass needle points north B Altimeter You can check the altitude of the current locati...

Страница 23: ...oading the app on a mobile network high packet communication fees may be incurred depending on the details of your contract Connecting to this unit with Wi Fi Direct requires Android OS 4 0 or higher and Wi Fi Direct support Installing the smartphone tablet app Panasonic Image App For AndroidTM apps For iOS apps OS Android 2 3 3 or higher iOS 6 0 or higher Please note that the iPhone 3GS is not su...

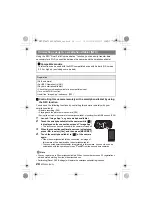
Страница 24: ...and then press MENU SET 4 Touch the smartphone tablet to of the camera again When the smartphone tablet has connected an image of this camera will be displayed on the smartphone tablet The connected smartphone tablet is registered to this camera A connection can be established with the operation of steps 1 and 2 from the second time onwards Note You can register up to 20 smartphones tablets When t...

Страница 25: ...r other pictures play back the picture you want to transfer and touch the smartphone tablet to the camera again Depending on the environment you are using it may take a few minutes to complete the image transfer About NFC If the camera is not recognised even when touching the smartphone tablet change positions and try again Do not touch this camera to the smartphone tablet strongly For information...

Страница 26: ...d then select the connection method For details refer to Changing the connection method P27 Connecting to a smartphone tablet Preparations Install the Image App in advance P23 On your smartphone tablet The default connection method is set to Manual Connection On the setting menu of your smartphone tablet turn on the Wi Fi function Select the SSID that matches the one displayed on the sceen of this...

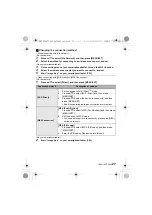
Страница 27: ...MENU SET On your smartphone tablet 2 Start Image App on your smartphone tablet P23 Connection method Description of settings Wi Fi Direct 1 Set the device to Wi Fi DirectTM mode 2 Press 3 4 to select Wi Fi Direct and then press MENU SET 3 Press 3 4 to select the device to connect to and then press MENU SET Read the operating instructions of your device for details WPS Connection WPS Push Button 1 ...

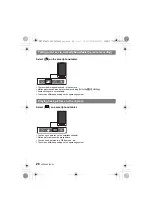
Страница 28: ...fers depending on the operating system Select on a smartphone tablet You can save pictures on the smartphone tablet Motion pictures cannot be played back You can send pictures to a WEB service etc The screen differs depending on the operating system Taking pictures via a smartphone tablet remote recording Playing back pictures in the camera DMC FT6 TS6GN SQT0840_eng book 28 ページ 2015年3月5日 木曜日 午後2時2...

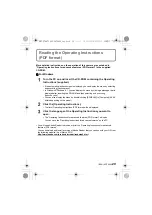
Страница 29: ...ng Launcher exe You can also display the menu by double clicking SFMXXXX in Computer XXXX differs depending on the model Click the Operating Instructions The list of Operating Instructions PDF format will be displayed Click the language of the Operating Instructions you want to open The Operating Instructions for advanced features PDF format will open You can save the Operating Instructions for ad...

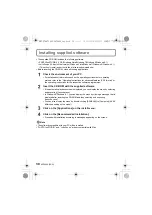
Страница 30: ...r the respective software programmes Insert the CD ROM with the supplied software If the automatic playback screen is displayed you can display the menu by selecting and executing Launcher exe In Windows 8 Windows 8 1 you can display the menu by clicking a message that is displayed after inserting the CD ROM and then selecting and executing Launcher exe You can also display the menu by double clic...

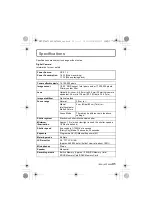
Страница 31: ...al 30 cm to Macro Intelligent auto Motion Picture 5 cm Wide 30 cm Tele to Scene Mode There may be differences in the above settings Shutter system Electronic shutteriMechanical shutter Minimum Illumination Approx 12 lx when i low light is used the shutter speed is 1 25th of a second Shutter speed 4 seconds to 1 1300th of a second Starry Sky Mode 15 seconds 30 seconds Exposure Programme AE P Manual...

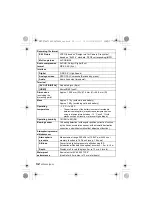
Страница 32: ...le pictures operating time may decrease temporarily when using in a temperature between j10 oC and 0 oC cold places such as ski resorts or places at high altitude Operating humidity 10 RH to 80 RH Bearing sensor 16 bearing detection with angular position correction function by the 3 axes acceleration sensor with automatic declination correction and with automatic offset adjustment function Atmosph...

Страница 33: ...rop height was changed from 122 cm to 200 cm dropping onto 3 cm thick plyboard This drop test was passed Disregarding appearance change such as loss of paint or distortion of the part where drop impact is applied There is no guarantee of not breaking or malfunctioning under all conditions Withstand Load Performance 100 kgf According to the test conditions specified by Panasonic Dustproof performan...

Страница 34: ...re Locator for the name address of the nearest Authorised Service Centre Send or take the product to a Panasonic Authorised Service Centre together with your proof of purchase receipt as a proof of purchase date Please note that freight and insurance to and or from your nearest Authorised Service Centre must be arranged by you Note that home or pick up delivery service is available for the followi...

Страница 35: ...lowing Operating Instructions for advanced features PDF format SDXC Logo is a trademark of SD 3C LLC Manufactured under license from Dolby Laboratories Dolby and the double D symbol are trademarks of Dolby Laboratories HDMI the HDMI Logo and High Definition Multimedia Interface are trademarks or registered trademarks of HDMI Licensing LLC in the United States and other countries HDAVI Control is a...

Страница 36: ...rporation DynaFont is a registered trademark of DynaComware Taiwan Inc Other names of systems and products mentioned in these instructions are usually the registered trademarks or trademarks of the manufacturers who developed the system or product concerned This product is licensed under the AVC patent portfolio license for the personal and non commercial use of a consumer to i encode video in com...

Отзывы: