background image

157

DVQP1242

Recording motion pictures

Pan or zoom while recording with the camera in a fixed position  [4K Live Cropping]

3

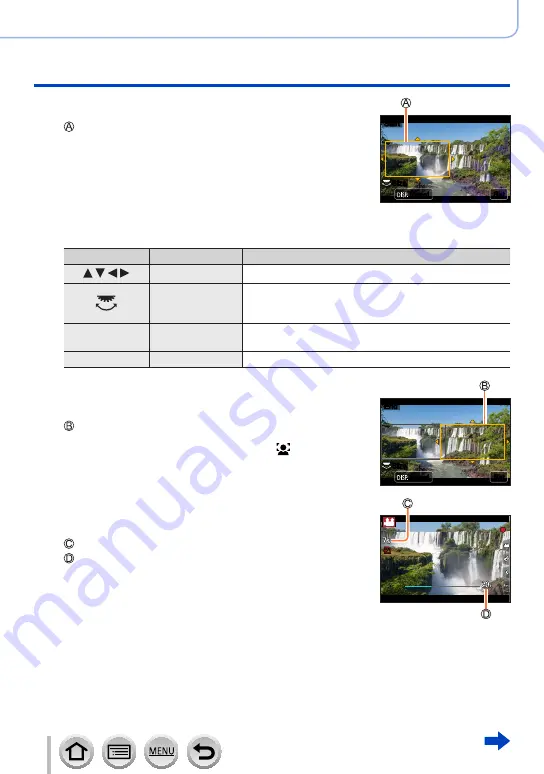
Set the crop start frame

Crop start frame

 •When making settings for the first time, a crop start 

frame of size 1920×1080 is displayed. (After setting 

the crop start frame and end frame, the start frame 

and end frame that you set immediately before will be 

displayed.)

 •The camera will remember the frame position and size 

even when the camera is turned off.

Set

Set

Size

Size

Reset

Reset

Start

Start

Operation

Touch operation

Description


Touch

Moves the frame

Pinch out / 

Pinch in

Enlarges/reduces the frame

(The range of settings allowed is from 1920×1080 to 

3840×2160.)

[DISP.]

[Reset]

Returns the position of the frame to the centre and its 

size to the default setting.

[MENU/SET]

[Set]

Decides the position and size of the frame

4

Repeat step 

3

, and then set the crop end 

frame

Crop end frame

 •The setting of [AF Mode] switches to [   ]  (Face/Eye 

Detection). (The Eye Detection cannot be used.)

Reset

Reset

End

End

Set

Set

Size

Size

5

Press the motion picture button (or 

shutter button) to start recording

Elapsed recording time
Set operating time

 •Immediately release the motion picture button (or 

shutter button) after pressing it.

 •When the set operating time has elapsed, recording 

automatically ends. To end recording midway, press 

the motion picture button (or the shutter button) again.

Содержание Lumix DCFZ80GNK

Страница 1: ...l No DC FZ80 DVQP1242ZA M0217KZ0 Message Display 292 Please read these instructions carefully before using this product and save this manual for future use Q A Troubleshooting 294 Finding the informat...

Страница 2: ...from Contents 4 Search from the list of function names Contents by Function 10 Search from Names and Functions of Main Parts 16 Search from List of monitor viewfinder displays 285 Search from the lis...

Страница 3: ...in the text to jump to the corresponding page About the symbols in the text Indicates that the menu can be set by pressing MENU SET button Indicates that the Wi Fi setting can be made by pressing Wi...

Страница 4: ...Levers Used for Recording 33 LVF button Recording pictures using the viewfinder 33 Zoom Lever Use Zoom 34 Shutter button Taking pictures 35 Motion picture button Recording motion pictures 36 Mode dia...

Страница 5: ...Mode 59 Taking pictures by setting the aperture value and shutter speed Manual Exposure Mode 60 Checking the effects of the aperture value and shutter speed Preview Mode 62 Easily set aperture value...

Страница 6: ...White Balance 103 4K Photo and Drive Settings Recording with the 4K Photo function and selecting pictures to save 107 Recording with the 4K Photo function 107 Selecting pictures from 4K burst file and...

Страница 7: ...Motion Picture 4K Motion Picture 151 Setting the format picture size and recording frame rate 153 Adjusting the focus while recording motion pictures Continuous AF 155 Pan or zoom while recording wit...

Страница 8: ...s recorded with Snap Movie according to your preference on a smartphone 241 Displaying still pictures on a TV 242 Sending pictures 243 Sending pictures to a smartphone 246 Wireless printing 247 Sendin...

Страница 9: ...PC 272 Downloading software 273 Copying still pictures and motion pictures 275 Storing recorded still pictures and motion pictures in the recorder 277 Printing 278 Printing with date and text 280 Othe...

Страница 10: ...Bracket 128 Metering Mode 177 Picture Quality and Colour Tone White Balance 103 Photo Style 172 Filter Settings 174 Picture Size 176 Quality 176 Highlight Shadow 178 i Dynamic 179 i Resolution 179 HD...

Страница 11: ...TO Bulk Saving 216 Light Composition 216 Clear Retouch 218 Resize 222 Cropping 223 Playback Adding information Location Logging 212 Title Edit 219 Text Stamp 220 Image settings Favorite 224 Print Set...

Страница 12: ...App 232 WPS Push Button 260 263 Direct connection 263 Image App Remote recording 237 Saving images 238 Sending images 239 246 Sending and adding location information 239 Combining motion pictures rec...

Страница 13: ...erproof Avoid using the camera in places with excessive dust or sand or where water can come into contact with the camera Avoid using the camera under the following conditions which present a risk tha...

Страница 14: ...roblems with the camera or card prevent recording Carefully observe copyright laws Unauthorised use of recordings that contain works with copyright for purposes other than personal use is prohibited u...

Страница 15: ...he camera was purchased For details on the accessories refer to Basic Operating Instructions Battery Pack is indicated as battery pack or battery in the text SD Memory Card SDHC Memory Card and SDXC M...

Страница 16: ...tch 30 8 Mode dial 36 9 Flash 140 10 Stereo microphone 32 Be careful not to cover the microphone with your finger Doing so may make sound difficult to record 11 Hot shoe 283 12 AF AE LOCK button 99 13...

Страница 17: ...278 31 DC coupler cover 284 When using an AC adaptor ensure that the Panasonic DC coupler optional and AC adaptor optional are used 32 Card Battery door 21 26 33 Release lever 21 26 34 Tripod mount 30...

Страница 18: ...prevent loss of the lens cap Do not hang or swing around the camera with the lens cap string Make sure to detach the lens cap when turning this unit on Be careful that the lens cap string does not be...

Страница 19: ...the shoulder strap through the stopper 3 Pass the end of the shoulder strap through the hole on the other side of the stopper Pull the shoulder strap 2 cm 0 066 feet or more 4 Pull the shoulder strap...

Страница 20: ...counterfeit battery packs which look very similar to the genuine products are made available to purchase in some markets Some of these battery packs are not adequately protected with internal protecti...

Страница 21: ...nsert the battery in the correct orientation Lever To remove battery Move the lever in the card battery compartment in the direction of the arrow Always use genuine Panasonic batteries If you use othe...

Страница 22: ...ied AC adaptor supplied Computer Getting ready Turn on the computer To the electrical outlet When charging the camera connect the USB connection cable supplied to the USB CHARGE socket USB CHARGE sock...

Страница 23: ...ra and notebook connected for a long period of time Always connect the USB connection cable to the USB connector on your computer Do not connect the USB connection cable to the USB connector of the mo...

Страница 24: ...malfunction of the camera Do not use any other AC adaptors except the supplied one Do not use a USB extension cable The AC adaptor supplied and the USB connection cable supplied are dedicated accessor...

Страница 25: ...0M 25p Available recording time Approx 100 min Approx 100 min Approx 80 min Actual available recording time Approx 50 min Approx 50 min Approx 40 min The time you can actually record when repeatedly t...

Страница 26: ...tion of a card Insert the card all the way firmly until it clicks 3 Close the card battery door and slide the release lever to the LOCK position To remove card Press the centre of the card Press Pull...

Страница 27: ...peed class Label example AVCHD All Class 4 or higher MP4 FHD HD MP4 4K High Speed Video UHS Speed Class 3 When recording in 4K Photo Post Focus UHS Speed Class 3 Latest information http panasonic jp s...

Страница 28: ...ormatted with a computer or another device Estimated recording capacity number of pictures recording time The number of pictures you can take and the recording time vary in proportion to card capacity...

Страница 29: ...pictures with Rec Quality setting of FHD 28M 50p FHD 17M 50i Recording stops when the continuous recording time exceeds 29 minutes and 59 seconds MP4 motion pictures with a Rec Quality size of FHD or...

Страница 30: ...is displayed 3 Press to select the language and press MENU SET The Please set the clock message appears 4 Press MENU SET 5 Press to select the items year month day hour minute and press to set Home ti...

Страница 31: ...Time If the clock is not set the correct date cannot be printed when you order a photo studio to print the picture or when you stamp the date on the pictures with Text Stamp Changing time settings 1 S...

Страница 32: ...in the vicinity while taking pictures Do not hold the lens barrel as you take pictures There is a risk that your finger will be trapped as the lens retracts AF Assist Lamp Microphone Speaker About the...

Страница 33: ...itor display and Viewfinder display Viewfinder display Monitor display If Monitor Priority Play 205 of the Setup menu is set to ON pictures will be played back on the monitor after switching to playba...

Страница 34: ...ails about zoom types and use refer to 136 1 Move the zoom lever T side Telephoto Enlarge the subject W side Wide angle Capture a wider area Turning angle is large Zoom speed is high Turning angle is...

Страница 35: ...less you are using the flash 2 Press the shutter button fully push the button all the way and take the picture Pictures can be taken only when the image is correctly focused as long as the Focus Relea...

Страница 36: ...motion picture button again to end recording Mode dial Select the recording mode 1 Set to the desired recording mode Rotate the mode dial slowly to select the desired mode Intelligent Auto Mode 51 In...

Страница 37: ...essing Operations that are the same as MENU SET button such as determine settings etc are performed during the various settings Cursor button MENU SET button Selecting setting items Pressing the curso...

Страница 38: ...tion again During recording You can switch the monitor viewfinder display method Custom Monitor Disp Style LVF Disp Style Settings Monitor style display layout Live View Finder style display layout Mo...

Страница 39: ...mation 50p During playback With information Detailed information display Histogram display 100 0001 10 00 1 DEC 2017 100 0001 1 98 R G B Y Without information Without information Highlight This screen...

Страница 40: ...the touch screen spread pinch out your 2 fingers to zoom in and pinch pinch in your 2 fingers to zoom out Touch the screen with the clean and dry finger If you use a commercially available monitor pro...

Страница 41: ...u to focus and record still pictures simply by touching the subjects that appear on the screen 1 Touch 2 Touch The icon changes to and you can now proceed with touch shutter recording 3 Touch the subj...

Страница 42: ...ring Mode is set to which is used exclusively for the Touch AE 3 Touch the subject you want to optimise the brightness for Touching Reset will bring the brightness optimisation position back to the ce...

Страница 43: ...picture quality and other settings Custom 191 Operation of the unit such as displaying of the screen and button operations can be set up according to your preferences Setup 201 You can perform settin...

Страница 44: ...T Selected setting Settings The setting methods vary depending on the menu item With touch screen operations Touch the setting to set 4 Press Q MENU button repeatedly until the recording or playback s...

Страница 45: ...e setting 50p 50p 4 Press Q MENU button to close the Quick menu Using the Quick menu on the monitor recording information screen 38 of monitor style Press Q MENU button Use to select a menu item and t...

Страница 46: ...n be set Bottom row Set items Items that are displayed in light grey in the top row have already been set 3 Press to select the empty space in the bottom row and press MENU SET You can also set the me...

Страница 47: ...nt to assign and press MENU SET For details on the functions that can be assigned in Setting in REC mode refer to 48 For details on the functions that can be assigned in Setting in PLAY mode refer to...

Страница 48: ...us Area Set Cursor Button Lock Photo Style 172 Filter Effect 174 Aspect Ratio 175 Picture Size 176 Quality 176 AFS AFF AFC 84 Metering Mode 177 Bracket 127 Highlight Shadow 178 i Dynamic 179 i Resolut...

Страница 49: ...med instead of the function assigned to function buttons by Fn Button Set Using the function buttons during playback You can directly set an assigned function to a selected image by pressing the funct...

Страница 50: ...al to the right To edit text Use to select and press MENU SET Then move the cursor to the text to edit You can also use the zoom lever or rear dial to reposition the cursor Use to select Delete and pr...

Страница 51: ...n for each scene turns blue for 2 seconds and then changes to the normal red indication Automatic Scene Detection 50p Switching between Intelligent Auto Plus Mode and Intelligent Auto Mode Select the...

Страница 52: ...subject and press the shutter button halfway to operate the AF tracking function When Face Recog 185 is set to ON and if the camera recognises a face similar to a registered face R is displayed on th...

Страница 53: ...ter speed that is slower than usual is selected After pressing the shutter button do not move the camera while recording When recording 4K photos or when recording using Post Focus Scene Detection wor...

Страница 54: ...c iHandheld Night Shot Settings ON OFF The angle of view becomes narrow slightly After the shutter button has been pressed do not move the camera during the burst operation The flash is fixed to the F...

Страница 55: ...een recorded it will be a few moments before you can record another picture In the case of composition from a burst afterimages may appear if the subject was moving This function will not work for sti...

Страница 56: ...dial to set Press MENU SET to return to the recording screen When setting the brightness exposure Press to set the exposure bracket 128 OFF When setting the background defocusing Pressing Q MENU butt...

Страница 57: ...ogramme Shift indication Aperture value Shutter speed 250 125 60 30 15 8 0 5 6 2 8 4 0 50p To cancel Programme Shift either turn off the camera or rotate the rear dial until the Programme Shift indica...

Страница 58: ...ng pictures by setting the aperture value Aperture Priority AE Mode When you set the aperture value the camera automatically optimises the shutter speed for the brightness of the subject 1 Set mode di...

Страница 59: ...ter speed It will switch between shutter speed setting operation and Exposure Compensation operation every time the rear dial is pressed Shutter speed Exposure meter Shutter speeds that can be set sec...

Страница 60: ...ion each time the rear dial is pressed Aperture value Shutter speed Manual Exposure Assist Exposure meter Aperture values that can be set 1 Shutter speeds that can be set seconds F2 8 F8 0 4 2 1 2000...

Страница 61: ...ppropriate for the aperture value and shutter speed Depending on recording conditions an appropriate exposure may not be set or the ISO sensitivity may become higher Manual exposure assist estimate Sh...

Страница 62: ...or the actual recording Checking the effect of the selected shutter speed This allows you to check motion in a scene by displaying the screen at the shutter speed used for the actual recording 1 Assig...

Страница 63: ...Far Depth of field Focus range Shallow narrow Example To take a picture by deliberately blurring the background Deep wide Example To take a picture by adjusting the focus while including the backgrou...

Страница 64: ...er button is pressed halfway If the Manual Exposure Assistance 61 is anything other than when in Manual Exposure Mode Blinks red 1 Assign One Push AE to the function button 47 2 When exposure is not a...

Страница 65: ...ical guide line Recording direction and progress status approximate Taking pictures from left to right Image size STANDARD Image size WIDE Pan the camera at a constant speed You may not be able to tak...

Страница 66: ...and number of stitched pictures The maximum number of recording pixels is as follows Image size Recording direction Horizontal Resolution Vertical Resolution STANDARD Horizontal 8176 pixels 1920 pixe...

Страница 67: ...e significantly different from those of the first picture the panorama picture as a whole when all pictures are stitched together may not have consistent focus and brightness Since several pictures ar...

Страница 68: ...ing on the scene the recording screen may seem as if frames are missed To change the Scene Guide Mode select the tab on the menu screen select Scene Switch and then press MENU SET You can return to st...

Страница 69: ...nations and tips for each scene are displayed Normal display Guide display List display 1 Clear Portrait 2 Silky Skin If a part of the background etc is a colour close to skin colour this part is also...

Страница 70: ...cape 15 Artistic Nightscape You can change the shutter speed by rotating the rear dial 16 Glittering Illuminations 17 Handheld Night Shot After the shutter button has been pressed do not move the came...

Страница 71: ...d defocusing can be changed by adjusting the aperture using the rear dial For close up recording we recommend that you avoid using the flash 21 Cute Dessert For close up recording we recommend that yo...

Страница 72: ...select the picture effects filters by touching the example images 3 Press MENU SET It is also possible to display the selection screen by touching the Recording mode icon in recording screen 50 Depen...

Страница 73: ...t the size of the focusing area frame On the touch screen spread pinch out your 2 fingers to zoom in and pinch pinch in your 2 fingers to zoom out 40 When you press DISP button the initial setting con...

Страница 74: ...on and size of the light source Sunshine After touching touch Press to move the centre of the light source to a different position The position of the light source can also be moved by touching the sc...

Страница 75: ...t Expressive Vividness Subdued colouring Gaudy colouring Retro Colouring Yellowish colouring Reddish colouring Old Days Contrast Low contrast High contrast High Key Colouring Pinkish colouring Light b...

Страница 76: ...ubdued colouring Gaudy colouring For details about Miniature Effect 73 Soft Focus Degree of defocusing Slight defocusing Strong defocusing Fantasy Vividness Subdued colouring Gaudy colouring Star Filt...

Страница 77: ...rear dial to set Press MENU SET to return to the recording screen When setting the brightness exposure Press to set the exposure bracket 128 OFF When setting the background defocusing Pressing Q MENU...

Страница 78: ...nging the aperture value shutter speed or ISO sensitivity is the same as the operation for setting the mode dial to or It is also possible to display the selection screen by touching the Recording mod...

Страница 79: ...Recording is done at 100 frames second with HD in MP4 3 Press the motion picture button or shutter button to start recording 4 Press the motion picture button or shutter button to stop recording No s...

Страница 80: ...during the recording of a motion picture Using touch icons allows silent operation while recording motion pictures Motion Picture Silent Operation ON 1 Start recording 2 Touch 3 Touch icon Zoom Apertu...

Страница 81: ...is registered as the custom settings initially Preparations Select in advance the recording mode you wish to register and set the desired menu settings on the camera Custom Cust Set Mem Custom set whe...

Страница 82: ...ant to use and press MENU SET The settings are switched to those settings you selected for the custom set 50p It is also possible to display the selection screen by touching the Recording mode icon in...

Страница 83: ...When focus is aligned illuminated When focus is not aligned flashing AF area When focus is aligned green Two beep sounds are heard and Auto Focus is activated Four beep sounds when focus is not align...

Страница 84: ...uto Focus Continuous In this mode while the shutter button is pressed halfway focusing is constantly performed to match the movement of the subject When the subject is moving the focusing is performed...

Страница 85: ...d press MENU SET Settings Face Eye Detection Tracking 49 area focusing etc Custom Multi 1 area focusing Pinpoint focusing 86 90 The AF Mode is fixed to Face Eye Detection in the following case When 4K...

Страница 86: ...rame turns green White Displayed when more than one face is detected Other faces that are the same distance away as faces within the yellow AF area are also focused Changing the eye to be in focus Tou...

Страница 87: ...ion released The AF Tracking area turns yellow while the subject is locked To release AF Tracking Touch If AF Lock fails a red frame flashes for a while and then turns off When you set Metering Mode t...

Страница 88: ...of an AF area by selecting 49 points in the AF area based on the subject 1 Press button 2 Select a Custom Multi icon etc and press Current AF area shape 3 Use to select the setting item Horizontal Pa...

Страница 89: ...area and press MENU SET to set repeat If you press MENU SET again the setting will be cancelled To cancel all the settings press the DISP button With touch screen operations Touch the parts you want...

Страница 90: ...essing the shutter button halfway move the camera to the composition you want with the shutter button pressed halfway and then take the picture Only when AFS AFF AFC in Rec menu is set to AFS Pinpoint...

Страница 91: ...th the AF area The position and size of the AF area cannot be changed in the Digital Zoom range When selecting You can change the position and size of the AF area Press button Select or and press The...

Страница 92: ...points is divided into groups consisting of 9 points each 6 points or 4 points for the groups located at the edges of the screen Press button Examples of group Select and press The AF area setting scr...

Страница 93: ...ear for setting the focus position Move to the focus position Operation Touch operation Description Touch Moves Pinch in Pinch out Enlarges reduces the screen in small steps Enlarges reduces the scree...

Страница 94: ...of the viewfinder according to the distance you drag the touch pad 40 OFF Press the shutter button halfway to determine the focus position If you press the DISP button before determining the focus po...

Страница 95: ...y for the Touch AE Touching Reset returns the brightness optimisation position and the AF area to the centre Set Set Reset Reset 2 Touch Set The AF area with the same function as is displayed on the t...

Страница 96: ...ayed in blue digital zoom range When recording a subject close to the camera we recommend taking a picture without using the flash A picture may be out of focus when the subject is out of focus range...

Страница 97: ...ll be displayed When MF Assist is set to ON MF Assist enlarged screen is displayed 194 You can move the enlarged part by dragging the screen 40 You can also enlarge the display by pinching out or touc...

Страница 98: ...of the screen can be enlarged or reduced approximately 3 to 6 times The image of the entire screen can be enlarged or reduced approximately 3 to 10 times 5 Press the shutter button halfway The recordi...

Страница 99: ...ease AF AE LOCK button the focus and or exposure lock is cancelled 3 While you press and hold AF AE LOCK button move the camera to compose the picture you want to take and fully press the shutter butt...

Страница 100: ...the exposure to the direction Adjust the exposure to the direction 3 Press the rear dial to set You can also press the shutter button halfway to set You can set the exposure compensation value in the...

Страница 101: ...ISO ISO sensitivity is automatically set in a range up to 3200 with the flash on 1600 depending on the movement and brightness of a subject 1 The shutter speed is not fixed when the shutter button is...

Страница 102: ...rence Low High Subject blur High Low For details on the available flash range used when the ISO sensitivity is set to AUTO refer to 141 Cannot select in the following cases Shutter Priority AE Mode Ma...

Страница 103: ...g the flash Use the White Balance value that was set manually Press Point the camera at a white object such as a piece of paper ensuring that it is inside the frame at the centre of the screen and pre...

Страница 104: ...ent setting back to AWB In the Scene Guide Mode settings suitable for each scene are made Auto White Balance When AWB Automatic White Balance is set the colouring is adjusted in accordance with the li...

Страница 105: ...magenta reddish colours You can also make fine adjustments by touching the White Balance graph Pressing DISP button resets the position back to the centre 3 Press MENU SET 4 Press MENU SET to finalise...

Страница 106: ...n also set the bracket by touching BKT BKT 2 Press MENU SET 3 Press MENU SET to finalise the setting You can also press the shutter button halfway to set the White Balance You can also set the White B...

Страница 107: ...n and pressing 2 Press to select the recording method and press MENU SET The recording method can also be set from 4K PHOTO in the Rec menu 4K Burst For capturing the best shot of a fast moving subjec...

Страница 108: ...nger from the shutter button immediately after the start of recording up to a period of approximately 1 5 seconds after the moment that the finger has been removed may be recorded Press and hold Recor...

Страница 109: ...is not at the centre use AF AE LOCK 99 When you perform 4K burst photo recording a 4K burst file will be saved in the MP4 format When Auto Review is enabled the picture selection screen will be displ...

Страница 110: ...he step 3 2 Drag the slide bar to perform rough scene selection For information on how to operate the slide view screen refer to 111 If you touch or press the Fn2 button you can choose a scene in the...

Страница 111: ...previous ones Touch Drag Selects the frames to be displayed Frames preceding and following the selected frame will be displayed Pinch out Pinch in Enlarges reduces the display Drag Moves the enlarged...

Страница 112: ...ewind playback Single frame rewind while paused Touch Drag Selects the frames to be displayed while paused Pinch out Pinch in Enlarges reduces the display while paused Drag Moves the enlarged area dur...

Страница 113: ...O Set VIERA Link of TV Connection in the Setup menu to OFF If you connect the camera to a TV and display 4K burst files on the TV they will be displayed only on the 4K burst playback screen Even if yo...

Страница 114: ...may increase the noise on the screen Shutter sound for 4K photo recording When using 4K Burst or 4K Pre Burst recording is performed with the electronic shutter You can change the electronic shutter s...

Страница 115: ...s in the Motion Picture menu are not applied to 4K burst files recorded with the 4K Photo function The following limitations apply to the recording functions indicated below 4K Burst 4K Burst S S 4K P...

Страница 116: ...r than 4 GB When recording the angle of view becomes narrower The following changes occur when recording 4K photos The i Resolution setting changes from EXTENDED to LOW Destination in Travel Date cann...

Страница 117: ...esired focus point We recommend using a tripod to perform Focus Stacking To record pictures use a UHS Speed Class 3 card 27 Recording using Post Focus 1 Press button 2 Press to select ON and press MEN...

Страница 118: ...ges automatically while recording When the recording progress bar disappears recording automatically ends A motion picture will be recorded in MP4 format No audio is recorded If Auto Review is set a s...

Страница 119: ...ctures cannot be saved The edge of the screen cannot be selected Operation Touch operation Description Touch Select focus point No selection can be made while display is enlarged Enlarge display Shrin...

Страница 120: ...the focus point and save the picture Post Focus 119 The same operation can be performed by pressing the Fn1 button 2 Choose a stacking method and touch it Auto Merging Automatically select photos sui...

Страница 121: ...you drag the screen you can then continue to select positions Operation Touch operation Description Touch Select the position Fn2 Set Cancel Set Clear the position DISP All Select all positions Before...

Страница 122: ...rower The Post Focus function is disabled when using the following settings Clear in Backlight Glistening Water Artistic Nightscape Glittering Illuminations Handheld Night Shot Clear Night Portrait So...

Страница 123: ...The pictures are recorded in succession while the shutter button is pressed 4K PHOTO 107 When the shutter button is pressed a picture is recorded with the 4K Photo function Post Focus 117 When the shu...

Страница 124: ...r the burst speed will become slower halfway through the recording The exact time when the slower burst speed will start depends on the settings of the aspect ratio picture size and quality as well as...

Страница 125: ...or AFC M or L and the exposure and White Balance are adjusted individually for each still picture It may take a while to store still pictures that were taken using the burst function If you continue t...

Страница 126: ...is activated after 2 seconds This is also effective for preventing jitter when pressing the shutter button After the self timer indicator flashes recording will start The focus and exposure are fixed...

Страница 127: ...the menu 3 Focus on the subject and take a picture When Exposure Bracket is selected the bracket display flashes until all of the pictures you have set are taken If you change the bracket settings or...

Страница 128: ...re taken Single Shot Setting Takes one picture each time you press the shutter button Takes all the pictures set to be taken when you press the shutter button once Not available for burst recording Wh...

Страница 129: ...Image Count The recording interval and the number of pictures can be set Select the item minute second number of pictures Setting MENU SET Set The camera may not be able to record using the preset int...

Страница 130: ...rs during Time Lapse Shot recording you can restart the operation by replacing the battery or card in the pause state and turning the camera on Note however that the pictures recorded after restarting...

Страница 131: ...ss to select Start and press MENU SET 3 Press to select New and press MENU SET 4 Press the shutter button fully Up to 9 999 frames can be recorded 5 Move the subject to decide on the composition Repea...

Страница 132: ...ity of the motion picture Frame Rate Set the number of frames per second The higher the number is the smoother the motion picture will be Sequence NORMAL Stitches the still pictures in the recording s...

Страница 133: ...le to create motion pictures with a file size greater than 4 GB With an SDXC Memory Card you can create motion pictures with a file size greater than 4 GB When creating a motion picture with a picture...

Страница 134: ...ctive Mode stabiliser for motion pictures will automatically function This decreases the jitter of the image when recording motion pictures while walking etc To prevent jitter If a warning is displaye...

Страница 135: ...be achieved at the wide end Cases where the stabiliser function may be ineffective When there is a lot of jitter When the zoom magnification is high also in the Digital Zoom range When taking picture...

Страница 136: ...in Picture Size 176 Extra optical zoom allows you to zoom in using a higher zoom ratio than Optical Zoom without degrading the picture quality The maximum zoom ratio varies depending on the picture si...

Страница 137: ...Rec Motion Picture i Zoom Settings ON OFF When Picture Size is set to S the zoom ratio can be increased to up to 1 5x the original zoom ratio i Zoom works automatically in Intelligent Auto Mode or Int...

Страница 138: ...layed at the centre in the Digital Zoom range This function is not available in the following cases When Live View Mode is set to ECO 30fps setting at the time of purchase Handheld Night Shot Scene Gu...

Страница 139: ...The slide bar is displayed 3 Perform zoom operations by dragging the slide bar The zoom speed varies depending on the touched position Slow zooming Fast zooming Touch again to end touch zoom operation...

Страница 140: ...object when you close the flash Forcibly closing the flash can damage the camera Be sure to close the built in flash when not in use The flash setting is fixed to Forced Flash Off while the flash is c...

Страница 141: ...r hand as it is firing Closing the flash as it is firing Do not close the flash immediately after the preliminary flash is operated prior to taking pictures for Forced ON Red Eye Reduction and other f...

Страница 142: ...The camera automatically sets the flash output MANUAL You can set the flash ratio manually Even in the case of dark scenes where the flash output tends to be higher in TTL this mode allows you to take...

Страница 143: ...nd using a tripod Forced Flash Off Always takes pictures without flash under all recording conditions Ideal for taking pictures where the use of flash is prohibited This item is available only when us...

Страница 144: ...ds 1 60 1 1 2000 Flash Mode Shutter speed seconds 1 1 16000 4 2 1 16000 1 The shutter speed is set to 4 seconds in Shutter Priority AE Mode and Manual Exposure Mode 2 The shutter speed is set to 60 se...

Страница 145: ...elaxing Tone Sweet Child s Face Distinct Scenery Bright Blue Sky Romantic Sunset Glow Vivid Sunset Glow Glistening Water Clear Nightscape Cool Night Sky Warm Glowing Nightscape Artistic Nightscape Gli...

Страница 146: ...curtain sync is the normal recording method when using the flash 2ND The light source is captured in back of the subject and this produces a picture that is vibrant and lively If you set to 2ND 2nd w...

Страница 147: ...y of the flash is adjusted or is displayed on the flash icon Flash Adjust is available only when Wireless in the Flash is set to OFF 148 and Firing Mode is set to TTL 142 The Flash Adjust setting func...

Страница 148: ...ing on the surrounding environment Flash controllable range Example of positioning flashes 7 m 23 feet 7 m 23 feet 5 m 16 feet 5 m 16 feet This flash positioning example shows a case where flash unit...

Страница 149: ...ition the flash Select the channel and group of the wireless flash 2 Set the menu 43 Rec Flash Wireless Set Wireless to ON WL will appear with the flash icon on the recording screen Wireless Channel S...

Страница 150: ...ower to 1 128 in 1 3 steps A Group B Group C Group Firing Mode TTL The flash output is automatically adjusted AUTO The wireless flash automatically sets the flash output MANUAL Manually sets the flash...

Страница 151: ...ease the motion picture button after pressing it While you are recording motion pictures the recording status indicator red will flash With recording in a quiet environment the sound of aperture focus...

Страница 152: ...rded The zoom speed will be slower than normal during motion picture recording Depending on the type of the card the card access indication may appear for a while after recording motion pictures This...

Страница 153: ...cture size Recording frame rate Sensor output Bit rate FHD 28M 50p 1 1920 1080 50p 50 fps 28 Mbps FHD 17M 50i 1920 1080 50i 50 fps 17 Mbps FHD 24M 25p 1920 1080 50i 25 fps 24 Mbps When MP4 is selected...

Страница 154: ...ctures are recorded at reduced Auto Focus speeds It may be difficult to focus on the subject with Auto Focus but this is not a malfunction Limitations on continuous recording 29 About the compatibilit...

Страница 155: ...ture recording MF 97 ON OFF Allow the focus to be adjusted manually When the focus setting is set to AFS AFF or AFC the camera will refocus if the shutter button is pressed halfway while recording mot...

Страница 156: ...eaving the camera in a fixed position Hold the camera firmly in place while recording A motion picture will be recorded at FHD 20M 25p under MP4 Pan Zoom in When you want to zoom in out set different...

Страница 157: ...Pinch in Enlarges reduces the frame The range of settings allowed is from 1920 1080 to 3840 2160 DISP Reset Returns the position of the frame to the centre and its size to the default setting MENU SET...

Страница 158: ...e of a crop frame Press Fn1 button while the recording screen is displayed and perform steps 3 and 4 To cancel 4K Live Cropping recording Set OFF in step 2 4K Live Cropping recording cannot be perform...

Страница 159: ...ding with the Touch Shutter function 41 is also available The aspect ratio of a still picture is fixed to 16 9 Takes a still picture using Picture Size S 2M The picture quality may be different to S 2...

Страница 160: ...otion pictures recorded with the camera Music can be added and various editing operations can be performed when you combine them In addition you can send the combined motion picture to a web service 2...

Страница 161: ...ffect that fades in from black and white to colour or an effect that fades out from colour to black and white Audio will be recorded normally OFF Motion pictures recorded with WHITE IN or BLACK IN are...

Страница 162: ...r effect can be achieved by creating a striking contrast of focus between the start and end positions for example by shifting focus from the background to foreground or vice versa After setting focus...

Страница 163: ...ding Playback Press Playback button again or press the Motion picture button The Playback can also be ended by pressing the shutter button halfway The playback screen appears if the camera is turned o...

Страница 164: ...ctures recorded in AVCHD Operations during motion picture playback Operation Touch operation Description Play pause Fast rewind 1 Single frame rewind 2 while paused Stop Fast forward 1 Single frame fo...

Страница 165: ...SET The same operation can be performed by touching The still picture is saved with aspect ratio of 16 9 and Quality of The picture size varies depending on the motion picture being played back Rec Q...

Страница 166: ...n forward or rewind a picture while maintaining the same zoom magnification and zoom position by rotating the rear dial during Playback Zoom Viewing a list of pictures Multi Playback 1 Move the zoom l...

Страница 167: ...d date Pictures are displayed in a 12 picture screen Turn the zoom lever toward the W side to return to the Calendar screen display MON SUN TUEWEDTHU FRI SAT You can display the calendar between Janua...

Страница 168: ...ictures in group units For example if you delete one of pictures in a group all pictures in that group will be deleted Pictures will not be grouped if they are recorded without setting Clock Set Playi...

Страница 169: ...Burst Play or Sequential Play select one of the following playback methods From the first picture Play back the group pictures consecutively from the first picture in a group From the current picture...

Страница 170: ...d as 1 picture All the pictures in the selected picture group are deleted 1 Press button while viewing a picture 2 Use to select Delete Multi Delete All and press MENU SET Picture selected You can sel...

Страница 171: ...will also be changed automatically Photo Style 172 Filter Settings 174 Aspect Ratio 175 Picture Size 176 Quality 176 AFS AFF AFC 84 Metering Mode 177 Burst Rate 124 4K PHOTO 107 Bracket 127 Self Timer...

Страница 172: ...nochrome shades of grey only such as black and white Scenery Setting that creates a picture using vivid colours for the blue sky and green Portrait Setting that produces the look of a healthy complexi...

Страница 173: ...1 Bluish colouring Yellowish colouring Filter Effect 2 Yellow Enhances the contrast of a subject Effect Low Records a blue sky clearly Orange Enhances the contrast of a subject Effect Medium Records...

Страница 174: ...fect 1 2 Soft Focus Star Filter and Sunshine are not available in the following cases Creative Video Mode During motion picture recording 1 When 4K Live Cropping is set 2 When the motion picture size...

Страница 175: ...display only the still picture with the effects applied This function is not available in the following cases Panorama Shot Mode When using Burst When recording 4K photos When recording using Post Fo...

Страница 176: ...S 2M 1920 1080 S 3 5M 1824 1824 The picture size will be fixed to 4K when recording 4K photos or recording in Post Focus Quality Recording mode Set the compression rate used for storing pictures Rec...

Страница 177: ...leted When you play back a picture recorded with the grey area is displayed according to the aspect ratio of the picture during recording The setting is fixed to when recording 4K photos or recording...

Страница 178: ...ter Custom You can set a custom registration shape 2 Rotate the rear dial to adjust the brightness of the highlighted and shadowed areas Highlighted area Shadowed area Preview display Each press of th...

Страница 179: ...s When HDR is set to ON When Sensitivity is set to H 6400 i Resolution Recording mode You can use the camera s Intelligent Resolution technology to record still pictures with sharper outlines and clea...

Страница 180: ...tc We recommend using this setting to take pictures with a handheld camera OFF Does not adjust the displacement of pictures We recommend using this setting when you use a tripod After the shutter butt...

Страница 181: ...at you took are saved and Multi Exposure is closed Retake Exit 4 Press to select Exit and press MENU SET You can also end the operation by pressing the shutter button halfway Changing the settings Aut...

Страница 182: ...hanical shutter mode has higher priority over the electronic shutter mode because the mechanical shutter has less function related restrictions when recording with a flash etc MSHTR Uses only the mech...

Страница 183: ...possible to correct red eye ISO Limit Set Recording mode You can set the upper limit of ISO sensitivity when ISO sensitivity is set to AUTO or Rec ISO Limit Set Settings 200 400 800 1600 3200 OFF Thi...

Страница 184: ...d out with higher ISO sensitivity Color Space Recording mode You can set the method for reproducing the colours to correctly display the recorded pictures on the screens of a PC or printer etc Rec Col...

Страница 185: ...s a registered face and adjusts focus and exposure When registered faces that have set names are recognised the names are displayed max 3 people During playback The name and age are displayed Face Rec...

Страница 186: ...cord Faces of subjects other than people e g pets cannot be registered When is pressed or is touched an explanation is displayed Use to select the item for editing and press MENU SET Name Set the name...

Страница 187: ...ssions or angles Register additional pictures at the place you are recording If a registered person is no longer recognised re register that person In some cases the camera cannot recognise or incorre...

Страница 188: ...e Age Enter the Name For details on how to enter characters refer to Entering Text 50 Use to select Exit and press MENU SET to finish Cancelling the display of the name and age in months years Set Pro...

Страница 189: ...peed Video 79 Continuous AF 155 Flkr Decrease 189 Silent Operation 80 Wind Noise Canceller 189 Zoom Mic 190 Flkr Decrease Recording mode The shutter speed can be fixed to reduce the flicker or stripin...

Страница 190: ...enlarging image and surrounding sounds with wide angle Motion Picture Zoom Mic Settings ON OFF When set to ON and performing zoom the operation sound may be recorded enhanced in accordance with the su...

Страница 191: ...8 Monitor Info Disp 38 Rec Area 198 Remaining Disp 198 Auto Review 199 Fn Button Set 47 Zoom lever 199 Lens Position Resume 199 Lens Retraction 199 Q MENU 46 Video Button 200 Touch Settings 200 Touch...

Страница 192: ...will immediately fire when the shutter button is pressed halfway Quick AF The focus is automatically adjusted when camera blurring is small even when the shutter button is not pressed Increases batter...

Страница 193: ...e Artistic Nightscape Handheld Night Shot Scene Guide Mode When Silent Mode is set to ON When Conversion is set to or Direct Focus Area Moves the AF area or MF assist using the cursor button while rec...

Страница 194: ...arged screen appears MF Assist is not displayed in the following cases During motion picture recording When recording with 4K Pre Burst of the 4K Photo function When using the Digital Zoom MF Assist D...

Страница 195: ...This function is not available in the following case Rough Monochrome Creative Control Mode Histogram Enabling disabling the histogram display When set to ON you can move the display position of the...

Страница 196: ...e recording screen This is useful for zooming while keeping the subject at the centre of the screen Highlight You can set overexposed areas areas that are too bright and where there are no shades of g...

Страница 197: ...gative exposure compensation 100 using the histogram display 195 and so on as a reference The displayed zebra pattern is not recorded If you set Zebra Pattern to Fn Button Set 47 in the Custom menu ev...

Страница 198: ...of the monitor The exposure meter will turn off if no operation is performed for approximately 4 seconds 2 4 8 15 30 6 8 0 5 6 2 8 4 0 Dial Guide Enabling disabling the operation guide display when sw...

Страница 199: ...ing the zoom operation settings Zoom The zoom operates in the normal way Step Zoom Each time zoom is operated the zoom stops at the position for one of the preset focal lengths Focus range Current zoo...

Страница 200: ...n the right side of the screen Touch AF Operation to optimise the focus AF or both the focus and brightness AF AE for a touched subject Touch Pad AF Operation to move the AF area by touching the monit...

Страница 201: ...Comp Reset 207 Self Timer Auto Off 207 No Reset 208 Reset 208 Reset Wi Fi Settings 208 Demo Mode 208 Format 28 Online Manual Settings URL display QR Code display World Time Sets the times for the regi...

Страница 202: ...t you can set the location For details on how to enter characters refer to Entering Text 50 To print Location or the number of days that have passed either use Text Stamp 220 or print using the PHOTOf...

Страница 203: ...tting pictures are displayed at 30 fps 30fps Pictures are displayed at 30 fps 60fps Display speed has higher priority over picture quality and pictures are displayed at 60 fps For example use when you...

Страница 204: ...be affected Monitor Luminance Sets the monitor brightness according to the ambient light level The brightness is adjusted automatically depending on how bright it is around the camera The brightness i...

Страница 205: ...era has not been used for approx 15 minutes with no Wi Fi connection To restore Press the shutter button halfway or turn the camera ON OFF switch to OFF and then turn it ON again Auto LVF Monitor Off...

Страница 206: ...essive scan method for the number of effective scanning lines 1 080 lines 1080i Outputs pictures using an interlace scan method for the number of effective scanning lines 1 080 lines 720p Outputs pict...

Страница 207: ...he screen If you set a different language by mistake select from the menu icons to set the desired language Version Disp Check the firmware version of the camera When you press MENU SET while the vers...

Страница 208: ...28 Reset The following settings are reset to the default Recording settings except for Face Recog and Profile Setup settings and drive mode Recording settings Face Recog and Profile Setup settings Se...

Страница 209: ...h Text Stamp Time Lapse Video Stop Motion Video Resize Cropping It may not be possible to set or edit pictures taken with other cameras How to select an image s after selecting Single or Multi When Si...

Страница 210: ...screen Playback Slide Show 1 Use to select the item and press MENU SET If you select Video Only 4K burst files and pictures recorded using Post Focus will also be played back Only an in focus represen...

Страница 211: ...d back from motion pictures OFF Music and audio will not play back During slide shows of 4K burst files pictures recorded in Post Focus or group pictures effects will stay turned off even if Effect is...

Страница 212: ...to it Abort writing location information Press MENU SET while location information is being written is displayed for the period of the abort operation If selected again while is displayed writing loca...

Страница 213: ...fects Standard Vivid Natural Monochrome Scenery or Portrait i Dynamic You can select the i Dynamic settings HIGH STANDARD LOW or OFF Contrast You can adjust the contrast Highlight You can adjust the b...

Страница 214: ...n 103 Only when White Balance is set to Adjust Used to display the White Balance fine adjustment screen 105 Only when White Balance is set DISP DISP Used to display the comparison screen MENU SET Set...

Страница 215: ...lt of a RAW file developed by this camera and a RAW file developed by the software SILKYPIX Developer Studio 274 will not be exactly the same Regardless of the aspect ratio of the picture during recor...

Страница 216: ...han the preceding frame will be superimposed on the preceding frame to combine the frames into one picture Playback Light Composition 1 Use to select the 4K burst files and press MENU SET 2 Choose the...

Страница 217: ...selection method is the same as in step of Composite Merging setting Select the frame of the last picture and then press MENU SET 3 Select Yes at the confirmation screen and press MENU SET Pictures a...

Страница 218: ...oom in and pinch in your two fingers to zoom out 40 Dragging the screen allows you to move the enlarged part Touch REMOVE This will bring you back to the operation of dragging your finger over the par...

Страница 219: ...ith texts already stamped 2 Enter characters For details on how to enter characters refer to Entering Text 50 To delete texts delete all the characters in the character input screen You can print out...

Страница 220: ...s that have elapsed since the travel date set in Setup menu s Travel Date Title Stamp text registered in Title Edit 3 Press Q MENU button 4 Use to select OK and press MENU SET Do not request date prin...

Страница 221: ...motion pictures that were created after the split During dividing do not turn off the camera or remove the card or battery If you do so the motion picture may be deleted Motion pictures cannot be divi...

Страница 222: ...e size can be reduced to facilitate e mail attachment and use in web pages etc Playback Resize 1 Select a still picture and size Single Use to select a still picture and press MENU SET Use to select s...

Страница 223: ...ce Recognition information will not be copied when still pictures are cropped Picture quality is reduced after cropping This function is not available in the following cases Motion pictures 4K burst f...

Страница 224: ...ng information etc to be added It was established by JEITA Japan Electronics and Information Technology Industries Association Favorite You can label your favourite pictures with a star This lets you...

Страница 225: ...t Print Set Cancel Yes and then press MENU SET When you have performed Print Set for pictures in a group the setting for how many prints to make applies to all pictures in the group and the number of...

Страница 226: ...sing other devices Face Rec Edit Edit or delete the recognition information for pictures with incorrect information Playback Face Rec Edit REPLACE or DELETE 1 Use to select picture and press MENU SET...

Страница 227: ...cture on a card more easily DATE TIME Displays pictures according to the date and time that the pictures were taken in chronological order When the pictures are taken using several cameras and stored...

Страница 228: ...one Connect easily You can easily set up a direct connection to your smartphone without entering a password Displaying still pictures on a TV 242 Wireless printing 247 Sending pictures to AV device 24...

Страница 229: ...when the Wi Fi function is in use Lit When the Wi Fi function is ON or connected by Wi Fi Blinking When sending picture data About the Wi Fi button In this Operating Instructions a function button to...

Страница 230: ...lowing operations Terminate the Connection Terminates the Wi Fi connection Change the Destination 1 Terminates the Wi Fi connection and allows you to select a different Wi Fi connection Change Setting...

Страница 231: ...to an area without any reception while sending images The camera cannot be used to connect to a public wireless LAN connection Use a IEEE802 11b IEEE802 11g or IEEE802 11n compatible device when usin...

Страница 232: ...g on the type of smartphone being used For the latest information on the Image App refer to the support site below http panasonic jp support global cs dsc This site is available in English only When d...

Страница 233: ...phone 1 Turn on the Wi Fi function in the setting menu 2 Select the SSID displayed on the screen of the camera 3 Start Image App 232 When the connection confirmation screen appears on the camera selec...

Страница 234: ...on by pressing Wi Fi button on the camera On your smartphone Start Image App 232 Select QR code When the smartphone is connected to a wireless access point it may take time to display QR code For iOS...

Страница 235: ...ton on the camera On your smartphone Turn on the Wi Fi function in the setting menu On the Wi Fi setting screen select the SSID displayed on the camera Enter the password displayed on the camera For f...

Страница 236: ...od 263 On your smartphone Start Image App 232 Closing the connection 1 Set the camera to Recording Mode Press the shutter button halfway to return to recording mode 2 Select the camera s menu items to...

Страница 237: ...secure the camera in place with a tripod or by other means This function is not available in the following cases Panorama Shot Mode When using Time Lapse Shot Taking a picture while jumping When you h...

Страница 238: ...ore the picture quality may be different from the actual motion picture that you have recorded Depending on your smartphone and its usage environment you may notice degradation in the picture quality...

Страница 239: ...smartphone You can send the location information acquired from a smartphone to the camera After the information is sent you can write it on the pictures in the camera GPS Starts location information...

Страница 240: ...t to send or write location information Follow the messages on the screen to perform the operation is displayed for pictures that have location information written to it The smartphone battery drains...

Страница 241: ...a web service Combine the motion pictures and save the combined motion picture Combining motion pictures by operating a smartphone Connect to a smartphone 233 Operate the smartphone Select Select Sna...

Страница 242: ...se the connection by pressing the Wi Fi button 230 When you display the pictures on a TV using the Wi Fi function they are not output using 4K resolution To output pictures using 4K resolution connect...

Страница 243: ...th Rec Quality of 4K Some images may not be played back or sent depending on the device For more information about picture playback see the operating instructions of the destination device or check th...

Страница 244: ...s function Send Images Stored in the Camera You can select and send recorded images How to select an image s after selecting Single Select or Multi Select Single Select Select the picture Set Set Sele...

Страница 245: ...tion from images before sending them ON Delete the location information then send OFF Keep the location information and send This operation only deletes the location information from the images that a...

Страница 246: ...tion that allows you to easily configure the settings related to the connection and security of wireless LAN devices To check if the smartphone you are using is compatible with WPS refer to the instru...

Страница 247: ...mpatible printers Setup Wi Fi Wi Fi Function New Connection Send Images Stored in the Camera Printer 1 Select Via Network or Direct to connect 260 263 2 Select a printer you want to connect 3 Select t...

Страница 248: ...r device for details Setup Wi Fi Wi Fi Function New Connection Send Images While Recording Send Images Stored in the Camera AV device 1 Select Via Network or Direct to connect 260 263 2 Select the dev...

Страница 249: ...phanumeric characters When using PHOTOfunSTUDIO Install PHOTOfunSTUDIO on the PC 273 Create a folder that receives images with PHOTOfunSTUDIO For details refer to the operating instructions of PHOTOfu...

Страница 250: ...press the DISP button 245 Send Images While Recording 5 Take a still picture 243 Send Images Stored in the Camera 5 Select the picture 244 Folders sorted by the sent date are created in the specified...

Страница 251: ...service you need to register the WEB service 252 Panasonic assumes no responsibility for the damages resulting from the leakage loss etc of images uploaded on WEB services When uploading images to th...

Страница 252: ...nd log in to the service 3 If you have not registered your email address with LUMIX CLUB register the email address 4 Select the WEB service to be used for WEB service link settings and register it Fo...

Страница 253: ...s are sent to the WEB service Step are not necessary when you continue to send another image To change the transmission setting for the picture press the DISP button 245 To terminate the connection pr...

Страница 254: ...nsferred images for 30 days up to 1 000 pictures Transferred images are deleted automatically 30 days after the transfer Furthermore when the number of stored images exceeds 1 000 some images may be d...

Страница 255: ...when uploading pictures to WEB services You can set the same LUMIX CLUB login ID for this unit and a smartphone 257 Refer to the LUMIX CLUB site for details http lumixclub panasonic net eng c Please...

Страница 256: ...tination Proceed to the next page by selecting Next 2 Read through the LUMIX CLUB terms of use and select Agree You can press to switch pages Turn the zoom lever to the T side to enlarge the page disp...

Страница 257: ...or PC into the camera To set the same login ID for the camera and the smartphone Setting the same login ID on this unit and your smartphone is convenient for sending images on this unit to other devic...

Страница 258: ...er actions to login IDs can only be made to the login ID acquired with the camera Setup Wi Fi Wi Fi Setup LUMIX CLUB Delete account The message is displayed Select Next 1 Select Yes in the login ID de...

Страница 259: ...Favourite When a screen similar to the one below is displayed select a connection method Example of operation for displaying a screen Setup Wi Fi Wi Fi Function New Connection Send Images While Recor...

Страница 260: ...Fi Protected Setup with a WPS mark 1 Press the wireless access point WPS button until it switches to WPS Mode Refer to the wireless access point instruction manual for details WPS PIN code Save PIN c...

Страница 261: ...g by Manual Input confirm SSID network authentication type encryption type encryption key of the wireless access point you are using 1 Select the wireless access point you are connecting to Pressing D...

Страница 262: ...encryption type The type of settings that can be changed may vary depending on the details of network authentication settings Network authentication type Encryption types that can be set WPA2 PSK WPA...

Страница 263: ...the device to WPS mode You can wait longer for a connection by pressing the DISP button on this unit WPS PIN code 1 Select WPS PIN code 2 Enter the PIN code of the device into the camera Manual Conne...

Страница 264: ...changed it may not be possible to connect to the device 1 Set the menu 43 Setup Wi Fi Wi Fi Function Select a destination from History Connects using the same settings as used previously Select a des...

Страница 265: ...or Favourite items you can view connection details by pressing the DISP button Performing Reset Wi Fi Settings deletes content registered in History and Favourite If the device you want to connect to...

Страница 266: ...roup Device Name You can change the name SSID of this unit Press DISP button Enter the desired device name Up to 32 characters can be entered For details on how to enter characters refer to Entering T...

Страница 267: ...display the playback screen 269 When the VIERA Link setting on the camera is set to ON and the camera is connected to a VIERA Link HDMI compatible Panasonic television VIERA the television automatical...

Страница 268: ...Quality with 4K to a Blu ray disc or DVD using a Panasonic recorder Current as of February 2017 Storing 4K motion pictures on your PC For details refer to 272 You can use the software PHOTOfunSTUDIO...

Страница 269: ...ction the plug could become deformed and cause faulty operation Also do not insert into the wrong socket Doing so may cause damage to this unit HDMI micro cable Use a High Speed HDMI micro cable with...

Страница 270: ...splayed on the camera screen HDMI output will be cancelled if a USB connection cable supplied is connected simultaneously Read the operating instructions for the TV The recorded pictures can be played...

Страница 271: ...a to a VIERA Link HDMI compatible Panasonic television VIERA with an HDMI micro cable 269 2 Turn on the camera and press Playback button 3 Operate with the remote control for the TV Turning the unit O...

Страница 272: ...uter that can detect a mass storage device device that stores a large volume of data Windows Windows 10 Windows 8 1 Windows 8 Windows 7 Mac OS X v10 5 v10 12 Some motion pictures recorded in AVCHD may...

Страница 273: ...le for download until the end of February 2022 http panasonic jp support global cs soft download d_pfs99pe html Operating environment Supported OS Windows 10 32 bit 64 bit Windows 8 1 32 bit 64 bit Wi...

Страница 274: ...X v10 6 v10 12 For details on the operating environment and how to use the SILKYPIX Developer Studio refer to the Help or the Ichikawa Soft Laboratory s support website LoiLoScope 30 day full trial v...

Страница 275: ...the wrong socket Doing so may cause damage to this unit Do not use any other USB connection cables except the supplied one Access Do not disconnect the USB connection cable supplied while Access is d...

Страница 276: ...rite PRIVATE AVCHD Motion pictures in AVCHD Colour Space P sRGB _ AdobeRGB Card 1 JPG Still pictures RW2 Still pictures recorded in RAW file MP4 MP4 Motion Pictures 2 New folders are created in the fo...

Страница 277: ...recorded with this camera into a Panasonic recorder you can dub the content to a Blu ray Disc or DVD etc The method of importing still pictures and motion pictures recorded in this unit to other devi...

Страница 278: ...ction the plug could become deformed and cause faulty operation Also do not insert into the wrong socket Doing so may cause damage to this unit Do not use any other USB connection cables except the su...

Страница 279: ...sufficient battery power or the AC adaptor optional and DC coupler optional When the battery begins to run out during communication a warning beep sounds Cancel printing and disconnect USB connection...

Страница 280: ...operating manual Even with completed Print Set settings dates may not be printed depending on the shop or printer used Printing with date and text Time and date can be set to be printed on the picture...

Страница 281: ...slowly and carefully Attach the tele conversion lens DMW LT55 optional Close up lens DMW LC55 optional can be attached in a similar manner Lens adaptor Tele conversion lens Tele conversion lens Close...

Страница 282: ...onal is needed to use the conversion lens Do not use with anything other than DMW LC55 or DMW LT55 MC protector optional or ND filters optional cannot be used together with the conversion lens Remove...

Страница 283: ...ra to Aperture Priority AE Mode or Manual Exposure Mode and then set the same aperture value and ISO sensitivity on the external flash The proper exposure cannot be achieved because the aperture value...

Страница 284: ...lected light from a metal or non spherical surfaces flat non metallic surfaces water vapour or invisible particles in the air making it possible to take a picture with enhanced contrast The ND filter...

Страница 285: ...ode 36 Custom Set 81 Photo Style 172 Flash 142 148 50p Rec Format Rec Quality 153 Snap Movie 160 Aspect Ratio 175 Picture Size 176 Image size Panorama Shot Mode 65 Picture effect Filter adjustment dis...

Страница 286: ...ghts green 35 Focus Under low illumination 83 Wi Fi connection status Histogram 195 Name 2 188 Travel elapsed days 3 202 Age in years months 2 188 Location 3 202 Current date time 3 Travel destination...

Страница 287: ...Guide 198 White Balance Bracket 106 White Balance Fine Adjustment 105 White Balance 103 Colouring 55 98 Number of recordable pictures 28 RXXmXXs Available recording time 1 29 Touch tab 200 Touch zoom...

Страница 288: ...anual Exposure Assist 61 Flash 142 148 Single 123 Burst 124 4K PHOTO 107 Self Timer 126 AFS AFF AFC MF AFS AFF AFC 84 MF 97 AF Mode 85 Quality 176 Aspect Ratio 175 Picture Size 176 Wi Fi Wi Fi 229 Fun...

Страница 289: ...ous playback of Time Lapse Shot picture group 168 Continuous playback of stop motion animation group 168 Text stamped display 220 XXhXXmXXs Elapsed playback time 1 Icon indicating the presence of a ma...

Страница 290: ...Group Display 169 Time Lapse Shot Picture Group Display 169 Display for the Stop Motion Animation Group 169 Submenu icon 169 253 Silent Mode 191 11 months 20 days Age in years months 186 188 Multi Pl...

Страница 291: ...Y Recording information Stabilizer 134 i Dynamic 179 HDR 180 iHDR 55 i Resolution 179 Recording date time World time 201 Aspect Ratio 175 Picture Size 176 50p Rec Format Rec Quality 153 200fps 100fps...

Страница 292: ...ending on Rec Format and Rec Quality of a motion picture 4K photo recording requires a card that meets a particular speed class rating Use a card that meets the rating Be sure to use a card of the rec...

Страница 293: ...the wireless access point connection may be automatically disconnected after specific time has passed Reconnect the connection again Connection failed Change the access point to connect to in the sma...

Страница 294: ...ure is 10 C to 30 C 50 F to 86 F temperature conditions also apply to the battery itself Charging is not possible if the power supply capacity of the computer is low Camera does not work even if the c...

Страница 295: ...to OFF 192 AF Lock 99 is set inappropriately If there are fingerprints or dirt on the lens the focus may be set to the lens and not the subject Recorded pictures are blurred The stabiliser function i...

Страница 296: ...can set the shutter speed manually in the Creative Video Mode 78 Brightness or colouring of recorded picture different from real life When recording under fluorescent or LED lighting fixture etc incr...

Страница 297: ...ng the Auto Focus speed in order to adjust the focus at high precision This is not a malfunction A noise such as a clicking or buzzing noise is recorded on a motion picture Audio is recorded at low vo...

Страница 298: ...not switch between the monitor and viewfinder when pressing LVF button When it is connected to a computer or printer the camera can display pictures on the monitor only Playback Cannot view pictures T...

Страница 299: ...ating state Check the radio wave condition of the wireless access point Perform the connection closer to the wireless access point Move the location or change the angle of the wireless access point It...

Страница 300: ...tches with time date and time zone in Windows PC or Mac computer When both settings do not match severely please match them Images cannot be transmitted to the WEB service Confirm that the login infor...

Страница 301: ...SDXC Memory Card Check whether your computer is compatible with SDXC Memory Cards http panasonic net avc sdcard information SDXC html A message prompting you to format the card may appear when you co...

Страница 302: ...ng the Extra Optical Zoom the zooming action will stop temporarily This is not a malfunction Red lamp illuminated when pressing shutter button halfway in dark locations AF Assist Lamp is set to ON 193...

Страница 303: ...and or sound If this unit is adversely affected by electromagnetic equipment and stops functioning properly turn this unit off and remove the battery or disconnect AC adaptor supplied AC adaptor opti...

Страница 304: ...n cool 15 C to 25 C 59 F to 77 F places with low humidity 40 RH to 60 RH and no major temperature changes Charge battery once per year and use completely before storing again Check all the parts befor...

Страница 305: ...battery usage Charging takes longer at high or low temperatures and when the battery has not been used in some time Battery will be warm during charging and for some time thereafter Battery will run...

Страница 306: ...orded data may be damaged or lost if the camera breaks down due to inappropriate handling Panasonic will not be liable for any damage caused due to loss of recorded data When disposing of transferring...

Страница 307: ...ing personal information When ordering repairs or transferring disposing of the camera After you make a note of the personal information perform Reset Wi Fi Settings Delete account to delete data cont...

Страница 308: ...radio waves may be intercepted by a third party We strongly recommend that you enable encryption in the settings of your wireless access point to ensure information security Do not use the camera in a...

Страница 309: ...iMovie Mac and Mac OS are trademarks of Apple Inc registered in the U S and other countries iPad iPhone iPod and iPod touch are trademarks of Apple Inc registered in the U S and other countries App St...

Страница 310: ...ive remuneration to i encode video in compliance with the AVC Standard AVC Video and or ii decode AVC Video that was encoded by a consumer engaged in a personal activity and or was obtained from a vid...

Страница 311: ...d party and licensed to Panasonic Corporation and or 3 open source software The software categorised as 3 is distributed in the hope that it will be useful but WITHOUT ANY WARRANTY without even the im...

Отзывы: