background image

27

DVQX2185 (ENG)

ENGLISH

Getting Started / Basic Operations

A

1

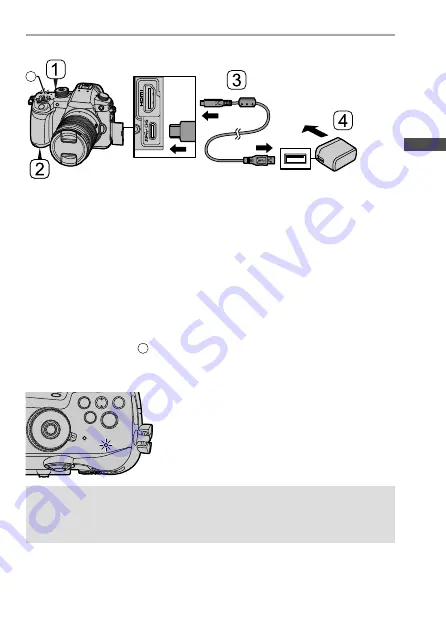
Set the camera on/off switch to [OFF].

2

Insert the battery into the camera.

3

Connect the camera USB port and the AC adaptor using 
the USB connection cable.

•  Check the direction of the terminals and plug in/out straight holding onto the 

plug. 
(Inserting these at an angle may cause deformation or malfunction)

4

Connect the AC adaptor to an electrical outlet.

•  The charging light 

A

 turns red and charging begins.

Charging Light Indications

Charging light (red)

On: Charging.
Off: Charging has completed.
Blinking: Charging error.

•  Even when the camera on/off switch is set to [OFF] thus turning the camera off, 

it consumes power. 
When the camera will not be used for a long time, remove the power plug from 
the electrical outlet in order to save power.

Содержание Lumix DC-GH5M2

Страница 1: ...En Instrucciones de funcionamiento Gu a completa Formato HTML formato PDF est n disponibles instrucciones de funcionamiento m s detalladas https panasonic jp support dsc oi GH5M2 index html U S custom...

Страница 2: ...tag located on the underside of your camera Be sure to retain this manual as your convenient camera information source Date of Purchase Dealer Phone No Dealer Purchased From Model No Dealer Address S...

Страница 3: ...nasonic jp support dsc oi GH5M2 index html URL and QR code can also be checked on the Online Manual of the Setup menu Symbols Used in This Document In this document camera operation is explained using...

Страница 4: ...Displays 22 Getting Started Basic Operations Attaching a Shoulder Strap 23 Charging the Battery 24 Inserting Cards Optional 28 Attaching a Lens 30 Adjusting the Monitor Direction and Angle 31 Setting...

Страница 5: ...n moisture dripping or splashing Use the recommended accessories Do not remove covers Do not repair this unit by yourself Refer servicing to qualified service personnel The socket outlet shall be inst...

Страница 6: ...rient or relocate the receiving antenna Increase the separation between the equipment and receiver Connect the equipment into an outlet on a circuit different from that to which the receiver is connec...

Страница 7: ...chip Several special packets are initiated by the MAC These are the only ways the digital baseband portion will turn on the RF transmitter which it then turns off at the end of the packet Therefore t...

Страница 8: ...to extremely low air pressure as this may result in explosions or leakage of flammable liquids and gases Warning Risk of fire explosion and burns Do not disassemble heat above 60 C 140 F or incinerate...

Страница 9: ...m electromagnetic equipment such as microwave ovens TVs video games etc If you use this unit on top of or near a TV the pictures and or sound on this unit may be disrupted by electromagnetic wave radi...

Страница 10: ...xternal case or the coating may peel off Do not leave the camera with the lens facing the sun as rays of light from the sun may cause it to malfunction Always use the supplied cords and cables Do not...

Страница 11: ...ips near the contact areas of the power plug or near the batteries Store the battery in a cool and dry place with a relatively stable temperature Recommended temperature 15 C to 25 C 59 F to 77 F Reco...

Страница 12: ...rovides explanations for camera firmware version 1 0 Refer to Owner s Manual Complete Guide for the changes after a firmware update 3 Handling of the Camera When using the camera take care not to drop...

Страница 13: ...en there are temperature or humidity differences Take care as this may lead to soiling mold and malfunctions in the lens viewfinder and monitor If condensation occurs turn off the camera and leave it...

Страница 14: ...tery pack or battery in this document Charge the battery before use DMW BLK22 Battery charger This is referred to as battery charger or charger in this document DVLC1005Z AC adaptor This is used for c...

Страница 15: ...s is referred to as lens in these operating instructions 3 This lens is dust and splash resistant 4 The recommended operating temperature is from 10 C to 40 C 14 F to 104 F 5 This is attached to the l...

Страница 16: ...e hot shoe cover Keep the hot shoe cover out of reach of children to prevent swallowing 4 Mode dial 5 WB White balance button 6 ISO ISO sensitivity button 7 Exposure compensation button 8 Video rec bu...

Страница 17: ...ick Fn buttons Center Fn8 Fn9 Fn10 Fn11 Fn12 19 Monitor Touch screen 20 AF ON button 21 Focus mode lever 22 Rear dial 23 DISP button 24 AF mode button 25 Q Quick menu button 26 Cursor buttons Fn butto...

Страница 18: ...of reach of children to prevent swallowing 31 Viewfinder 32 Eye sensor 33 Diopter adjustment dial 34 Speaker 35 Card door 36 REMOTE socket 37 Card access light 1 38 Card slot 1 39 Card slot 2 40 Card...

Страница 19: ...0PP optional When using an AC Adaptor optional use the AC cable supplied with the AC Adaptor optional 44 Battery grip connector cover for the battery grip connector Keep the cover for the battery grip...

Страница 20: ...ash with a synchronization voltage of 400 V or less Keep the flash synchro socket cap out of reach of children to prevent swallowing 54 Sensor 55 MIC socket 56 Headphone socket Excessive sound pressur...

Страница 21: ...ocus ring 4 Zoom ring 5 Wide 6 O I S switch 7 AF MF switch When either the AF MF switch of the lens or the setting of the camera is set to MF Manual Focus MF is enabled 8 Contact point 9 Lens mount ru...

Страница 22: ...200 999 999 1 Photo Style 2 Level gauge 3 Picture quality Picture size 4 AF area 5 Focus mode 6 AF mode 7 Image stabilizer 8 Focus green Recording state red 9 Recording mode 10 Metering mode 11 Shutt...

Страница 23: ...to prevent it from dropping Pull the shoulder strap and check that it will not come out Attach the opposite end of the shoulder strap with the same procedure Use the shoulder strap around your should...

Страница 24: ...supplied optional it is recommended to use DMW BLK22 supplied optional The battery is not charged at the time of purchase Charge the battery before use For charging use this camera or the battery char...

Страница 25: ...on 2 Connect the AC adaptor to an electrical outlet 3 Insert the battery The charging lights CHARGE A blink and charging begins CHARGE Light Indications Charging status 0 to 49 50 to 79 80 to 99 100 C...

Страница 26: ...e other batteries we cannot guarantee the quality of this product A Check that the lever A is holding the battery in place When removing the battery push the lever A toward the arrow and pull out the...

Страница 27: ...lug Inserting these at an angle may cause deformation or malfunction 4 Connect the AC adaptor to an electrical outlet The charging light A turns red and charging begins Charging Light Indications Char...

Страница 28: ...Battery Indication Display Battery indication 75 or higher 50 to 74 25 to 49 24 or below Low battery Indication on monitor Blinking in red You can use the sleep function to reduce battery consumption...

Страница 29: ...lass 60 or higher For the latest information on memory cards with confirmed operation check the following support site https panasonic jp support global cs dsc English only A B C A Card slot 1 B Card...

Страница 30: ...ount interchangeable lens by attaching the M Mount Adaptor DMW MA2M optional Refer to catalogs websites for most current information regarding supported lenses https panasonic jp support global cs dsc...

Страница 31: ...lens H ES12060 B C A 1 Align mark A on the lens hood with the mark on the tip of the lens 2 Rotate the lens hood in the direction of the arrow until it clicks and then align the mark B on the lens ho...

Страница 32: ...r the first time a screen to set the time zone and clock appears Follow the message to make the settings Press to select the language if a language selection screen is displayed Time zone selection Ye...

Страница 33: ...enu items that cannot be set are displayed grayed out If you press or while a grayed out menu item is selected the reason why it cannot be set is displayed The reason why a menu item cannot be set may...

Страница 34: ...the camera reinsert the card and then turn it on again The card may be broken Insert a different card The lens is not attached properly Do not push lens release button while lens is attached Remove t...

Страница 35: ...r if the camera is continuously used for High definition video recording high speed burst pictures and HDMI output etc the temperature of the camera will rise If the camera temperature rises will be d...

Страница 36: ...introduce slight changes to brightness or coloring These are a result of the characteristics of the light source and do not indicate a malfunction When recording subjects in extremely bright locations...

Страница 37: ...ce 9 0 V Power consumption 4 5 W when recording with the monitor 3 8 W when playing back with the monitor When using the interchangeable lens H ES12060 Type Type Digital Single Lens Mirrorless camera...

Страница 38: ...MOV LPCM 2ch 48 kHz 16 bit 1 1 When an XLR Microphone Adaptor DMW XLR1 optional is attached LPCM 2ch 48 kHz 24 bit 96 kHz 24 bit can be selected System frequency 59 94 Hz 50 00 Hz 24 00 Hz Image quali...

Страница 39: ...sion ISO sensitivity standard output sensitivity AUTO 200 to 25600 When Extended ISO is set AUTO 100 to 25600 1 3 EV steps Shutter Format Focal plane shutter Shutter speed Pictures Mechanical shutter...

Страница 40: ...ternal dimensions Mass External dimensions Approx 138 5 mm W 98 1 mm H 87 4 mm D 5 45 W 3 86 H 3 44 D excluding the projecting parts Mass Weight Approx 727 g 1 60 lb camera body with battery and one c...

Страница 41: ...to 11ch 5180 MHz to 5320 MHz 36 40 44 48 52 56 60 64ch 5500 MHz to 5720 MHz 100 104 108 112 116 120 124 128 132 136 140 144ch 5745 MHz to 5825 MHz 149 153 157 161 165ch Encryption method Wi Fi complia...

Страница 42: ...r Panasonic VSK0815F Information for your safety Input 110 V 240 V 50 60 Hz 0 25 A Output 5 0 V 1 8 A Operating temperature 0 C to 40 C 32 F to 104 F Battery pack lithium ion Panasonic DMW BLK22 Infor...

Страница 43: ...he focus distance reference line Maximum image magnification 0 3x 35 mm film camera equivalent 0 6x Optical image stabilizer Yes Filter diameter 62 mm Maximum diameter 68 4 mm 2 7 Overall length Appro...

Страница 44: ...DMI Licensing Administrator Inc in the United States and other countries USB Type C and USB C are trademarks of USB Implementers Forum The USB Type C Charging Trident Logos are trademarks of USB Imple...

Страница 45: ...emark of Wi Fi Alliance The Wi Fi Protected Setup Logo is a trademark of Wi Fi Alliance Wi Fi is a registered trademark of Wi Fi Alliance Wi Fi Protected Setup WPA and WPA2 are trademarks of Wi Fi All...

Страница 46: ...elivery of this product Panasonic will give to any third party who contacts us at the contact information provided below for a charge no more than our cost of physically performing source code distrib...

Страница 47: ...will be no charge for labor During the Parts warranty period there will be no charge for parts This Limited Warranty excludes both parts and labor for non rechargeable batteries antennas and cosmetic...

Страница 48: ...vicer or damage that is attributable to acts of God THERE ARE NO EXPRESS WARRANTIES EXCEPT AS LISTED UNDER LIMITED WARRANTY COVERAGE THE WARRANTOR IS NOT LIABLE FOR INCIDENTAL OR CONSEQUENTIAL DAMAGES...

Страница 49: ...49 DVQX2185 ENG ENGLISH Limited Warranty ONLY FOR U S A PARTS AND SERVICE WHICH ARE NOT COVERED BY THIS LIMITED WARRANTY ARE YOUR RESPONSIBILITY As of April 2021...

Страница 50: ...ra inferior de su c mara Tenga cuidado de guardar este manual como fuente de informaci n til para la c mara Fecha de compra N de tel fono del distribuidor Distribuidor donde se compr N de modelo Direc...

Страница 51: ...gente https panasonic jp support dsc oi GH5M2 index html La URL y el c digo QR tambi n se pueden consultar en Manual en l nea del men Conf S mbolos utilizados en este documento En este documento el fu...

Страница 52: ...nes en el Buscador Monitor 70 Primeros pasos Operaciones b sicas Colocaci n de la correa de transporte 71 Cargar la bater a 72 Inserci n de tarjetas Opcional 76 C mo montar una lente 78 C mo ajustar l...

Страница 53: ...d goteo o salpicaduras Utilice los accesorios recomendados No retire las cubiertas No repare esta unidad usted mismo Ll vesela al personal de reparaci n calificado La salida del tomacorriente debe est...

Страница 54: ...antena receptora Aumente el espacio separador entre el equipo y el receptor Conecte el equipo a un toma de un circuito diferente al que est conectado el receptor Llame para ayuda a concesionario o a...

Страница 55: ...nte al chip de RF El MAC inicia varios paquetes especiales Los paquetes son la nica forma en la que la parte de banda base digital activar el transmisor de RF que despu s se desactivar al final del pa...

Страница 56: ...damente baja ya que podr a provocar explosiones o fugas de l quidos y gases inflamables Advertencia Riesgo de incendio explosi n o quemaduras No desmonte caliente a m s de 60 C 140 F ni incinere Acerc...

Страница 57: ...o hornos microondas TV video juegos etc Si usa esta unidad arriba o cerca de un TV es posible que las im genes y o sonidos en esta unidad se distorsionen debido a la radiaci n de ondas electromagn tic...

Страница 58: ...rse su revestimiento No deje la c mara con el objetivo mirando al sol ya que los rayos que emite podr an originar un funcionamiento defectuoso de la c mara Utilice siempre los cables suministrados No...

Страница 59: ...de las reas de contacto de la clavija de alimentaci n o cerca de las bater as Guarde la bater a en un lugar fr o y seco y con una temperatura relativamente estable Temperatura recomendada de 15 C a 2...

Страница 60: ...ucciones de funcionamiento Gu a completa para ver los cambios despu s de una actualizaci n del firmware 51 Manipulaci n de la c mara Al utilizar la c mara tenga cuidado de no dejarla caer golpearla o...

Страница 61: ...tiene lugar cuando se producen diferencias de temperatura o humedad Tenga cuidado ya que esto puede provocar suciedad moho y mal funcionamiento en la lente el buscador y el monitor Si se produce cond...

Страница 62: ...ento Cargue la bater a antes de usarla DMW BLK22 Cargador de bater a Esto se denomina cargador de bater a o cargador en este documento DVLC1005Z Adaptador de CA Se utiliza para la carga y la alimentac...

Страница 63: ...denomina lente en estas instrucciones de funcionamiento 3 Esta lente es resistente al polvo y a las salpicaduras 4 La temperatura de funcionamiento recomendada es de 10 C a 40 C 14 F a 104 F 5 Esto se...

Страница 64: ...la cubierta de la zapata caliente fuera del alcance de los ni os para evitar que se la traguen 4 Disco del modo 5 Bot n WB Balance de blancos 6 Bot n ISO Sensibilidad ISO 7 Bot n Compensaci n de la ex...

Страница 65: ...ck Botones Fn Centro Fn8 Fn9 Fn10 Fn11 Fn12 19 Monitor Pantalla t ctil 20 Bot n AF ON 21 Palanca del modo de enfoque 22 Disco trasero 23 Bot n DISP 24 Bot n modo AF 25 Bot n Q Men r pido 26 Botones de...

Страница 66: ...ue se la traguen 31 Visor 32 Sensor ocular 33 Disco de ajuste di ptrico 34 Altavoz 35 Tapa de la tarjeta de memoria 36 Toma REMOTE 37 Luz de acceso a la tarjeta 1 38 Ranura para tarjeta 1 39 Ranura pa...

Страница 67: ...izar un adaptador de CA opcional use el cable de CA suministrado con el adaptador de CA opcional 44 Conector de la empu adura con bater a cubierta del conector de la empu adura con bater a Mantenga la...

Страница 68: ...de sincronizaci n de 400 V o menos Mantenga la tapa de conexi n de sincronizaci n del flash fuera del alcance de los ni os para evitar que se la traguen 54 Sensor 55 Toma MIC 56 Entrada del auricular...

Страница 69: ...zoom 5 Gran angular 6 Interruptor O I S 7 Interruptor AF MF Cuando el interruptor AF MF del objetivo o de la configuraci n de la c mara se establece a MF se habilita el enfoque manual MF 8 Punto de c...

Страница 70: ...d de la imagen Tama o de la imagen 4 rea del enfoque autom tico 5 Modo de enfoque 6 Modo AF 7 Estabilizador de imagen 8 Enfoque verde Estado de la grabaci n rojo 9 Modo de grabaci n 10 Modo de medici...

Страница 71: ...o el siguiente procedimiento para evitar que se caiga Tire de la correa de transporte y compruebe que no se salga Coloque el extremo opuesto de la correa de transporte siguiendo el mismo procedimiento...

Страница 72: ...strada opcional se recomienda usar la DMW BLK22 suministrada opcional En el momento de la compra la bater a no est cargada Cargue la bater a antes de usarla Para la carga utilice esta c mara o el carg...

Страница 73: ...tador de CA a la toma de corriente 3 Inserte la bater a Las luces de carga CHARGE A parpadean y comienza la carga Indicaciones de la luz CHARGE Estado de carga Del 0 al 49 Del 50 al 79 Del 80 al 99 10...

Страница 74: ...ras b ater as no podemos garantizar la calidad de este producto A Compruebe que la palanca A mantenga la bater a en su sitio Para extraer la bater a empuje la palanca A hacia la flecha y saque la bate...

Страница 75: ...os en ngulo puede provocar deformaci n o mal funcionamiento 4 Conecte el adaptador de CA a la toma de corriente La luz de carga A se vuelve roja y comienza la carga Indicaciones de la luz de carga Luz...

Страница 76: ...de la bater a 75 o m s Del 50 al 74 Del 25 al 49 24 o menos Bater a baja Indicaci n en el monitor Parpadea de color rojo Puede utilizar la funci n de hibernaci n para reducir el consumo de bater a Se...

Страница 77: ...m s reciente sobre las tarjetas de memoria cuyo funcionamiento se ha confirmado consulte el siguiente sitio de soporte https panasonic jp support global cs dsc Solo en ingl s A B C A Ranura para tarje...

Страница 78: ...ontura Leica M si monta el adaptador de montaje M DMW MA2M opcional Consulte los cat logos sitios web para conocer la informaci n m s actual sobre las lentes compatibles https panasonic jp support glo...

Страница 79: ...B C A 1 Alinee la marca A en la visera de la lente con la marca en el extremo de la lente 2 Gire la visera de la lente en la direcci n de la flecha hasta que haga clic y despu s alinee la marca B en l...

Страница 80: ...e una pantalla para ajustar la zona horaria y el reloj Siga el mensaje para realizar los ajustes Pulse para seleccionar el idioma si se muestra una pantalla de selecci n de idioma Selecci n de zona ho...

Страница 81: ...tran en gris Si pulsa o mientras est seleccionado un elemento del men en gris se mostrar la raz n por la que no se puede ajustar La raz n por la que no se puede ajustar un elemento del men puede que n...

Страница 82: ...datos Apague la c mara vuelva a insertar la tarjeta y vuelva a encenderla La tarjeta puede estar rota Inserte una tarjeta diferente Objetivo mal puesto No presione bot n para desmontar objetivo estand...

Страница 83: ...aturas ambiente o si se utiliza la c mara de manera continua para la grabaci n de v deo de alta definici n im genes en r faga a alta velocidad y salida HDMI etc la temperatura de la c mara subir Si la...

Страница 84: ...oraci n Esto es resultado de las caracter sticas de la fuente de iluminaci n y no representa un fallo de la unidad Cuando se graban sujetos en ubicaciones extremadamente brillantes o bajo iluminaci n...

Страница 85: ...0 V Potencia absorbida 4 5 W cuando se graba con el monitor 3 8 W cuando se reproduce con el monitor Cuando utilice la lente intercambiable H ES12060 Tipo Tipo C mara digital monolente sin espejo Med...

Страница 86: ...48 kHz 16 bits 1 1 Cuando se conecta un adaptador para micr fono XLR DMW XLR1 opcional se puede seleccionar LPCM 2c 48 kHz 24 bits 96 kHz 24 bits Frecuencia de sistema 59 94 Hz 50 00 Hz 24 00 Hz Calid...

Страница 87: ...ensibilidad de salida est ndar AUTO 200 a 25600 Cuando se ajusta Ampliar ISO AUTO 100 a 25600 Incrementos de 1 3 EV Obturador Formato Obturador de plano focal Velocidad de obturaci n Im genes Obturado...

Страница 88: ...picaduras S Dimensiones externas Masa Dimensiones externas Aprox 138 5 mm An 98 1 mm Alt 87 4 mm P 5 45 An 3 86 Alt 3 44 P excluyendo las porciones de proyecci n Masa Aprox 727 g 1 60 lb cuerpo de la...

Страница 89: ...11c 5180 MHz a 5320 MHz 36 40 44 48 52 56 60 64c 5500 MHz a 5720 MHz 100 104 108 112 116 120 124 128 132 136 140 144c 5745 MHz a 5825 MHz 149 153 157 161 165c M todo de cifrado Wi Fi en cumplimiento c...

Страница 90: ...F Informaci n para su seguridad Entrada 110 V 240 V 50 60 Hz 0 25 A Salida 5 0 V 1 8 A Temperatura de funcionamiento 0 C a 40 C 32 F a 104 F Bater a iones de litio Panasonic DMW BLK22 Informaci n para...

Страница 91: ...sde la l nea de referencia de la distancia de enfoque M xima ampliaci n de la imagen 0 3x equivalente a una c mara de pel cula de 35 mm 0 6x Estabilizador ptico de la imagen S Di metro del filtro 62 m...

Страница 92: ...92 DVQX2185 SPA...

Страница 93: ...de HDMI Licensing Administrator Inc en los Estados Unidos y en otros pa ses USB Type C y USB C son marcas comerciales de USB Implementers Forum Los logotipos de tridente de carga de USB Type C son ma...

Страница 94: ...cial registrada de Wi Fi Alliance El logotipo Wi Fi Protected Setup es una marca comercial de Wi Fi Alliance Wi Fi es una marca registrada de Wi Fi Alliance Wi Fi Protected Setup WPA y WPA2 son marcas...

Страница 95: ...tercero que se ponga en contacto a trav s de la informaci n proporcionada a continuaci n por un precio que no supere el costo de realizar f sicamente la distribuci n del c digo fuente una copia comple...

Страница 96: ...Panasonic Corporation of North America Two Riverfront Plaza Newark NJ 07102 5490 http shop panasonic com Panasonic Corporation 2021 Printed in China Impreso en China...

Отзывы: