background image

60

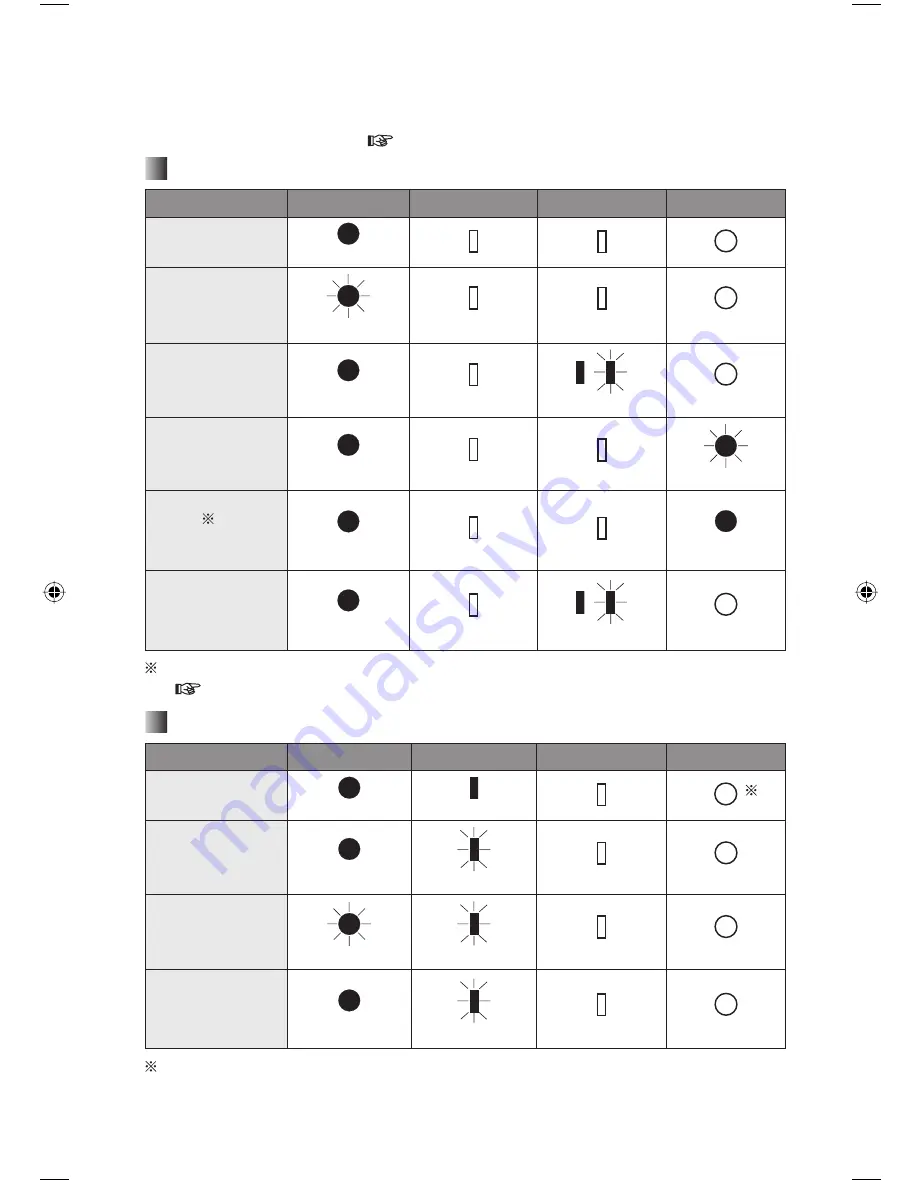
LED Indicators

The operational and error status of the printer is displayed using a combination of lit and 
blinking LED indicators. Messages can be displayed on the LCD monitor and the status 
monitor of the computer screen (

 p. 67, 68).

  When operations are normal

Status

 POWER lamp

 ERROR lamp

 ACCESS lamp

 PRINT lamp

Power is on

Lit (Green)

The LCD monitor 

is sleeping.

Blink (Green)

Loading image

Lit (Green)


Lit/Blink (Green)

Printing

Lit (Green)

Blink (Green)

Waiting to 

print

1

(when 

temperature is too 

high or too low)

Lit (Green)

Lit (Green)

Connecting to 

or disconnecting 

from a PictBridge 

compatible device.

Lit (Green)


Lit/Blink (Green)

1 When temperature is too high or too low, the printer will temporarily enter Waiting mode

(

 p. 9).

  When an error occurs 

(For details, refer to page 67, 68.)

Status

POWER lamp

ERROR lamp

ACCESS lamp

PRINT lamp

Paper/ink error

Lit (Green)

Lit (Red)

2

Paper jam

Lit (Green)

Blink (Red)

Internal printer 

error

Blink (Green)

Blink (Red)

Connecting 

to a device 

incompatible with 

PictBridge.

Lit (Green)

Blink (Red)

2 Sometimes the PRINT lamp blinks or lights up during printing.

KX-PX2M.indb   60

KX-PX2M.indb   60

2007/01/11   14:02:37

2007/01/11   14:02:37

Содержание KXPX2M - HOME PHOTO PRINTER

Страница 1: ...ad the Important Safety Instructions pages 6 8 before using this product Store this manual and warranty in a safe place for future references Accessory Purchases Purchase Parts Accessories and Instruction Books online for all Panasonic Products by visiting our Web Site at http www pasc panasonic com or send your request by E mail to npcparts us panasonic com Guía rápida en español Vea la contrapor...

Страница 2: ... use when the printer is connected to a digital camera etc PC Printer Indicates the functions that you can use when the printer is connected to a computer Thank you for purchasing a Panasonic Home Photo Printer For your future reference Date of purchase Serial number found on the rear of the unit Dealer s name and address Dealer s telephone number Attach your sales receipt here Caution Note that t...

Страница 3: ...ssette x 1 for Postcard size paper and Wide size paper Part number PFZCPX2E Others Operating Instructions this manual x 1 CD ROM Printer Driver x 1 Package Contents Check that you have all of the following before using the product If any items are found to be defective or missing during your check please contact your dealer Note that a Paper and Ink set sold separately is required in order to prin...

Страница 4: ...ce 18 Printing PictBridge Printing with a Digital Camera 19 Printing with the LCD Monitor 21 Changing the language 23 Printing single image 25 Printing multiple images 26 Printing with various print settings 28 Printing all images on a memory card 32 Printing an index 33 Printing using DPOF settings 35 Changing Settings Device Settings 37 Restoring Default Settings 39 Advanced Operations Searching...

Страница 5: ...equirements 51 Installing the printer driver 52 Printing from the computer 56 Status monitor 56 License agreement 57 Others If a Paper Jam Occurs 58 LED Indicators 60 Troubleshooting 61 Message Display 67 Maintenance 69 Specifications 70 List of Factory Settings 71 Additional Information 72 Customer Services 74 Warranty 75 Index 77 ...

Страница 6: ...h the plug with wet hands 12 Do not use a damaged plug or AC adaptor or slack cord Insert the power plug fully and firmly 13 Regularly clear away dust from the power plug 14 Never push any objects through slots in this unit This may result in the risk of fire or electric shock Never spill any liquid on the unit 15 To reduce the risk of electric shock do not disassemble this unit Take the unit to a...

Страница 7: ...the wall outlet if you will not be using the unit for an extended period of time Place the unit so the plug can be easily removed Be sure to remove the memory card from the unit before disconnecting the power cord When moving the unit disconnect the power cord Do not place heavy object on the unit or sit on it Do not use the unit in a location exposed to sooty or steamy emissions dampness or exces...

Страница 8: ...equipment into an outlet on a circuit different from that to which the receiver is connected Consult the dealer or an experienced radio TV technician for help FCC Caution To assure continued compliance follow the attached installation instructions and use only shielded cables when connecting to computer or other devices Also any changes or modifications not expressly approved by the party responsi...

Страница 9: ...rinting operations may temporarily halt in order to keep the internal temperature of the printer from rising Printing will automatically resume when the internal temperature of the printer goes down Ensure that the printer is used in a well ventilated location When ambient temperatures are low To maintain high quality image output the printer does not begin printing until the internal temperature ...

Страница 10: ...he LCD monitor screen Doing so can cause uneven color display and can permanently damage the monitor In a place with drastic temperature changes condensation may form on the LCD monitor Wipe it with a soft dry cloth Extremely high precision technology is employed to produce the LCD monitor screen The result is more than 99 99 effective pixels with a mere 0 01 of the pixels inactive or always lit H...

Страница 11: ... Green PictBridge Terminal p 19 POWER Button Paper Cassette Compartment Cover Air Vent Do not block USB Port p 55 DC IN Port Ink Cassette Compartment Cover Paper Jam Removal Lever p 59 Paper Support Lever p 69 p 60 LED Indicators Ink Cassette Eject Lever p 17 MENU Button PRINT Button Direction Buttons p 42 Selects menu items and images Also reduces enlarges the image size and rotates moves the ima...

Страница 12: ...r and Ink set described below Paper and ink cassettes are kits consisting of paper and ink together Do not use postcard and ink jet type paper This will cause paper jams and the printer to malfunction Ensure that only the ink cassette and papers which come together as part of a set are used with the printer The ink cassettes included in the Paper and Ink set provide enough ink to print the number ...

Страница 13: ...When storing printed paper in an album select holder sleeves made of nylon polypropylene or cellophane Do not allow any volatile solvents such as alcohol to come in contact with the printed surface Do not touch the printed surface Do not leave printed surfaces in contact with one another or place any other papers on printed surfaces for a certain period of time Do not store printed paper in locati...

Страница 14: ...lready been printed on 1 Adjust the feeding stop according to the paper size you want to use Postcard size paper Protective sheet Pull the feeding stop upwards Wide size paper Protective sheet Push the feeding stop down 2 Fan the paper to avoid multi sheet feeds Place the paper in the paper cassette without removing protective sheet so as not to touch the print surface The protective sheet will st...

Страница 15: ...per with a word processor before printing with this printer Do not write on the paper before printing with this printer Do not remove unused sheets of paper from the paper cassette Close the cassette lid then insert the paper cassette into a plastic bag and store so that it lies flat Insert the paper cassette to the printer 1 Slide the paper cassette lid forward until it catches in place Pull the ...

Страница 16: ...en the ink cassette compartment cover and insert the cassette into the printer Insert the ink cassette as far as it will go with the arrow mark facing forward until it catches in place If you cannot insert the ink cassette until it catches in place p 62 Ink cassette compartment cover When using the printer for the first time be sure to remove the padding used during transportation Ink cassette 3 C...

Страница 17: ...used ink cassette and be sure to dispose according to local regulations Do not touch or pull on the ink sheet until it is used up Notice of Ink Cassettes The numbers of the ink sheets and papers in the Paper and Ink set are matched An ink cassette provides enough ink to print 36 sheets of paper 20 sheets of paper when using wide size paper Store the ink cassette and papers used together The number...

Страница 18: ...ER lamp Wall outlet Connect to household power supply 120 V AC CAUTION Never touch the power cord during a lightning storm When you operate this product the wall outlet should be near the product and easily accessible Use only the included AC adaptor and power cord 2 3 ...

Страница 19: ...g instructions 3 Turn the printer on The POWER lamp on the printer lights up in green Turning off the power Press the POWER button for approximately 1 second The POWER lamp goes out 4 Connect the digital camera to the printer using the USB cable provided with the digital camera Do not connect the digital camera to the printer when the printer is processing a print job as print quality may be reduc...

Страница 20: ...printed directly from PictBridge compatible devices such as digital cameras p 70 When printing images with DPOF settings from PictBridge compatible devices settings such as the date are controlled by the DPOF setting Settings on the printer driver p 52 55 have no effect when printing directly from PictBridge compatible devices When printing from a PictBridge compatible devices image adjustments ma...

Страница 21: ...to the card adaptor Then insert the card adaptor into the memory card slot Important Push the memory card all the way in until it clicks into place Do not remove the memory card when displaying images stored on the memory card on the LCD monitor To print from a PictBridge compatible device such as a digital camera connected directly to the printer insert the memory card into the device Note This p...

Страница 22: ...utton POWER lamp on the printer will light up in green ACCESS lamp POWER button Printer POWER lamp Turning off the power Press the POWER button for approximately 1 second The POWER lamp goes out Printing with the LCD Monitor continued Printer ...

Страница 23: ... OK 3 Press to select Language and press OK 4 Press to select the language to be used and press OK Changing the language Printer The direction buttons are represented in this manual as follows Press Up Down Left or Right Press Up or Down Press Left or Right MENU Direction buttons OK CANCEL PRINT Continued on next page ...

Страница 24: ...24 5 Press to select OK and press OK To cancel changes Press CANCEL Printing with the LCD Monitor continued Printer ...

Страница 25: ...ect the image you want to print 2 Press PRINT 3 Press PRINT Printing begins If you press CANCEL the display will return to the Image View For details on print settings refer to page 28 Image display To change pages Press 1 The date of the file will be displayed for images that do not include shooting date information 2 P is displayed for the postcard size W is displayed for the wide size Image num...

Страница 26: ...one by one each time you press Up to 10 copies can be set for each image To cancel all settings regarding number of copies Press CANCEL Press to select Yes and press OK 3 Repeat steps 1 and 2 to specify the number of copies for images you want to print Up to 99 sheets can be printed by one operation 4 Press PRINT Printing multiple images Printing with the LCD Monitor continued Printer ...

Страница 27: ... the display will return to the Image View For details on print settings refer to page 28 To stop print job midway Press CANCEL Press to select Yes and press OK The printing for the paper currently being printed will be completed and subsequent printing is halted ...

Страница 28: ...IX digital camera insert a memory card containing the images for which information has been recorded with LUMIX Travel Date and Baby mode 1 Press to select the image you want to print 2 Press PRINT 3 Press to select the item to be changed and press OK For details on Date refer to page 29 For details on Borders refer to page 29 For details on Scene refer to page 30 For details on LUMIX refer to pag...

Страница 29: ...ly being printed will be completed and subsequent printing is halted Depending on the item you select under Scene AUTO ON or OFF will be displayed p 30 Print setting items Date You can print image date information including the shooting date on the lower right corner of the image Print date format can be changed if you alter the settings under Date on Settings p 37 38 Borders You can select whethe...

Страница 30: ...age brightness contrast automatically ON Soft Skin Adjusts image brightness contrast to make skin appear smoother Night Scenery Adjusts image brightness contrast to print night scenery with a more natural balance between dark and light positions Indoor Adjusts image brightness contrast to give darker images brighter exposure Vividness Adjusts image brightness contrast to print more vividly OFF OFF...

Страница 31: ...Travel Date and age using LUMIX Baby mode are not displayed on the LCD monitor You cannot print date for images with no date information stored on a memory card The date information printed for images edited and saved on a computer will differ from the actual image shooting date For details on settings available in LUMIX Travel Date and Baby mode refer to the operating instructions provided with t...

Страница 32: ...Press MENU 2 Press to select Quick Print and press OK 3 Press to select All and press OK 4 Press PRINT Printing begins To return to the Menu screen press MENU For details on print settings refer to page 28 To stop print job midway Press CANCEL Press to select Yes and press OK The printing for the paper currently being printed will be completed and subsequent printing is halted Printing all images ...

Страница 33: ...f paper 30 thumbnail images when using wide size paper You cannot proceed this operation if you set the number of copies for individual images beforehand p 26 Index print 1 Press MENU 2 Press to select Quick Print and press OK 3 Press to select Index and press OK Printing an index Continued on next page ...

Страница 34: ...ress to select Yes and press OK The printing for the paper currently being printed will be completed and subsequent printing is halted Note Each image is printed as one thumbnail on an index You cannot set the number of copies for index The paper size cannot be changed after completing step 3 Otherwise printing will be impossible Printing with the LCD Monitor continued Printer ...

Страница 35: ...not proceed this operation if you set the number of copies for individual images beforehand p 26 Before operation Insert the memory card containing images with DPOF settings into the printer p 21 1 Press MENU 2 Press to select Quick Print and press OK 3 Press to select DPOF and press OK 4 Press PRINT Printing begins Images are printed using the settings number of copies date etc specified in the c...

Страница 36: ... per image can be printed when using DPOF printing You cannot perform this operation when the total number of copies to be printed with DPOF settings exceeds 999 DPOF is an abbreviation for Digital Print Order Format You can add print information etc to images stored on memory cards by using digital video cameras and digital cameras and use that information in other DPOF compatible devices The pap...

Страница 37: ...ation format Printer MENU Direction buttons OK CANCEL 1 Press MENU 2 Press to select Settings and press OK 3 Press to select the item to be changed and press OK Example Date 4 Press to select the desired option on the option select screen and press OK For details on Settings refer to page 38 Device Settings Printer Continued on next page ...

Страница 38: ...ed Press any button to resume operations 2 5min 10min 60min Display by 3 Selects image information format Date File number Date File File Number 1 The POWER lamp blinks in green when the sleep mode is on 2 To resume with the POWER button press the POWER button for approximately 1 second 3 The information displayed is below Date Displays image date information including the shooting date informatio...

Страница 39: ... all settings to the default values factory settings Printer MENU Direction buttons OK CANCEL 1 Press MENU 2 Press to select Defaults and press OK 3 Press to select Yes and press OK For details on those settings which will be initialized and the factory settings refer to page 71 Printer ...

Страница 40: ...ow by Date and press OK 3 Press to select the desired date and press OK Shooting date Indicates the number of images that are taken on the selected date 4 Press to select the desired image Note The date information printed for images edited and saved on a computer may differ from the actual image shooting date Specifiable range from 1980 January 1 to 2107 December 31 Printer ...

Страница 41: ... operations Otherwise printing will be impossible You cannot proceed this operation if you set the number of copies for individual images beforehand p 26 Printer MENU Direction buttons OK CANCEL PRINT Select image 1 Press MENU 2 Press to select Edit Print and press OK 3 Press to select Calendar and press OK Printer Continued on next page ...

Страница 42: ...the table below Button functions when changing zoom rotate Button Function Reduce Enlarge Rotate Function Move Reduces the image Can be reduced up to 20 Moves the image downward Enlarges the image Can be enlarged up to 500 Moves the image upward Each time you press this button the image rotates 90 clockwise Moves the image rightward Each time you press this button the image rotates 90 counterclock...

Страница 43: ...ur edited image For details of button functions refer to page 42 4 Press OK 5 Press to select the item to specify the starting year month and day of the week and then press OK Example Year 6 Press to select the desired option and press OK 7 Press to select OK and press OK Continued on next page ...

Страница 44: ...ting begins To stop print job midway Press CANCEL Press to select Yes and press OK The printing for the paper currently being printed will be completed and subsequent printing is halted During printing After printing To return to the Menu screen Press MENU Note The preview is not exact print image Actual printouts may differ from the preview When enlarging an image the image quality will deteriora...

Страница 45: ...rations Otherwise printing will be impossible You cannot proceed this operation if you set the number of copies for individual images beforehand p 26 Printer MENU Direction buttons OK CANCEL PRINT Select image 1 Press MENU 2 Press to select Edit Print and press OK 3 Press to select Frame and press OK Printer Continued on next page ...

Страница 46: ... reduce enlarge rotate the image using then press OK Press CANCEL to cancel your edited image For details of button functions refer to page 42 3 Press to move the image using then press OK Press CANCEL to cancel your edited image For details of button functions refer to page 42 4 Press OK Composite Printing continued Printer ...

Страница 47: ...es will increase one by one each time you press The number of copies will decrease one by one each time you press Up to 10 copies can be set for each image 2 Press PRINT Printing begins To stop print job midway Press CANCEL Press to select Yes and press OK The printing for the paper currently being printed will be completed and subsequent printing is halted During printing After printing To return...

Страница 48: ...e paper size during operations Otherwise printing will be impossible You cannot proceed this operation if you set the number of copies for individual images beforehand p 26 Printer MENU Direction buttons OK CANCEL PRINT Select image 1 Press MENU 2 Press to select Edit Print and press OK Printer ...

Страница 49: ...s OK Select effect 1 Press to select the desired effect and press OK Print 1 Press to set the number of copies The number of copies will increase one by one each time you press The number of copies will decrease one by one each time you press Up to 10 copies can be set for each image Continued on next page ...

Страница 50: ...Effect items Item Result Sepia Prints images with a sepia effect Oil Painting Prints images so they resemble oil paintings on canvas Japanese Paper Prints images as if drawn on Japanese paper Sharpness Prints images so they appear sharp Convex Sphere Prints images so they appear convex Monochrome Prints images with a monochrome effect Example Oil Painting Note The preview is not exact print image ...

Страница 51: ...r 16 bit or higher Desktop area 800 x 600 pixels or higher Interface USB port Disc Drive CD ROM drive required for installation Other Mouse or equivalent device Operation is not necessarily guaranteed with the above environments Operation is not guaranteed on Macintosh Computers Operation is not guaranteed on Windows 3 1 Windows 95 Windows 98 or Windows NT environments Operation is not guaranteed ...

Страница 52: ...mputer while printing is in process Doing so prevents the printer from printing properly To insure against data loss or deletion of any data ensure that you make a backup copy of the software contained on the CD ROM For Windows XP and Windows 2000 log on as system administrator or have a similar level of authorization to install the printer driver The following descriptions are intended for Window...

Страница 53: ...p make sure the printer is off appears click OK 5 Read the License Agreement p 57 carefully Select I accept the terms of the license agreement and click Next If you do not agree to the conditions of the license agreement click Cancel The installation process will be discontinued 6 Click Install Continued on next page ...

Страница 54: ...en is displayed Then turn the printer on p 55 If Printer not found Check the connection screen is displayed Make sure that the USB cable is connected properly and the printer is turned on and then click Retry 8 Click Finish The installation process has completed Printing with a Computer continued PC Printer ...

Страница 55: ... printer driver Disconnect the USB cable before uninstalling the printer driver Quit all other active applications Select Start All Programs Programs Panasonic Panasonic KX PX2 and then click Uninstall Click Yes when Do you want to completely remove the selected application and all of its features screen appears Select Yes I want to restart my computer now and click Finish After the computer has r...

Страница 56: ...f the current print job will be displayed The status monitor will not be displayed under the following conditions When you have selected a different printer Select this printer When there are still previously initiated active print jobs remaining in the print queue Delete any unwanted print jobs Important Do not shut down or log off your computer while printing is in process Doing so prevents the ...

Страница 57: ...ecompile or disassemble the SOFTWARE except as expressly permitted by applicable laws You may not use copy modify alter rent lease or transfer the SOFTWARE its related documentation or any copies thereof in whole or in part except as expressly provided in this Agreement You may not export the SOFTWARE in contravention of any applicable U S or foreign export laws and regulations 4 TERM This license...

Страница 58: ...cassette and ink cassette still inserted Jammed paper will be ejected from the front panel or the rear panel Paper may be ejected from both the front panel and the rear panel Opening for removing paper jams Front panel Rear panel 2 Remove the paper from the front panel or rear panel 3 Remove the ink cassette to verify that there is no more paper lodged inside the printer 4 Replace the ink cassette...

Страница 59: ... keep the internal temperature of the printer from rising Printing will automatically resume when the internal temperature of the printer goes down Note When printing from a computer printing sometimes continues after jammed paper is removed If paper is not ejected 1 Turn off the power and remove the paper cassette Paper jam removal lever 2 Remove the paper from either the front panel p 58 or the ...

Страница 60: ...en Blink Green Waiting to print 1 when temperature is too high or too low Lit Green Lit Green Connecting to or disconnecting from a PictBridge compatible device Lit Green Lit Blink Green 1 When temperature is too high or too low the printer will temporarily enter Waiting mode p 9 When an error occurs For details refer to page 67 68 Status POWER lamp ERROR lamp ACCESS lamp PRINT lamp Paper ink erro...

Страница 61: ...e is off press the POWER button again for approximately 1 second 22 38 LCD monitor Problem Cause and Remedy Page The LCD monitor is turned off although the printer is turned on The LCD monitor is automatically turned off if the printer has not been used for the time selected under Sleep on Settings Press any button to resume operations 1 38 Some pixels are inactive or always lit on the LCD monitor...

Страница 62: ... out the ink sheet Have you inserted the paper cassette as far as it will go Insert the paper cassette all the way in Does the size of paper and ink cassette match Make sure that the paper and ink cassette sizes match Have you been printing continuously or printing when the room temperature is high Printing operations may temporarily halt in order to keep the internal temperature of the printer fr...

Страница 63: ...the thermal heads 3 12 16 14 63 64 Paper jams occur frequently Paper does not feed Have you loaded more than 18 sheets of paper or more than 20 sheets of wide size paper in the paper cassette Reduce the number of sheets Have you inserted curled paper Do not use curled paper Is the feeding stop adjusted according to the paper size you want to use Adjust the feeding stop 14 14 Part of the printed im...

Страница 64: ...ails see the help on the supplied CD ROM Printing Printer Problem Cause and Remedy Page The brightness and color tones of the preview image on the LCD monitor is different from the ones of the printed pictures The preview image is not exact print image just for your reference Therefore there may be some differences in the quality of the image on the LCD and the printed image This is not a malfunct...

Страница 65: ...rd that is not compatible with this printer Check that the format of the memory card is compatible with the printer 21 70 It takes considerable time for the image to be displayed It may take some time until the image is displayed depending on the image format or size of the image This is not a malfunction It takes considerable time for the initial screen to be displayed Do you have many images sto...

Страница 66: ...ch image noise in the dark areas of the printed image Changing Auto Mode setting to OFF on the Image Adjustment tab of the printer driver 4 may improve these problems A message indicating The USB port cannot be located is displayed on the computer Have you connect the printer to USB port that supports printers USB ports are displayed as USB001 and USB002 Check the USB port configuration Checking m...

Страница 67: ...0 UA1 UA2 Load paper into the paper cassette 14 Load the paper cassette U27 UA3 UA4 UA5 Insert the paper cassette with paper 14 Paper size error Paper jam LED indicators POWER lamp ERROR lamp ACCESS lamp PRINT lamp Lit Green Blink Red Messages Message Remedy Page Paper is jammed U2E A paper jam has occurred U28 Remove the jammed paper 58 Check the paper and the paper cassette UB0 UBB U62 U63 Inser...

Страница 68: ... when printing all images or printing using DPOF settings Select the images and set the total number of copies to 99 or less Then print again 26 32 35 The number of copies exceeded Up to 99 copies can be printed at once Select the images and set the total number of copies to 99 or less Then print again 26 Unable to display or print this image U3C Unable to print U3E The image you attempted to prin...

Страница 69: ...ral diluted with water and wring the cloth out thoroughly Then wipe off the dust with the cloth and wipe again with a dry cloth When using a chemical cleaning cloth follow the precautions outlined in the guideline instructions Air vents If dust enters from the air vents it can accumulate on the ink sheet compromising print quality As dust builds up the printer s air vents can be blocked which coul...

Страница 70: ...f wide size paper Image Quality 256 levels color Printing Resolution 300 x 300 dpi Number of Images Displayable Maximum of 20 000 Maximum Pixels of Image 6144 x 4096 pixels Print Head Thermal Input Terminal PictBridge PictBridge terminal front panel 1 For personal computer USB port Type B rear panel 1 Compatible Memory Card SD Memory Card SDHC Memory Card MultiMediaCard miniSD Memory Card adaptor ...

Страница 71: ...5 to 80 External Dimensions Approx 173 W x 63 5 H x 132 D mm Approx 6 81 W x 2 50 H x 5 20 D excluding protruding parts Mass Approx 930 g 2 05 lbs main unit This product conforms with the Design rule for Camera File system DCF and Exif2 21 Exif Print image format as defined by the Japan Electronics and Information Technology Industries Association JEITA List of Factory Settings Item Factory settin...

Страница 72: ...ndard Energy Star As an ENERGY STAR Partner Panasonic has determined that this product meets the ENERGY STAR guidelines for energy efficiency ENERGY STAR is a U S registered mark Copyrights Prints of material other than the images and videos that you have made can be used for your personal enjoyment Copyright laws prevent their use in any other way without the written permission of the copyright h...

Страница 73: ...ws 2000 Microsoft Windows XP Home Edition Professional is referred to Windows XP Microsoft product screen shots reprinted with permission from Microsoft Corporation Intel Pentium and Celeron are registered trademarks or trademarks of Intel Corporation or its subsidiaries in the United States and other countries IBM and PC AT are trademarks of International Business Machines Corporation in the Unit...

Страница 74: ...3 8855 Accessory Purchases Purchase Parts Accessories and Instruction Books online for all Panasonic Products by visiting our Web Site at http www pasc panasonic com or send your request by E mail to npcparts us panasonic com You may also contact us directly at 1 800 332 5368 Phone 1 800 237 9080 Fax Only Monday Friday 9 am to 9 pm EST Panasonic Service and Technology Company 20421 84th Avenue Sou...

Страница 75: ... Labor One 1 Year One 1 Year During the Labor Limited Warranty period there will be no charge for labor During the Parts Limited Warranty period there will be no charge for parts You must carry in or mail in your product prepaid during the Limited Warranty period This Limited Warranty excludes both parts and labor for batteries and cosmetic parts cabinet This Limited Warranty only applies to produ...

Страница 76: ...able to acts of God THERE ARE NO EXPRESS WARRANTIES EXCEPT AS LISTED UNDER LIMITED WARRANTY COVERAGE THE WARRANTOR IS NOT LIABLE FOR INCIDENTAL OR CONSEQUENTIAL DAMAGES RESULTING FROM THE USE OF THIS PRODUCT OR ARISING OUT OF ANY BREACH OF THIS LIMITED WARRANTY As examples this excludes damages for lost time lost calls or messages cost of having someone remove or re install an installed unit if ap...

Страница 77: ...MIX 31 M Moving Images 43 46 MultiMediaCard 21 N Number of Copies 26 P Paper and Ink Set 12 Paper Cassette 14 Paper Jam 58 Paper Jam Removal Lever 11 59 Paper Support Lever 11 69 PictBridge 19 72 Power Cord 3 POWER Lamp 11 60 Print All Images 32 PRINT Lamp 11 60 Printer Driver 52 Printing Effects 48 Protective Sheet 14 R Reducing Images 42 46 Rotating Images 42 46 S Scene 30 SDHC Memory Card 21 SD...

Страница 78: ...78 Notes ...

Страница 79: ...Others 79 Notes ...

Страница 80: ... Puerto Rico Inc San Gabriel Industrial Park Ave 65 de Infantería Km 9 5 Carolina Puerto Rico 00985 Copyright This material is copyrighted by Panasonic Communications Co Ltd and may be reproduced for internal use only All other reproduction in whole or in part is prohibited without the written consent of Panasonic Communications Co Ltd 2007 Panasonic Communications Co Ltd All Rights Reserved ...

Отзывы: