6
7
3-A Initialization Setup
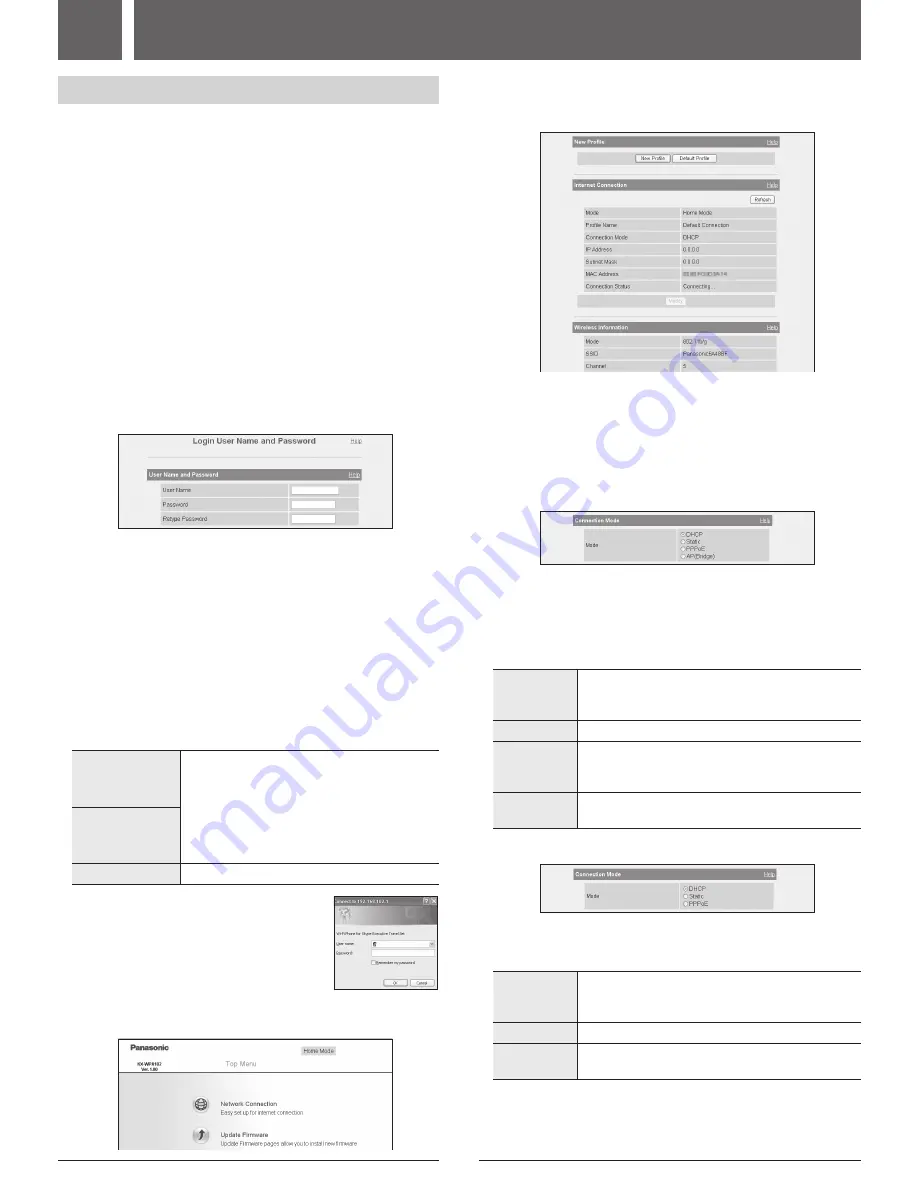
When you log in the base unit for the
fi
rst time, you must register the
network settings you use for HOME or HOTEL mode as a pro
fi
le in
Initialization Setup using the Web browser on the computer you connected
to the base unit’s “LAN” port.
Important:
L
Required Web browser:
– Microsoft
®
Internet Explorer
®
6.0 or later for Windows
®
– Mozilla
®
Firefox
®
1.5 or later for Windows
Operating tips:
[ ]
: The words in the brackets indicate button names displayed on the
computer screen.
1
After the base unit installation (pages 2-5), turn on the computer you
connected to the base unit’s “LAN” port.
2
Open the Web browser. Enter
http://192.168.102.1/
(the base unit’s
default IP address) or
http://kxwpa.webpage
in the address
fi
eld of the
browser and press the ENTER key.
L
Initialization Setup starts. The Login User Name and Password page is
displayed.
L
If you have already set your user name and password, skip to step 4.
If “Initialization Setup” window is not displayed:
L
Check the network setting on your computer. It is necessary to obtain
an IP address of your computer automatically from a DHCP server.
See “Obtain an IP address automatically on your computer” in the
Operating Instructions included in the CD-ROM.
L
Sometimes it is necessary to set up your Web browser’s proxy server
to access the base unit. See “Changing the proxy server settings on
Web browser” in the Operating Instructions included in the CD-ROM.
3
Enter the desired user name and password, then click
[Save]
.
Important:
L
Please keep your user name and password secure.
[User Name]
L
The user name and password can contain 6 to
15 alphanumeric characters.
L
The following cannot be used:
[ ” ], [ ’ ], [&], [<], [>], [ : ], [(space)]
L
User name and password must be different from
each other.
L
User name and password are case-sensitive.
[Password]
[Retype Password]
L
Enter the password again to verify.
L
The base unit begins restarting and a prompt
screen with
fi
elds for your user name and
password is displayed.
4
Enter the user name and password set in step 3. Then click
[OK]
.
L
Top Menu is displayed.
5
Click
[Network Connection]
on the Top Menu.
L
The current Internet connection settings and information of the
wireless connection are displayed.
6
Click
[New Pro
fi
le]
under the New Pro
fi
le heading.
L
If you have no speci
fi
c instructions for the Internet connection from the
hotel, you can use
[Default Pro
fi
le]
for an easy setup. Ask the hotel
front desk for details. Select
[Default Pro
fi
le]
then skip to step 10.
7
Select the desired connection mode used in the current mode (HOME or
HOTEL), then click
[Next>]
.
When the Mode selector is set to “HOME”:
L
Internet connection modes vary according to the Internet service
provider. Select a connection mode referring to the Internet service
provider’s setup information.
L
Select
[DHCP]
,
[Static]
or
[PPPoE]
if the base unit is installed in
Router mode.
Select
[AP (Bridge)]
if the base unit is installed in AP (Bridge) mode.
[DHCP]
L
Allows the base unit to receive an IP address
automatically from a DHCP server. This connection
mode is usually required for use with cable modems.
[Static]
L
Allows the base unit to assign a speci
fi
c IP address.
[PPPoE]
L
Allows the base unit to receive an IP address from
a PPPoE server. This connection mode is usually
required for use with DSL modems.
[AP (Bridge)]
L
Allows the base unit to work as an access point when
you have a router at home.
When the Mode selector is set to “HOTEL”:
L
Select the conection mode as speci
fi
c instructions for the Internet
connection from the hotel.
L
[AP (Bridge)]
is not available in HOTEL mode.
[DHCP]
L
Allows the base unit to receive an IP address
automatically from a DHCP server. DHCP
con
fi
guration is often used in hotel rooms.
[Static]
L
Allows the base unit to assign a speci
fi
c IP address.
[PPPoE]
L
Allows the base unit to receive an IP address from a
PPPoE server.
L
A screen with
fi
elds for con
fi
guring the connection mode you select in
this step is displayed.
3
Setting up the base unit
ł


