4
5
2. Installing the base unit
ł
2-B While you are at home
The base unit has 2 modes of operation for use at home: AP (Bridge) mode
and Router mode.
–
AP (Bridge) mode
is designed for the case when you have an existing
router or modem (cable or DSL) with a built-in router.
–
Router mode
is designed for the case when you only have a standard
cable or DSL modem.
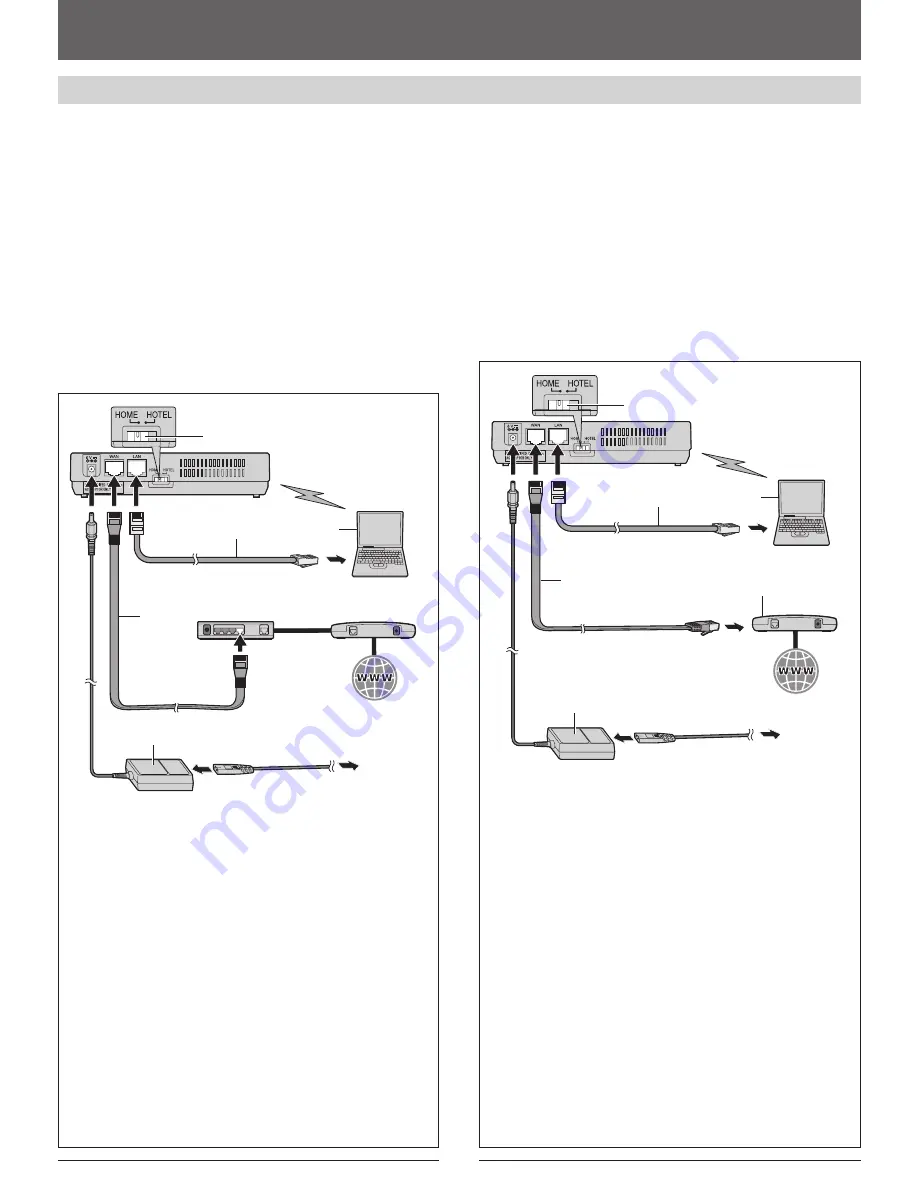
With an EXISTING ROUTER or MODEM with a built-in
ROUTER
<AP (Bridge) mode>
If you install the base unit with your existing router or modem with a
built-in router, the base unit should be set to AP (Bridge) mode. Select
[AP (Bridge)]
for your connection mode in Initialization Setup (3-A on
page 6). In AP (Bridge) mode, the base unit connects wireless devices to
one another and to the LAN, and allows wireless devices to use a DHCP
server on the LAN. In most cases, routers are equipped with the function
as the DHCP server.
1
2
4
5
AC mains lead
AC adaptor
To AC outlet
Existing router
Internet
Computer
(if necessary)
Base unit
Mode selector
Ethernet cable
(included)
Ethernet cable (not included)
1
Switch the Mode selector to “HOME”.
2
Turn off your computer properly. Unplug any cable connecting your
existing router (or modem with a built-in router) to your computer.
However, your existing router (or modem with a built-in router) needs
to remain connected to your cable or DSL modem.
3
Connect the included Ethernet cable to the “WAN” port on the base
unit and an unused Ethernet (LAN) port on your existing router (or
modem with a built-in router).
4
Connect a separate Ethernet cable to the “LAN” port on the base
unit and the Ethernet (LAN) port on your computer.
5
Connect the included AC adaptor to the power port and an AC outlet.
L
The WAN indicator on the base unit lights in steady green or
amber.
Note:
L
Use only the included Panasonic AC adaptor PQWEWP1050 and AC
mains lead PSJA1106Y.
L
You need a separate AC mains lead when you use this unit in USA,
Canada, Japan, Germany and France.
3
Cable or DSL modem
With a MODEM ONLY
<Router mode>
If you install the base unit with a modem only, the base unit should be set
to Router mode. In Router mode, the base unit assigns IP addresses to
network devices (including wireless devices) as a DHCP server. It also
protects the network devices from being directly exposed to the WAN. For
your connection mode, select
[DHCP]
,
[Static]
or
[PPPoE]
in Initialization
Setup (3-A on page 6).
1
2
4
6
AC mains lead
AC adaptor
To AC outlet
Internet
Computer
(if necessary)
Base unit
Mode selector
Ethernet cable (included)
Ethernet cable (not included)
1
Switch the Mode selector to “HOME”.
2
Turn off your computer properly and unplug your cable or DSL
modem’s Mains lead. Unplug any cable connecting the modem to
your computer. However, the modem needs to remain connected to
the Internet.
3
Connect the included Ethernet cable to the “WAN” port on the base
unit and the Ethernet (LAN) port on the modem.
4
Connect a separate Ethernet cable to the “LAN” port on the base
unit and Ethernet (LAN) port on your computer.
5
Plug your modem’s power adaptor into an AC outlet.
L
Wait for your modem’s power light to stop
fl
ashing before you go
to the next step. (It may take a few minutes.)
6
Connect the included AC adaptor to the power port and an AC outlet.
L
The WAN indicator on the base unit lights in steady green or
amber.
Note:
L
Use only the included Panasonic AC adaptor PQWEWP1050 and AC
mains lead PSJA1106Y.
L
You need a separate AC mains lead when you use this unit in USA,
Canada, Japan, Germany and France.
3
Cable or
DSL modem
2,5


